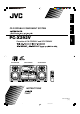
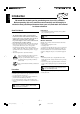
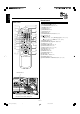
English CD PORTABLE COMPONENT SYSTEM PC-X292V Consists of CA-PCX292V and SP-PCX292V SP-PCX292V SP-PCX292V CA-PCX292V CD PORTABLE COMPONENT SYSTEM + STANDBY STANDB GR O UP / T P RE WN DO ET ET /P UP GR O CLOCK/ REMAIN DIGEST ES /S TAPE/ AUX PROG/SET Q M RESET E UP R A BAND/ TUNER CD S/P ET OG AUX TAPE PR BAND/ TUNER HB ES PHONES /R OCK EMAIN CL EA R P SENSOR CD VOLUME STANDBY/ON R RESUME OSD PBC GOTO FM MODE/ BEAT CUT A B OVER SLOW REPEAT L/R RANDOM
Warnings, Cautions and Others CAUTION—STANDBY/ON button! Disconnect the mains plug to shut the power off completely (all lamps and indications go off). button in any position does not disconnect the mains line. The STANDBY/ON • When the unit is on standby, the STANDBY lamp lights red. • When the unit is turned on, the STANDBY lamp goes off. The power can be remote controlled. CAUTION CAUTION • Do not block the ventilation openings or holes.
IMPORTANT FOR LASER PRODUCTS 1. CLASS 1 LASER PRODUCT 2. CAUTION: Do not open the top cover. There are no user serviceable parts inside the unit; leave all servicing to qualified service personnel. 3. CAUTION: Visible and invisible laser radiation when open and interlock failed or defeated. Avoid direct exposure to beam. 4. REPRODUCTION OF LABEL: CAUTION LABEL, PLACED INSIDE THE UNIT. CAUTION - INVISIBLE LASER RADIATION WHEN OPEN AND INTERLOCKS DEFEATED. AVOID EXPOSURE TO BEAM.
Caution: Proper Ventilation To avoid risk of electric shock and fire, and to prevent damage, locate the apparatus as follows: 1 Front: No obstructions and open spacing. 2 Sides/ Top/ Back: No obstructions should be placed in the areas shown by the dimensions below. 3 Bottom: Place on the level surface. Maintain an adequate air path for ventilation by placing on a stand with a height of 10 cm or more.
English Introduction We would like to thank you for purchasing one of our JVC products. Before operating this unit, read this manual carefully and thoroughly to obtain the best possible performance from your unit, and retain this manual for future reference. About This Manual Power sources This manual is organized as follows: • When unplugging from the wall outlet, always pull the plug, not the AC power cord. • The manual mainly explains operations using the buttons and controls on the unit.
English Contents Location of the Buttons and Controls ........................................................ 3 Front Panel .......................................................................................................... 3 Remote Control ................................................................................................... 5 Getting Started ............................................................................................ 6 Unpacking ......................................
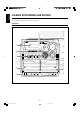
English Location of the Buttons and Controls Become familiar with the buttons and controls on your unit.
Display Window 1 - 2 = 3 4 5 6 ~ 7 8 0 9 ! @ # See pages in the parentheses for details.
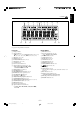
English Remote Control Remote Control r t 1 2 3 BAND/ TUNER CD TAPE/ AUX y PROG/SET 4 5 6 7 8 9 p u CLOCK/ REMAIN i DIGEST RESUME OSD PBC GOTO FM MODE/ BEAT CUT A OVER SLOW REPEAT L/R RANDOM B o ; a s q w d RETURN HBS/ PRESET EQ GROUP/PRESET DOWN e MUTING UP RM-SPCX292V REMOTE CONTROL f g 1 2 3 4 5 6 7 8 9 p q w e r t y u i o ; a s d f g STANDBY/ON button (10) PROG/SET button (10, 13, 17) CLOCK/REMAIN button (10, 21) DIGEST button (20) OSD button (20) RESUME button (1
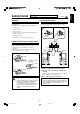
Do not connect the AC power cord until all other connections have been made. Unpacking Connecting the Speakers After unpacking, check to be sure that you have all the following items. The number in the parentheses indicates the quantity of the pieces supplied. To connect speakers • • • • • Continued You can connect the speakers using the speaker cords.
English Do not connect the AC power cord until all other connections have been made. Connecting a TV Attaching the speaker system to the main unit Fit the speaker into the grooves on the main unit (1) and slide down the speaker vertically (2) as the illustration shows. Connect your TV and this unit using the supplied audio/video cord. • DO NOT connect any equipment while the power is on. • DO NOT plug in any equipment until all connections are complete.
Continued To select the color system Adjusting the Voltage Selector You can select the video output to match it to the color system of your TV. Set the PAL/NTSC switch on the rear correctly while in standby mode. Before plugging in the unit, set the correct voltage for your area with the voltage selector on the bottom of the unit. Move the voltage selector so the voltage number is the same as the voltage where you are plugging in the unit. (See the back cover page.) NTSC: For an NTSC TV.
English Power Supply To connect the AC power cord Use AC power or dry batteries (not supplied) to operate the unit. • As long as the AC power cord is connected to a power source, the unit operates on AC power rather than on the batteries in it.
English Common Operations Continued 3 Press 4 or ¢ to adjust the minute, then press PROGRAM/SET. Turning On or Off the Power To turn on the unit, press STANDBY/ON . • When you use the batteries for power supply, the backlight of the display dims to save power consumption. GR O UP / T P ET RE ES To turn off the unit (on standby), press STANDBY/ON again. The STANDBY lamp on the unit lights red. EA R P The built-in clock starts.
English Adjusting the Volume Reinforcing the Bass Sound You can adjust the volume level only while the unit is turned on. The Hyper Bass Sound function provided for this unit can enhance the bass sound while listening to any source at low volume. • This function only affects the playback sound, but does not affect your recording. + S/PRESET EQ To turn on the function, press and hold HBS/ PRESET EQ for more than 1 second. “BASS ON” appears on the display and the HBS indicator lights up on the display.
English Listening to FM and AM Broadcasts Continued Ensuring Good FM and AM Reception Setting the Tuner Interval Spacing FM reception: Pull out the antenna and reorient it for better reception. On the unit ONLY: Set the FM and AM tuner interval spacing according to your area. 1 Select the band you want to set by pressing BAND/TUNER. BAND/ TUNER • Each time you press the button, the band alternates between FM and AM.
English GR O UP / T P ET RE ES UP The unit automatically tunes in to the previously tuned station (either FM or AM). • Each time you press the button, the band alternates between FM and AM. EA R or GROUP/PRESET DOWN to select a preset number. 1 Press BAND/TUNER. P 3 Press GROUP/PRESET UP Tuning in to a Station BAND/ R A 2 Press and hold 4 or ¢ M ES OG ET PR DO WN TUNER /S /P UP GR O ET 4 Press PROGRAM/SET again. for more than 1 second.
Continued Disc Information • This unit has been designed to play back the following discs—CD, CD-R, CD-RW and VIDEO CD (VCD). You can play back the discs containing the tracks in audio CD format or MP3 files in ISO 9660 Level 1 or Joliet format. • In this instruction, we call a disc recorded MP3 files “MP3 disc,” “folder” is referred to as “group” and “file” is referred to as “track.” • This unit cannot play CD-I (CD-I ready), CD-ROM and Photo CD. indicates types of disc available for the operation.
English Indications on the display while operating a disc While playing back a disc: While disc play is stopped: • Audio CD: • Audio CD: Current track number Total track number Total time Elapsed playing time • VCD: • VCD: L/R sound indicator Current track number VCD indicator L/R sound indicator Total track number Elapsed playing time VCD indicator Total time • VCD 2.0: • VCD 2.0: Current track number L/R sound indicator L/R sound indicator Total track number VCD 2.
English Continued Basic Disc Operations To go to another track directly using the number buttons While playing a disc, you can do the following operations. On the remote control ONLY: To stop playback for a moment Press 3¥8. While pausing, current track number and the elapsed playing time flash on the display. To resume playback, press 3¥8 again. To locate a particular point in a track During play, press and hold 4 or ¢. • 4: Fast reverses the disc. • ¢: Fast forwards the disc.
English Programming the Playing Order of the Tracks—Program Play To stop during play, press 7. The unit stops Program play. You can arrange the order in which the tracks play before you start playing. You can program up to 40 tracks. • To use Repeat play (see page 18) for Program play, press REPEAT after starting Program play. • Program play is not available when playing back a VCD 2.0 with the PBC function. (See page 21 for playing back a VCD 2.0 with the PBC function.
English Continued Playing at Random— Random Play Playing Repeatedly— Repeat Play The tracks of loaded disc will play at random. • To use Repeat play for Random play, press REPEAT so that REPEAT ALL indicator lights up on the display after starting Random play. (You cannot select Repeat 1 during Random play.) • To use Random play for a VCD 2.0 with the PBC function, deactivate the PBC function. (See page 21.
English Repeating a Desired Portion—A-B Repeat To Locate a Particular Point in a Track Directly Using the Number Buttons—Go To You can repeat playback of a desired portion by specifying the beginning (point A) and the ending (point B). • You cannot use A-B Repeat before playback. • A-B repeat can be used only within the same track. You can move to a particular point by specifying the elapsed playing time from the beginning. • There is a time limit in doing the following steps.
English Continued TRACK: To select TRACK, press 3. The unit shows the first track of the disc in 9 division—Track Scan. “TRACK SCAN” appears on the TV, then Track Scan starts. Using the Digest Menu On the remote control ONLY: Press DIGEST before playing. DIGEST The unit starts playing the first 10 seconds of all the tracks— Intro Scan. “INTRO SCAN” appears on the TV. To resume normal playback, press DIGEST. Digest menu appears on the TV.
English To deactivate the PBC function You can change the playback information. Press PBC while the playback is stopped. • Each time you press the button, the PBC function turns on and off alternately. OCK/REMAIN CL S/PRESET EQ Press and hold CLOCK/REMAIN while playing. HB Changing the Playback Information • Each time you press and hold the button, the playback information is shown on the display and TV as follows: TRACK ELAPSED PBC To stop playback Press 7.
English Playing Back Tapes You can play back only type I (Normal) tapes. To play the tapes in the decks B and A continuously Playing Back a Tape 1 Set the cassette tapes in the decks A and B. • If the source is not TAPE, select the tape for source. (See page 10.) • If the tape direction is set wrong, replace the cassette. 1 Press STOP/EJECT 7 /0 for the deck you want to use. 2 Press PLAY 3 for the deck B. The tape in the deck B begins to play. 3 Press PAUSE 8, then press PLAY 3 for the deck A.
English Recording Recording onto a Tape on Deck A IMPORTANT: • It may be unlawful to record or play back copyrighted material without the consent of the copyright owner. • The recording level is automatically set correctly, so it is not affected by the VOLUME +/–. Thus, during recording you can adjust the sound you are actually listening to without affecting the recording level. • While recording, you can hear sound modes through the speakers or headphones (see page 11).
English Dubbing Tapes Recording Disc —Disc Synchronized Recording On the unit ONLY: You can start disc play and recording at the same time. 1 Press TAPE. On the unit ONLY: TAPE 1 Put a recordable cassette into the deck A with the exposed part of the tape down. 2 Put the source cassette into the deck B, and a recordable cassette into the deck A. 3 Press PAUSE 8, then press REC ¶ for the • See also page 22. 2 Close the cassette holder gently. 3 Press CD to select the disc player as the deck A.
English Maintenance To get the best performance of the unit, keep your discs, tapes, and mechanism clean. Handling cassette tapes Handling discs • If the tape is loose in its cassette, take up the slack by inserting a pencil in one of the reels and rotating. • If the tape is loose, it may get stretched, cut, or caught in the cassette. • Remove the disc from its case by holding it at the edge while pressing the center hole lightly. • Do not touch the shiny surface of the disc, or bend the disc.
Design and specifications are subject to change without notice. Amplifier section—CA-PCX292V Output Power: 5 W + 5 W at 3 Ω (10% THD) Audio input sensitivity/Impedance (at 1 kHz) AUX: 1 000 mV/47 kΩ Video output: Color system: VIDEO (composite): NTSC/PAL selectable 1V(p-p)/75 Ω Speakers/Impedance: 3 Ω – 16 Ω Tuner FM tuning range: 87.5 MHz – 108.
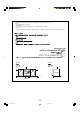
Mains (AC) Line Instruction PC-X292V Bottom Side IMPORTANT for mains (AC) line BEFORE PLUGGING IN, do check that your mains (AC) line voltage corresponds with the position of the voltage selector switch provided on the outside of this equipment and, if different, reset the voltage selector switch, to prevent from a damage or risk of fire/electric shock. EN, CS, AR © 2005 Victor Company of Japan, Limited PC-X292V[US]COVER 2 0405TMMMDWORI 05.4.