English COVER_UX-G210[J].FM Page 1 Monday, December 7, 2009 2:27 PM MICRO COMPONENT SYSTEM UX-G210 —Consists of CA-UXG210 and SP-UXG210 INSTRUCTIONS For Customer Use: Enter below the Model No. and Serial No. which are located either on the rear, bottom or side of the cabinet. Retain this information for future reference. Model No. Serial No.
SAFETY_UX-G210[J].FM Page 1 Monday, December 7, 2009 3:14 PM Warnings, Cautions and Others Mises en garde, précautions et indications diverses CAUTION RISK OF ELECTRIC SHOCK DO NOT OPEN CAUTION: TO REDUCE THE RISK OF ELECTRIC SHOCK, DO NOT REMOVE COVER (OR BACK). NO USER SERVICEABLE PARTS INSIDE. REFER SERVICING TO QUALIFIED SERVICE PERSONNEL.
SAFETY_UX-G210[J].FM Page 2 Monday, December 7, 2009 3:14 PM For Canada/pour le Canada THIS DIGITAL APPARATUS DOES NOT EXCEED THE CLASS B LIMITS FOR RADIO NOISE EMISSIONS FROM DIGITAL APPARATUS AS SET OUT IN THE INTERFERENCE-CAUSING EQUIPMENT STANDARD ENTITLED “DIGITAL APPARATUS,” ICES-003 OF THE DEPARTMENT OF COMMUNICATIONS.
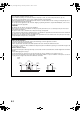
SAFETY_UX-G210[J].FM Page 3 Monday, December 7, 2009 3:14 PM CAUTION • Do not block the ventilation openings or holes. (If the ventilation openings or holes are blocked by a newspaper or cloth, etc., the heat may not be able to get out.) • Do not place any naked flame sources, such as lighted candles, on the apparatus. • When discarding batteries, environmental problems must be considered and local rules or laws governing the disposal of these batteries must be followed strictly.
UX-G210[J].BOOK Page 1 Friday, November 20, 2009 10:23 AM Contents Introduction ....................................................... 2 Precautions .........................................................................2 How to Read This Manual .................................................2 Getting Started ................................................... 3 Step 1: Unpack ...................................................................3 Step 2: Prepare the Remote Control .....................
UX-G210[J].BOOK Page 2 Friday, November 20, 2009 10:23 AM Introduction Thank you for purchasing a JVC product. Please read all instructions carefully before operation, to ensure your complete understanding and to obtain the best possible performance from the unit. Precautions Installation • Install in a place which is level, dry and neither too hot nor too cold—between 5°C (41°F) and 35°C (95°F).
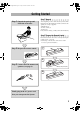
UX-G210[J].BOOK Page 3 Friday, November 20, 2009 10:23 AM Getting Started Step 1: Unpack Step 1:Unpack the package and check the accessories. After unpacking, check to make sure that you have all the following items. The number in parentheses indicates the quantity of each piece supplied. • FM antenna (1) • Remote control (1) • Batteries (2) If any items are missing, consult your dealer immediately.
UX-G210[J].BOOK Page 4 Friday, November 20, 2009 10:23 AM Step 3: Hook Up Turn the power off to all components before connections. FM antenna (supplied) Extend it so that you can obtain the best reception. Right Left FM COAXIAL ( 75 ) ANTENNA PHONES SPEAKER (4 8 ) AC IN Red To a wall outlet Plug in the AC power cord only after all connections are complete.
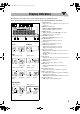
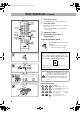
UX-G210[J].BOOK Page 5 Friday, November 20, 2009 10:23 AM Display Indicators The indications on the display teach you a lot of things while you are operating the System. Before operating the System, be familiar with when and how the indicators illuminate on the display. 1 3 2 4 6 5 7 8 9 REPEAT1 GROUP RANDOM PROG.
UX-G210[J].BOOK Page 6 Friday, November 20, 2009 10:23 AM Daily Operations—Playback 1 Turn on the power. The STANDBY lamp on the main unit turns off. 2 Select the source. Playback automatically starts if the selected source is ready to start. • If you select AUDIO IN, start playback on the external device. Number buttons DISPLAY/ PROGRAM PRESET 1,y, 4,x 3 Adjust the volume. 4 Operate the target source as explained later.
UX-G210[J].BOOK Page 7 Friday, November 20, 2009 10:23 AM To preset the stations Listening to the FM Radio You can preset 20 FM stations. This system cannot receive AM broadcast. To select FM FM/ AUDIO IN 1 2 Tune in to the station you want to preset. Activate the preset number entry mode. DISPLAY/ PROGRAM FM(PRE) FM MONO MHz A-IN (AUDIO IN) To tune in to a station • Finish the following process while the indication on the display is flashing. 3 While FM is selected... 1 sec.
UX-G210[J].BOOK Page 8 Friday, November 20, 2009 10:23 AM Playable Media and Files This System can play back following types of discs/files. • Audio CD • MP3/WMA files on a CD-R, CD-RW, or USB mass storage class device Audio CD CD-R CD-RW Playing Back a USB Mass Storage Class Device You can connect a USB mass storage class device such as a USB flash memory device, Digital Audio Player (DAP) to this System. IMPORTANT • This System may not play back some files even though their formats are listed above.
UX-G210[J].BOOK Page 9 Friday, November 20, 2009 10:23 AM To display ID3/WMA tag information Playing Back Discs/Files While playing MP3/WMA... To select a track/group DISPLAY/ PROGRAM To select a track: ID3 ON ID3 OFF PRESET Selects the next track. ID3/WMA tag information is shown on the display. Selects the previous track. Playing Back an External Device To connect an external device To select a group (MP3/WMA only): TUNING/GROUP Selects the next group.
UX-G210[J].BOOK Page 10 Friday, November 20, 2009 10:23 AM Daily Operations—Sound & Other Adjustments Adjusting the Volume Remote control You can adjust the volume level from level 0 (“VOL MIN”) to level 31 (“VOL MAX”). Remote control: CLOCK/ SLEEP Main unit: VOLUME VOLUME Remote ONLY To drop the volume in a moment FADE MUTING PRESET 1,y 4,x To restore the volume, press again, or adjust the volume level.
UX-G210[J].BOOK Page 11 Friday, November 20, 2009 10:23 AM Setting the Clock Turning Off the Power Automatically You can set the clock only when the System is turned off (on standby). —Sleep Timer 1 Turn off (standby) the System. 1 Activate the sleep timer mode. 2 sec. CLOCK/ SLEEP SLEEP 2 Activate the clock setting mode. 2 sec. CLOCK/ SLEEP 2 Specify the shut-off time (in minutes). CLOCK/ SLEEP REPEAT1 GROUP TRACK WMA 3 Adjust the hour.
UX-G210[J].BOOK Page 12 Friday, November 20, 2009 10:23 AM Advanced Disc/USB Mass Storage Class Device Operations Programming the Playing Order— Program Play Remote control You can arrange the playing order of the tracks (up to 32) before you start playback. • You can repeat the programmed tracks by pressing REPEAT (see page 14). 1 Number buttons DISPLAY/ PROGRAM USB MEMORY 6 STOP 7 CD 6 PRESET 1,y 4,x USB MEMORY CD STOP or 2 TUNING/ GROUP K,5 RANDOM Select the source.
UX-G210[J].BOOK Page 13 Friday, November 20, 2009 10:23 AM To check the programmed contents (2) Select a track. • You can also use number buttons to select a track. PRESET While the PROG. indicator lights up on the display and playback is stopped... DISPLAY/ PROGRAM PROG. CD Track number 4 While the PROG. indicator lights up on the display and playback is stopped... Confirm the selection.
UX-G210[J].BOOK Page 14 Friday, November 20, 2009 10:23 AM Playing at Random—Random Play Remote ONLY Playing Repeatedly—Repeat Play You can play back all the tracks at random. You can play back tracks repeatedly. 1 For audio CD: Select the source. USB MEMORY CD STOP REPEAT REPEAT1 or Remote ONLY REPEAT Canceled (No indication) 2 For MP3/WMA: Start Random Play. REPEAT RANDOM REPEAT1 Canceled REPEAT REPEAT GROUP (No indication)* Playback starts in the random order.
UX-G210[J].BOOK Page 15 Friday, November 20, 2009 10:23 AM Additional Information Learning More about This System Daily Operations—Playback (see pages 6 to 9) Listening to the Radio: • If you store a new station into an occupied preset number, the previously stored station in that number will be erased. • When you unplug the AC power cord or if a power failure occurs, the preset stations will be erased in a few days. If this happens, preset the stations again.
UX-G210[J].BOOK Page 16 Friday, November 20, 2009 10:23 AM Troubleshooting Maintenance If you are having a problem with your System, check this list for a possible solution before calling for service. To get the best performance of the System, keep your discs, and the mechanism clean. General: Handling discs Adjustments or settings are suddenly canceled before you finish. • When removing the disc from its case, hold it at the edge while pressing the center hole lightly.
UX-G210[J].BOOK Page 17 Friday, November 20, 2009 10:23 AM General Specifications Power requirement: Power consumption: Amplifier section Output Power: Speakers/Impedance: 5 W per channel, min. RMS, driven into 4 Ω at 1 kHz with no more than 10% total harmonic distortion. (IEC268-3) 4Ω–8Ω Dimensions (approx.): Mass (approx.): Terminals AUDIO IN: Input sensitivity/Impedance: 250 mV/50 kΩ USB MEMORY: USB specification Compatible with USB 2.
UX-G210[J].BOOK Page 18 Friday, November 20, 2009 10:23 AM Parts Index Refer to the pages to see how to use the buttons and controls.
UX-G210[J].
COVER_UX-G210[J].