MULTIMEDIA PRINTER GV-DT3 ENGLISH For Customer Use: INSTRUCTIONS Enter below the Model No. and Serial No. which is located on the bottom of cabinet. Retain this information for future reference. Model No. Serial No.
Dear Customer, Thank you for purchasing this Multimedia Printer. Before use, please read the safety information and precautions contained in the following pages to ensure safe use of this product. SAFETY PRECAUTIONS Using This Instruction Manual • All major sections and subsections are listed in the Table Of Contents (Z pg. 9). • Notes appear after most subsections. Be sure to read these as well. • Basic and advanced features/operation are separated for easier reference. It is recommended that you . . .
IMPORTANT PRODUCT SAFETY INSTRUCTIONS Electrical energy can perform many useful functions. But improper use can result in potential electrical shock or fire hazards. This product has been engineered and manufactured to assure your personal safety. In order not to defeat the built-in safeguards, observe the following basic rules for its installation, use and servicing. ATTENTION: Follow and obey all warnings and instructions marked on your product and its operating instructions.
USE SERVICING 1. Accessories 1. Servicing To avoid personal injury: • Do not place this product on an unstable cart, stand, tripod, bracket or table. It may fall, causing serious injury to a child or adult, and serious damage to the product. • Use only with a cart, stand, tripod, bracket, or table recommended by the manufacturer or sold with the product. • Use a mounting accessory recommended by the manufacturer and follow the manufacturer’s instructions for any mounting of the product.
CAUTIONS If you notice smoke or a peculiar smell coming from the printer, shut it down and unplug it IMMEDIATELY. Use of the printer under these conditions could lead to fire or electric shock. Contact your JVC dealer. DO NOT attempt to repair the malfunction yourself. DO NOT attempt to insert foreign objects into the printer, as this can lead to electric shock or fire. If an object other than print paper is accidentally inserted, shut the printer down, unplug it and contact your JVC dealer.
EXACT FRAME FUNCTION You can choose the exact image you want from 54 frames shown in the index window, perfect for when you miss the right moment to press the MEMORY button. PICTURE PROCESSOR FUNCTION A built-in image processor offers a variety of special effects such as Auto Picture Adjustment, Clear Black, Back-Lit Compensation, B/W and Sepia. Manual adjustment is also possible.
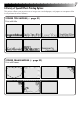
A Variety of Special Effects Printing Optionss This printer allows you to print text or images on standard paper, seal paper or transparent film in any of one of several formats. STORED TITLE IMPOSE (Z page 31) Print with titles. STORED FRAME IMPOSE (Z page 32) Print with frames.
MAJOR FEATURES (cont.) MULTI-PRINT OF SAME IMAGE (Z page 24) Print 2, 4 or 16 of the same image on one sheet. MULTI-PRINT OF DIFFERENT IMAGES (Z page 25) Print 2, 4 or 16 different images on one sheet. STROBE PRINT ( Z page 26) Print at set intervals, as when taking snapshots in rapid succession. CALENDAR PRINT (Z page 27) OCT.
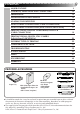
CONTENTS MAJOR FEATURES 6 CONTROLS, INDICATORS AND CONNECTORS 10 PREPARATION 12 INSTALLATION OF INK CASSETTE 14 LOADING THE PAPER TRAY 15 HOW TO MAKE CONNECTIONS (CABLE CONNECTION) 16 HOW TO MAKE CONNECTIONS [IrDA (IrTran-P) RECEPTION] 17 PRINTING FROM A DIGITAL CAMCORDER/S-VHS VCR (CABLE CONNECTION) 18 PRINTING FROM A DIGITAL STILL CAMERA [IrDA (IrTran-P) RECEPTION] 20 DIFFERENT TYPES OF PRINTING 22 CONVENIENT FUNCTIONS 33 TROUBLESHOOTING 39 SPECIFICATIONS 46 INDEX 47 FOR SER
CONTROLS, INDICATORS AND CONNECTORS Front View 1 e 2 3 4 6 5 r Rear View t y u 1 IrDA (IrTran-P) sensor 2 3 4 5 6 7 8 9 • Receives video data through the IrDA (IrTran-P) communication system. VIDEO INPUT connector • Connect to the source unit’s normal video output using the provided video cable. S-Video INPUT connector • Connect to the source unit’s S-Video output using the provided S-Video cable.
POWER 7 % ^ & EXACT FRAME MENU PICTURE PROCESSOR OK 8 9 0 DV INPUT SELECT ! @ IrDA (IrTran-P) SOURCE/ STORED IMAGE & * ( ) q w e PC MEMORY $ EXACT FRAME PRINT FRAME STABILIZER * ( ) ^ MENU button VIDEO # • Press to access the MENU screen. Cursor buttons • Use to make selections during menu operation. INPUT SELECT button • Press to select the video data input mode. SOURCE/STORED IMAGE button • Press to switch between input and stored display.
PREPARATION ● Before printing, make sure everything is set up and ready. 1 Have a Color Print Paper Sheet Set ready (page 13). 2 Install the ink cassette in the printer (page 14). 3 Place the color print paper sheets in the paper tray and load the tray (page 15). ● Use the print sheets and ink cassette from the same kit. 4 Connect an image source to the printer (page 16). 5 Plug the printer’s power cable into an AC outlet and press the POWER button.
About Color Print Paper Sheet Sets (optional) You must use one of the sets shown in the following chart: SET CONTENTS USES PV-50SFAU (Standard type) • Standard Print Paper (50 Sheets) • Ink Cassette (50 Prints) Print your favorite images, just like snapshots. PV-25SFSAU (Sticker type) • Sticker Print Paper (25 Sheets) • Ink Cassette (25 Prints) Make customized seals and stick them on greeting cards, envelopes, letters, etc.
INSTALLATION OF INK CASSETTE Install the ink cassette included with the optionally available color print paper sheet set. CASSETTE DOOR 1 OPEN Pull the right top of the door in the direction indicated by the arrow to open it. UP SLACK 2 TAKE Turn the roller on the side with the in the direction of the arrow. Do not turn the part marked with mark A mark . INK CASSETTE 3 INSTALL Insert the cassette label-side up from the end marked. Push it until you hear a click.
LOADING THE PAPER TRAY Opening the paper tray A ● Open the lid while pushing A . Inserting color print paper sheets in the paper tray To printer Detection marks Printing side Partition panel With Standard/Sticker Print Paper 1. Keep the partition panel upright. If it is down or tilted, push it back to the upright position. 2. Load print sheets in the tray, placing the sides with the detection marks or printing toward the printer face down. •The tray can hold up to 25 sheets at one time.
HOW TO MAKE CONNECTIONS (CABLE CONNECTION) WHEN PRINTING FROM A DIGITAL CAMCORDER WITH A DV CONNECTOR OR A VCR WITH AN S-VIDEO OUTPUT CONNECTOR Make sure that you have easy access to the AC outlet which the printer is plugged into so that it can be immediately unplugged in case of emergency. Connect the printer power plug to a different AC outlet from the TV and VCR.
HOW TO MAKE CONNECTIONS [IrDA (IrTran-P) RECEPTION] 17 WHEN PRINTING FROM AN IrTran-P COMPATIBLE DIGITAL STILL CAMERA IrTran-P compatible digital still camera Approx. 15& Approx. 15& Within a distance of approximately 19” Data communications may not be possible between some units when they are too close or too distant.
PRINTING FROM A DIGITAL CAMCORDER/S-VHS VCR (CABLE CONNECTION) This section explains how to print a single image from a digital camcorder or an S-VHS VCR connected to the printer via a cable. Preparation See page 12. INPUT SELECT TO SELECT INPUT 1 PRESS MODE DV •Press INPUT SELECT to select the appropriate input mode depending on the connector being used, referring to the indication shown on the TV screen or the relevant lamps on the printer. (See Input Mode Selection below.
2 BEGIN SOURCE PLAYBACK MEMORY WHEN THE 3 1 PRESS DESIRED IMAGE APPEARS •If the image is unstable, press MEMORY again. 2 PRESS OK •If the PRINT lamp does not blink, the video data has not been properly input to the printer. Make sure you have a proper connection and try again. 4 PRESS PRINT TO START PRINTING If you want to try to stabilize the stored image again ... press MEMORY again. If you store the wrong image or an image incorrectly ...
PRINTING FROM A DIGITAL STILL CAMERA [IrDA (IrTran-P) RECEPTION] This section explains how to print an image transmitted from an IrDA (IrTran-P) compatible digital still camera using infrared communication. Preparation See page 12. When using a digital still camera compatible with IrTran-P, refer also to the instruction manual provided with the camera.
● Refer to the instruction manuals provided with the machines in use for details of their operation. ● If you want to transmit the stored picture to your computer, refer to the instruction manual of the provided image transfer software. ● Data communications may be variable or impossible depending on the lighting condition, battery consumption, communications distance and sending and receiving angles.
DIFFERENT TYPES OF PRINTING POSTCARD/GREETING CARD PRINT There are 4 different types of layout for printing.
Number of Print Copies ● Press Cursor to select from 1 up to 25. MENU 1 NUMBER OF PRINTS ON SCREEN PRINT TYPE TO MENU 2 [ ] ITEM [ / ] SELECT [ / ] ON SCREEN Display ● ON : Usually set to ON. ● OFF : Set to OFF when the on-screen display and the stored image are superimposed upon one another, making the screen difficult to view. Print Quality ● STD ● HIGH : Print at 153 dpi (faster than HIGH). : Print at 306 dpi for better quality. 1/2 : 16 : .ON OFF : .
DIFFERENT TYPES OF PRINTING (cont.) MULTI-PRINT (SAME SCENE) You can print the same image 2, 4 or 16 times on one sheet. Preparation ● See page 12. ● Press INPUT SELECT to select the appropriate input mode depending on the connection to the source unit. (Z page 18).
MULTI-PRINT (DIFFERENT SCENES) You can print various images (your choice of 2, 4 or 16) on the same print sheet. Preparation ● See page 12. ● Press INPUT SELECT to select the appropriate input mode depending on the connection to the source unit (Z page 18). PERFORM STEPS 1 – 3 ON PAGE 1 24 PRESS CURSOR TO SELECT 2 SELECTED PIX ON CONTENT, THEN PRESS OK MULTI PIX MENU MULTI CONTENT : 16 : SELECTED PIX •The screen switches from the stored to the input display.
DIFFERENT TYPES OF PRINTING (cont.) STROBE PRINT The printer stores a selected number of images at short intervals, then prints them on one sheet. Preparation See page 12.
CALENDAR PRINT You can print an image and calendar together with either a vertical or horizontal layout. Preparation ● See page 12. ● Press INPUT SELECT to select the appropriate input mode depending on the connection to the source unit (Z page 18). OCT. 1999 SUN MON TUE WED THU FRI SAT 1 2 3 4 5 6 7 8 9 10 11 12 13 14 15 16 17 18 19 20 21 22 23 24 25 26 27 28 29 30 31 •It is recommended to select HIGH on QUALITY.
DIFFERENT TYPES OF PRINTING (cont.) TRIMMING PRINT You can cut out a particular part of an image and enlarge it for printing. The size of the part to be trimmed can be selected. Preparation ● See page 12. ● Press INPUT SELECT to select the appropriate input mode depending on the connection to the source unit (Z page 18). •If IrDA (INFRARED) or PC MODE is selected, you do not have to perform steps 1 and 2. Refer to page 20 or 38 to send the image you want to print to the printer.
PRESS CURSOR TO SELECT THE 6 SIZE OF THE PART TO BE TRIMMED, SIZE THEN PRESS OK •To go back to the EFFECT SET MENU, press MENU before pressing OK. CURSOR TO SELECT THE 7 PRESS POSITION OF THE PART TO BE SIZE [ / ] QUIT [MENU] OK [OK] TRIMMED •To go back to the SIZE set screen, press MENU. POSITION OK 8 PRESS •The processed image will be displayed. •Since the size and position of the part to be trimmed are approximate, the actual trimmed image may not exactly match what was specified.
DIFFERENT TYPES OF PRINTING (cont.) ROTATING/REVERSING IMAGES You can rotate an image 90& clockwise/counterclockwise or 180°, or you can reverse it to create a mirror image. If you rotate a horizontal image 90&, it will be automatically resized to fit the vertical layout. Preparation ● See page 12. ● Press INPUT SELECT to select the appropriate input mode depending on the connection to the source unit (Z page 18). •If IrDA (INFRARED) or PC MODE is selected, you do not have to perform steps 1 and 2.
TITLE IMPOSE Seven different titles including Congratulations! are stored in the printer and can be called up for superimposed printing. Colors and positions of the titles are set in advance. Preparation ● See page 12. ● Press INPUT SELECT to select the appropriate input mode depending on the connection to the source unit (Z page 18). •If IrDA (INFRARED) or PC MODE is selected, you do not have to perform steps 1 and 2. Refer to page 20 or 38 to send the image you want to print to the printer.
DIFFERENT TYPES OF PRINTING (cont.) FRAME IMPOSE Seven different frames are stored in the printer and can be called up for superimposed printing. Preparation ● See page 12. ● Press INPUT SELECT to select the appropriate input mode depending on the connection to the source unit (Z page 18). •If IrDA (INFRARED) or PC MODE is selected, you do not have to perform steps 1 and 2. Refer to page 20 or 38 to send the image you want to print to the printer.
CONVENIENT FUNCTIONS EXACT FRAME FUNCTION The printer stores 54 frames when the MEMORY button is pressed, letting you choose the best image even if you didn’t press the button at the right moment. Preparation MEMORY ● See page 12. ● Press INPUT SELECT to select the DV or VIDEO mode. (Z page 18) 1 BEGIN SOURCE PLAYBACK EXACT FRAME 2 PRESS •The EXACT FRAME lamp lights up. •If there is no video input, NO INPUT IMAGE appears on the screen.
CONVENIENT FUNCTIONS (cont.) PICTURE PROCESSOR FUNCTION (Auto Adjustment) You can add one of the following special effects to an image: Auto Picture Adjustment, Clear Black, Back-Lit Compensation, B/W, Sepia. The image will be automatically processed by the printer. Preparation ● See page 12. ● Press INPUT SELECT to select the appropriate input mode depending on the connection to the source unit (Z page 18). •If IrDA (INFRARED) or PC MODE is selected, you do not have to perform steps 1 and 2.
PICTURE PROCESSOR FUNCTION (Manual Adjustment) You can perform manual picture processing on an image. There are 7 levels for each of the following items: TINT (CYAN/RED, YELLOW/BLUE), CONTRAST (LOW/HIGH) and BRIGHTNESS (LOW/ HIGH). Preparation ● See page 12. ● Press INPUT SELECT to select the appropriate input mode depending on the connection to the source unit (Z page 18). •If IrDA (INFRARED) or PC MODE is selected, you do not have to perform steps 1 and 2.
CONVENIENT FUNCTIONS (cont.) PICTURE MEMORY FUNCTION — To Store An Image In Memory You can store up to 8 of your favorite images in the printer’s memory. Even if you turn the power off, these images will remain in memory. Preparation ● See page 12. ● Press INPUT SELECT to select the appropriate input mode depending on the connection to the source unit (Z page 18). •If IrDA (INFRARED) or PC MODE is selected, you do not have to perform steps 1 and 2.
PICTURE MEMORY FUNCTION — To View Stored Images You can call up stored images for viewing or printing. INPUT SELECT SO THAT THE 1 PRESS PICTURE MEMORY SCREEN APPEARS PRESS CURSOR TO SELECT THE 2 IMAGE YOU WANT TO VIEW OK 3 PRESS •The image you want to view appears on the PICTURE MEMORY PICTURE 1 PICTURE 3 PICTURE 5 PICTURE 7 PICTURE 2 PICTURE 4 PICTURE 6 PICTURE 8 PLEASE SELECT A PICTURE QUIT [INPUT SELECT] OK [OK] screen. •If you want to print the image, press PRINT.
CONVENIENT FUNCTIONS (cont.) HOW TO MAKE CONNECTIONS WITH A COMPUTER By connecting the printer to your computer and using the provided image transfer software, you can manipulate images more easily and process/print them with higher picture quality. Preparation ● Install the provided image transfer software in your computer. ● Connect the printer to the computer.
TROUBLESHOOTING WHEN PAPER JAMS 1. Press POWER to turn off the printer power first, and unplug the power cord. •Stored images will be erased unless they are stored using the Picture Memory function. If the jammed paper cannot be removed in step 3 4. Remove the jammed paper removing door and remove the paper. 2. Remove the jammed sheet from the slot of the paper tray. Slot If the jammed paper cannot be removed in step 2 3. Remove the paper tray then remove the jammed sheet.
TROUBLESHOOTING (cont.) LAMP INDICATIONS Lamp indication DV IrDA (IrTran-P) VIDEO PC PRINT Blinking quickly DV IrDA (IrTran-P) Blinking quickly DV IrDA (IrTran-P) EXACT FRAME VIDEO PC Blinking quickly VIDEO PC EXACT FRAME PRINT EXACT FRAME PRINT Blinking quickly DV IrDA (IrTran-P) VIDEO PC v Ink running out or ink cassette not loaded. m Replace with new one or insert ink cassette. One of the following occurs: 1) v Rear door is open. m Close the rear door.
Lamp indication DV IrDA (IrTran-P) VIDEO PC IrDA (IrTran-P) VIDEO PC EXACT FRAME 17 v IrDA (IrTran-P) data being converted. 17 PRINT Lit Reference pages v IrDA (IrTran-P) data being received. PRINT Blinking DV EXACT FRAME v Appears when: m Recommended actions: Blinking quickly DV IrDA (IrTran-P) VIDEO PC EXACT FRAME PRINT Lit v IrDA (IrTran-P) reception finished. m Pressing the PRINT button prints the stored picture.
TROUBLESHOOTING (cont.) v Appears when: m Recommended actions: Lamp indication DV IrDA (IrTran-P) VIDEO PC Blinking EXACT FRAME v Picture data being captured from the printer to the PC. PRINT Reference pages 38 Lit DV IrDA (IrTran-P) VIDEO PC Lit EXACT FRAME v Picture data communication with the PC has finished. PRINT 38 Lit DV IrDA (IrTran-P) VIDEO PC EXACT FRAME Lit PRINT DV IrDA (IrTran-P) VIDEO PC EXACT FRAME v Exact Frame is ready.
OTHER PROBLEMS This unit is a precision machine which includes a microprocessor. Its operational performance may be influenced by external noise or disturbance. If normal operation cannot be achieved even after taking appropriate actions as defined below, the power should be turned off by unplugging the power cable. Then, reconnect the power by plugging it in again and recheck for proper operation. Reference pages If Check to see if Power won’t turn on v The power cord is unplugged.
TROUBLESHOOTING (cont.) If Check to see if Picture data cannot be transmitted through the DV connection v m v m v m Picture blurred when printed from a camcorder via the DV connector v The camcorder is in the Still Picture mode. m When transferring a picture from the camcorder to the printer using the DV connector, set the camcorder to the Still Picture mode. m After transferring the picture to the printer, press the MEMORY button again to stabilize it.
WHAT TO DO IF ANY OF THE MESSAGES BELOW APPEAR Message v Appears when: m Action: PULL OUT PAPER TRAY AND CHECK PAPER. v The paper tray is running out of paper or the paper feed is not working properly. m Remove the paper tray and correctly set the print sheets. 15 CLOSE BACK DOOR. v The jammed paper removing door is open. m Close the jammed paper removing door. 10 NOW PRINTING!! v Printing is in progress. — PLEASE WAIT.
SPECIFICATIONS Power AC 120 V `, 60 Hz Power consumption During printing : Approx. 73 W, 0.85 A Print format Sublimation dye thermal transfer line printing Print quality Resolution : 1360 (horiz.) x 1024 (vert.) dots Gradation : 256 tones Resolution 306 dpi Print medium Ink sheet : (dedicated) Print sheet : (dedicated) Print speed (QUALITY STD/HIGH) * Transmission and processing of video data is not included. Standard/Sticker Print Paper (65/125 sec.
INDEX A Automatic Picture Adjustment ......... Z pg. 34 B Back-Lit Compensation ................... Z pg. 34 Black & White ................................. Z pg. 34 C Calendar Print ................................. Z pg. 27 Cable Connections .................... Z pg. 16, 18 Clear Black ..................................... Z pg. 34 Color Print Paper Sheet Set .............. Z pg. 13 Cursor Buttons ................................ Z pg. 22 D DV IN Connector ............................ Z pg.
FOR SERVICING (Only in U.S.A.) HOW TO LOCATE YOUR JVC SERVICE CENTER TOLL FREE: 1-800-252-5722 Dear customer: In order to receive the most satisfaction from your purchase, read the instruction booklet before operating the unit. In the event that repair is necessary, or for the address nearest your location, please refer to the factory service center list below or within the Continental United States, call 1-800252-5722 for your authorized servicer.
WARRANTY (Only in U.S.A.) LIMITED WARRANTY CONSUMER VIDEO 1-90 JVC COMPANY OF AMERICA warrants this product and all parts thereof, except as set forth below ONLY TO THE ORIGINAL PURCHASER AT RETAIL to be FREE FROM DEFECTIVE MATERIALS AND WORKMANSHIP from the date of original retail purchase for the period as shown below. (“The Warranty Period”) PARTS 1 YR LABOR 90 DAYS THIS LIMITED WARRANTY IS VALID ONLY IN THE FIFTY (50) UNITED STATES, THE DISTRICT OF COLUMBIA AND IN COMMONWEALTH OF PUERTO RICO.
MEMO
MEMO 51
GV-DT3 VICTOR COMPANY OF JAPAN, LIMITED COPYRIGHT© 1999 VICTOR COMPANY OF JAPAN, LTD.