KD-G240/KD-G140 CD RECEIVER: INSTRUCTIONS/INSTALLATION GET0485-001A [J] ENGLISH Thank you for purchasing a JVC product. Please read all instructions carefully before operation, to ensure your complete understanding and to obtain the best possible performance from the unit. Installation/connection are explained at the last section of this manual (reverse page, indicated with symbol). For customer Use: Enter below the Model No. and Serial No. which are located on the top or bottom of the cabinet.
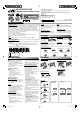
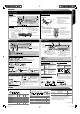
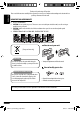
Basic operations Remote sensor DO NOT expose to strong light. Control panel • Turn on the power. • Turn off the power [Hold]. • Attenuate the sound (if the power is on). Check the current clock time/other information. See also “CLK DISP“ of “General settings—PSM.” Remote controller—RM-RK50 7 Installing battery Lithium coin battery (CR2025) Detach the panel. Volume control. Select the source.
Select an item. CLK DISP *1 • DEMO OFF • ON • OFF CLOCK H (Hour) CLOCK M (Minute) DIMMER SCROLL L/O MODE WOOFER * : Initial) Setting 1 – 12 00 – 59 • ON • OFF • ONCE • AUTO • OFF • REAR 2 AUX ADJ • WOOFER • LOW • MID • HIGH A.ADJ 00 – A.ADJ 05 TAG DISP (for KD-G240) AMP GAIN *3 • TAG ON • TAG OFF • LOW PWR AREA • HIGH PWR • AREA US • AREA EU • AREA SA : The display demonstration will be activated automatically if no operation is done for about 20 seconds. : Cancels.
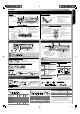
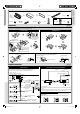
INSTALLATION / CONNECTION Parts list for installation and connection A B C D E Control panel Sleeve Trim plate Power cord Washer (ø5) G Mounting bolt— M4 x 5 mm (M4 x 1/4"); M5 x 15 mm (M5 x 5/8") F Lock nut (M5) H I J K Rubber cushion Handles Remote controller Battery INSTALLATION The following illustration shows a typical installation. If you have any questions or require information regarding installation kits, consult your JVC car audio dealer or a company supplying kits.
Thank you for purchasing a JVC product. Please read all instructions carefully before operation, to ensure your complete understanding and to obtain the best possible performance from the unit. KD-G394/KD-G244 CD RECEIVER: INSTRUCTIONS/INSTALLATION Installation/connection are explained at the last section of this manual (reverse page, indicated with symbol). 0907DTSMDTJEIN GET0493-001A EN © 2007 Victor Company of Japan, Limited [UI] ENGLISH ESPAÑOL MAINTENANCE IMPORTANT FOR LASER PRODUCTS 1.
INSTRUCTIONS OPERATIONS Basic operations Remote sensor (for KD-G394) DO NOT expose to strong light. Control panel • Turn on the power. • Turn off the power [Hold]. • Attenuate the sound (if the power is on). Check the current clock time/other information. See also “CLK DISP“ of “General settings—PSM.” Remote controller—RM-RK50 RM-RK50 is supplied only for KD-G394. 7 Installing battery Lithium coin battery (CR2025) Detach the panel. Volume control.
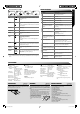
General settings—PSM : Initial) Setting DEMO • DEMO ON • DEMO OFF CLK DISP * 1 • ON • OFF : The display demonstration will be activated automatically if no operation is done for about 20 seconds. : Cancels. : The clock time is shown on the display at all times when the power is turned off. : Cancels; pressing DISP will show the clock time for about 5 seconds when the power is turned off.
INSTALLATION / CONNECTION Parts list for installation and connection A/B C D E F Hard case (for KD-G394)/ Control panel Sleeve Trim plate Power cord Washer (ø5) For KD-G394 H Mounting bolt (M4 × 5 mm; M5 × 15 mm) G Lock nut (M5) I J K L Rubber cushion Handles Remote controller Battery INSTALLATION The following illustration shows a typical installation.
KD-G396/KD-G395/KD-G245 ENGLISH CD RECEIVER KD-G396/KD-G395/KD-G245 For canceling the display demonstration, see page 6. For installation and connections, refer to the separate manual. INSTRUCTIONS GET0486-001A [U/UH] Cover_KD-G396[U_UH]f.
ENGLISH Thank you for purchasing a JVC product. Please read all instructions carefully before operation, to ensure your complete understanding and to obtain the best possible performance from the unit. IMPORTANT FOR LASER PRODUCTS 1. CLASS 1 LASER PRODUCT 2. CAUTION: Do not open the top cover. There are no user serviceable parts inside the unit; leave all servicing to qualified service personnel. 3. CAUTION: Visible and/or invisible class 1M laser radiation when open.
Ex.: When number button 2 works as MO (monaural) button. CONTENTS Control panel — KD-G396/KD-G395/KD-G245 .................. 4 Remote controller — RM-RK50........... 5 Getting started ................................ 6 ENGLISH How to use the M MODE button If you press M MODE, the unit goes into functions mode, then the number buttons and 5/∞ buttons will work as different function buttons. Basic operations ...................................................
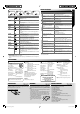
ENGLISH Control panel — KD-G396/KD-G395/KD-G245 Parts identification Display window 1 5 (up) / ∞ (down) buttons 2 0 (eject) button 3 (standby/on attenuator) button 4 KD-G396/KD-G395: Remote sensor 5 6 7 8 9 p q w e r t y u i o DO NOT expose the remote sensor to strong light (direct sunlight or artificial lighting).
Remote controller — RM-RK50 ENGLISH Main elements and features RM-RK50 is supplied only for KD-G396/KD-G395. Installing the lithium coin battery (CR2025) 1 Aim the remote controller directly at the remote sensor on the unit. Make sure there is no obstacle in between. 2 Warning: • Do not install any battery other than CR2025 or its equivalent; otherwise, it may explode.
ENGLISH Getting started Basic settings Basic operations • See also “General settings — PSM” on pages 11 and 12. ~ 1 Turn on the power. 2 Ÿ 1 Canceling the display demonstrations Select “DEMO,” then “DEMO OFF.” 2 Setting the clock Select “CLOCK H” (hour), then adjust the hour. Select “CLOCK M” (minute), then adjust the minute. * You cannot select “CD” as the playback source if there is no disc in the unit. ! For FM/AM tuner ⁄ Adjust the volume. 3 Volume level appears.
Radio operations You can preset six stations for each band. ~ FM station automatic presetting— SSM (Strong-station Sequential Memory) Ÿ Lights up when receiving an FM stereo broadcast with sufficient signal strength. ! 1 ENGLISH Storing stations in memory Select the FM band (FM1 – FM3) you want to store into. 2 Start searching for a station. When a station is received, searching stops. To stop searching, press the same button again.
ENGLISH Listening to a preset station To fast-forward or reverse the track 1 2 Select the preset station (1 – 6) you want.
Skipping tracks quickly during play • When “TAG DISP” is set to “TAG ON” (see page 12) • KD-G396/KD-G395: For MP3 or WMA discs, you can skip tracks within the same folder Ex.
ENGLISH 7 Random play Adjusting the sound Mode Plays at random FLDR RND * : All tracks of the current folder, then the tracks of the next folder ] and so on. [ ALL RND : All tracks of the current disc. [ ] RND OFF : Cancels. You can adjust the sound characteristics to your preference. 1 2 * KD-G396/KD-G395: Only while playing an MP3 or a WMA disc. [ ] : Corresponding indicator lights up on the display BAS *1 (bass), [–06 to +06] Adjust the bass.
You can connect an external component to the AUX (auxiliary) input jack on the control panel. General settings — PSM You can change PSM (Preferred Setting Mode) items listed in the table on page 12. 1 2 Select a PSM item. 3 Adjust the PSM item selected. Turn on the connected component and start playing the source. 4 Repeat steps 2 and 3 to adjust other PSM items if necessary. Adjust the volume. 5 Finish the procedure.
ENGLISH Indications Item ( : Initial) Selectable settings, [reference page] DEMO Display demonstration • DEMO ON : The display demonstration will be activated automatically if no operation is done for about 20 seconds, [6]. : Cancels. • DEMO OFF CLK DISP *1 Clock display • ON • OFF : The clock time is shown on the display at all times when the power is turned off. : Cancels; pressing DISP will show the clock time for about 5 seconds when the power is turned off, [6].
How to clean the connectors Frequent detachment will deteriorate the connectors. To minimize this possibility, periodically wipe the connectors with a cotton swab or cloth moistened with alcohol, being careful not to damage the connectors. To keep discs clean A dirty disc may not play correctly. If a disc does become dirty, wipe it with a soft cloth in a straight line from center to edge. • Do not use any solvents (for example, conventional record cleaner, spray, thinner, benzine, etc.) to clean discs.
ENGLISH More about this unit Basic operations Turning on the power • By pressing SRC on the unit, you can also turn on the power. If the source is ready, playback also starts. Turning off the power • If you turn off the power while listening to a disc, disc play will start from where it had been stopped previously next time you turn on the power. Tuner operations Storing stations in memory • During SSM search... – All previously stored stations are erased and the stations are stored anew.
• This unit can play back MP3/WMA files with the extension code <.mp3> or <.wma> (regardless of the letter case—upper/lower). • This unit can show the names of albums, artists (performer), and Tag (Version 1.0, 1.1, 2.2, 2.3, or 2.4) for MP3 files and for WMA files. • This unit can display only one-byte characters. No other characters can be correctly displayed. • This unit can play back MP3/WMA files meeting the conditions below: – Bit rate: 8 kbps — 320 kbps – Sampling frequency: 48 kHz, 44.
What appears to be trouble is not always serious. Check the following points before calling a service center. General Remedies/Causes • Sound cannot be heard from the speakers. • Adjust the volume to the optimum level. • Check the cords and connections. • The unit does not work at all. Reset the unit (see page 2). FM/AM Symptoms • SSM automatic presetting does not work. Store stations manually. • Static noise while listening to the radio. Connect the antenna firmly.
AUDIO AMPLIFIER SECTION CD PLAYER SECTION Maximum Power Output: Front/Rear: 50 W per channel Continuous Power Output (RMS): Front/Rear: 19 W per channel into 4 Ω, 40 Hz to 20 000 Hz at no more than 0.8% total harmonic distortion. Load Impedance: 4 Ω (4 Ω to 8 Ω allowance) Tone Control Range: Bass: ±12 dB at 60 Hz Mid-range: ±12 dB at 1 kHz Treble: ±12 dB at 7.5 kHz Frequency Response: 40 Hz to 20 000 Hz Signal-to-Noise Ratio: 70 dB For KD-G396/KD-G395: Line-Out Level/ 2.
Having TROUBLE with operation? Please reset your unit Refer to page of How to reset your unit EN, TH © 2007 Victor Company of Japan, Limited Rear_KD-G396[U_UH]f.
KD-G396/KD-G395/KD-G245 Installation/Connection Manual °“√µ‘¥µ—Èß/§ŸË¡◊Õ°“√µ‘¥µ—Èß 0807DTSMDTJEIN GET0486-006A [U/UH] EN, TH © 2007 Victor Company of Japan, Limited ENGLISH ‰∑¬ This unit is designed to operate on 12 V DC, NEGATIVE ground electrical systems. If your vehicle does not have this system, a voltage inverter is required, which can be purchased at JVC car audio dealers.
INSTALLATION (IN-DASH MOUNTING) °“√µ‘¥µ—Èß (°“√ª√–°Õ∫·ºßÀπÈ“ªí∑¡Ï‡¢È“) The following illustration shows a typical installation. If you have any questions or require information regarding installation kits, consult your JVC car audio dealer or a company supplying kits. • If you are not sure how to install this unit correctly, have it installed by a qualified technician.
ENGLISH ‰∑¬ ELECTRICAL CONNECTIONS A °“√‡™◊ËÕ¡‚¥¬„™È ‰øøÈ“ Typical connections / °“√‡™◊ËÕ¡µËÕ·∫∫ª°µ Before connecting: Check the wiring in the vehicle carefully. Incorrect connection may cause serious damage to this unit. The leads of the power cord and those of the connector from the car body may be different in color.
B Connecting the external amplifier (only for KD-G396/KD-G395) / °“√‡™◊ËÕ¡µËÕ‡§√◊ËÕߢ¬“¬‡ ’¬ß¿“¬πÕ° ( ”À√—∫ KD-G396 À√◊Õ KD-G395 ‡∑Ë“π—Èπ) You can connect an amplifier to upgrade your car stereo system. • Connect the remote lead (blue with white stripe) to the remote lead of the other equipment so that it can be controlled through this unit. • Disconnect the speakers from this unit, connect them to the amplifier. Leave the speaker leads of this unit unused.
CD RECEIVER KD-G396/KD-G395/KD-G245 ENGLISH ALAT PENERIMA CD KD-G396/KD-G395/KD-G245 INDONESIA For canceling the display demonstration, see page 6. Untuk membatalkan tampilan demonstrasi, lihat halaman 6. For installation and connections, refer to the separate manual. Untuk instalasi dan penyambungan, lihat buku pedoman terpisah. INSTRUCTIONS BUKU PETUNJUK GET0486-004A [UN] Cover_KD-G396_004A_f.
ENGLISH Thank you for purchasing a JVC product. Please read all instructions carefully before operation, to ensure your complete understanding and to obtain the best possible performance from the unit. IMPORTANT FOR LASER PRODUCTS 1. CLASS 1 LASER PRODUCT 2. CAUTION: Do not open the top cover. There are no user serviceable parts inside the unit; leave all servicing to qualified service personnel. 3. CAUTION: Visible and/or invisible class 1M laser radiation when open.
Ex.: When number button 2 works as MO (monaural) button. CONTENTS Control panel — KD-G396/KD-G395/KD-G245 .................. 4 Remote controller — RM-RK50........... 5 Getting started ................................ 6 ENGLISH How to use the M MODE button If you press M MODE, the unit goes into functions mode, then the number buttons and 5/∞ buttons will work as different function buttons. Basic operations ...................................................
ENGLISH Control panel — KD-G396/KD-G395/KD-G245 Parts identification Display window 1 5 (up) / ∞ (down) buttons 2 0 (eject) button 3 (standby/on attenuator) button 4 KD-G396/KD-G395: Remote sensor 5 6 7 8 9 p q w e r t y u i o DO NOT expose the remote sensor to strong light (direct sunlight or artificial lighting).
Remote controller — RM-RK50 ENGLISH Main elements and features RM-RK50 is supplied only for KD-G396/KD-G395. Installing the lithium coin battery (CR2025) 1 Aim the remote controller directly at the remote sensor on the unit. Make sure there is no obstacle in between. 2 Warning: • Do not install any battery other than CR2025 or its equivalent; otherwise, it may explode.
ENGLISH Getting started Basic settings Basic operations • See also “General settings — PSM” on pages 11 and 12. ~ 1 Turn on the power. 2 Ÿ 1 Canceling the display demonstrations Select “DEMO,” then “DEMO OFF.” 2 Setting the clock Select “CLOCK H” (hour), then adjust the hour. Select “CLOCK M” (minute), then adjust the minute. * You cannot select “CD” as the playback source if there is no disc in the unit. ! For FM/AM tuner ⁄ Adjust the volume. 3 Volume level appears.
Radio operations You can preset six stations for each band. ~ FM station automatic presetting— SSM (Strong-station Sequential Memory) Ÿ Lights up when receiving an FM stereo broadcast with sufficient signal strength. ! 1 ENGLISH Storing stations in memory Select the FM band (FM1 – FM3) you want to store into. 2 Start searching for a station. When a station is received, searching stops. To stop searching, press the same button again.
ENGLISH Listening to a preset station To fast-forward or reverse the track 1 2 Select the preset station (1 – 6) you want.
Skipping tracks quickly during play • When “TAG DISP” is set to “TAG ON” (see page 12) • KD-G396/KD-G395: For MP3 or WMA discs, you can skip tracks within the same folder Ex.
ENGLISH 7 Random play Adjusting the sound Mode Plays at random FLDR RND * : All tracks of the current folder, then the tracks of the next folder ] and so on. [ ALL RND : All tracks of the current disc. [ ] RND OFF : Cancels. You can adjust the sound characteristics to your preference. 1 2 * KD-G396/KD-G395: Only while playing an MP3 or a WMA disc. [ ] : Corresponding indicator lights up on the display BAS *1 (bass), [–06 to +06] Adjust the bass.
You can connect an external component to the AUX (auxiliary) input jack on the control panel. General settings — PSM You can change PSM (Preferred Setting Mode) items listed in the table on page 12. 1 2 Select a PSM item. 3 Adjust the PSM item selected. Turn on the connected component and start playing the source. 4 Repeat steps 2 and 3 to adjust other PSM items if necessary. Adjust the volume. 5 Finish the procedure.
ENGLISH Indications Item ( : Initial) Selectable settings, [reference page] DEMO Display demonstration • DEMO ON : The display demonstration will be activated automatically if no operation is done for about 20 seconds, [6]. : Cancels. • DEMO OFF CLK DISP *1 Clock display • ON • OFF : The clock time is shown on the display at all times when the power is turned off. : Cancels; pressing DISP will show the clock time for about 5 seconds when the power is turned off, [6].
How to clean the connectors Frequent detachment will deteriorate the connectors. To minimize this possibility, periodically wipe the connectors with a cotton swab or cloth moistened with alcohol, being careful not to damage the connectors. To keep discs clean A dirty disc may not play correctly. If a disc does become dirty, wipe it with a soft cloth in a straight line from center to edge. • Do not use any solvents (for example, conventional record cleaner, spray, thinner, benzine, etc.) to clean discs.
ENGLISH More about this unit Basic operations Turning on the power • By pressing SRC on the unit, you can also turn on the power. If the source is ready, playback also starts. Turning off the power • If you turn off the power while listening to a disc, disc play will start from where it had been stopped previously next time you turn on the power. Tuner operations Storing stations in memory • During SSM search... – All previously stored stations are erased and the stations are stored anew.
• This unit can play back MP3/WMA files with the extension code <.mp3> or <.wma> (regardless of the letter case—upper/lower). • This unit can show the names of albums, artists (performer), and Tag (Version 1.0, 1.1, 2.2, 2.3, or 2.4) for MP3 files and for WMA files. • This unit can display only one-byte characters. No other characters can be correctly displayed. • This unit can play back MP3/WMA files meeting the conditions below: – Bit rate: 8 kbps — 320 kbps – Sampling frequency: 48 kHz, 44.
What appears to be trouble is not always serious. Check the following points before calling a service center. General Remedies/Causes • Sound cannot be heard from the speakers. • Adjust the volume to the optimum level. • Check the cords and connections. • The unit does not work at all. Reset the unit (see page 2). FM/AM Symptoms • SSM automatic presetting does not work. Store stations manually. • Static noise while listening to the radio. Connect the antenna firmly.
AUDIO AMPLIFIER SECTION CD PLAYER SECTION Maximum Power Output: Front/Rear: 50 W per channel Continuous Power Output (RMS): Front/Rear: 19 W per channel into 4 Ω, 40 Hz to 20 000 Hz at no more than 0.8% total harmonic distortion. Load Impedance: 4 Ω (4 Ω to 8 Ω allowance) Tone Control Range: Bass: ±12 dB at 60 Hz Mid-range: ±12 dB at 1 kHz Treble: ±12 dB at 7.5 kHz Frequency Response: 40 Hz to 20 000 Hz Signal-to-Noise Ratio: 70 dB For KD-G396/KD-G395: Line-Out Level/ 2.
Having TROUBLE with operation? Please reset your unit Refer to page of How to reset your unit Ada MASALAH dengan cara pengoperasian? Setel kembali unit Anda Lihat halaman mengenai Bagaimana mereset unit anda EN, IN © 2007 Victor Company of Japan, Limited Rear_KD-G396_004A_f.
KD-G396/KD-G395/KD-G245 Installation/Connection Manual Manual Pemasangan/Penyambungan 0807DTSMDTJEIN GET0486-009A [UN] EN, IN © 2007 Victor Company of Japan, Limited ENGLISH INDONESIA This unit is designed to operate on 12 V DC, NEGATIVE ground electrical systems. If your vehicle does not have this system, a voltage inverter is required, which can be purchased at JVC car audio dealers. Alat penerima ini didisain untuk beroperasi hanya pada 12 V DC, sistem listrik tanah NEGATIVE.
INSTALLATION (IN-DASH MOUNTING) PEMASANGAN (BINGKAI-DALAM DASH) The following illustration shows a typical installation. If you have any questions or require information regarding installation kits, consult your JVC car audio dealer or a company supplying kits. • If you are not sure how to install this unit correctly, have it installed by a qualified technician. Ilustrasi berikut menunjukkan sebuah tipe pemasangan.
ENGLISH INDONESIA ELECTRICAL CONNECTIONS A SAMBUNGAN-SAMBUNGAN LISTRIK Typical connections / Ciri khas sambungan-sambungan Before connecting: Check the wiring in the vehicle carefully. Incorrect connection may cause serious damage to this unit. The leads of the power cord and those of the connector from the car body may be different in color. Sebelum penyambungan: Periksa perkabelan dalam mobil dengan hati-hati. Penyambungan yang tidak benar mungkin menyebabkan kerusakan serius pada alat penerima.
B Connecting the external amplifier (only for KD-G396/KD-G395) / Penyambungan penguat eksternal (hanya untuk KD-G396/KD-G395) You can connect an amplifier to upgrade your car stereo system. • Connect the remote lead (blue with white stripe) to the remote lead of the other equipment so that it can be controlled through this unit. • Disconnect the speakers from this unit, connect them to the amplifier. Leave the speaker leads of this unit unused.
KD-G396/KD-G395/KD-G245 ENGLISH CD RECEIVER KD-G396/KD-G395/KD-G245 For canceling the display demonstration, see page 6. For installation and connections, refer to the separate manual. INSTRUCTIONS GET0486-005A [UT] Cover_KD-G396_005A_f.
ENGLISH Thank you for purchasing a JVC product. Please read all instructions carefully before operation, to ensure your complete understanding and to obtain the best possible performance from the unit. IMPORTANT FOR LASER PRODUCTS 1. CLASS 1 LASER PRODUCT 2. CAUTION: Do not open the top cover. There are no user serviceable parts inside the unit; leave all servicing to qualified service personnel. 3. CAUTION: Visible and/or invisible class 1M laser radiation when open.
Ex.: When number button 2 works as MO (monaural) button. CONTENTS Control panel — KD-G396/KD-G395/KD-G245 .................. 4 Remote controller — RM-RK50........... 5 Getting started ................................ 6 ENGLISH How to use the M MODE button If you press M MODE, the unit goes into functions mode, then the number buttons and 5/∞ buttons will work as different function buttons. Basic operations ...................................................
ENGLISH Control panel — KD-G396/KD-G395/KD-G245 Parts identification Display window 1 5 (up) / ∞ (down) buttons 2 0 (eject) button 3 (standby/on attenuator) button 4 KD-G396/KD-G395: Remote sensor 5 6 7 8 9 p q w e r t y u i o DO NOT expose the remote sensor to strong light (direct sunlight or artificial lighting).
Remote controller — RM-RK50 ENGLISH Main elements and features RM-RK50 is supplied only for KD-G396/KD-G395. Installing the lithium coin battery (CR2025) 1 Aim the remote controller directly at the remote sensor on the unit. Make sure there is no obstacle in between. 2 Warning: • Do not install any battery other than CR2025 or its equivalent; otherwise, it may explode.
ENGLISH Getting started Basic settings Basic operations • See also “General settings — PSM” on pages 11 and 12. ~ 1 Turn on the power. 2 Ÿ 1 Canceling the display demonstrations Select “DEMO,” then “DEMO OFF.” 2 Setting the clock Select “CLOCK H” (hour), then adjust the hour. Select “CLOCK M” (minute), then adjust the minute. * You cannot select “CD” as the playback source if there is no disc in the unit. ! For FM/AM tuner ⁄ Adjust the volume. 3 Volume level appears.
Radio operations You can preset six stations for each band. ~ FM station automatic presetting— SSM (Strong-station Sequential Memory) Ÿ Lights up when receiving an FM stereo broadcast with sufficient signal strength. ! 1 ENGLISH Storing stations in memory Select the FM band (FM1 – FM3) you want to store into. 2 Start searching for a station. When a station is received, searching stops. To stop searching, press the same button again.
ENGLISH Listening to a preset station To fast-forward or reverse the track 1 2 Select the preset station (1 – 6) you want.
Skipping tracks quickly during play • When “TAG DISP” is set to “TAG ON” (see page 12) • KD-G396/KD-G395: For MP3 or WMA discs, you can skip tracks within the same folder Ex.
ENGLISH 7 Random play Adjusting the sound Mode Plays at random FLDR RND * : All tracks of the current folder, then the tracks of the next folder ] and so on. [ ALL RND : All tracks of the current disc. [ ] RND OFF : Cancels. You can adjust the sound characteristics to your preference. 1 2 * KD-G396/KD-G395: Only while playing an MP3 or a WMA disc. [ ] : Corresponding indicator lights up on the display BAS *1 (bass), [–06 to +06] Adjust the bass.
You can connect an external component to the AUX (auxiliary) input jack on the control panel. General settings — PSM You can change PSM (Preferred Setting Mode) items listed in the table on page 12. 1 2 Select a PSM item. 3 Adjust the PSM item selected. Turn on the connected component and start playing the source. 4 Repeat steps 2 and 3 to adjust other PSM items if necessary. Adjust the volume. 5 Finish the procedure.
ENGLISH Indications Item ( : Initial) Selectable settings, [reference page] DEMO Display demonstration • DEMO ON : The display demonstration will be activated automatically if no operation is done for about 20 seconds, [6]. : Cancels. • DEMO OFF CLK DISP *1 Clock display • ON • OFF : The clock time is shown on the display at all times when the power is turned off. : Cancels; pressing DISP will show the clock time for about 5 seconds when the power is turned off, [6].
How to clean the connectors Frequent detachment will deteriorate the connectors. To minimize this possibility, periodically wipe the connectors with a cotton swab or cloth moistened with alcohol, being careful not to damage the connectors. To keep discs clean A dirty disc may not play correctly. If a disc does become dirty, wipe it with a soft cloth in a straight line from center to edge. • Do not use any solvents (for example, conventional record cleaner, spray, thinner, benzine, etc.) to clean discs.
ENGLISH More about this unit Basic operations Turning on the power • By pressing SRC on the unit, you can also turn on the power. If the source is ready, playback also starts. Turning off the power • If you turn off the power while listening to a disc, disc play will start from where it had been stopped previously next time you turn on the power. Tuner operations Storing stations in memory • During SSM search... – All previously stored stations are erased and the stations are stored anew.
• This unit can play back MP3/WMA files with the extension code <.mp3> or <.wma> (regardless of the letter case—upper/lower). • This unit can show the names of albums, artists (performer), and Tag (Version 1.0, 1.1, 2.2, 2.3, or 2.4) for MP3 files and for WMA files. • This unit can display only one-byte characters. No other characters can be correctly displayed. • This unit can play back MP3/WMA files meeting the conditions below: – Bit rate: 8 kbps — 320 kbps – Sampling frequency: 48 kHz, 44.
What appears to be trouble is not always serious. Check the following points before calling a service center. General Remedies/Causes • Sound cannot be heard from the speakers. • Adjust the volume to the optimum level. • Check the cords and connections. • The unit does not work at all. Reset the unit (see page 2). FM/AM Symptoms • SSM automatic presetting does not work. Store stations manually. • Static noise while listening to the radio. Connect the antenna firmly.
AUDIO AMPLIFIER SECTION CD PLAYER SECTION Maximum Power Output: Front/Rear: 50 W per channel Continuous Power Output (RMS): Front/Rear: 19 W per channel into 4 Ω, 40 Hz to 20 000 Hz at no more than 0.8% total harmonic distortion. Load Impedance: 4 Ω (4 Ω to 8 Ω allowance) Tone Control Range: Bass: ±12 dB at 60 Hz Mid-range: ±12 dB at 1 kHz Treble: ±12 dB at 7.5 kHz Frequency Response: 40 Hz to 20 000 Hz Signal-to-Noise Ratio: 70 dB For KD-G396/KD-G395: Line-Out Level/ 2.
Having TROUBLE with operation? Please reset your unit Refer to page of How to reset your unit EN, CT © 2007 Victor Company of Japan, Limited Rear_KD-G396_005A_f.
KD-G396/KD-G395/KD-G245 Installation/Connection Manual 安裝/連接手冊 0807DTSMDTJEIN GET0486-010A EN, CT © 2007 Victor Company of Japan, Limited [UT] ENGLISH 中文 This unit is designed to operate on 12 V DC, NEGATIVE ground electrical systems. If your vehicle does not have this system, a voltage inverter is required, which can be purchased at JVC car audio dealers.
INSTALLATION (IN-DASH MOUNTING) 安裝(裝設、固定在儀表板內) The following illustration shows a typical installation. If you have any questions or require information regarding installation kits, consult your JVC car audio dealer or a company supplying kits. • If you are not sure how to install this unit correctly, have it installed by a qualified technician. 下面的圖解表示了典型的安裝程序。如果您有問題,或需要有關配套元件的資料,請向 JVC 汽車音響分銷商或配套元件供應公司詢問。 • 如果您不能確定如何正確地安裝本機,應請合格的技術人員來安裝。 Do the required electrical connections.
中文 ENGLISH 電路連接 ELECTRICAL CONNECTIONS A Typical connections / 典型的接線方法 接線前:仔細檢查汽車內的線路。不正確的接線會導致本機嚴重損壞。 Before connecting: Check the wiring in the vehicle carefully. Incorrect connection may cause serious damage to this unit. The leads of the power cord and those of the connector from the car body may be different in color. 1 2 3 電源線的引線和車身的連接器引線在顏色上可能有所不同。 1 2 3 Connect the colored leads of the power cord in the order specified in the illustration below. Connect the antenna cord.
B Connecting the external amplifier (only for KD-G396/KD-G395) / 連接至外部功率放大器(僅對應 KD-G396/KD-G395) You can connect an amplifier to upgrade your car stereo system. • Connect the remote lead (blue with white stripe) to the remote lead of the other equipment so that it can be controlled through this unit. • Disconnect the speakers from this unit, connect them to the amplifier. Leave the speaker leads of this unit unused.
ENGLISH FRANÇAIS CD RECEIVER RÉCEPTEUR CD KD-G343/KD-G342/KD-G341 For canceling the display demonstration, see page 5. Pour annuler la démonstration des affichages, référez-vous à la page 5. For installation and connections, refer to the separate manual. Pour l’installation et les raccordements, se référer au manuel séparé. INSTRUCTIONS MANUEL D’INSTRUCTIONS GET0484-003A [EX/EU] Cover_KD-G343_003A_f.
ENGLISH Thank you for purchasing a JVC product. Please read all instructions carefully before operation, to ensure your complete understanding and to obtain the best possible performance from the unit. IMPORTANT FOR LASER PRODUCTS 1. CLASS 1 LASER PRODUCT 2. CAUTION: Do not open the top cover. There are no user serviceable parts inside the unit; leave all servicing to qualified service personnel. 3. CAUTION: Visible and/or invisible class 1M laser radiation when open.
Ex.: When number button 2 works as MO (monaural) button. CONTENTS Control panel — KD-G343/KD-G342/KD-G341 ............. 4 Getting started ................................ 5 ENGLISH How to use the M MODE button If you press M MODE, the unit goes into functions mode, then the number buttons and 5 / ∞ buttons will work as different function buttons. Basic operations ................................................... 5 Radio operations ............................. 6 FM RDS operations ....................
ENGLISH Control panel — KD-G343/KD-G342/KD-G341 Parts identification Display window 1 2 3 4 5 6 7 8 9 p q w e r t y u i o 0 (eject) button 4 /¢ buttons Loading slot (standby/on attenuator) button BAND button Display window T/P (traffic programme/programme type) button DISP (display) button 5(up)/∞(down) buttons (control panel release) button SRC (source) button Control dial SEL (select) button M MODE button EQ (equalizer) button MO (monaural) button SSM (Strong-station Sequential Memory) button Number
Getting started • See also “General settings — PSM” on pages 13 – 15. Basic operations ~ ENGLISH Basic settings Turn on the power. 1 2 Ÿ * You cannot select “CD” as the playback source if there is no disc in the unit. ! For FM/AM tuner ⁄ Adjust the volume. 1 Canceling the display demonstrations Select “DEMO,” then “DEMO OFF.” 2 Setting the clock Select “CLOCK H” (hour), then adjust the hour. Select “CLOCK M” (minute), then adjust the minute. Select “24H/12H,” then “24H” (hour) or “12H” (hour).
ENGLISH Radio operations When an FM stereo broadcast is hard to receive ~ Lights up when monaural mode is activated. Ÿ Reception improves, but the stereo effect will be lost. Lights up when receiving an FM stereo broadcast with sufficient signal strength. ! To restore the stereo effect, repeat the same procedure. “MONO OFF” appears and the MO indicator goes off. Storing stations in memory Start searching for a station. You can preset six stations for each band.
1 FM RDS operations What you can do with RDS RDS (Radio Data System) allows FM stations to send an additional signal along with their regular programme signals. ENGLISH Manual presetting Ex.: Storing the FM station of 92.5 MHz into preset number 4 of the FM1 band. 2 3 Preset number flashes for a while. Listening to a preset station 1 2 Select the preset station (1 – 6) you want.
ENGLISH ! Start searching for your favorite programme. If there is a station broadcasting a programme of the same PTY code as you have selected, that station is tuned in. Storing your favorite programme types You can store six favorite programme types. Preset programme types in the number buttons (1 to 6): 1 Select a PTY code (see pages 7 and 8). 2 Select the preset number (1 – 6) you want to store into.
To check the current clock time while listening to an FM RDS station Station name (PS) = Station Frequency = Programme type (PTY) = Clock = (back to the beginning) Tracing the same programme— Network-Tracking Reception When driving in an area where FM reception is not sufficient enough, this unit automatically tunes in to another FM RDS station of the same network, possibly broadcasting the same programme with stronger signals (see the illustration below).
ENGLISH To stop play and eject the disc • Press SRC to listen to another playback source. To fast-forward or reverse the track Other main functions Skipping tracks quickly during play • For MP3 or WMA discs, you can skip tracks within the same folder. Ex.
Selecting the playback modes You can use only one of the following playback modes at a time.
ENGLISH Sound adjustments Adjusting the sound You can select a preset sound mode suitable to the music genre (c-EQ: custom equalizer). You can adjust the sound characteristics to your preference. 1 1 2 2 Preset values Indication (For) BAS TRE LOUD (bass) (treble) (loudness) Indication, [Range] USER (Flat sound) 00 00 OFF BAS*1 (bass), [–06 to +06] Adjust the bass. ROCK (Rock or disco music) +03 +01 ON TRE*1 (treble), [–06 to +06] Adjust the treble.
You can change PSM (Preferred Setting Mode) items listed in the table below, on page 14 and 15. ENGLISH General settings — PSM 3 Adjust the PSM item selected. 4 Repeat steps 2 and 3 to adjust other PSM items if necessary. 5 Finish the procedure. 1 2 Select a PSM item. Indications Item ( : Initial) Selectable settings, [reference page] DEMO Display demonstration • DEMO ON : The display demonstration will be activated automatically if no operation is done for about 20 seconds, [5]. : Cancels.
ENGLISH Indications Item ( : Initial) Selectable settings, [reference page] CLK ADJ *2 Clock adjustment • AUTO : The built-in clock is automatically adjusted using the CT (clock time) data in the RDS signal. : Cancels. • OFF AF-REG *2 Alternative frequency/ regionalization reception • AF • OFF : When the currently received signals become weak, the unit switches to another station (the programme may differ from the one currently received), [9, 17]. • The AF indicator lights up.
Item ( : Initial) Selectable settings, [reference page] AUX ADJ Auxiliary input level adjustment A.ADJ 00 — A.ADJ 05 : Adjust the auxiliary input level to avoid the sudden increase of the output level when changing the source from external component connected to the AUX input jack on the control panel. TAG DISP Tag display • TAG ON • TAG OFF : Shows the Tag information while playing MP3/WMA tracks, [11]. : Cancels.
To keep discs clean ENGLISH Maintenance How to clean the connectors Frequent detachment will deteriorate the connectors. To minimize this possibility, periodically wipe the connectors with a cotton swab or cloth moistened with alcohol, being careful not to damage the connectors. A dirty disc may not play correctly. If a disc does become dirty, wipe it with a soft cloth in a straight line from center to edge.
• If you want to know more about RDS, visit . Basic operations Disc operations Turning on the power Caution for DualDisc playback • By pressing SRC on the unit, you can also turn on the power. If the source is ready, playback also starts. • The Non-DVD side of a “DualDisc” does not comply with the “Compact Disc Digital Audio” standard. Therefore, the use of Non-DVD side of a DualDisc on this product may not be recommended.
ENGLISH • CD-RWs may require a longer readout time since the reflectance of CD-RWs is lower than that of regular CDs. • Do not use the following CD-Rs or CD-RWs: – Discs with stickers, labels, or protective seal stuck to the surface. – Discs on which labels can be directly printed by an ink jet printer. Using these discs under high temperature or high humidity may cause malfunctions or damage to the unit. Playing an MP3/WMA disc • This unit can play back MP3/WMA files with the extension code <.mp3> or <.
What appears to be trouble is not always serious. Check the following points before calling a service center. FM/AM General Symptoms Remedies/Causes • Sound cannot be heard from the speakers. • Adjust the volume to the optimum level. • Check the cords and connections. • The unit does not work at all. Reset the unit (see page 2). • SSM automatic presetting does not work. Store stations manually. • Static noise while listening to the radio. Connect the aerial firmly. • Disc cannot be played back.
MP3/WMA playback ENGLISH Symptoms Remedies/Causes • Disc cannot be played back. • Use a disc with MP3/WMA tracks recorded in a format compliant with ISO 9660 Level 1, Level 2, Romeo, or Joliet. • Add the extension code <.mp3> or <.wma> to the file names. • Noise is generated. Skip to another track or change the disc. (Do not add the extension code <.mp3> or <.wma> to non-MP3 or WMA tracks.) • A longer readout time is required (“READING” keeps flashing on the display).
AUDIO AMPLIFIER SECTION CD PLAYER SECTION Maximum Power Output: Front/Rear: 50 W per channel Continuous Power Output (RMS): Front/Rear: 19 W per channel into 4 Ω, 40 Hz to 20 000 Hz at no more than 0.8% total harmonic distortion. Load Impedance: 4 Ω (4 Ω to 8 Ω allowance) Tone Control Range: Bass: ±12 dB at 100 Hz Treble: ±12 dB at 10 kHz Frequency Response: 40 Hz to 20 000 Hz Signal-to-Noise Ratio: 70 dB Line-Out Level/ 2.
Having TROUBLE with operation? Please reset your unit Refer to page of How to reset your unit Vous avez des PROBLÈMES de fonctionnement? Réinitialisez votre appareil Référez-vous à la page intitulée Comment réinitialiser votre appareil Dear Customer, This apparatus is in conformance with the valid European directives and standards regarding electromagnetic compatibility and electrical safety.
KD-G343/KD-G342/KD-G341 Installation/Connection Manual Manuel d’installation/raccordement GET0484-010A 0807DTSMDTJEIN [EX/EU] EN, FR © 2007 Victor Company of Japan, Limited ENGLISH FRANÇAIS This unit is designed to operate on 12 V DC, NEGATIVE ground electrical systems. If your vehicle does not have this system, a voltage inverter is required, which can be purchased at JVC IN-CAR ENTERTAINMENT dealers.
INSTALLATION (IN-DASH MOUNTING) INSTALLATION (MONTAGE DANS LE TABLEAU DE BORD) The following illustration shows a typical installation. If you have any questions or require information regarding installation kits, consult your JVC IN-CAR ENTERTAINMENT dealer or a company supplying kits. • If you are not sure how to install this unit correctly, have it installed by a qualified technician. L’illustration suivante est un exemple d’installation typique.
ENGLISH FRANÇAIS ELECTRICAL CONNECTIONS A RACCORDEMENTS ELECTRIQUES Typical Connections / Raccordements typiques Before connecting: Check the wiring in the vehicle carefully. Incorrect connection may cause serious damage to this unit. The leads of the power cord and those of the connector from the car body may be different in color. Avant de commencer la connexion: Vérifiez attentivement le câblage du véhicule. Une connexion incorrecte peut endommager sérieusement l’appareil.
B Connecting the external amplifier / Connexion d’un amplificateur extérieur You can connect an amplifier to upgrade your car stereo system. • Connect the remote lead (blue with white stripe) to the remote lead of the other equipment so that it can be controlled through this unit. • Disconnect the speakers from this unit, connect them to the amplifier. Leave the speaker leads of this unit unused. Vous pouvez connecter un amplificateur pour améliorer votre système autoradio.
ENGLISH DEUTSCH CD-RECEIVER РЕСИВЕР С ПРОИГРЫВАТЕЛЕМ КОМПАКТ-ДИСКОВ KD-G343/KD-G342/KD-G341 РУCCKИЙ CD RECEIVER For canceling the display demonstration, see page 5. Zum Abbrechen der Displaydemonstration siehe Seite 5. Информацию об отмене демонстрации функций дисплея см. на стр. 5. For installation and connections, refer to the separate manual. Für den Einbau und die Anschlüsse siehe das eigenständige Handbuch. Указания по установке и выполнению соединений приводятся в отдельной инструкции.
ENGLISH Thank you for purchasing a JVC product. Please read all instructions carefully before operation, to ensure your complete understanding and to obtain the best possible performance from the unit. IMPORTANT FOR LASER PRODUCTS 1. CLASS 1 LASER PRODUCT 2. CAUTION: Do not open the top cover. There are no user serviceable parts inside the unit; leave all servicing to qualified service personnel. 3. CAUTION: Visible and/or invisible class 1M laser radiation when open.
Ex.: When number button 2 works as MO (monaural) button. CONTENTS Control panel — KD-G343/KD-G342/KD-G341 ............. 4 Getting started ................................ 5 ENGLISH How to use the M MODE button If you press M MODE, the unit goes into functions mode, then the number buttons and 5 / ∞ buttons will work as different function buttons. Basic operations ................................................... 5 Radio operations ............................. 6 FM RDS operations ....................
ENGLISH Control panel — KD-G343/KD-G342/KD-G341 Parts identification Display window 1 2 3 4 5 6 7 8 9 p q w e r t y u i o 0 (eject) button 4 /¢ buttons Loading slot (standby/on attenuator) button BAND button Display window T/P (traffic programme/programme type) button DISP (display) button 5(up)/∞(down) buttons (control panel release) button SRC (source) button Control dial SEL (select) button M MODE button EQ (equalizer) button MO (monaural) button SSM (Strong-station Sequential Memory) button Number
Getting started • See also “General settings — PSM” on pages 13 – 15. Basic operations ~ ENGLISH Basic settings Turn on the power. 1 2 Ÿ * You cannot select “CD” as the playback source if there is no disc in the unit. ! For FM/AM tuner ⁄ Adjust the volume. 1 Canceling the display demonstrations Select “DEMO,” then “DEMO OFF.” 2 Setting the clock Select “CLOCK H” (hour), then adjust the hour. Select “CLOCK M” (minute), then adjust the minute. Select “24H/12H,” then “24H” (hour) or “12H” (hour).
ENGLISH Radio operations When an FM stereo broadcast is hard to receive ~ Lights up when monaural mode is activated. Ÿ Reception improves, but the stereo effect will be lost. Lights up when receiving an FM stereo broadcast with sufficient signal strength. ! To restore the stereo effect, repeat the same procedure. “MONO OFF” appears and the MO indicator goes off. Storing stations in memory Start searching for a station. You can preset six stations for each band.
1 FM RDS operations What you can do with RDS RDS (Radio Data System) allows FM stations to send an additional signal along with their regular programme signals. ENGLISH Manual presetting Ex.: Storing the FM station of 92.5 MHz into preset number 4 of the FM1 band. 2 3 Preset number flashes for a while. Listening to a preset station 1 2 Select the preset station (1 – 6) you want.
ENGLISH ! Start searching for your favorite programme. If there is a station broadcasting a programme of the same PTY code as you have selected, that station is tuned in. Storing your favorite programme types You can store six favorite programme types. Preset programme types in the number buttons (1 to 6): 1 Select a PTY code (see pages 7 and 8). 2 Select the preset number (1 – 6) you want to store into.
To check the current clock time while listening to an FM RDS station Station name (PS) = Station Frequency = Programme type (PTY) = Clock = (back to the beginning) Tracing the same programme— Network-Tracking Reception When driving in an area where FM reception is not sufficient enough, this unit automatically tunes in to another FM RDS station of the same network, possibly broadcasting the same programme with stronger signals (see the illustration below).
ENGLISH To stop play and eject the disc • Press SRC to listen to another playback source. To fast-forward or reverse the track Other main functions Skipping tracks quickly during play • For MP3 or WMA discs, you can skip tracks within the same folder. Ex.
Selecting the playback modes You can use only one of the following playback modes at a time.
ENGLISH Sound adjustments Adjusting the sound You can select a preset sound mode suitable to the music genre (c-EQ: custom equalizer). You can adjust the sound characteristics to your preference. 1 1 2 2 Preset values Indication (For) BAS TRE LOUD (bass) (treble) (loudness) Indication, [Range] USER (Flat sound) 00 00 OFF BAS*1 (bass), [–06 to +06] Adjust the bass. ROCK (Rock or disco music) +03 +01 ON TRE*1 (treble), [–06 to +06] Adjust the treble.
You can change PSM (Preferred Setting Mode) items listed in the table below, on page 14 and 15. ENGLISH General settings — PSM 3 Adjust the PSM item selected. 4 Repeat steps 2 and 3 to adjust other PSM items if necessary. 5 Finish the procedure. 1 2 Select a PSM item. Indications Item ( : Initial) Selectable settings, [reference page] DEMO Display demonstration • DEMO ON : The display demonstration will be activated automatically if no operation is done for about 20 seconds, [5]. : Cancels.
ENGLISH Indications Item ( : Initial) Selectable settings, [reference page] CLK ADJ *2 Clock adjustment • AUTO : The built-in clock is automatically adjusted using the CT (clock time) data in the RDS signal. : Cancels. • OFF AF-REG *2 Alternative frequency/ regionalization reception • AF • OFF : When the currently received signals become weak, the unit switches to another station (the programme may differ from the one currently received), [9, 17]. • The AF indicator lights up.
Item ( : Initial) Selectable settings, [reference page] AUX ADJ Auxiliary input level adjustment A.ADJ 00 — A.ADJ 05 : Adjust the auxiliary input level to avoid the sudden increase of the output level when changing the source from external component connected to the AUX input jack on the control panel. TAG DISP Tag display • TAG ON • TAG OFF : Shows the Tag information while playing MP3/WMA tracks, [11]. : Cancels.
To keep discs clean ENGLISH Maintenance How to clean the connectors Frequent detachment will deteriorate the connectors. To minimize this possibility, periodically wipe the connectors with a cotton swab or cloth moistened with alcohol, being careful not to damage the connectors. A dirty disc may not play correctly. If a disc does become dirty, wipe it with a soft cloth in a straight line from center to edge.
• If you want to know more about RDS, visit . Basic operations Disc operations Turning on the power Caution for DualDisc playback • By pressing SRC on the unit, you can also turn on the power. If the source is ready, playback also starts. • The Non-DVD side of a “DualDisc” does not comply with the “Compact Disc Digital Audio” standard. Therefore, the use of Non-DVD side of a DualDisc on this product may not be recommended.
ENGLISH • CD-RWs may require a longer readout time since the reflectance of CD-RWs is lower than that of regular CDs. • Do not use the following CD-Rs or CD-RWs: – Discs with stickers, labels, or protective seal stuck to the surface. – Discs on which labels can be directly printed by an ink jet printer. Using these discs under high temperature or high humidity may cause malfunctions or damage to the unit. Playing an MP3/WMA disc • This unit can play back MP3/WMA files with the extension code <.mp3> or <.
What appears to be trouble is not always serious. Check the following points before calling a service center. FM/AM General Symptoms Remedies/Causes • Sound cannot be heard from the speakers. • Adjust the volume to the optimum level. • Check the cords and connections. • The unit does not work at all. Reset the unit (see page 2). • SSM automatic presetting does not work. Store stations manually. • Static noise while listening to the radio. Connect the aerial firmly. • Disc cannot be played back.
MP3/WMA playback ENGLISH Symptoms Remedies/Causes • Disc cannot be played back. • Use a disc with MP3/WMA tracks recorded in a format compliant with ISO 9660 Level 1, Level 2, Romeo, or Joliet. • Add the extension code <.mp3> or <.wma> to the file names. • Noise is generated. Skip to another track or change the disc. (Do not add the extension code <.mp3> or <.wma> to non-MP3 or WMA tracks.) • A longer readout time is required (“READING” keeps flashing on the display).
AUDIO AMPLIFIER SECTION CD PLAYER SECTION Maximum Power Output: Front/Rear: 50 W per channel Continuous Power Output (RMS): Front/Rear: 19 W per channel into 4 Ω, 40 Hz to 20 000 Hz at no more than 0.8% total harmonic distortion. Load Impedance: 4 Ω (4 Ω to 8 Ω allowance) Tone Control Range: Bass: ±12 dB at 100 Hz Treble: ±12 dB at 10 kHz Frequency Response: 40 Hz to 20 000 Hz Signal-to-Noise Ratio: 70 dB Line-Out Level/ 2.
Having TROUBLE with operation? Please reset your unit Refer to page of How to reset your unit Haben Sie PROBLEME mit dem Betrieb? Bitte setzen Sie Ihr Gerät zurück Siehe Seite Zurücksetzen des Geräts Затруднения при эксплуатации? Пожалуйста, перезагрузите Ваше устройство Для получения информации о перезагрузке Вашего устройства обратитесь на соответствующую страницу Dear Customer, This apparatus is in conformance with the valid European directives and standards regarding electromagnetic compatibility and
KD-G343/KD-G342/KD-G341 Installation/Connection Manual Einbau/Anschlußanleitung GET0484-013A Руководство по установке/подключению 0807DTSMDTJEIN EN, GE, RU © 2007 Victor Company of Japan, Limited [EY] ENGLISH DEUTSCH РУССКИЙ This unit is designed to operate on 12 V DC, NEGATIVE ground electrical systems. If your vehicle does not have this system, a voltage inverter is required, which can be purchased at JVC IN-CAR ENTERTAINMENT dealers.
INSTALLATION (IN-DASH MOUNTING) EINBAU (IM ARMATURENBRETT) УСТАНОВКА (УСТАНОВКА В ПРИБОРНУЮ ПАНЕЛЬ) The following illustration shows a typical installation. If you have any questions or require information regarding installation kits, consult your JVC IN-CAR ENTERTAINMENT dealer or a company supplying kits. • If you are not sure how to install this unit correctly, have it installed by a qualified technician. Die folgende Abbildung zeigt einen typischen Einbau.
ENGLISH DEUTSCH ELECTRICAL CONNECTIONS A РУССКИЙ ELEKTRISCHE ANSCHLÜSSE ЭЛЕКТРИЧЕСКИЕ ПОДКЛЮЧЕНИЯ Typical Connections / Typische Anschlüsse / Типичные подключения Before connecting: Check the wiring in the vehicle carefully. Incorrect connection may cause serious damage to this unit. The leads of the power cord and those of the connector from the car body may be different in color. Vor dem Anschließen: Die Verdrahtung im Fahrzeug sorgfältig überprüfen.
B Connecting the external amplifier / Anschließen des externen Verstärkers / Подключение внешнего усилителя You can connect an amplifier to upgrade your car stereo system. • Connect the remote lead (blue with white stripe) to the remote lead of the other equipment so that it can be controlled through this unit. • Disconnect the speakers from this unit, connect them to the amplifier. Leave the speaker leads of this unit unused.
Thank you for purchasing a JVC product. Please read all instructions carefully before operation, to ensure your complete understanding and to obtain the best possible performance from the unit. KD-G347 CD RECEIVER: INSTRUCTIONS/INSTALLATION Installation/connection are explained at the last section of this manual (reverse page, indicated with symbol). 0907DTSMDTJEIN GET0491-001A EN © 2007 Victor Company of Japan, Limited [EE] ENGLISH IMPORTANT FOR LASER PRODUCTS MORE ABOUT THIS UNIT 1.
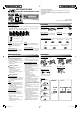
Basic operations Radio operations Control panel Check the current clock time/other information. See also “CLK DISP“ of “General settings—PSM.” • Turn on the power. • Turn off the power [Hold]. • Attenuate the sound (if the power is on). Note: FM1 and FM2: 87.5 MHz – 108.0 MHz FM3: 65.00 MHz – 74.00 MHz Select preset station. Detach the panel. Select “FM/AM.” Volume control. *You cannot select “CD” as the playback source if there is no disc in the unit. Select the source. Select the bands.
BAS TRE LOUD 00 +01 –02 +01 00 +03 FAD *2 (fader) Adjust the front and rear speaker balance. R06 to F06 LOUD *1 (loudness) LOUD ON or Boost low and high frequencies to LOUD OFF produce a well-balanced sound at a low volume level. VOL (volume) Adjust the volume. 00 to 50 (or 00 to 30) *3 General settings—PSM Select an item. Indication Item ( DEMO • DEMO ON : Initial) • DEMO OFF CLK DISP *1 • ON • OFF Adjust. Finish.
INSTALLATION This unit is designed to operate on 12 V DC, NEGATIVE ground electrical systems. If your vehicle does not have this system, a voltage inverter is required, which can be purchased at JVC IN-CAR ENTERTAINMENT dealers. The following illustration shows a typical installation. If you have any questions or require information regarding installation kits, consult your JVC IN-CAR ENTERTAINMENT dealer or a company supplying kits.
CD RECEIVER KD-G396S For canceling the display demonstration, see page 6. INSTRUCTIONS GET0554-001A [UI] Cover_KD-G396[UI]f.
Thank you for purchasing a JVC product. Please read all instructions carefully before operation, to ensure your complete understanding and to obtain the best possible performance from the unit. IMPORTANT FOR LASER PRODUCTS 1. CLASS 1 LASER PRODUCT 2. CAUTION: Do not open the top cover. There are no user serviceable parts inside the unit; leave all servicing to qualified service personnel. 3. CAUTION: Visible and/or invisible class 1M laser radiation when open. Do not view directly with optical instruments.
How to use the M MODE button If you press M MODE, the unit goes into functions mode, then the number buttons and 5/∞ buttons will work as different function buttons. Ex.: When number button 2 works as MO (monaural) button. CONTENTS Control panel .................................. 4 Remote controller — RM-RK50........... 5 Getting started ................................ 6 Basic operations ................................................... 6 Radio operations .............................
Control panel Parts identification Display window 1 5 (up) / ∞ (down) buttons 2 0 (eject) button 3 (standby/on attenuator) button 4 Remote sensor 5 6 7 8 9 p q w e r t y u i o DO NOT expose the remote sensor to strong light (direct sunlight or artificial lighting).
Remote controller — RM-RK50 Main elements and features Installing the lithium coin battery (CR2025) Aim the remote controller directly at the remote sensor on the unit. Make sure there is no obstacle in between. Warning: • Do not install any battery other than CR2025 or its equivalent; otherwise, it may explode. • Do not leave the remote controller in a place (such as the dashboard) exposed to direct sunlight for a long time; otherwise, it may explode.
Getting started Basic settings Basic operations • See also “General settings — PSM” on pages 11 and 12. ~ 1 Turn on the power. 2 Ÿ 1 Canceling the display demonstrations Select “DEMO,” then “DEMO OFF.” 2 Setting the clock Select “CLOCK H” (hour), then adjust the hour. Select “CLOCK M” (minute), then adjust the minute. * You cannot select “CD” as the playback source if there is no disc in the unit. ! For FM/AM tuner ⁄ Adjust the volume. 3 Volume level appears. @ Adjust the sound as you want.
Radio operations Storing stations in memory You can preset six stations for each band. ~ FM station automatic presetting— SSM (Strong-station Sequential Memory) Ÿ Lights up when receiving an FM stereo broadcast with sufficient signal strength. ! 1 Select the FM band (FM1 – FM3) you want to store into. 2 Start searching for a station. When a station is received, searching stops. To stop searching, press the same button again. 3 “SSM” flashes, then disappears when automatic presetting is over.
Listening to a preset station To fast-forward or reverse the track 1 2 Select the preset station (1 – 6) you want.
While playing an MP3 or a WMA track Other main functions • When “TAG DISP” is set to “TAG ON” (see page 12) Skipping tracks quickly during play • For MP3 or WMA discs, you can skip tracks within the same folder Ex.
7 Random play Adjusting the sound Mode Plays at random FLDR RND * : All tracks of the current folder, then the tracks of the next folder ] and so on. [ ALL RND : All tracks of the current disc. [ ] RND OFF : Cancels. You can adjust the sound characteristics to your preference. 1 2 * Only while playing an MP3 or a WMA disc. [ ] : Corresponding indicator lights up on the display Indication, [Range] Sound adjustments BAS *1 (bass), [–06 to +06] Adjust the bass.
Other external component operations You can connect an external component to the AUX (auxiliary) input jack on the control panel. General settings — PSM You can change PSM (Preferred Setting Mode) items listed in the table on page 12. 1 2 Select a PSM item. 3 Adjust the PSM item selected. Turn on the connected component and start playing the source. 4 Repeat steps 2 and 3 to adjust other PSM items if necessary. Adjust the volume. 5 Finish the procedure.
Indications Item ( : Initial) Selectable settings, [reference page] DEMO Display demonstration • DEMO ON : The display demonstration will be activated automatically if no operation is done for about 20 seconds, [6]. : Cancels. • DEMO OFF CLK DISP *1 Clock display • ON • OFF : The clock time is shown on the display at all times when the power is turned off. : Cancels; pressing DISP will show the clock time for about 5 seconds when the power is turned off, [6].
Maintenance How to clean the connectors Frequent detachment will deteriorate the connectors. To minimize this possibility, periodically wipe the connectors with a cotton swab or cloth moistened with alcohol, being careful not to damage the connectors. To keep discs clean A dirty disc may not play correctly. If a disc does become dirty, wipe it with a soft cloth in a straight line from center to edge. • Do not use any solvents (for example, conventional record cleaner, spray, thinner, benzine, etc.
More about this unit Basic operations • MP3 and WMA “tracks” (words “file” and “track” are used interchangeably) are recorded in “folders.” • While fast-forwarding or reversing on an MP3 or WMA disc, you can only hear intermittent sounds. Turning on the power • By pressing SRC on the unit, you can also turn on the power. If the source is ready, playback also starts.
Playing an MP3/WMA disc Changing the source • This unit can play back MP3/WMA files with the extension code <.mp3> or <.wma> (regardless of the letter case—upper/lower). • This unit can show the names of albums, artists (performer), and Tag (Version 1.0, 1.1, 2.2, 2.3, or 2.4) for MP3 files and for WMA files. • This unit can display only one-byte characters. No other characters can be correctly displayed.
Troubleshooting What appears to be trouble is not always serious. Check the following points before calling a service center. • Sound cannot be heard from the speakers. • Adjust the volume to the optimum level. • Check the cords and connections. • The unit does not work at all. Reset the unit (see page 2). • SSM automatic presetting does not work. Store stations manually. • Static noise while listening to the radio. Connect the antenna firmly.
Specifications AUDIO AMPLIFIER SECTION CD PLAYER SECTION Maximum Power Output: Front/Rear: 50 W per channel Continuous Power Output (RMS): Front/Rear: 19 W per channel into 4 Ω, 40 Hz to 20 000 Hz at no more than 0.8% total harmonic distortion. Load Impedance: 4 Ω (4 Ω to 8 Ω allowance) Tone Control Range: Bass: ±12 dB at 60 Hz Mid-range: ±12 dB at 1 kHz Treble: ±12 dB at 7.5 kHz Frequency Response: 40 Hz to 20 000 Hz Signal-to-Noise Ratio: 70 dB Line-Out Level/ 2.
Having TROUBLE with operation? Please reset your unit Refer to page of How to reset your unit EN © 2008 Victor Company of Japan, Limited Rear_KD-G396[UI]f.
Thank you for purchasing a JVC product. Please read all instructions carefully before operation, to ensure your complete understanding and to obtain the best possible performance from the unit. KD-S15 CD RECEIVER: INSTRUCTIONS/INSTALLATION Installation/connection are explained at the last section of this manual (reverse page, indicated with symbol). For customer Use: Enter below the Model No. and Serial No. which are located on the top or bottom of the cabinet.
Basic operations Remote sensor DO NOT expose to strong light. Control panel • Turn on the power. • Turn off the power [Hold]. • Attenuate the sound (if the power is on). Check the current clock time/other information. See also “CLK DISP“ of “General settings—PSM.” Remote controller—RM-RK50 7 Installing battery Lithium coin battery (CR2025) Detach the panel. Volume control. Select the source.
Enter PSM menu. Select an item. Indication Item ( DEMO • DEMO ON Adjust. Finish • ON • OFF Power Output: 20 W RMS × 4 Channels at 4 Ω and ≤ 1% THD+N Signal to Noise Ratio: 80 dBA (reference: 1 W into 4 Ω) : The display demonstration will be activated automatically if no operation is done for about 20 seconds. : Cancels. 1 – 12 : [Initial: 1 (1:00)] CLOCK M (Minute) 00 – 59 : [Initial: 00 (1:00)] DIMMER • ON • OFF : Dims the display and button illumination. : Cancels.
INSTALLATION / CONNECTION Parts list for installation and connection A B C D Control panel Sleeve Trim plate Power cord G E F Washer (ø5) Lock nut (M5) Mounting bolt— M4 x 5 mm (M4 x 1/4"); M5 x 12.5 mm (M5 x 1/2") H I J K Handles Remote controller Battery Rubber cushion INSTALLATION If you are not sure how to install this unit correctly, consult your JVC car audio dealer. In dash-mounting Removing the unit Before removing the unit, release the rear section.
Thank you for purchasing a JVC product. Please read all instructions carefully before operation, to ensure your complete understanding and to obtain the best possible performance from the unit. KD-G347 CD RECEIVER: INSTRUCTIONS/INSTALLATION Installation/connection are explained at the last section of this manual (reverse page, indicated with symbol). 1207DTSMDTJEIN GET0491-001B EN © 2007 Victor Company of Japan, Limited [EE] ENGLISH IMPORTANT FOR LASER PRODUCTS MORE ABOUT THIS UNIT 1.
Basic operations Radio operations Control panel Check the current clock time/other information. See also “CLK DISP“ of “General settings—PSM.” • Turn on the power. • Turn off the power [Hold]. • Attenuate the sound (if the power is on). Note: FM1 and FM2: 87.5 MHz – 108.0 MHz FM3: 65.00 MHz – 74.00 MHz Select preset station. Detach the panel. Select “FM/AM.” Volume control. *You cannot select “CD” as the playback source if there is no disc in the unit. Select the source. Select the bands.
BAS TRE LOUD 00 +01 –02 +01 00 +03 FAD *2 (fader) Adjust the front and rear speaker balance. R06 to F06 LOUD *1 (loudness) LOUD ON or Boost low and high frequencies to LOUD OFF produce a well-balanced sound at a low volume level. VOL (volume) Adjust the volume. 00 to 50 (or 00 to 30) *3 General settings—PSM Select an item. Indication Item ( DEMO • DEMO ON : Initial) • DEMO OFF CLK DISP *1 • ON • OFF Adjust. Finish.
INSTALLATION This unit is designed to operate on 12 V DC, NEGATIVE ground electrical systems. If your vehicle does not have this system, a voltage inverter is required, which can be purchased at JVC IN-CAR ENTERTAINMENT dealers. The following illustration shows a typical installation. If you have any questions or require information regarding installation kits, consult your JVC IN-CAR ENTERTAINMENT dealer or a company supplying kits.