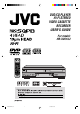
DVD/CD PLAYER Hi-Fi STEREO VIDEO CASSETTE RECORDER USER'S GUIDE For model: HR-XVC1UJ TV DVD MENU DISPLAY VCR DVD MARKER RETURN OPEN/ CLOSE C.RESET ZERO RETURN A.TRK SUB TITLE ANGLE SEARCH MODE ZOOM TITLE REPEAT A-B SP/EP PLAY MODE POWER TV POWER INPUT TV VOL 0 TIMER TV/VCR PLAY REW REC SKIP /INDEX SET FF STOP PAUSE TV/VCR CH + ENTER/ SELECT SKIP /INDEX SET SET UP MENU OSD CANCEL TV/VCR CH Ð A.
Dear Customer, Thank you for purchasing the JVC DVD player video cassette recorder. Before use, please read the safety information and precautions to ensure safe use of your new DVD/VCR. CAUTIONS WARNING: DANGEROUS VOLTAGE INSIDE WARNING: TO PREVENT FIRE OR SHOCK HAZARD, DO NOT EXPOSE THIS UNIT TO RAIN OR MOISTURE. The POWER /l button does not completely shut off mains power from the unit, but switches operating current on and off. “ ” shows electrical power standby and “ l ” shows ON.
When the equipment is installed in a cabinet or a shelf, make sure that it has sufficient space on all sides to allow for ventilation (10 cm or more on both sides, on top and at the rear). When discarding batteries, environmental problems must be considered and the local rules or laws governing the disposal of these batteries must be followed strictly. Failure to heed the following precautions may result in damage to the DVD/VCR, Remote or video cassette. 1. DO NOT place the DVD/VCR ... ...
CAUTION: THIS DIGITAL VIDEO PLAYER EMPLOYS A LASER SYSTEM. TO ENSURE PROPER USE OF THIS PRODUCT, PLEASE READ THIS USER'S GUIDE CAREFULLY AND RETAIN FOR FUTURE REFERENCE. SHOULD THE UNIT REQUIRE MAINTENANCE, CONTACT A JVC AUTHORIZED SERVICE CENTER. USE OF CONTROLS, ADJUSTMENTS OR THE PERFORMANCE OF PROCEDURES OTHER THAN THOSE SPECIFIED HEREIN MAY RESULT IN HAZARDOUS RADIATION EXPOSURE. TO PREVENT DIRECT EXPOSURE TO LASER BEAM, DO NOT TRY TO OPEN THE ENCLOSURE.
* This product incorporates copyright protection technology that is protected by method claims of certain U.S. patents and other intellectual property rights owned by Macrovision Corporation and other rights owners. Use of this copyright protection technology must be authorized by Macrovision Corporation or other rights owners and is intended for home and other limited viewing uses only unless otherwise authorized by Macrovision Corporation or other rights owners.
Features DVD/CD Player/Video Cassette Recorder • DVD/CD player with Video Cassette Recorder - Unique space saving design combines a DVD/CD player and a Hi-Fi Video cassette recorder. The DVD disc has much more capacity, but is the same size as the audio CD disc. Picture quality is higher than Super VHS. Audio quality is higher than audio CD. The DVD PLAYER can play back video CDs and audio CDs. • High Quality Picture - More than 500 lines(VCR mode: 230 lines) of Horizontal Resolution.
Contents Before using your unit Disc Playback operation Features ........................................................... 6 Contents ........................................................... 7 Parts and functions .......................................... 8 Display ............................................................. 9 Remote control ............................................... 10 Basic connections .......................................... 12 CATV (CABLE TV) connections .................
Parts and functions Front VCR/DVD mode selector button PLAY button Cassette Loading Slot OPEN/CLOSE button STOP button Disc tray EJECT button PLAY STOP POWER VIDEO (M) L - AUDIO - R EJECT CH VCR OPEN/CLOSE REW FF REC DVD VCR/DVD Remote sensor POWER button CHANNEL +/– buttons AUDIO (L/R)/ VIDEO IN jacks DVD indicator REC button REW (Rewind) button FF (Fast Forward) button VCR indicator Rear AC power cord DVD OUTPUT DIGITAL AUDIO OPTICAL COAXIAL AUDIO S-VIDEO COMPONENT L IN Y
Display Display window 1 2 3 4 11 5 6 10 No. 1 9 8 7 Display Description VCR mode VCR 2 Playback (lights) / Auto resume (flashes) 3 Still picture 4 DVD DVD disc is inserted. 5 CD CD is inserted.
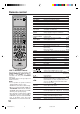
Remote control TV VCR DVD POWER DVD MENU MARKER RETURN OPEN/ CLOSE DISPLAY A.TRK C.RESET ZERO RETURN SUB TITLE ANGLE SEARCH MODE ZOOM TITLE REPEAT A-B SP/EP PLAY MODE TV POWER INPUT TV VOL 0 TIMER TV/VCR PLAY REW FF STOP PAUS REC SKIP /INDEX SET E TV/VCR CH + SKIP /INDEX ENTER/ SELECT SET UP MENU SET CANCEL T V/V C R C H — OSD TV/VCR/DVD switch POWER DVD MENU MARKER RETURN OPEN/CLOSE DISPLAY A.TRK SUB TITLE C.
Remote control Inserting Batteries 1 two "AA" batteries (supplied), 3 2 Install paying attention to the polarity Open the battery compartment cover in the direction of the arrow. Replace the compartment cover. diagram in the battery compartment. Battery precautions The precautions below should be followed when using batteries in this device: 1. Use only the size and type of batteries specified. 2.
Basic connections If you are using an antenna system, follow these instructions. If you are a cable (CATV) subscriber,skip ahead to page 14 for the proper connections. ANTENNA TO DVD/VCR CONNECTION The DVD/VCR must be connected "between" the antenna and the TV. First, disconnect the antenna from the TV and connect it to the DVD/VCR. Then connect the DVD/VCR to the TV. Below are 3 common methods of connecting an antenna system to a DVD/VCR.
Basic connections DVD/VCR TO TV CONNECTION After you have connected the antenna to the DVD/VCR, you must connect the DVD/VCR to the TV. Below are 3 common methods of connecting your DVD/VCR to a TV. Find the type of TV you are using and follow the connection diagram. This DVD/VCR has a single 75 ohm output for connection to a TV. If your TV has separate VHF and UHF antenna inputs (numbers 2 and 3 below), use a splitter to connect the DVD/VCR to the TV for VHF and UHF reception.
CATV (CABLE TV) connections Many cable companies offer services permitting reception of extra channels including pay or subscription channels. This DVD/VCR has an extended tuning range and can be tuned to most cable channels without using a cable company supplied converter box, except for those channels which are intentionally scrambled. If you subscribe to a special channel which is scrambled, you must have a descrambler box for proper reception. 1 DVD/VCR TV IN (ANT.
CATV (CABLE TV) connections IMPORTANT: Make sure the TV/CATV menu option is set to the "CATV" mode. This DVD/VCR cannot receive scrambled programs since it does not contain a descrambler. In order to receive scrambled programs, your existing descrambler must be used. Descrambler boxes are available from cable companies. Consult your local cable company for more information concerning connection to their descrambler equipment. There are many ways to connect your DVD/VCR to a cable system.
Playback Connection The exact arrangement you use to interconnect various video and audio components to the DVD/VCR is dependent on the model and features of each component. Check the Owner's Manual provided with each component for the location of video and audio inputs and outputs. Connect to a TV with Audio/Video Output Use the supplied AUDIO/VIDEO Cord.
Playback Connection Connect to a Stereo Amplifier with Audio Output If your TV has a COMPONENT VIDEO IN jack, you can connect the DVD/VCR to the TV with a COMPONENT cable (not supplied) as shown below. COMPONENT VIDEO output jack can send higher-quality video signal to a TV than S-Video output.
Setting the Video Channel / Setting the language Setting the Video Channel When a TV is connected with the 75 ohm coaxial cable only. To view playback of a recorded tape, or to watch a program selected by the VCR's channel selector, the TV must be set to channel 3 or 4 (video channel). 1 Press POWER to turn on the DVD/VCR. Slide TV/VCR/DVD switch to VCR/DVD. Then press VCR to 2 select the VCR mode.
Tuner Setting This DVD/VCR is equipped with a channel memory feature which allows channels to skip up or down to the next channel set into memory, skipping over unwanted channels. Before selecting channels, they must be programmed into the DVD/VCR’s memory. In addition to normal VHF and UHF channels, this DVD/ VCR can receive up to 113 Cable TV channels. To use this DVD/VCR with an antenna, set the TV/CATV menu option to the TV mode. When shipped from the factory, this menu option is in the CATV mode.
To ADD/DELETE channels / Noise elimination To ADD/DELETE channels You can add the channels you want or delete the channels you do not want manually. TV VCR DVD POWER Preparation: • Turn ON the TV and set it to the video input mode. • Make sure TV/VCR/DVD switch has been slided to VCR/DVD. Then press VCR to select the VCR mode. (The VCR indicator will light.) the step 1 on page 19. 1 Repeat Then press or to select the “ADD/DELETE” option and press ENTER.
Auto clock setting The Auto Clock feature enables the automatic clock setting and updating, and also to set the Time Zone and Daylight Saving Time by receiving XDS (Extended Data Service) information carried on the channel signal. Preparation: • You must set the antenna connection before the AC cord plug is inserted into the AC outlet. • Make sure the AUTO CH MEMORY (on P.19) is done.
Auto clock setting Daylight saving time setting You can set the Daylight saving time automatically or manually. TV VCR DVD POWER Preparation: • Turn ON the TV. • When a TV is connected with an audio/video cable, select the video input mode on the TV. • When a TV is connected only with an antenna cable, set to the video channel 3 or 4. Then select VCR position with TV/VCR. • Make sure TV/VCR/DVD switch has been slided to VCR/DVD. Then press VCR to select the VCR mode. (The VCR indicator will light.
Manual clock setting You must set the date and time manually for timer recordings and Daylight Saving Time if the Auto Clock process did not set them correctly. TV VCR POWER DVD Preparation: • Turn ON the TV and set to the video input mode. • Make sure TV/VCR/DVD switch has been slided to VCR/DVD. Then press VCR to select the VCR mode. (The VCR indicator will light.) EXAMPLE: Setting the clock to "8:30 AM" October, 26 (SAT), 2002. 1 Press SETUP MENU. The VCR menu screen will appear.
Loading and Unloading a Cassette Tape Use only video cassette tapes marked and . • Cassettes marked “VHS” (or “S-VHS”) can be used with this video cassette recorder. However, S-VHS recording is not possible with this model. • This model is equipped with SQPB (S-VHS QUASI PLAYBACK) that makes it possible to play back S-VHS recordings with regular VHS resolution. • HQ VHS is compatible with existing VHS equipment. Loading Push the center of the tape until it is automatically inserted.
Cassette tape Playback Preparation: • Turn ON the TV and set to the video input mode. • Make sure TV/VCR/DVD switch has been slided to VCR/DVD. Then press VCR to select the VCR mode. (The VCR indicator will light.) TV VCR DVD POWER a prerecorded tape 1 Load (When loading a cassette tape without the erase prevention tab, playback will start automatically). start playback 2 To Press PLAY. DVD MENU MARKER RETURN OPEN/ CLOSE DISPLAY A.TRK C.
Special playback Picture Search Repeat playback Reverse picture search function Press REW x 1 or x 2 during the playback. The entire video tape will be played until its end.The tape will then automatically rewind to the beginning and the playback will be repeated. Forward picture search function Press FF x 1 or x 2 during the playback. Press SETUP MENU. Press 1 AUTO REPEAT. or to select To return to playback: Press PLAY. Then press ENTER to 2 select [ON] or [OFF].
ZERO RETURN function / Video Index Search system ZERO RETURN function This function makes tape-rewinding stop at the counter 00:00:00 position automatically. DVD MENU MARKER RETURN OPEN/ CLOSE DISPLAY A.TRK C.RESET ZERO RETURN SUB TITLE ANGLE SEARCH MODE ZOOM TITLE REPEAT A-B SP/EP PLAY MODE Preparation: • Turn ON the TV and set it to the video input mode. • Make sure TV/VCR/DVD switch has been slided to VCR/DVD. Then press VCR to select the VCR mode. (The VCR indicator will light.) OSD.
Recording a TV program Recording and viewing the same TV program TV VCR DVD POWER Preparation: • Turn ON the TV and set it to the video input mode. • Make sure TV/VCR/DVD switch has been slided to VCR/DVD. Then press VCR to select the VCR mode. (The VCR indicator will light.) a cassette tape with the erase 1 Load prevention tab intact. The VCR will automatically turn on. DVD MENU DISPLAY MARKER RETURN OPEN/ CLOSE A.TRK C.
Recording a TV program To stop recording Press STOP to stop recording. " " will appear on screen for about 4 seconds. TV VCR DVD POWER To stop recording temporarily Press PAUSE to avoid recording unwanted material. Press again to continue the recording. " " will appear on screen for about 4 seconds. DVD MENU DISPLAY MARKER RETURN OPEN/ CLOSE A.TRK C.
Instant Timer Recording (ITR) The Instant Timer Recording feature provides a simple and convenient way to make a timed recording. Preparation: • Turn ON the TV and set it to the video input mode. • Make sure TV/VCR/DVD switch has been slided to VCR/DVD. Then press VCR to select the VCR mode. (The VCR indicator will light.) Example: Instant Timer Recording for 30 minutes. TV VCR DVD POWER a cassette tape with the erase 1 Load prevention tab intact. The VCR will automatically turn on.
Timer Recording Timer recording can be programmed on-screen with the remote control. The built-in timer allows automatic unattended recording of up to 8 programs within 1 month. DVD MENU MARKER RETURN OPEN/ CLOSE DISPLAY A.TRK C.RESET ZERO RETURN SUB TITLE ANGLE SEARCH MODE ZOOM TITLE REPEAT A-B SP/EP PLAY MODE TV POWER Preparation: • Make sure TV/VCR/DVD switch has been slided to VCR/DVD. Then press VCR to select the VCR mode. • Load a cassette tape with the erase prevention tab intact.
Timer-Recording Timer Recording Special case Weekly (e.g. WKL-TU: each Tuesday) or daily (e.g. MO-SA: Monday to Saturday) Timer recording Follow the procedure of timer recording on the previous page. At picture 3 press SET + or – repeatedly until the desired setting appears. Then press ENTER. When you press SET – repeatedly, the indicator at DATE will change as follows, in this case the today is Friday.
Stereo Recording and Playback / Separate Audio Program (SAP) Stereo Recording and Playback The VHS Hi-Fi audio system permits high fidelity recording of MTS STEREO TV broadcasts. TV VCR DVD POWER When a MTS STEREO broadcast is received, the word STEREO will appear on the screen and the program can be viewed or recorded in stereo. The Hi-Fi STEREO recording procedure is the same as for normal recordings.
Duplicating a video tape/Duplicating a disc material onto a video tape Duplicating a video tape If you connect the VCR to another VCR or camcorder, you can duplicate a previously recorded tape. Make all connections before turning on the power. a blank cassette tape with the erase prevenREC on the recording VCR or on the Remote. 1 Load 4 Press tion tab intact into the recording VCR. While holding REC, press PLAY. Load a previously recorded tape into the playback VCR or CAMCORDER. Then press PAUSE.
Disc This unit applies to DVD discs from Region 1 only. The loaded Disc (DVD, Video-CD, Audio-CD and MP3-CD) will be recognized automatically. The suitable Disc-formats are: DVD, CD-R and CD-RW. Do not play DVD-ROM, DVD-Audio, CDV, CD-G or Photo CD to prevent accidental erasure of prerecorded material. Some DVDs are played back with a Copy guard system. In case of a dubbing on video tape, strong disturbance may occur. This is not a defect of this DVD/VCR.
Setting setup language The setup language can be selected. TV VCR DVD POWER Preparation: • Turn ON the TV and set it to the video input mode. • Make sure TV/VCR/DVD switch has been slided to VCR/DVD. • When using an amplifier, switch on the amplifier. DVD to select the DVD 1 Press mode. (The DVD indicator will light) “No Disc” will appear on the screen. (If a DVD disc has already loaded, the playback will start automatically.) DVD MENU DISPLAY MARKER RETURN OPEN/ CLOSE A.TRK C.
Playback procedure TV VCR DVD POWER Preparation: • Turn ON the TV and set it to the video input mode. • Make sure TV/VCR/DVD switch has been slided to VCR/DVD. Then press DVD to select the DVD mode. (The DVD indicator will light.) Press OPEN/CLOSE. 1 The disc tray will open. DVD MENU DISPLAY MARKER RETURN OPEN/ CLOSE A.TRK C.
Special playback Note: There may be a slight delay between pressing the button and the function activation. Fast Forward Playback Press FF during normal playback. Each press of FF will increase the speed of the search (x4), (x8), (x20). (x2), • To resume normal playback, press PLAY. TV VCR DVD POWER Review Playback Press REW during normal playback. Each press of REW will increase the speed of the search (x4), (x8), (x20). (x2), • To resume normal playback, press PLAY.
Zooming / Locating Desired Scene Preparation: • Turn ON the TV and set it to the video input mode. • Make sure TV/VCR/DVD switch has been slided to VCR/DVD. Then press DVD to select the DVD mode. (The DVD indicator will light.) Zooming TV VCR DVD POWER This unit will allow you to zoom in on the frame image. You can then make selections by switching the position of the frame. ZOOM during playback. 1 Press The center part of the image will DVD MENU MARKER RETURN OPEN/ CLOSE DISPLAY A.TRK C.
Repeat playback Preparation: • Turn ON the TV and set it to the video input mode. • Make sure TV/VCR/DVD switch has been slided to VCR/DVD. Then press DVD to select the DVD mode. (The DVD indicator will light.) Title, Chapter, Track Playback TV VCR DVD POWER 1 Press PLAY MODE during playback or stop mode. DVD CD Repeat : Off /Enter/Play Mode DVD MENU MARKER RETURN OPEN/ CLOSE DISPLAY A.TRK C.
Program playback/Random playback (CD) Preparation: • Turn ON the TV and set it to the video input mode. • Make sure TV/VCR/DVD switch has been slided to VCR/DVD. Then press DVD to select the DVD mode. (The DVD indicator will light.) TV VCR POWER DVD Program playback You can arrange the order of tracks on the disc. Press PLAY MODE in the stop 1 mode. DVD MENU MARKER RETURN OPEN/ CLOSE DISPLAY A.TRK C.
MP3 Playback This player can play back the MP3-data which has been recorded on CD-R or CDRW. To produce the MP3-data, you need a Windows-PC with CD-ROM drive and a MP3encoding Software (not supplied). The Apple-HFS-System can not be played. MP3 CD Information Limitations on MP3 CD playback • MP3 CD is the disc that is standardized by ISO9660, its file name must include 3-digits extension letters, “mp3”. • The directory and file names of the MP3 CD must be correspond to the ISO standardized files.
Marking Desired Scenes The unit stores the points that you want to watch again up to 3 points. You can resume playback from each scene. Preparation: • Turn ON the TV and set it to the video input mode. • Make sure TV/VCR/DVD switch has been slided to VCR/DVD. Then press DVD to select the DVD mode. (The DVD indicator will light.) Marking the Scenes TV VCR DVD POWER DVD MENU MARKER RETURN OPEN/ CLOSE DISPLAY A.TRK C.
Changing soundtrack language / Subtitles DVD MENU DISPLAY MARKER RETURN OPEN/ CLOSE A.TRK C.RESET ZERO RETURN SUB TITLE ANGLE SEARCH MODE ZOOM TITLE REPEAT A-B SP/EP PLAY MODE Preparation: • Turn ON the TV and set it to the video input mode. • Make sure TV/VCR/DVD switch has been slided to VCR/DVD. Then press DVD to select the DVD mode. (The DVD indicator will light.) Changing soundtrack language You can select the language when you play a multilingual disc. TV POWER INPUT A.
Changing angles / Title selection / DVD menu Preparation: • Turn ON the TV and set it to the video input mode. • Make sure TV/VCR/DVD switch has been slided to VCR/DVD. Then press DVD to select the DVD mode. (The DVD indicator will light.) TV VCR DVD POWER Changing Angles When playing back a disc recorded with multi-angle facility, you can change the angle that you are viewing the scene from. ANGLE during playback. 1 Press The current angle will appear.
Parental control Some discs are specified not suitable for children. Such discs can be prevented from play back with the unit. Preparation: • Turn ON the TV and set to the video input mode. • Make sure TV/VCR/DVD switch has been slided to VCR/DVD. Then press DVD to select the DVD mode. (The DVD indicator will light.) Parental control setting TV VCR DVD POWER SETUP MENU in the stop mode. 1 Press Press or to select “Parental”. Then press ENTER.
Temporary disabling of rating level by DVD disc Depending on the DVD disc, the disc may try to temporarily cancel the rating level that you have set. It is up to you to decide whether to cancel the rating level or not. TV VCR DVD POWER Preparation: • Turn ON the TV and set to the video input mode. • Make sure TV/VCR/DVD switch has been slided to VCR/DVD. Then press DVD to select the DVD mode. (The DVD indicator will light.) a DVD disc and press PLAY 1 Load or OPEN/CLOSE (see page 37).
Setting menu language You can select the language of the disc menu messages of DVDs. TV VCR DVD POWER Preparation: • Turn ON the TV and set to the video input mode. • Make sure TV/VCR/DVD switch has been slided to VCR/DVD. Then press DVD to select the DVD mode. (The DVD indicator will light.) SETUP MENU in the stop 1 Press mode. Press or “Language”. Language Picture Sound Parental Other to select /Enter/Setup/Return DVD MENU MARKER RETURN OPEN/ CLOSE DISPLAY A.TRK C.
Setting subtitle language The same subtitle language can always be selected even if you replace the disc or turn the power off. TV VCR DVD POWER Preparation: • Turn ON the TV and set to the video input mode. • Make sure TV/VCR/DVD switch has been slided to VCR/DVD. Then press DVD to select the DVD mode. (The DVD indicator will light.) SETUP MENU in the stop 1 Press mode.
Setting audio soundtrack language / Setting surround sound Setting audio soundtrack language The same audio soundtrack language can always be selected by your unit even if you replace the disc or turn the power off. Preparation: • Turn ON the TV and set to the video input mode. • Make sure TV/VCR/DVD switch has been slided to VCR/DVD. Then press DVD to select the DVD mode. (The DVD indicator will light.) SETUP MENU in the stop 1 Press mode.
Setting the aspect ratio of TV screen You can select the aspect ratio for your TV. TV VCR DVD POWER Preparation: • Turn ON the TV and set to the video input mode. • Make sure TV/VCR/DVD switch has been slided to VCR/DVD. Then press DVD to select the DVD mode. (The DVD indicator will light.) SETUP MENU in the stop 1 Press mode. Press or Language Picture Sound Parental Other to select “Picture”. /Enter/Setup/Return DVD MENU MARKER RETURN OPEN/ CLOSE DISPLAY A.TRK C.
Setting on Screen display / Status display of Disc On screen display can be switched on or off when you press the buttons. TV VCR DVD POWER Preparation: • Turn ON the TV and set to the video input mode. • Make sure TV/VCR/DVD switch has been slided to VCR/DVD. Then press DVD to select the DVD mode. (The DVD indicator will light.) SETUP MENU in the stop 1 Press mode. Press or Language Picture Sound Parental Other to select “Picture” /Enter/Setup/Return ENTER, then press 2 Press to select “Display”.
Dynamic Range Control DRC (Dynamic Range Control) enables you to control the dynamic range so as to achieve a suitable sound for your equipment. TV VCR DVD POWER Preparation: • Turn ON the TV and set to the video input mode. • Make sure TV/VCR/DVD switch has been slided to VCR/DVD. Then press DVD to select the DVD mode. (The DVD indicator will light.) Press SETUP MENU in the stop mode. 1 Press or to select “Sound”.
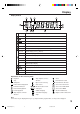
Language Code List Enter the appropriate code number for the initial settings "Audio", "Subtitle" and/or "Menu" (see pages 4850).
Problems and troubleshooting Use the following check list for troubleshooting when you have problems with your unit. Consult your local dealer or service outlet if problems persist. Be sure all connections are properly made when using with other units. SYMPTOMS POSSIBLE SOLUTIONS PAGE DVD/VCR DVD/VCR does not operate. • Make sure the power cord is plugged in. • Try another AC outlet. • Power is off, check fuse or circuit breaker. • Unplug unit, then plug it back in.
Problems and troubleshooting / Video head cleaning SYMPTOMS POSSIBLE SOLUTIONS PAGE Stopping playback, search, slowmotion play, repeat play, or program • Some discs may not do some of the functions. play, etc. cannot be performed. – No 4:3 (16:9) picture • The setup does not match your TV. 51 No on-screen display • Select Display On. 52 No surround sound • The setup does not match your stereo system. 17 The unit or remote operation key is not functioning.
Specifications GENERAL Power supply: Power consumption: 110-220V, 50/60 Hz Operation: 22W Stand by: 4W 9.9lbs (4.
MEMO ................................................................................................................ ................................................................................................................ ................................................................................................................ ................................................................................................................ .......................................................
................................................................................................................ ................................................................................................................ ................................................................................................................ ................................................................................................................ ............................................................
VICTOR COMPANY OF JAPAN, LIMITED J2B00501A U 02/07 Printed in Thailand (HR-XVC1UJ/M) 60 2B00501AE(52-60) 60 1/7/2002, 10:13