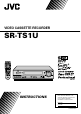
VIDEO CASSETTE RECORDER SR-TS1U CABLE/ DBS TV MBR SET A/B POWER TV/VCR ENTER/OSD DISPLAY 1 2 3 2 4 5 6 DBS DAILY(M-F) WEEKLY 7 8 9 C.
EN Dear Customer, Thank you for purchasing the JVC VHS video cassette recorder. Before use, please read the safety information and precautions contained in the following pages to ensure safe use of your new VCR. CAUTIONS CAUTION RISK OF ELECTRIC SHOCK DO NOT OPEN CAUTION: TO REDUCE THE RISK OF ELECTRIC SHOCK. DO NOT REMOVE COVER (OR BACK). NO USER-SERVICEABLE PARTS INSIDE. REFER SERVICING TO QUALIFIED SERVICE PERSONNEL.
EN IMPORTANT PRODUCT SAFETY INSTRUCTIONS Electrical energy can perform many useful functions. But improper use can result in potential electrical shock or fire hazards. This product has been engineered and manufactured to assure your personal safety. In order not to defeat the built-in safeguards, observe the following basic rules for its installation, use and servicing. ATTENTION: 3 5. Ventilation Slots and openings in the cabinet are provided for ventilation.
EN USE SERVICING 1. Accessories 1. Servicing To avoid personal injury: • Do not place this product on an unstable cart, stand, tripod, bracket, or table. It may fall, causing serious injury to a child or adult, and serious damage to the product. • Use only with a cart, stand, tripod, bracket, or table recommended by the manufacturer or sold with the product. • Use a mounting accessory recommended by the manufacturer and follow the manufacturer’s instructions for any mounting of the product.
CONTENTS I NSTALLING YOUR NEW VCR EN 6 Connections ........................................... 6 Basic Connections .....................................................6 S-Video Connection ................................................... 7 I NITIAL SETTINGS 8 Plug & Play .................................................. 8 Clock .......................................................... 10 Preparation ..............................................................10 Semi-Auto .....................
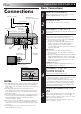
EN INSTALLING YOUR NEW VCR Basic Connections Connections Antenna or Cable ANTENNA IN (Antenna or Cable input) Coaxial Cable 2 Flat Feeder AC Outlet AC Power Cord Matching Transformer (Not supplied) CABLE BOX IN 1 3 OUT ANTENNA IN R S VIDEO IN OUT AUDIO VHF/UHF L TV (MONO) OUT CH3 VIDEO REMOTE CH4 Back of VCR AUDIO OUT VIDEO OUT TV OUT Audio/Video Cable (supplied) TV RF Cable (supplied) 75 ohm terminal Back of VCR CH3 TE CH4 4 NOTES: ● The VCR channel is the channel on
EN Antenna or Cable Connect the power plug to an AC outlet before installing the lithium battery.
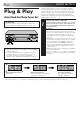
EN INITIAL SETTINGS Plug & Play Auto Clock Set/Auto Tuner Set The Plug & Play function sets the clock and tuner channels automatically when power is first connected to the VCR. The antenna cable must be connected for the Plug & Play function. The time and date can be set automatically from clock setting data that is transmitted by one of the regular TV broadcast channels. We call this TV channel the “Host Channel” and it is a PBS channel in your area.
EN INFORMATION ● If "AUTO CLOCK" is set to "ON" at the Clock Set screen on page 11, the clock will be adjusted automatically by the host channel every hour on the hour (except for 11:00 PM, midnight, 1:00 AM and 2:00 AM) by the incoming PBS channel clock setting data. (This automatic clock adjustment can only be performed when the VCR’s power is turned off. The clock will be adjusted on the hour based on the time displayed on the VCR, not on the actual real time.
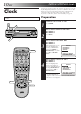
EN INITIAL SETTINGS (cont.) Perform clock setting only if the clock has not been set correctly by the Plug & Play function or you use a cable box. Access the Clock Set screen to perform the Semi-Auto or Manual clock setting procedure. Each procedure starts from step 5. If you use a cable box, set the clock manually. (墌 pg. 12) Clock Preparation 1 M EN U POWER Turn on the TV and select the VCR channel 3 or 4 (or AV mode).
EN 11 MENU Semi-Auto You can change the Host Channel/D.S.T. /Time Zone setting manually. OK JOG 5 CH SHATTLE SET AUTO CLOCK TO ON At the Clock Set screen, CLOCK SET press OK or SHUTTLE TIME DATE YEAR PLUS # repeatedly to 1:00PM 12/24 99 FRI move the highlight bar to AUTO CLOCK : ON "AUTO CLOCK" and press HOST CH : AUTO (CATV) D.S.T. : AUTO CH 5∞ or SHUTTLE PLUS TIME ZONE : AUTO %fi to set to "ON".
EN 8 INITIAL SETTINGS (cont.) SELECT TIME ZONE You can select the time zone automatically or manually. Move the highlight bar to "TIME ZONE" by pressing OK or SHUTTLE PLUS #, then press CH 5∞ or SHUTTLE PLUS %fi to select "AUTO" or the desired time zone. AUTO HAWAII ALASKA PACIFIC Manual 5 ATLANTIC EASTERN CENTRAL MOUNTAIN 9 RETURN TO NORMAL SCREEN Press MENU. IMPORTANT Turn the VCR off after performing the Semi-Auto Clock Set procedure.
EN Set Receivable Channels Tuner 1 Turn on the TV and select the VCR channel 3 or 4 (or AV mode). M EN U POWER 13 OK JOG CH SHATTLE 2 3 TURN ON THE VCR Press POWER. ACCESS MAIN MENU SCREEN Press MENU. ACCESS TUNER SET SCREEN Move the highlight bar (arrow) to "TUNER SET" by pressing CH5∞ or SHUTTLE PLUS %fi, then press OK or SHUTTLE PLUS #.
EN INITIAL SETTINGS (cont.) MENU Add Or Delete A Channel OK JOG CH SHATTLE 1 2 3 1 2 3 4 5 6 7 8 9 2 NUMBER 0 4 4 1 3 MENU OK SHUTTLE PLUS 5 ACCESS MAIN MENU SCREEN Press MENU. ACCESS TUNER SET SCREEN Move the highlight bar (arrow) to "TUNER SET" by pressing CH5∞ or SHUTTLE PLUS %fi, then press OK or SHUTTLE PLUS #. ACCESS MANUAL CHANNEL SET SCREEN Move the highlight bar (arrow) to "MANUAL CHANNEL SET" by pressing CH5∞ or SHUTTLE PLUS %fi, then press OK or SHUTTLE PLUS #.
EN This procedure is required if you receive your TV channels through a cable box (descrambler). The Controller allows the VCR to automatically switch the cable box channel during timer-recording. The Controller is effective for recording shows that have been programmed using VCR Plus+ (墌 pg. 43) or Express Timer Programming (墌 pg. 47). Cable Box Control Suggested Location Place the cable box on top of the VCR.
EN INITIAL SETTINGS (cont.) Set Cable Box Output Channel & Cable Box Brand M EN U POWER Turn on the TV and select the VCR channel 3 or 4 (or AV mode). OK JOG CH SHATTLE 1 2 POWER 1 2 3 4 5 6 7 8 9 2 0 3 4 5 4 TURN ON CABLE BOX Select a channel other than channel 9 on your cable box. TURN ON THE VCR Press POWER. ACCESS MAIN MENU SCREEN Press MENU.
M EN U EN OK JOG CH SHATTLE 1 2 3 2 NUMBER 4 5 6 7 8 9 0 1 Press OK. ENTER CABLE BOX BRAND Press the appropriate NUMBER keys to enter the Cable Box Code from the CABLE BOX BRAND LIST shown below, then press OK.
EN INITIAL SETTINGS (cont.) DBS Receiver Control Suggested Location Place the DBS (Direct Broadcast Satellite) receiver on top of the VCR. Attach the VCR's Controller to the top of the VCR with the Controller’s transmitter pointed towards the DBS receiver's remote sensor. ATTENTION: The Controller can also control a cable box. If both a DBS receiver and a cable box are used, position the controller so its signal reaches the remote control sensors of both the DBS receiver and cable box.
EN Set DBS Receiver Output Channel & DBS Receiver Brand M EN U POWER Turn on the TV and select the VCR channel 3 or 4 (or AV mode). OK JOG CH SHATTLE POWER 1 2 3 4 5 6 7 8 9 2 0 1 2 3 4 4 5 1 19 TURN ON DBS RECEIVER Select a channel other than channel 55, 100 or 205 on your DBS receiver. TURN ON THE VCR Press POWER. ● Set the VCR to the channel (3 or 4 or F-1 or L-1) on which the signals from the DBS receiver are received. ACCESS MAIN MENU SCREEN Press MENU.
EN OK SIMPLE PLAYBACK AND RECORDING JOG CH SHATTLE 7 8 ACCESS DBS RECEIVER BRAND SET SCREEN Press OK. SET DBS RECEIVER BRAND Press the appropriate NUMBER keys to enter the DBS Receiver Code from the following list, then press OK.
EN Simple Playback 1 PLAY JOG 3 4 5 6 7 8 9 SHUTTLE STOP/EJECT SHATTLE 2 Make sure the window side is up, the rear label side is facing you and the arrow on the front of the cassette is pointing towards the VCR. Don’t apply too much pressure when inserting. 2 3 4 FIND PROGRAM START POINT If the tape is advanced past the start point, press REW or turn the SHUTTLE ring to the left. To go forward, press FF or turn the SHUTTLE ring to the right. START PLAYBACK Press PLAY.
EN SIMPLE PLAYBACK AND RECORDING(cont.) Simple Recording 1 Turn on the TV and select the VCR channel 3 or 4 (or AV mode). PLAY 2 JOG SHATTLE PAUSE CH ST OP C EC CR /V TV EN TE R SP/EP RE /EJ 1 2 3 4 5 6 7 8 9 T 3 4 2 NUMBER 0 4 CH 5 PLAY PAUSE OK SELECT RECORDING CHANNEL Press CH5∞ (+/–). Or press the appropriate NUMBER keys, then press ENTER. (The channel changes after a few seconds whether you press ENTER or not.
PLAYBACK AND RECORDING FEATURES EN 23 Still Picture/Frame-ByFrame Playback Playback Features PAUSE DURING PLAYBACK G JO SHUTTLE 1 Press PAUSE. If there is vertical jitter, use the CH 5 (+) or ∞ (–) button to correct the picture. ACTIVATE FRAME-BYFRAME PLAYBACK 2 PLAY JOG SHATTLE Turn the JOG dial to the right for forward frame-byframe playback, or to the left for reverse frame-by-frame playback. OR PAUSE Press PAUSE repeatedly to advance one frame at a time.
EN PLAYBACK AND RECORDING FEATURES (cont.) Variable-Speed Search/ Reverse Motion Playback 1 ACTIVATE VARIABLE-SPEED SEARCH During playback or still, turn the SHUTTLE ring to the right for forward variable-speed search, or to the left for reverse variable-speed search. High-Speed Search 1 During playback or still, turn the SHUTTLE ring to the right for forward high-speed search, or to the left for reverse high-speed search. By releasing the SHUTTLE ring, still picture playback is selected.
EN 25 MENU Picture Control O K This feature helps you to adjust the playback picture quality according to your preference. *The default setting is "AUTO." JOG CH SHATTLE 1 ACCESS MAIN MENU SCREEN Press MENU. ACCESS FUNCTION SET 1 SCREEN MAIN MENU 2 1 2 3 4 5 6 7 8 9 2 0 3 4 1 3 MENU OK SHUTTLE PLUS Move the highlight bar (arrow) to "FUNCTION SET 1" by pressing CH5∞ or SHUTTLE PLUS%fi, then press OK or SHUTTLE PLUS #.
EN PLAYBACK AND RECORDING FEATURES (cont.) MENU Select The Soundtrack O K Your VCR can record two soundtracks simultaneously (Normal and Hi-Fi) and play back the selected one, or both together. Or, when viewing a pre-recorded tape that contains two separate Hi-Fi audio programs, you can choose to listen to either one by selecting either "Hi-Fi L" or "Hi-Fi R" in step 3. JOG SHATTLE CH 1 2 1 2 3 2 4 5 6 7 8 9 0 3 4 1 3 MENU ACCESS MAIN MENU SCREEN Press MENU.
EN 27 MENU Video Stabilizer O K By activating the Video Stabilizer you can correct vertical vibrations in the picture when playing back unstable EP recordings that were made on another VCR. When this function is set to "ON", vertical vibration will be automatically corrected. *The default setting is "OFF". JOG SHATTLE CH 1 1 2 2 3 3 2 4 5 6 7 8 9 0 4 1 3 MENU OK SHUTTLE PLUS 4 ACCESS MAIN MENU SCREEN Press MENU.
EN PLAYBACK AND RECORDING FEATURES (cont.) MENU Returning Position O K Returning position for Playback, Repeat Playback or Series Playback can be set to tape end or recording end. (This VCR considers a 20-second unrecorded portion as the recording end.) When the returning position is reached, playback stops and the cassette will be automatically rewound. JOG SHATTLE CH 1 2 REVIEW 1 2 3 ACCESS MAIN MENU SCREEN Press MENU.
1 JOG START REPEAT Press and hold PLAY for more than 5 seconds (until " " blinks on the front display panel) during playback, then release. SP SHATTLE PAUSE STOP SHUTTLE VCR 2 3 4 5 6 7 8 9 AY PL IS D 1 2 0 STOP REPEAT To stop, press STOP at any time. NOTE: Pressing PLAY, REW, FF, PAUSE or SHUTTLE PLUS ™ or £ also stops Repeat Playback. To prohibit operations during Repeat Playback (Mode Lock) Press and hold OK on the remote control for more than 5 seconds.
PLAYBACK AND RECORDING FEATURES (cont.) Superimpose This function, switchable between ON and OFF, determines whether or not operational indicators will appear on screen. You can set it to "ON" or "OFF" for playback and recording separately. When it is set to "OFF", no indications will appear on the screen. O K MENU 30 EN JOG SHATTLE CH 1 2 3 OSD 1 2 3 4 5 6 7 8 9 2 0 4 ACCESS MAIN MENU SCREEN Press MENU.
EN 31 Movie Advance AY PL SKIP SEARCH 1 3 MENU OK SHUTTLE PLUS ATTENTION Movie Advance and Movie Advance (Preview) work only on prerecorded cassettes that have been recorded in the SP mode, and have no safety tab. If the VCR detects the EP mode after you press OK in step 4, the following screen appears. This feature helps you locate certain parts of prerecorded movies (rented or purchased) and works in two ways. ● You can go to the beginning of the movie, skipping over all previews.
EN Series Playback To REMOTE SR-TS1U–1 To S VIDEO OUT To AUDIO/ VIDEO OUT S-Video Cable (Supplied) Audio/Video Cable (Supplied) Mini-plug cable (not supplied) To S VIDEO IN To AUDIO/VIDEO IN To REMOTE SR-TS1U–2 To S VIDEO OUT S-Video Cable (Supplied) To S-Video Input To AUDIO/VIDEO OUT Audio/Video Cable (Supplied) To Audio/Video Input NOTE: Series Playback is also possible using the front AUDIO/VIDEO connectors.
EN 33 To prohibit operations during Series Playback (Mode Lock) PLAY JOG STOP/EJECT CH SHATTLE Using two sets of SR-TS1U, you can play back two cassettes alternately as many times as you want. You can select the returning position for Series Playback (墌 pg. 28) Use the buttons and controls on the VCR‘s front panel for the Series Playback operations (except when using Mode Lock). 1 2 3 4 5 MAKE CONNECTIONS Connect two sets of SR-TS1U and a TV using AV cables as shown in the illustration on page 32.
EN Series Recording or Camcorder To S Video Output Another VCR To Audio/Video Output Audio/Video Cable (Not supplied) S-Video Cable (Not supplied) To S VIDEO IN To AUDIO/ VIDEO IN To REMOTE SR-TS1U–1 To AUDIO/ VIDEO OUT To S VIDEO OUT S-Video Cable (Supplied) To S VIDEO IN Audio/ Video Cable (Supplied) Mini-plug cable (not supplied) To AUDIO/ VIDEO IN To REMOTE SR-TS1U–2 To S VIDEO OUT To AUDIO/ VIDEO OUT To S Video Input S-Video Cable (Supplied) To Audio/Video Input Audio/Video Cabl
EN 5 JOG STOP/EJECT CH REC Use the buttons and controls on the VCR‘s front display panel for the Series Playback operations (except when using Mode Lock). 1 2 3 4 MAKE CONNECTIONS Connect two sets of SR-TS1U to other equipment, antenna or cable as shown in the illustration on page 34. ● The mini-plug cable is a mono 3.5 mm mini-plug to mono 3.5 mm mini-plug connector.
EN PLAYBACK AND RECORDING FEATURES (cont.) Active Video Calibration checks the condition of the tape during recording and playback, and compensates for poor reproduction to provide the best quality recording and playback pictures. *The default setting is "ON". Active Video Calibration Preparation 1 M EN U POWER Turn on the TV and select the VCR channel 3 or 4 (or AV mode). 2 OK JOG SHATTLE CH 3 TURN ON THE VCR Press POWER. ACCESS MAIN MENU SCREEN Press MENU.
EN PLAY Recording Perform steps 1 – 3 on page 22 ("Simple Recording") before continuing. JOG SHATTLE RE C PAUSE 1 2 3 4 5 6 7 8 9 PLAY PAUSE REC 3 Playback The VCR assesses the quality of the tape once you start playback. Perform steps 1 and 2 on page 21 ("Simple Playback") before continuing. START PLAYBACK Press PLAY. ● The VCR adjusts the playback picture quality based on the quality of the tape in use.
EN PLAYBACK AND RECORDING FEATURES (cont.) Display Elapsed Recording Time Recording Features 1 JOG 2 Before recording starts, press C.RESET. The counter resets to zero and displays the exact elapsed time as the tape runs. DISPLAY ELAPSED TIME ON SCREEN During recording, press OSD at any time to see the elapsed time. All indications corresponding to the current status of the VCR are displayed for 5 seconds. The counter display remains on the screen indicating the elapsed time.
Record Safety Usually, you can only record onto a cassette with its record safety tab intact. When the Record Safety mode is set to "OFF", recording can be done onto a cassette whose record safety tab is removed. * The default setting is "ON". O K MENU EN JOG CH SHATTLE 1 ACCESS MAIN MENU SCREEN Press MENU.
PLAYBACK AND RECORDING FEATURES (cont.) O K MENU 40 EN JOG 1 CH SHATTLE 2 3 1 3 MENU OK ACCESS MAIN MENU SCREEN Press MENU. ACCESS FUNCTION SET 1 SCREEN Move the highlight bar (arrow) to "FUNCTION SET 1" by pressing CH5∞ or SHUTTLE PLUS %fi, then press OK or SHUTTLE PLUS #. SELECT S-VHS MODE Move the highlight bar (arrow) to "S-VHS MODE" by pressing CH5∞ or SHUTTLE PLUS %fi, then press OK or SHUTTLE PLUS # to set to "ON" or "OFF".
EN 41 Super VHS ET S-VHS ET Your VCR is equipped with Super VHS ET that makes it possible to record with S-VHS picture quality on VHS cassettes. JOG SHATTLE 1 SELECT S-VHS ET SET MODE Press S-VHS ET. The button lights up. ● The "S-VHS" indicator lights on the front display panel. ● To disengage the S-VHS ET mode, press S-VHS ET. The button‘s light goes off. NOTES: ● You cannot activate the S-VHS ET function... ...while recording is in progress. ...while timer-recording (incl.
PLAYBACK AND RECORDING FEATURES (cont.) Stereo And SAP (Second Audio Program) O K MENU 42 EN JOG CH SHATTLE Your VCR’s built-in MTS decoder enables reception of Multichannel TV Sound broadcasts. When the channel is changed on the VCR ... ● The "STEREO" indication appears on the screen for about 5 seconds if the program is a stereo broadcast. ● The "SAP" indication appears on the screen for about 5 seconds if the program is a SAP broadcast.
TIMER RECORDING EN VCR Plus+ Timer Programming Turn on the TV and select the VCR channel 3 or 4 (or AV mode). Timer recording allows you to program the VCR to automatically record a program that will be broadcast at some future time. The timer record function can be programmed using VCR Plus+ or Express Timer programming up to 8 shows as far as a year in advance. (墌 pg.
EN TIMER RECORDING (cont.) 5 1 2 2 4 5 6 NUMBER "8" 7 8 9 0 CANCEL 4 E MB NU TIMER STOP+/– PROG. 1 P /E SP OK 3 6 7 8 ATTENTION If there is a conflict in the timer schedule and one program overlaps with another, only the parts shown below in gray will be recorded. Pattern 1: The program with the lower program number will be recorded.
EN 45 IMPORTANT VCR Plus+ Setup If you have moved to a different area or if a broadcasting station's channel number has been changed, the wrong VCR or CABLE CH number will be displayed on the VCR Plus+ program screen (墌 step 5 on page 44). When this happens, perform the following steps to set the correct the Guide Channel number for that station. Turn on the TV and select the VCR channel 3 or 4 (or AV mode).
TIMER RECORDING (cont.) 4 O K MENU 46 EN JOG SHATTLE ACCESS GUIDE CHANNEL SET SCREEN Press CH 5∞ or SHUTTLE PLUS %fi to move the highlight bar (arrow) to “GUIDE CHANNEL SET”, then press OK or SHUTTLE PLUS #.
EN 47 You can directly program the VCR’s timer to record up to 8 shows, as far as a year in advance. Remember, the clock must be set before you can program the timer (墌 pg. 8 or 10). Express Timer Programming 1 Turn on the TV and select the VCR channel 3 or 4 (or AV mode). 2 JOG SHATTLE 3 LOAD A CASSETTE Make sure the record safety tab is intact. If not, cover the hole with adhesive tape, then load it into the VCR. ● The VCR comes on, and the counter is reset, automatically.
EN TIMER RECORDING (cont.) 8 R BE M U N 2 3 4 5 6 7 8 9 0 PROG. NUMBER "9" 4 TIMER RETURN TO NORMAL SCREEN 9 ENGAGE TIMER MODE 10 Press TIMER. The VCR turns off automatically and "‰" is displayed on the display panel. To Timer-Record Weekly Or Daily Serials . . . . . . anytime during steps 3 through 9, press WEEKLY (NUMBER “9”) for weekly serials or DAILY (NUMBER “8”) for daily serials (Monday–Friday). Either "WEEKLY" or "DAILY" appears on the screen.
OK JOG 1 CH SHATTLE 2 DISENGAGE TIMER Press TIMER, then press POWER. ACCESS PROGRAM CHECK SCREEN Press PROG. CHECK. POWER 1 2 3 7 5 8 DATE+/– 4 STOP+/– 2 0 CANCEL 6 9 4 TIMER CH+/– START+/– 3 PR O G .C H EC K P /E SP 3 OK PR START STOP CH DATE 1 8:00P 10:00 12 12/24 2 10:00A 10:45 40 12/25 3 11:30P 1:00 125 12/25 4 5 6 7 8 PRESS (CHECK) TO NEXT ACCESS PROGRAM SCREEN Press PROG. CHECK again to check more information. Each time you press PROG.
EN TIMER RECORDING (cont.) Auto SP→EP Timer Auto Timer If, when recording in SP mode, there is not enough tape to record the entire program, the VCR automatically switches to EP mode to allow complete recording. This feature is especially handy when recording a program of more than 2 hours in length. When the Auto Timer is set to "ON" the timer is automatically engaged when the VCR's power is turned off. It is automatically disengaged when the VCR is powered back on. For Example . . .
EN This easy method lets you record from 30 minutes to 6 hours (selectable in 30-min. increments) and shuts the VCR off after recording is finished. Instant Timer Recording (ITR) 1 2 JOG REC SHATTLE SP VCR 51 3 START RECORDING Press REC on the front panel. ENGAGE ITR MODE Press REC again. " " blinks and "0:30" appears on the front display panel. SET RECORDING DURATION If you want to record for more than 30 minutes, press REC to extend the time. Each press extends recording time by 30 minutes.
EN TIMER RECORDING (cont.) Automatic Satellite Program Recording This facility allows you to automatically record a satellite program which is timer-programmed on your external satellite receiver.
EDITING EN 53 You can use your VCR as the player or the recorder. Edit To Or From Another 1 VCR Player AUDIO OUT Your VCR 2 S VIDEO OUT VIDEO OUT S-Video cable (supplied) Audio/Video cable (supplied) 3 MAKE CONNECTIONS Connect an AV cable between the player’s VIDEO OUT and AUDIO OUT connectors and the recorder’s VIDEO IN and AUDIO IN connectors.
EN EDITING (cont.) You can use a camcorder as the player and your VCR as the recorder. Edit From A Camcorder Recorder AUDIO IN 1 Your VCR JOG SHATTLE VIDEO IN 2 Audio/Video cable (supplied) AUDIO OUT 3 VIDEO OUT Camcorder O K MENU 4 JOG SHATTLE CH NUMBER "0" 5 4 1 3 MENU Connect an AV cable between the camcorder’s VIDEO OUT and AUDIO OUT connectors and your VCR’s VIDEO IN and AUDIO IN connectors.
O K MENU EN JOG 6 CH SHATTLE 1 2 SELECT REAR AUX INPUT SET MODE Move the highlight bar (arrow) to "REAR AUX INPUT" by pressing CH 5∞ or SHUTTLE PLUS %fi, then press OK or SHUTTLE PLUS # to set to "VIDEO" or "S-VIDEO".
EN SPECIAL FEATURES BR M TV Multi-Brand Remote Control T SE POWER TV The VCR's remote control can control several functions on JVC remote control TVs and on the brands of remote control TVs listed below. *The default setting is JVC code 01. TURN ON THE TV TV/VCR EN TE R 1 2 3 2 4 5 6 7 8 9 0 4 NUMBER 1 2 Turn the power on using the TV's remote control. SET TV BRAND CODE Refer to the chart in the left column.
EN BR M Cable Box Multi-Brand Remote Control T SE POWER CABLE/DBS EN TE R 1 57 2 3 2 4 5 6 7 8 9 0 NUMBER 4 The VCR's remote control can control functions on the brands of cable boxes listed below. Some cable box brands have more than one code. If your cable box does not function with a specified code, try other codes. 1 2 1 TURN ON THE CABLE BOX Turn the power on using the cable box’s remote control.
EN SPECIAL FEATURES (cont.) BR M DBS Receiver Multi-Brand Remote Control T SE The VCR's remote control can control functions on the brands of DBS (Direct Broadcast Satellite) receivers listed below. POWER CABLE/DBS 1 2 3 4 5 6 7 8 9 EN TE R 2 0 NUMBER 1 4 2 1 TURN ON THE DBS RECEIVER Turn the power on using the DBS receiver's remote control.
EN 59 A/B Control Two JVC VCRs POWER NUMBER "1" 1 2 3 4 5 6 7 8 9 NUMBER "2" The remote control is capable of controlling two JVC VCRs independently; one set to respond to your remote control's A code control signals and another set to respond to B code control signals. The remote control is preset to send A code signals because your VCR is initially set to respond to A code signals. You can easily modify your VCR to respond to B code signals.
EN TROUBLESHOOTING Before requesting service for a problem, use this chart and see if you can repair the trouble yourself. Small problems are often easily corrected, and this can save you the trouble of sending your VCR off for repair. POWER SYMPTOM POSSIBLE CAUSE CORRECTIVE ACTION 1. The power won’t come on. ● The power cord is disconnected. Connect the power cord. 2. The clock works, but the VCR’s power won’t come on. ● The TIMER mode is engaged with Auto Timer set to "OFF" (墌 pg. 50).
EN 61 TIMER RECORDING SYMPTOM 1. Timer recording won’t work. POSSIBLE CAUSE ● The clock and/or the timer have been set incorrectly. ● The timer is not engaged. ● The VCR has not been set up properly. CORRECTIVE ACTION Set the clock and/or timer correctly. Press TIMER and check to make sure that ‰ appears on the front display panel. Re-perform the set-up procedures. Make sure you have compensated for Guide Channel and VCR or cable box channel number mismatches ( 墌 pg. 45). 2.
EN TROUBLESHOOTING (cont.) OTHER PROBLEMS SYMPTOM POSSIBLE CAUSE 1. When scanning channels, some of them are skipped over. ● Those channels have been preset to be skipped. If you need the skipped channels, restore them (墌 pg. 14). CORRECTIVE ACTION 2. The channel can’t be changed. ● Recording is in progress. Press PAUSE to pause the recording, change channels, then press PLAY to resume recording. 3. The remote control won’t operate my TV or cable box or DBS receiver.
QUESTIONS AND ANSWERS EN 63 PLAYBACK RECORDING Q. What happens if the end of the tape is reached during playback or search? A. The tape is automatically rewound to the beginning. Q. When I pause and then resume a recording, the end of the recording before the pause is overlapped by the new recording. Why does this happen? A. This is normal. It reduces distortion at the pause and resume points. ○ ○ ○ ○ ○ ○ ○ ○ ○ ○ ○ ○ ○ ○ ○ ○ ○ ○ ○ ○ ○ ○ ○ ○ ○ ○ ○ ○ Q.
EN INDEX List Of Terms This guide serves as a quick way to locate frequently used terms and on-screen display names. A M A/B Code ....................................................................59 Active Video Calibration ............................................. 36 Add Channel ...............................................................14 Audio Monitor ............................................................26 Auto Channel Setting ..................................................
EN 65 FRONT VIEW 1 23 4 5 6 FF REW MENU 7 PLAY OK POWER JOG S-VHS ET VIDEO (MONO)L—AUDIO—R CH REC LINK PAUSE SP EP VCR SHATTLE REC SP/EP 8 9 0 ! 1 Power On/Off Button (墌 pg. 10) 2 MENU Button ( 墌 pg. 10) 3 OK Button ( 墌 pg. 10) 4 Cassette Loading Slot 5 PLAY Button ( 墌 pg. 21) 6 JOG Dial ( 墌 pg. 23) 7 SHUTTLE Ring (墌 pg. 21) 8 VIDEO/AUDIO Input Connectors (墌 pg. 53) 9 Channel [CH] 5∞ Button (墌 pg. 22) @ TV/VCR #$ % ^& * 0 REC LINK Button (墌 pg. 52) ! S-VHS ET Button (墌 pg.
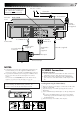
EN INDEX (cont.) REAR VIEW 1 2 3 4 IN CABLE BOX 5 6 OUT ANTENNA IN R S VIDEO IN AUDIO VHF/UHF OUT L (MONO) TV OUT CH3 VIDEO CH4 REMOTE 7 8 90 1 Power Cord (墌 pg. 6) 2 CABLE BOX Controller Connector (墌 pg. 15, 18) 3 VIDEO/AUDIO Input Connectors (墌 pg. 53) 4 VIDEO/AUDIO Output Connectors (墌 pg. 53) 5 Rethium Battery Compartment (墌 pg. 7) 6 ANTENNA IN Connector (墌 pg. 6) ! 7 S VIDEO Input Connector (墌 pg. 53) 8 S VIDEO Output Connector (墌 pg. 53) 9 REMOTE Connector (墌 pg.
EN REMOTE CONTROL 1 2 3 4 TV MBR SET A/B POWER TV/VCR ENTER/OSD DISPLAY 1 5 6 7 8 2 3 2 4 5 6 DBS DAILY(M-F) WEEKLY 9 7 8 C.
EN GENERAL Power requirement Power consumption Power on Power off Temperature Operating Storage Operating position Dimensions (W x H x D) SPECIFICATIONS : AC 120 V` , 60 Hz : 22 W : 3W : 5°C to 40°C (41°F to 104°F) : –20°C to 60°C (–4°F to140°F) : Horizontal only : 400 x 94 x 347 mm (15-3/4" x 3-3/4" x 13-11/16") : 4.2 kg (9.3 lbs) : S-VHS/VHS NTSC standard Weight Format Maximum recording time SP : 210 min. with ST-210 video cassette EP : 630 min.
MEMO EN 69
MEMO
MEMO
SR-TS1U VICTOR COMPANY OF JAPAN, LIMITED COPYRIGHT © 1999 VICTOR COMPANY OF JAPAN, LTD.