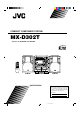
COMPACT COMPONENT SYSTEM MX-D302T Consists of CA-D302T and SP-D302. COMPACT DIGITAL AUDIO REPEAT DISC RANDOM DISC CONTINUE DISC 1 2 CLOCK TIMER 4 5 3 POWER 6 SLEEP – SELECT + 8 7 9 SHIFT FM MODE FM/AM SET 10 10 DISC PLAY MODE AUX DISC 7/CLEAR £/8 CD DISC A B DECK REC PAUSE VOLUME SOUND ACTIVE MODE BASS EX. RM-SE40TU REMOTE CONTROL SP-D302 CA-D302T INSTRUCTIONS SP-D302 For Customer Use: Enter below the Model No. and Serial No.
Warnings, Cautions and Others CAUTION RISK OF ELECTRIC SHOCK DO NOT OPEN TO REDUCE THE RISK OF ELECTRIC SHOCK. DO NOT REMOVE COVER (OR BACK) NO USER SERVICEABLE PARTS INSIDE. REFER SERVICING TO QUALIFIED SERVICE PERSONNEL. Caution –– POWER switch! Disconnect the mains plug to shut the power off completely. The POWER switch in any position does not disconnect the mains line. The power can be remote controlled.
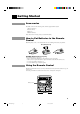
Thank you for purchasing the JVC Compact Component System. We hope it will be a valued addition to your home, giving you years of enjoyment. Be sure to read this instruction manual carefully before operating your new stereo system. Here you will find all the information you need to set up and use the system. For questions that are not be answered in the manual, please contact your dealer. Features Here are some of the things that make your System powerful and easy to use.
Table of Contents Features ...................................................................... 1 How This Manual Is Organized ................................. 1 IMPORTANT CAUTIONS ....................................... 1 Getting Started ................................................ 3 Accessories ................................................................ 3 How to Put Batteries in the Remote Control ............. 3 Using the Remote Control .........................................
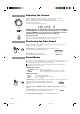
Getting Started Accessories Check that you have all of the following items, which are supplied with the System. AM Loop Antenna (1) Remote Control (1) Batteries (2) FM Wire Antenna (1) If any of these items is missing, contact your dealer immediately. How to Put Batteries in the Remote Control Match the polarity (+ and –) on the batteries with the + and – markings in the battery compartment. R6P (SUM-3)/AA (15F) CAUTION: Handle batteries properly.
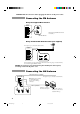
CAUTION: Make all connections before plugging the Unit into an AC power outlet. Connecting the FM Antenna Using the Supplied Wire Antenna Extend the supplied FM Wire Antenna horizontally. FM Wire Antenna Using an FM 75-Ohm Antenna Cable (not supplied) If reception is poor, connect the outside antenna. Outside FM Antenna Wire 2 1 3 Before attaching a 75-ohm coaxial lead (the kind with a round wire going to an outside antenna), disconnect the supplied FM Wire Antenna.
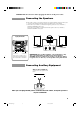
CAUTION: Make all connections before plugging the Unit into an AC power outlet. Connecting the Speakers For each speaker, connect one end of the speaker wire to the speaker terminals on the back of the System. 1. Open each of the terminals and insert the speaker wires firmly, then close the terminals. 2. Connect the red (+) and black (–) terminals of the right side speaker to the red (+) and black (–) terminals marked RIGHT on the System.
COMPU PLAY COMPU PLAY is JVC’s feature that lets you control the most frequently used functions of the System with a single touch. One Touch Operation starts playing a CD, turns on the radio, plays a tape, etc. with a single press of the play button for that function. What One Touch Operation does for you is to turn the power on, then start the function you have specified. If the Unit is not ready, such as no CD or tape in place, the Unit still powers on so you can insert a CD or tape.
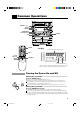
Common Operations REPEAT DISC RANDOM DISC CONTINUE DISC STANDBY indicator POWER PHONES SOUND MODE ACTIVE BASS EX. VOLUME AUX 1 2 CLOCK TIMER 4 5 3 POWER 6 SLEEP 9 SHIFT FM MODE FM/AM – SELECT + 8 7 POWER Display Source, Sound Mode Volume level etc. SET 10 10 DISC PLAY MODE AUX DISC 7/CLEAR £/8 CD DISC ACTIVE BASS EX. A kHz MHz B DECK REC PAUSE VOLUME SOUND MODE AUX A.BASS EX VOLUME –, + CONT. RANDOM ALL PRGM CLOCK SOUND ACTIVE MODE BASS EX. S.
Adjusting the Volume Turn the VOLUME control clockwise to increase the volume or anticlockwise to decrease it. Turning the VOLUME control quickly also adjusts the volume level quickly. When using the Remote Control, press the VOLUME + button to increase the volume or press the VOLUME – button to decrease it. You can adjust the volume level between 0 and 50. or VOLUME CAUTION: The Volume cannot be adjusted while the Unit is in STANDBY mode.
Listening to Auxiliary Equipment By playing the sound from auxiliary equipment through the System, you can gain control over how the music or program sounds. Once the connected equipment is playing through the System, you can apply the sound effects. o First make sure that the optional equipment is properly connected to the System. (See page 5). 1. Set the VOLUME control to 0. 2. Press the AUX button. When System is in Standby mode, the Unit is automatically turned on and “AUX” appears on the display.
Using the Tuner REPEAT DISC RANDOM DISC CONTINUE DISC MULTI CONTROL FM/AM When TUNER is selected as the source, the button lights up. Number keys 1 2 CLOCK TIMER 4 5 3 POWER 6 SLEEP – SELECT + 9 SHIFT FM MODE FM/AM DISC PLAY MODE AUX DISC 7/CLEAR £/8 8 7 SET 10 10 Display FM MODE Band display, Frequency display, Preset channel CD DISC A FM/AM B DECK REC PAUSE kHz MHz VOLUME SOUND ACTIVE MODE BASS EX. RM-SE40TU REMOTE CONTROL A.BASS EX CONT.
Three Ways to Select a Station —————————————— o o o Press the TUNING DOWN or TUNING UP on the MULTI CONTROL repeatedly to move from frequency to frequency until you find the one you want. (Manual Tuning). OR Press and hold the TUNING DOWN or TUNING UP on the MULTI CONTROL for a few seconds, the frequency starts changing on the display. When a station is tuned in, the frequency stops changing. (Auto Tuning). OR Possible only after presetting stations. Press once and release the P. DOWN or P.
Using the CD Player Number keys 1 2 CLOCK TIMER 4 5 3 POWER 6 SLEEP REPEAT RANDOM CONTINUE Disc Trays 0 REPEAT DISC RANDOM DISC buttons DISC – SELECT + 9 SHIFT FM MODE FM/AM 8 7 CONTINUE DISC SET 10 10 DISC PLAY MODE AUX DISC 7/CLEAR £/8 CD DISC A B MULTI CONTROL CD Player control buttons CD £/8 When CD is selected as the source, the button lights up. DECK REC PAUSE VOLUME SOUND ACTIVE MODE BASS EX.
The Quickest Way to Start a CD Is with the One Touch Operation ————————————————————————— o Press the CD £ /8 button (or the £/8 button on the Remote Control). For Normal Play (Play mode indicator is not lit): • If there is a CD in the disc tray for the selected disc number, the power is automatically turned on and the CD is played from the first track. • If there is no CD in the disc tray for the selected disc number, the power is automatically turned on and “NO DISC” appears on the display.
Basics of Using the CD Player — Normal Play or £/8 Playing a Disc ——————————————————————— 1. Prepare the discs. 2. Press the CD £/8 or DISC button (1-3) of the disc you want to play. When using the Remote Control, press the £/8 button or the DISC button (1 to 3). The first track of the selected disc will begin playing. The CD Player automatically stops when the playback finishes the last track of the CD.
Continuous Play This function plays the discs in the Unit continuously. 1. Prepare the discs. CONTINUE 2. Select Continuous mode. On the Unit Press the CONTINUE button. The playback automatically starts from the selected CD. • The CONT. indicator lights up. You can press the CONTINUE button while a CD is playing to switch to Continuous mode. On the Remote Control 1. Press the PLAY MODE button while the CD Player is stopped, to select “CONTINUE”. • The CONT. indicator lights up.
1 2 CLOCK TIMER 3 4 5 3. Press the number keys (1 to 10 and +10) to select the track to program. 6 • – SELECT + 7 8 9 Example: for track 5, press 5. For track 15, press +10 then 5. For track 20, press +10 then 10. A.BASS EX S.MODE PRGM SET 10 10 4. Repeat steps 1 to 3 to select the other tracks for the program. 5. Press the £/8 button. The Unit plays the tracks in the order you have programmed them.
Repeating a Selection or the Discs You can have all the discs, the program or the individual selection currently playing repeat as many times as you like. REPEAT Press the REPEAT button. Each time you press the button, the Repeat Modes changes as follows. = = ALL = No indication = (back to the beginning) : Repeats one track on a CD. ALL: For Normal Play, repeats all the tracks on the current CD. For Continuous Play or Random Play, repeats all the tracks on all the CDs in the CD Player.
Using the Cassette Deck (Listening to a Tape) REPEAT DISC RANDOM 1 2 CLOCK TIMER 4 5 3 POWER 6 SLEEP CONTINUE DISC – SELECT + 8 7 DISC 9 SHIFT FM MODE FM/AM SET 10 10 DISC PLAY MODE AUX DISC 7/CLEAR £/8 CD DISC A MULTI CONTROL TAPE ™ £ When TAPE is selected as the source, the button lights up. B Cassette Deck control buttons DECK REC PAUSE VOLUME SOUND ACTIVE MODE BASS EX.
3. Close the holder gently. When both Deck A and Deck B contain a tape, the last deck to have a tape inserted is selected. To change the selected deck, press the DECK A/B button. When using the Remote Control, press the A or B button. 4. Press the TAPE ™ £ button (or ™ or £ button on the Remote Control). On the Unit: The tape play starts toward the direction currently selected. On the Remote Control: The tape play starts toward the same direction as the button is pressed for.
Using the Cassette Deck (Recording) REPEAT 2 1 DISC POWER 3 RANDOM DISC CLOCK TIMER 4 5 CONTINUE 6 SLEEP 9 SHIFT FM MODE FM/AM – SELECT + 8 7 DISC SET 10 10 DISC PLAY MODE AUX DISC 7/CLEAR £/8 CD DISC A B DECK REC PAUSE REC PAUSE VOLUME SOUND ACTIVE MODE BASS EX. RM-SE40TU REMOTE CONTROL CD REC START REC START/STOP DUBBING Display kHz MHz A.BASS EX CONT. RANDOM ALL PRGM CLOCK S.
CAUTION: If recordings you have made have excessive noise or static, the Unit may be too close to a TV which was on during the recording. Either turn off the TV or increase the distance between the TV and the System. Standard Recording This is the basic method for recording any source. The System also has special ways for recording CD to tape, and tape to tape, which save you time and effort, as well as give you some special effects.
Recording AM Station to Tape ——————————————— When recording an AM broadcast, beats may be produced which are not heard when listening to the broadcast. In this case, press the CONTINUE button on the CD Player to eliminate the beats. 1. Set to AM station and start recording. CONTINUE 2. Press the CONTINUE button repeatedly until the beats are eliminated.
Using the Timer 2 TIMER 1 CLOCK 4 – SELECT 5 + 1 2 CLOCK TIMER 4 5 3 POWER 6 SLEEP – SELECT + 9 SHIFT FM MODE FM/AM DISC PLAY MODE AUX DISC 7/CLEAR £/8 8 7 8 SET SHIFT SET 10 10 Clock, timer-on time etc. CD DISC A Display kHz MHz B DECK REC PAUSE A.BASS EX VOLUME CONT. RANDOM ALL PRGM CLOCK SOUND ACTIVE MODE BASS EX. S.MODE REC SLEEP MONO ST RM-SE40TU REMOTE CONTROL Timer indicator When the System is being used, the display shows other items as well.
Setting the Timer o You can set the Timer whether the Unit is on or off. Procedure For Setting the Timer SHIFT 1. Press the SHIFT button. 2. Press the 2 TIMER button. 2 The Timer indicator on the display lights up and the blinking “TIMER ON” changes to the On-Time setting display. TIMER \ 4 3. Set the time you want the Unit to come on. 5 Press the SELECT 5 + or 4 – button to set the On-Time. – SELECT + 8 4. Press the 8 SET button.
8 8. Press the 8 SET button. The volume level blinks on the display. SET 4 5 9. Press the SELECT 5 + or 4 – button to set the volume level. – SELECT + 8 10. Press the 8 SET button. SET The display returns to the display before you set the timer. Before Turning the Unit Off • • Check that the selected source is ready. If you will be recording a source while you are out, set the volume to 0. To turn the Timer off, press the 2 TIMER button after pressing the SHIFT button.
Care And Maintenance Compact Discs Cassette Tapes Handle your compact discs, cassette tapes, and Cassette Deck carefully, and they will last a long time. • • • • • • • • Remove the CD from the case by holding it at the edges while pressing the centre hole lightly. Do not touch the shiny surface of the CD, or bend the CD. Put the CD back in its case after use to prevent warping. Be careful not to scratch the surface of the CD when placing it back in the case.
Troubleshooting • • If you are having a problem with your System, check this list for a possible solution before calling for service. If you cannot solve the problem from the hints given here, or the Unit has been physically damaged, call a qualified person, such as your dealer, for service. Symptom Possible Cause Action No sound is heard. Connections are incorrect, or loose. Check all connections and make corrections. (See pages 4 - 5.) Unable to record. Cassette record protect tabs are removed.
QUALITY SERVICE HOW TO LOCATE YOUR JVC SERVICE CENTER TOLL FREE : 1-800-537-5722 Dear customer: In order to receive the most satisfaction from your purchase, read the instruction booklet before operating the unit. In the event that repair is necessary, or for the address nearest your location, please refer to the factory service center list below or within the Continental United States, Call 1-800-537—5722 for your authorized servicer. Remember to retain you Bill of Sale for Warranty Service.
LIMITED WARRANTY AUDIO-1 JVC COMPANY OF AMERICA warrants this product and all parts thereof, except as set forth below ONLY TO THE ORIGINAL PURCHASER AT RETAIL to be FREE FROM DEFECTIVE MATERIAL AND WORKMANSHIP from the date of original retail purchase for the period as shown below. (“The Warranty Period.”) PARTS LABOR 1YR 1YR THIS LIMITED WARRANTY IS VALID ONLY IN THE FIFTY(50) UNITED STATES, THE DISTRICT OF COLUMBIA AND IN COMMONWEALTH OF PUERTO RICO.
Specifications Amplifier Section Output Power 55 watts per channel, min. RMS at 6 ohms at 1 kHz, with no more than 3% total harmonic distortion. Input Sensitivity/Impedance (1 kHz) AUX 300 mV/50 kohms Speaker terminals 6 - 16 ohms Cassette Deck Section Frequency Response Type II (CrO2) : 50 - 14,000 Hz Type I (NORMAL) : 50 - 14,000 Hz Wow And Flutter 0.