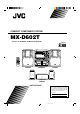
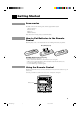
COMPACT COMPONENT SYSTEM MX-D602T Consists of CA-D602T, SP-D602 and SP-DS90. COMPACT DIGITAL AUDIO PROGRAM /RANDOM DISC REPEAT SHIFT CENTER LEVEL + – REAR LEVEL + DELAY TIME SOUND MODE L BALANCE R FM MODE S.A.
Warnings, Cautions and Others CAUTION RISK OF ELECTRIC SHOCK DO NOT OPEN TO REDUCE THE RISK OF ELECTRIC SHOCK. DO NOT REMOVE COVER (OR BACK) NO USER SERVICEABLE PARTS INSIDE. REFER SERVICING TO QUALIFIED SERVICE PERSONNEL. Caution –– POWER switch! Disconnect the mains plug to shut the power off completely. The POWER switch in any position does not disconnect the mains line. The power can be remote controlled.
Thank you for purchasing the JVC Compact Component System. We hope it will be a valued addition to your home, giving you years of enjoyment. Be sure to read this instruction manual carefully before operating your new stereo system. Here you will find all the information you need to set up and use the system. For questions that are not be answered in the manual, contact your dealer. Features Here are some of the things that make your System powerful and easy to use.
Table of Contents Features ...................................................................... 1 How This Manual Is Organized ................................. 1 IMPORTANT CAUTIONS ....................................... 1 Getting Started ................................................ 3 Accessories ................................................................ 3 How to Put Batteries in the Remote Control ............. 3 Using the Remote Control .........................................
Getting Started Accessories Check that you have all of the following items, which are supplied with the System. AM Loop Antenna (1) Remote Control (1) Batteries (2) FM Wire Antenna (1) If any of these items is missing, contact your dealer immediately. How to Put Batteries in the Remote Control Match the polarity (+ and –) on the batteries with the + and – markings in the battery compartment. R6P (SUM-3)/AA (15F) CAUTION: Handle batteries properly.
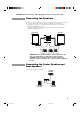
CAUTION: Make all connections before plugging the Unit into an AC power outlet. Connecting the FM Antenna Using the Supplied Wire Antenna Extend the supplied FM Wire Antenna horizontally. FM Wire Antenna Using an FM 75-Ohm Antenna Cable (not supplied) If reception is poor, connect the outside antenna. Outside FM Antenna Wire 2 1 3 Before attaching a 75-ohm coaxial lead (the kind with a round wire going to an outside antenna), disconnect the supplied FM Wire Antenna.
CAUTION: Make all connections before plugging the Unit into an AC power outlet. Connecting the Speakers For each speaker, connect one end of the speaker wire to the speaker terminals on the back of the System. 1. Open each of the terminals and insert the speaker wires firmly, then close the terminals. 2. Connect the red (+) and black (–) terminals of the right side speaker to the red (+) and black (–) terminals marked RIGHT on the System.
Connecting Auxiliary Equipment VCR or other equipment To listen to this source, press AUX. AUX RIGHT LEFT Now you can plug the AC power cord into the wall outlet, and your System is at your command! 6 EN/MX-D602T[J]/f 6 98.3.
COMPU PLAY COMPU PLAY is JVC’s feature that lets you control the most frequently used functions of the System with a single touch. One Touch Operation starts playing a CD, turns on the radio, plays a tape, etc. with a single press of the play button for that function. What One Touch Operation does for you is to turn the power on, then start the function you have specified. If the Unit is not ready, such as no CD or tape in place, the Unit still powers on so you can insert a CD or tape.
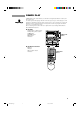
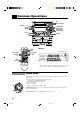
Common Operations PROGRAM /RANDOM SET DISC REPEAT MULTI CONTROL DISC EDIT DISC STANDBY indicator SOUND MODE POWER PHONES TIMER/CLOCK SEA CONTROL CANCEL/DEMO S.A. BASS VOLUME AUX FM PRO LOGIC REAR LEVEL –, + BALANCE L, R TEST TONE SHIFT – CENTER LEVEL + CENTER MODE SLEEP – REAR LEVEL + DELAY TIME SOUND MODE L BALANCE R FM MODE S.A.
Setting the Clock Before operating the unit, set the correct time. You can set the clock whether the Unit is on or off. 1 1. Press TIMER/CLOCK. The hour digits begin flashing. Flashing 2. Press 4 P. DOWN or ¢ P. UP on the MULTI CONTROL to set the hours. 2, 4 Press ¢ P. UP to increase the hour. Press 4 P. DOWN to decrease the hour. Holding down continuously changes the hour setting more rapidly. 3. Press SET. The minute digits begin flashing. 4. Press 4 P. DOWN or ¢ P.
CAUTION: The Volume cannot be adjusted while the Unit is on STANDBY. DO NOT turn on the Unit and/or start playing any source without setting the VOLUME control to 0; otherwise, the sudden blast of sound can damage your hearing, speakers and/or headphones. For private listening Connect a pair of headphones to the PHONES jack. No sound comes out of the speakers. Be sure to turn down the volume before connecting or putting on headphones.
Sound Modes The System has some preset sound effects that give you control of the way your music sounds, so you can tailor it for your room and for the quality of the source. We can give you some idea of how each one affects the music, but the only way to really tell is to try them yourself. You can also create up to three of your own customized S.E.A. (Sound Effect Amplifier) settings and store them in the Unit’s memory (MANUAL 1, MANUAL 2, MANUAL 3).
3. Use MULTI CONTROL to adjust to any Sound Mode desired. Press 4 P. DOWN or ¢ P. UP on the MULTI CONTROL to select the tone range you want to adjust. You can adjust “LOW”, “MID” or “HIGH” tone. Flashing Flashing Flashing Press 1 TUNING DOWN or TUNING UP ¡ on the MULTI CONTROL to adjust the level. The level can be adjusted between –3 and +3 in 7 steps. 4. Press SET. “MANUAL 1” appears on the display. 5. Press 4 P. DOWN or ¢ P. UP on the MULTI CONTROL to select the MANUAL number for the memory. 6.
Listening to Auxiliary Equipment By playing the sound from auxiliary equipment through the System, you can gain control over how the music or program sounds. Once the connected equipment is playing through the System, you can apply the sound effects. First make sure that the auxiliary equipment is properly connected to the System. (See page 6). 1. Turn down the volume level to 0. 2. Press AUX. “AUX” appears on the display. The AUX button on the Unit lights up.
Dolby Surround PROGRAM /RANDOM DISC REPEAT DISC EDIT DISC PRO LOGIC / 3CH LOGIC Operation keys PRO LOGIC POWER FM AM 3CH LOGIC TEST TONE SHIFT CENTER MODE SLEEP – CENTER LEVEL + – REAR LEVEL + DELAY TIME SOUND MODE L BALANCE R FM MODE S.A.
Preparing the Dolby Surround To use the Dolby Surround effects, you need to prepare the various settings. These settings are set using the Remote Control. The Dolby Surround settings are: Center Speaker Mode Center Speaker mode contains the following four settings. PHANTOM: Select this setting if you have not connected a center speaker. The left and right front speakers project the sound to give the effect of a center speaker.
Getting Ready To Use Dolby Pro Logic Speaker Arrangements for Dolby Pro Logic ———————— Layout when using the center speaker and rear speakers Front Speaker TV Center Speaker Rear Speaker Front Speaker Rear Speaker Layout when using the rear speakers Front Speaker TV Front Speaker Rear Speaker Rear Speaker Setting-up Dolby Pro Logic ———————————————— 1. Press PRO LOGIC/3CH LOGIC to select PRO LOGIC.
Getting Ready To Use Dolby 3 Channel Logic Speaker Arrangements for Dolby 3 Channel Logic ———— Front Speaker TV Center Speaker Front Speaker Setting-up Dolby 3ch Logic ———————————————— 1. Press PRO LOGIC/3CH LOGIC to select 3CH LOGIC. Each time you press the button, Dolby Surround programs change as follows: = PRO LOGIC = 3CH LOGIC = OFF = (back to the beginning) or SHIFT \ 3CH LOGIC When using the Remote Control, press SHIFT then press the 3CH LOGIC (2).
Using the Tuner PROGRAM /RANDOM DISC REPEAT DISC SET EDIT DISC MULTI CONTROL FM/AM When TUNER is selected as the source, the button lights up. FM AM PRO LOGIC FM AM 3CH LOGIC TEST TONE SHIFT CENTER MODE SLEEP POWER – CENTER LEVEL + – REAR LEVEL + DELAY TIME SOUND MODE L BALANCE R FM MODE S.A.
On the Remote Control To tune in FM stations, press FM. To tune in AM stations, press AM. AM FM or COMPU PLAY When FM or AM is pressed while the power is on standby, the power is automatically turned on. Three Ways to Select a Station —————————————— Press 1 TUNING DOWN or TUNING UP ¡ on the MULTI CONTROL repeatedly to move from frequency to frequency until you find the one you want. (Manual Tuning).
Using the CD Player PROGRAM/RANDOM REPEAT Disc Trays PRO LOGIC 3CH LOGIC 0 POWER AM FM TEST TONE SHIFT – CENTER LEVEL + CENTER MODE SLEEP – REAR LEVEL + DELAY TIME SOUND MODE PROGRAM /RANDOM DISC REPEAT Number keys DISC EDIT DISC buttons DISC L BALANCE R FM MODE S.A.BASS TAPE A TAPE B DIRECTION REPEAT DISC 1 DISC 2 DISC 3 CD CONTROL AUX SET CD Player control buttons TAPE CONTROL MULTI CONTROL REC PAUSE CD £/8 When CD is selected as the source, the button lights up.
Loading CDs 1. Press 0 on the CD Player you want to insert the disc onto. “OPEN” appears on the display and the disc tray slides out. COMPU PLAY When 0 is pressed while the power is on standby, the power is automatically turned on. 2. Place a CD, with its label side up, onto the tray. ATTENTION: To avoid malfunctions when you play a CD, set the CD in the right place at the center of the tray. CD Tray 3. Press 0 to close the tray. CORRECT INCORRECT “CLOSE” appears on the display. 4.
CD CONTROL On the Remote Control Press CD CONTROL then press 3. \ DISC 1 The source is set to CD and play starts from the first track of the currently selected CD whose disc number shown on the CD indicator. • If the above operation is carried out while the power is on standby, the power is automatically turned on. DISC 2 Press DISC (1 to 3) of the disc you want to play. DISC 3 The source is set to CD and play starts from the first track of the selected CD.
Programing the Playing Order of the Tracks You can change the order in which the discs and tracks play, and select only the discs and tracks you want from among those loaded in the CD Player. You can program up to 32 steps in any desired order from among the discs in the CD player. You can only make a program when the CD Player is stopped. On the Unit PROGRAM /RANDOM 1. Press PROGRAM/RANDOM. “PROGRAM” appears on the display and the PROGRAM indicator lights up.
3. Press the number keys (1 to 10 and +10) to select the tracks. PRO LOGIC 3CH LOGIC The indications on the display stop flashing and remains lit. The selected track numbers light up and the step number appears on the display. • Example: For track 5, press 5. For track 15, press +10 then 5. For track 20, press +10 then 10. For track 32, press +10 three times, then 2. TEST TONE – CENTER LEVEL + CENTER MODE – REAR LEVEL + DELAY TIME L BALANCE R 4.
Repeating a Track or the Discs You can have all the discs, the program or the individual track currently playing repeat as many times as you like. REPEAT Press REPEAT on the Unit. Each time you press the button, the Repeat Modes change as follows. = REPEAT ALL = REPEAT 1 = No indicator = (back to the beginning) REPEAT ALL: Repeats all the tracks on the CDs, or all the tracks in the program. REPEAT 1: Repeats one track on one CD.
Using the Cassette Deck (Playing) PROGRAM /RANDOM DISC REPEAT DISC EDIT DISC FM PRO LOGIC 3CH LOGIC POWER AM TEST TONE SHIFT – CENTER LEVEL + CENTER MODE SLEEP – REAR LEVEL + DELAY TIME SOUND MODE L BALANCE R FM MODE S.A.BASS REPEAT TAPE A TAPE B DIRECTION DISC 1 DISC 2 DISC 3 CD CONTROL AUX MULTI CONTROL TAPE ™ £ When TAPE is selected as the source, the button lights up.
Regular Play When the power is already on, you can use this basic procedure: 1. Press down 0 for the deck you want to use. 2. When the cassette holder opens, put a cassette in, with the exposed part of the tape down, toward the base of the Unit. • If the cassette holder does not open, turn the power off, then back on and press down 0 again. 3. Close the holder gently. When both Deck A and Deck B contain a tape, the last deck to have a tape inserted is selected.
Music Scan works by detecting a 4-second long blank at the beginning of each selection, so it will not work well if your tape has • • • • • • No blank at the beginning of a selection. Noise (often caused by much use or poor quality dubbing) which fills the blank with noise. Long, very soft passages or pauses in a selection. The scan will detect these as 4-second long blanks. If this happens, just scan again until you reach the selection you want.
Using the Cassette Deck (Recording) PROGRAM /RANDOM DISC REPEAT DISC EDIT EDIT DISC FM PRO LOGIC 3CH LOGIC AM POWER TEST TONE SHIFT CENTER MODE SLEEP – CENTER LEVEL + – REAR LEVEL + DELAY TIME SOUND MODE L BALANCE R FM MODE S.A.
CAUTION: If recordings you have made have excessive noise or static, the Unit may be too close to a TV which was on during recording. Either turn off the TV or increase the distance between the TV and the System. Standard Recording This is the basic method for recording any source. The System also has special ways for recording CD to tape, and tape to tape, which save your time and effort, as well as give you some special effects.
Recording AM Station to Tape ——————————————— When recording an AM broadcast, beats may be produced which are not heard when listening to the broadcast. In this case, press PROGRAM/RANDOM on the CD Player to eliminate the beats. 1. Set to AM station and start recording. PROGRAM /RANDOM 2. Press PROGRAM/RANDOM repeatedly until the beats are eliminated.
5. Press SET. The tracks to be recorded on side B appear on the display. • Each time you press the button, the tracks to be recorded on side A and side B appear on the display alternately. 6. Insert a blank or erasable cassette in Deck B. When you want to record on both sides of a tape, press REVERSE MODE to turn Reverse mode on. 7. Press CD REC START . The Unit plays the CD and starts recording. If the tape has not been rewound, the Unit rewinds the tape before starting to record the CD.
Using the Timer PROGRAM /RANDOM FM AM POWER 3CH LOGIC TEST TONE SHIFT DISC REPEAT DISC EDIT PRO LOGIC DISC – CENTER LEVEL + CENTER MODE SLEEP – REAR LEVEL + DELAY TIME SOUND MODE L BALANCE R FM MODE S.A.BASS TAPE A TAPE B DIRECTION REPEAT DISC 1 DISC 2 DISC 3 CD CONTROL AUX SET MULTI CONTROL SLEEP TIMER/CLOCK TAPE CONTROL REC PAUSE + VOLUME – RM-SED602TU REMOTE CONTROL Display Clock, timer-on time etc.
Setting the Daily Timer With this timer you can wake up to music from a CD, tape, your favorite radio program. You can set the Daily Timer whether the Unit is on or off. Procedure For Setting the Daily Timer 1. Press TIMER/CLOCK so that “DAILY” appears on the display. The DAILY indicator flashes on the display.
To use the Tuner as the source (Possible only after presetting stations.): 1. To listen to FM, press 4 P. DOWN or ¢ P. UP on the MULTI CONTROL repeatedly until “TUNER FM” flashes and press SET. To listen to AM, press 4 P. DOWN or ¢ P. UP on the MULTI CONTROL repeatedly until “TUNER AM” flashes and press SET. or 2. Press 4 P. DOWN or ¢ P. UP on the MULTI CONTROL repeatedly to select the station to be listened to as a preset channel and press SET. To use a Cassette Deck as the source: Press 4 P. DOWN or ¢ P.
CAUTION: If the Unit is unplugged, or a power failure occurs, the timer setting will be erased in a few days. If the settings are erased in this way, reset the timer settings. Setting the Recording Timer With the Recording Timer you can make a tape of a radio broadcast automatically whether or not you are home.
Turning the Recording Timer On and Off ————————— Once the Recording Timer has been used, the setting is maintained but the Timer is set to off. To turn the Recording Timer off before the timer starts, press TIMER/CLOCK repeatedly until “REC” appears on the display, then press CANCEL/DEMO. “OFF” appears on the display and the REC indicator goes out. To record at the same time again, press TIMER/CLOCK repeatedly until “REC” appears on the display, then press SET.
Timer Priority Since each timer can be set independently, you may wonder what happens if the settings overlap. Here are the priorities for each timer: The Recording Timer always has priority. This means that: • If another timer is set to come on during a time when the Recording Timer is operating, the other timer just will not come on at all, so you will always get the entire program on tape.
Care and Maintenance Compact Discs Cassette Tapes Handle your compact discs, cassette tapes, and Cassette Deck carefully, and they will last a long time. • • • • • • • • Remove the CD from the case by holding it at the edges while pressing the center hole lightly. Do not touch the shiny surface of the CD, or bend the CD. Put the CD back in its case after use to prevent warping. Be careful not to scratch the surface of the CD when placing it back in the case.
Troubleshooting • • If you are having a problem with your System, check this list for a possible solution before calling for service. If you cannot solve the problem from the hints given here, or the Unit has been physically damaged, call a qualified person, such as your dealer, for service. Symptom Possible Cause Action No sound is heard. Connections are incorrect, or loose. Check all connections and make corrections. (See pages 4 - 6.) Unable to record. Cassette record protect tabs are removed.
Specifications CA-D602T ————————————————————————— Amplifier Section Output Power Front 80 watts per channel, min. RMS at 6 ohms at 1 kHz, with no more than 3% total harmonic distortion. Center 25 watts min. RMS at 8 ohms at 1 kHz, with no more than 0.9% total harmonic distortion. Rear 12.5 watts per channel, min. RMS at 16 ohms at 1 kHz, with no more than 0.9% total harmonic distortion.
SP-D602 —————————————————————————— Type Speaker Tweeter Midrange Woofer Power Handling Capacity Impedance Frequency Range Sound Pressure Level 3-way, 3-speaker bass-reflex type (Magnetically-shielded type) 2 cm (13/16 inches) dome × 1 5 cm (2 inches) cone × 1 16 cm (6-5/16 inches) cone × 1 80 W 6 ohms 46 - 20,000 Hz 87 dB/w • m Dimensions 215 × 315 × 271 mm (W/H/D) (8-1/2 × 12-7/16 × 10-11/16 inches) Mass 3.3 kg (7.
43 EN/MX-D602T[J]/f 43 98.3.
QUALITY SERVICE HOW TO LOCATE YOUR JVC SERVICE CENTER TOLL FREE : 1-800-537-5722 Dear customer: In order to receive the most satisfaction from your purchase, read the instruction booklet before operating the unit. In the event that repair is necessary, or for the address nearest your location, please refer to the factory service center list below or within the Continental United States, Call 1-800-537—5722 for your authorized servicer. Remember to retain you Bill of Sale for Warranty Service.
LIMITED WARRANTY AUDIO-1 JVC COMPANY OF AMERICA warrants this product and all parts thereof, except as set forth below ONLY TO THE ORIGINAL PURCHASER AT RETAIL to be FREE FROM DEFECTIVE MATERIAL AND WORKMANSHIP from the date of original retail purchase for the period as shown below. (“The Warranty Period.”) PARTS LABOR 1YR 1YR THIS LIMITED WARRANTY IS VALID ONLY IN THE FIFTY(50) UNITED STATES, THE DISTRICT OF COLUMBIA AND IN COMMONWEALTH OF PUERTO RICO.
VICTOR COMPANY OF JAPAN, LIMITED EN MX-D602T[J]Cover V J 4 98.3.