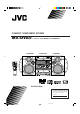
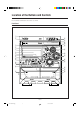
COMPACT COMPONENT SYSTEM MX-DVA5 — Consists of CA-MXDVA5 and SP-MXDVA5 SP-MXDVA5 SP-MXDVA5 CA-MXDVA5 DISC CHANGE STANDBY STANDBY/ON CD-R/RW PLAYBACK SOUND MODE SUBWOOFER LEVEL COMPACT DIGITAL VIDEO / PHONES TUNING CLOCK / TIMER SELECT DISPLAY REPEAT REC START CD /STOP REC START DUBBING TAPE A TAPE B INSTRUCTIONS For Customer Use: Enter below the Model No. and Serial No. which are located either on the rear, bottom or side of the cabinet. Retain this information for future reference.
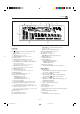
Warnings, Cautions and Others Mises en garde, précautions et indications diverses CAUTION To reduce the risk of electrical shocks, fire, etc.: 1. Do not remove screws, covers or cabinet. 2. Do not expose this appliance to rain or moisture. CAUTION RISK OF ELECTRIC SHOCK DO NOT OPEN CAUTION: TO REDUCE THE RISK OF ELECTRIC SHOCK, DO NOT REMOVE COVER (OR BACK). NO USER SERVICEABLE PARTS INSIDE. REFER SERVICING TO QUALIFIED SERVICE PERSONNEL. CAUTION • Do not block the ventilation openings or holes.
For Canada/pour le Canada For Canada/pour le Canada CAUTION: TO PREVENT ELECTRIC SHOCK, MATCH WIDE BLADE OF PLUG TO WIDE SLOT, FULLY INSERT. ATTENTION: POUR EVITER LES CHOCS ELECTRIQUES, INTRODUIRE LA LAME LA PLUS LARGE DE LA FICHE DANS LA BORNE CORRESPONDANTE DE LA PRISE ET POUSSER JUSQUAU FOND.
Introduction We would like to thank you for purchasing one of our JVC products. Before operating this unit, read this manual carefully and thoroughly to obtain the best possible performance from your unit, and retain this manual for future reference. About This Manual Power sources This manual is organized as follows: • When unplugging from the wall outlet, always pull the plug, not the AC power cord. • The manual mainly explains operations using the buttons and controls on the unit.
Contents Location of the Buttons and Controls ....................... 3 VCD/CD Playback .................................................... 23 Front Panel ................................................................. 3 Remote Control .......................................................... 5 Showing the On-Screen Bar ..................................... 23 Disc Menu-Driven Playback (Only for VCD) .......... 23 Moving to a Particular Portion Directly ...................
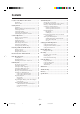
Location of the Buttons and Controls Become familiar with the buttons and controls on your unit. Front Panel 1 DISC CHANGE STANDBY 2 y STANDBY/ON CD-R/RW PLAYBACK 3 u i o ; SOUND MODE 4 5 a SUBWOOFER LEVEL 6 7 8 9 p q s d COMPACT DIGITAL VIDEO f g PHONES w e TUNING SELECT CLOCK / TIMER DISPLAY REPEAT REC START CD /STOP REC START DUBBING TAPE A TAPE B r h j k t –3– EN01-13MX-DVA5[J]_f 3 01.8.
Continued Display Window 1 2 3 4 5 6 7 8 p 9 See pages in the parentheses for details. Front Panel 1 Carrousel 2 STANDBY/ON button and STANDBY lamp (10, 35, 36) 3 7 (stop) button (15, 21, 23, 26, 32, 33) 4 SET button (10, 13, 34 – 36) 5 CANCEL/DEMO button (9, 10, 34 – 36) 6 Display window 7 TAPE 2 3 button and lamp (10, 31 – 33) • Pressing this button also turns on the unit. 8 DVD 6 (play/pause) (SELECT) button and lamp (10, 15, 16, 21, 23, 26) • Pressing this button also turns on the unit.
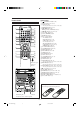
Remote Control Remote Control e 1 r t y u i o ; a s d f 2 3 4 5 / 6 7 g h 8 9 j p k q w VOCAL MASKING « l / The front lid opens in the arrow direction. DISC CHANGE STANDBY STANDBY/ON CD-R/RW PLAYBACK SOUND MODE SUBWOOFER LEVEL 1 STANDBY/ON button (10) 2 Number buttons (13, 16, 19) 3 AUX button (10) • Pressing this button also turns on the unit. 4 MENU/PBC button (19, 23) 5 4 / ¢ buttons (16) PREV.
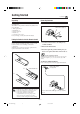
Getting Started Continued Unpacking Connecting Antennas After unpacking, check to be sure that you have all the following items. The number in the parentheses indicates the quantity of the pieces supplied. • AM loop antenna (1) • FM antenna (1) • Remote control (1) • Batteries (2) • Composite video cord (1) If any is missing, consult your dealer immediately.
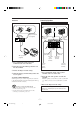
Connecting Speakers AM antenna 2 1 1 ANTENNA FM [ 75 ] AM 2 Vinyl-covered wire (not supplied) Speaker cord (blue/black) Black MAIN SPEAKER [ 4-8 ] Speaker cord (red/black) SUBWOOFER [ 6-16 ] L L R R Blue Red Black Speaker cord (blue/black) AM loop antenna (supplied) From right main speaker terminals Speaker cord (red/black) From right subwoofer terminals 1 Press and hold the clamp of the AM terminals on the rear of the unit.
Continued Connecting Other Equipment To connect other audio components 7 Analog components Be sure that the plugs of the audio cords are color coded: White plugs and jacks are for left audio signals, and red ones for right audio signals. • DO NOT connect any equipment while the power is on. • DO NOT plug in any equipment until all connections are complete. To connect the TV Connect your TV and this unit using the composite video cord (supplied) or an S-video cord (not supplied).
To connect audio equipment with an optical digital input terminal — such as digital decoder About sounds reproduced through the rear terminals You can connect a digital decoder or MD recorder by using an optical digital cord (not supplied). • See “About sounds reproduced through the rear terminals” on the right column. • Through the LINE OUT (L/R) jacks and MAIN SPEAKERS/SUBWOOFER terminals: Analog stereo signals are output.
Common Operations Continued 3 Press ¢ or 4 to adjust Turning On and Off the Power To turn on the unit, press STANDBY/ON so that the STANDBY lamp goes off. • When the unit is turned on, the DVD VIDEO lamp on the unit lights up. To turn off the unit (on standby), press STANDBY/ON again so that the STANDBY lamp lights up. • When the unit is turned on, the DVD VIDEO lamp on the unit goes off. the minute, then press SET. PRESET NEXT PREV.
Adjusting the Volume Reinforcing the Bass Sound You can adjust the volume level only while the unit is turned on. This function only affects the playback sound, but does not affect your recording. Turn the VOLUME control clockwise to increase the volume or counterclockwise to decrease it. • The volume level can be adjusted in 32 steps (VOL MIN, VOL 1 — VOL 30, and VOL MAX). Turn the SUBWOOFER LEVEL control clockwise to increase the subwoofer sound or counterclockwise to decrease it.
Selecting the Sound Modes * Surround elements are added to the SEA elements to create a being-there feeling in your room. When one of these modes is selected, the SOUND MODE indicator lights up as — This function only affects the playback sound, but does not affect your recording. You can select one of the 6 preset sound modes (3 surround modes and 3 SEA — Sound Effect Amplifier — modes). To select the sound modes, turn the SOUND MODE control until the sound mode you want appears on the display.
Listening to FM and AM Broadcasts Tuning in a Station On the unit ONLY: 1 Tune in the station you want to preset. 1 Press FM/AM. • See “Tuning in a Station” on the left column. The unit automatically turns on and tunes in the previously tuned station (either FM or AM). • Each time you press the button, the band alternates between FM and AM. 2 Press SET. SET 2 Start searching for stations. On the unit: Press and hold TUNING + or TUNING – for more than 1 second.
Disc Introduction—DVD/VCD/CD This unit has been designed to play back the following discs: DVD, Video CD, Audio CD, CD-R, and CD-RW. Discs you can play: Disc Type Mark (Logo) Video Format DVD Video Region Code Number* 1 ALL NTSC Video CD Audio CD COMPACT Disc structure — DVD, Video CD (VCD) and Audio CD (CD) A DVD disc consists of Titles, and each title may be divided into some Chapters. (See Example 1.
Basic Disc Operations Loading Discs Playing Back Discs 1 Press 0. You can play a disc(s). • If a menu appears while playing a DVD or VCD with PBC function, see page 19 (for DVD) or page 23 (for VCD). The unit automatically turns on and the carrousel comes out. 2 Place one or two discs correctly on the front slots of the carrousel, with its label side up. 1 Load a disc(s). 2 Press one of the disc number buttons (DVD1, DVD2, and DVD3) for the disc you want to play.
When playing back CDs and VCD without PBC function, all loaded discs can be played continuously When 3 discs are loaded on the disc trays, they are played in one of the following sequences. • When DVD1 is pressed : DVD1 ] DVD2 ] DVD3 (then stops) • When DVD2 is pressed : DVD2 ] DVD3 ] DVD1 (then stops) • When DVD3 is pressed : DVD3 ] DVD1 ] DVD2 (then stops) – When only 2 discs are loaded, they are played in the same order, but the disc tray without a disc is skipped.
DVD Playback Some DVDs contain several audio languages, subtitles, and multi-angle views. When you find the following marks on the DVD or its package, you can select these elements recorded on the DVD. 3 3 3 Subtitles are recorded on the disc. The number inside the mark indicates the total number of the recorded subtitles. Several audio languages are recorded on the disc. The number inside the mark indicates the total number of the recorded audio languages.
Continued Selecting the Subtitles Selecting the Multi-Angle Views While playing a disc containing subtitles in different languages, you can select the subtitle to be displayed on the TV screen. • You can set your favorite subtitle language as the initial language shown on the TV screen. (See page 28.) While playing a disc containing multi-angle views, you can view the same scene at different angles. On the remote control ONLY: To select the subtitle language, press SUBTITLE repeatedly.
Disc Menu-Driven Playback Moving to a Particular Portion Directly Disc menu-driven playback is possible while playing back a DVD with menus. • When operating a disc using the disc menu, refer also to the instructions supplied with the disc. You can move to another title, chapter, or particular scene in the chapter directly. DVD discs generally have their own menus or title lists. A menu usually contains various information about the disc and playback selections.
Continued 7 A-B Repeat Searching for a Particular Point You can search for a particular portion while playing a disc— Variable Speed Forward/Reverse Search. • No sound comes out during Variable Speed Forward/ Reverse Search. While playing, you can also select a portion you want to repeat. • A-B repeat is not performed between different titles. Example: 7 Variable Speed Forward Search To fast-forward the chapter, press ¡ during play.
5 Press Cursor 3 or 2 (or Programming the Playing Order of the Chapters—Program Play number button) to select a chapter number, then ENTER. You can arrange the chapter playback order before you start playing. You can program up to 20 steps. • Before making a program, make sure that the TV is turned on and the correct input is selected on the TV. TITLE CHAPT 1 2 3 4 5 On the remote control ONLY: 1 Load a disc.
To modify the program 7 Slow Motion Playback You can modify the program while the PROGRAM MENU screen is shown on the TV screen. To erase a step: press Cursor ∞ (or 5) to select (highlight) an unwanted program step, then press CLEAR. To modify a step: press Cursor ∞ (or 5) to select (highlight) a program step you want to modify, then perform steps 4 to 5 on page 21. (Before entering a new number, press CLEAR repeatedly until “– –” appears on number entry position.
VCD/CD Playback When a menu appears, select a desired item on the disc menu. For basic disc operations such as inserting discs, starting playback, and moving to another tracks, see “Basic Disc Operations” on pages 15 and 16. • When a list of items is displayed on the screen, press the number buttons to select an item. (To use the number buttons, see “To go to another chapter or track directly using the number buttons” on page 16.
Continued Moving to a Particular Portion Directly Searching for a Particular Point You can move to a particular portion in the track directly. You can search for a particular portion while playing a disc— Variable Speed Forward/Reverse Search. • No sound comes out during Variable Speed Forward/ Reverse Search on a VCD. On the remote control ONLY: 1 Press GO TO during play or pause. 7 Variable Speed Forward Search • Each time you press the button, the following indication appears on the TV screen.
Repeating Playback 7 A-B Repeat 7 Repeat Play While playing, you can also select a portion you want to repeat. • A-B repeat may not be used on some VCDs with the PBC function. • Repeat play cannot be used on a VCD with the PBC function. To repeat playback, press REPEAT repeatedly during play. • Each time you press the button, repeat mode changes as follows: REPEAT Example: REP. A– REP. ONE REP. ALL REP. OFF REP. A–B • REP. ONE : Current track will be repeated.
Continued Programming the Playing Order of the Tracks—Program Play You can arrange the track playback order before you start playing. You can program up to 20 steps. • Before making a program, make sure that the TV is turned on and the correct input is selected on the TV. 5 Repeat step 4 to program other tracks you want. • After 10 steps are programed, “NEXT «” is selected (highlighted). If you want to program more steps, press ENTER. 6 Press DVD 6. The tracks are played in the order you have programed.
2 Press STILL repeatedly to advance To check the programed contents the picture frame by frame. You can check the programed contents by pressing PLAY MODE. The PROGRAM MENU screen appears on the TV screen. • If you press the button during play, the program play will stop. • Each time you press the button, the picture advances frame by frame. 38 STEP 38 STEP 38 STEP 38 STEP 38 STEP 38 STEP To modify the program You can modify the program while the PROGRAM MENU screen is shown on the TV screen.
Setting up the DVD Operations On the Setup menu, you can perform two important settings—language selection (LANGUAGE) and system setting (SYSTEM). • Setup menu can only be displayed while a disc is not playing. (The DVD player must be selected as the playback source.) • You can only use the remote control for Setup menu operations. Continued Language selecting procedure Ex.: To select “FRENCH” as the initial language for “AUDIO.” 1 Press SETUP. Language selection menu appears on the TV screen.
Setting the DVD Preference (System) Preference (System) setting procedure Ex.: To select “16:9” for “TV SCREEN.” You can set the DVD preference to match it to your usage and operating circumstances. On the system setting menu, you can set the following: VIDEO OUTPUT : You can select the video output jack on the rear to use. 1 Press SETUP. Language selection menu appears on the TV screen. 2 Press Cursor 3 (or 2) to select (highlight) the system setting menu.
6 Press Cursor ∞ (or 5) to select Setting the Parental Lock Using this function, you can restrict playback of DVD containing violent scenes and those not suitable for your family members. Nobody can play such a disc unless this function is canceled. (“PARENTAL LEVEL” appears on the display if you try to play back such a disc.) • This setting takes effect only for the DVDs containing the rating level information—Level 1 (most restrictive) to Level 8 (least restrictive). 1 Press SETUP.
Playing Back Tapes Playing Back a Tape You can play back only type I tape. When the tape plays to the end, the deck automatically stops if the Reverse Mode is canceled. (See “To play both sides repeatedly — Reverse Mode.”) 1 Press EJECT (0) for the deck you want to To stop during play, press 7. use. To operate the other deck, press TAPE A or TAPE B (or TAPE A/B on the remote control), then TAPE 2 3. To fast wind to the left or to the right, press 1 or ¡.
Recording Continued Recording a Tape on Deck B IMPORTANT: • It should be noted that it may be unlawful to re-record pre-recorded tapes, records, or discs without the consent of the owner of copyright in the sound or video recording, broadcast or cable programme and in any literary, dramatic, musical, or artistic embodied therein. • The recording level is automatically set correctly, so it is not affected by the VOLUME control, the SOUND MODE control, and the SUBWOOFER LEVEL control.
Dubbing Tapes CD Synchronized Recording When dubbing on tapes, it is recommended to dub on the tapes of the same length and of the same quality as used for source tapes. You can easily record a disc onto a tape. • You can also record the tracks in order you have made the program. On the unit ONLY: On the unit ONLY: 1 Press TAPE 2 3, then 7. 1 Put a recordable cassette into deck B. 2 Place a disc correctly on the circle of the disc tray, with its label side up.
Using the Timers Continued There are three timers available — Daily Timer, Recording Timer, and Sleep Timer. 2 Press CLOCK/TIMER again. CLOCK / TIMER “ON TIME” appears for 2 seconds, then the unit enters on-time setting mode. Before using the timers, you need to set the clock built in the unit. (See “Setting the Clock” on page 10.) Using Daily Timer With Daily Timer, you can wake to your favorite music or radio program. You can set the timer whether the unit is on or off.
6 When you have selected “TUNER FM” or “TUNER AM” in step 5, select a preset station number. NEXT PREV. With Recording Timer, you can make a tape of a radio broadcast automatically. You can set the timer whether the unit is on or off. Press 4 or ¢ to select the preset station number, then press SET. The unit enters volume setting mode. 7 Press 4 or ¢ to set the volume level. Using Recording Timer PRESET How Recording Timer actually works SET PRESET NEXT PREV.
Continued 4 Set the on-time you want the unit to turn on. NEXT PREV. With Sleep Timer, you can fall asleep to music. You can set Sleep Timer when the unit is turned on. 1) Press 4 or ¢ to set the hour, then press SET. 2) Press 4 or ¢ to set the minute, then press SET. “OFF TIME” appears for 2 seconds, then the unit enters off-time setting mode. How Sleep Timer actually works The unit automatically turns off after the specified time length passes.
Maintenance To get the best performance of the unit, keep your discs, tapes, and mechanism clean. Handling discs Handling cassette tapes • Remove the disc from its case by holding it at the edge while pressing the center hole lightly. • Do not touch the shiny surface of the disc, or bend the disc. • Put the disc back in its case after use to prevent warping. • Be careful not to scratch the surface of the disc when placing it back in its case.
Troubleshooting If you are having a problem with your unit, check this list for a possible solution before calling for service. If you cannot solve the problem from the hints given here, or the unit has been physically damaged, call a qualified person, such as your dealer, for service. Symptom Hard to listen to broadcasts because of noise. FM/AM DISC GENERAL • Antennas are disconnected. • Reconnect the antennas correctly and securely. • Change the position and direction of the AM loop antenna.
Glossary Dolby Digital This is a digital audio compression format that was developed by Dolby Laboratories. Dolby Digital encoding method (socalled discrete 5.1 channel digital audio format) records and compresses the left front channel, right front channel, center channel, left rear channel, right rear channel, and LFE channel (total 6 channels, but LFE channel is counted as 0.1 channel, therefore called 5.1 channels) signals digitally.
Specifications Design and specifications are subject to change without notice. Amplifier section — CA-MXDVA5 Output Power SUBWOOFERS: MAIN SPEAKERS: 80 W per channel, min. RMS, driven into 6 Ω at 63 Hz with no more than 10% total harmonic distortion. 40 W per channel, min. RMS, driven into 4 Ω at 1 kHz with no more than 10% total harmonic distortion. Audio input sensitivity/Impedance (at 1 kHz, measured at MAIN SPEAKERS) AUX IN: 400 mV/50 kΩ Audio output level/Impedance LINE OUT: 400 mV/4.
Authorized Service Centers ® QUALITY SERVICE HOW TO LOCATE YOUR JVC SERVICE CENTER TOLL FREE: 1 (800) 537-5722 http://www.jvc.com Dear Customer, In order to receive the most satisfaction from your purchase, please read the instruction booklet before operating the unit. In the event that repairs are necessary, please call 1 (800)537-5722 for your nearest authorized servicer or visit our website at www.JVC.com Remember to retain your Bill of Sale for Warranty Service.
LIMITED WARRANTY AUDIO-1 JVC COMPANY OF AMERICA warrants this product and all parts thereof, except as set forth below ONLY TO THE ORIGINAL PURCHASER AT RETAIL to be FREE FROM DEFECTIVE MATERIALS AND WORKMANSHIP from the date of original retail purchase for the period as shown below. ("The Warranty Period") PARTS 1 LABOR YR 1 YR THIS LIMITED WARRANTY IS VALID ONLY IN THE FIFTY (50) UNITED STATES, THE DISTRICT OF COLUMBIA AND IN COMMONWEALTH OF PUERTO RICO.
VICTOR COMPANY OF JAPAN, LIMITED V 0801KSMMDWSAM EN MX-DVA5[J]COVER_f J 2 01.8.
COMPACT COMPONENT SYSTEM SYSTEME DE COMPOSANTS COMPACT MX-DVA5 — Consists of CA-MXDVA5 and SP-MXDVA5 — Composé du CA-MXDVA5 et SP-MXDVA5 SP-MXDVA5 SP-MXDVA5 CA-MXDVA5 DISC CHANGE STANDBY STANDBY/ON CD-R/RW PLAYBACK SOUND MODE SUBWOOFER LEVEL COMPACT DIGITAL VIDEO / PHONES TUNING CLOCK / TIMER SELECT DISPLAY REPEAT REC START CD /STOP REC START DUBBING TAPE A TAPE B INSTRUCTIONS MANUEL D’INSTRUCTIONS For Customer Use: Enter below the Model No. and Serial No.
Warnings, Cautions and Others Mises en garde, précautions et indications diverses CAUTION To reduce the risk of electrical shocks, fire, etc.: 1. Do not remove screws, covers or cabinet. 2. Do not expose this appliance to rain or moisture. CAUTION RISK OF ELECTRIC SHOCK DO NOT OPEN CAUTION: TO REDUCE THE RISK OF ELECTRIC SHOCK, DO NOT REMOVE COVER (OR BACK). NO USER SERVICEABLE PARTS INSIDE. REFER SERVICING TO QUALIFIED SERVICE PERSONNEL.
English For Canada/pour le Canada CAUTION: TO PREVENT ELECTRIC SHOCK, MATCH WIDE BLADE OF PLUG TO WIDE SLOT, FULLY INSERT. ATTENTION: POUR EVITER LES CHOCS ELECTRIQUES, INTRODUIRE LA LAME LA PLUS LARGE DE LA FICHE DANS LA BORNE CORRESPONDANTE DE LA PRISE ET POUSSER JUSQUAU FOND.
English Introduction We would like to thank you for purchasing one of our JVC products. Before operating this unit, read this manual carefully and thoroughly to obtain the best possible performance from your unit, and retain this manual for future reference. About This Manual Power sources This manual is organized as follows: • When unplugging from the wall outlet, always pull the plug, not the AC power cord. • The manual mainly explains operations using the buttons and controls on the unit.
English Contents Location of the Buttons and Controls ....................... 3 VCD/CD Playback .................................................... 23 Front Panel ................................................................. 3 Remote Control .......................................................... 5 Showing the On-Screen Bar ..................................... 23 Disc Menu-Driven Playback (Only for VCD) .......... 23 Moving to a Particular Portion Directly ...................
English Location of the Buttons and Controls Become familiar with the buttons and controls on your unit. Front Panel 1 DISC CHANGE STANDBY 2 y STANDBY/ON CD-R/RW PLAYBACK 3 u i o ; SOUND MODE 4 5 a SUBWOOFER LEVEL 6 7 8 9 p q s d COMPACT DIGITAL VIDEO f g PHONES w e TUNING SELECT CLOCK / TIMER DISPLAY REPEAT REC START CD /STOP REC START DUBBING TAPE A TAPE B r h j k t –3– EN01-13MX-DVA5[C]_f 3 01.8.
Display Window 1 2 3 4 5 6 7 8 p 9 See pages in the parentheses for details. Front Panel 1 Carrousel 2 STANDBY/ON button and STANDBY lamp (10, 35, 36) 3 7 (stop) button (15, 21, 23, 26, 32, 33) 4 SET button (10, 13, 34 – 36) 5 CANCEL/DEMO button (9, 10, 34 – 36) 6 Display window 7 TAPE 2 3 button and lamp (10, 31 – 33) • Pressing this button also turns on the unit. 8 DVD 6 (play/pause) (SELECT) button and lamp (10, 15, 16, 21, 23, 26) • Pressing this button also turns on the unit.
English Remote Control Remote Control e 1 r t y u i o ; a s d f 2 3 4 5 / 6 7 g h 8 9 j p k q w VOCAL MASKING « l / The front lid opens in the arrow direction. DISC CHANGE STANDBY STANDBY/ON CD-R/RW PLAYBACK SOUND MODE SUBWOOFER LEVEL 1 STANDBY/ON button (10) 2 Number buttons (13, 16, 19) 3 AUX button (10) • Pressing this button also turns on the unit. 4 MENU/PBC button (19, 23) 5 4 / ¢ buttons (16) PREV.
Continued Unpacking Connecting Antennas After unpacking, check to be sure that you have all the following items. The number in the parentheses indicates the quantity of the pieces supplied. • AM loop antenna (1) • FM antenna (1) • Remote control (1) • Batteries (2) • Composite video cord (1) If any is missing, consult your dealer immediately.
English Connecting Speakers AM antenna 2 1 1 ANTENNA FM [ 75 ] AM 2 Vinyl-covered wire (not supplied) Speaker cord (blue/black) Black MAIN SPEAKER [ 4-8 ] Speaker cord (red/black) SUBWOOFER [ 6-16 ] L L R R Blue Red Black Speaker cord (blue/black) AM loop antenna (supplied) From right main speaker terminals Speaker cord (red/black) From right subwoofer terminals 1 Press and hold the clamp of the AM terminals on the rear of the unit.
Connecting Other Equipment To connect other audio components 7 Analog components Be sure that the plugs of the audio cords are color coded: White plugs and jacks are for left audio signals, and red ones for right audio signals. • DO NOT connect any equipment while the power is on. • DO NOT plug in any equipment until all connections are complete. To connect the TV Connect your TV and this unit using the composite video cord (supplied) or an S-video cord (not supplied).
English To connect audio equipment with an optical digital input terminal — such as digital decoder About sounds reproduced through the rear terminals You can connect a digital decoder or MD recorder by using an optical digital cord (not supplied). • See “About sounds reproduced through the rear terminals” on the right column. • Through the LINE OUT (L/R) jacks and MAIN SPEAKERS/SUBWOOFER terminals: Analog stereo signals are output.
Continued 3 Press ¢ or 4 to adjust Turning On and Off the Power To turn on the unit, press STANDBY/ON so that the STANDBY lamp goes off. • When the unit is turned on, the DVD VIDEO lamp on the unit lights up. To turn off the unit (on standby), press STANDBY/ON again so that the STANDBY lamp lights up. • When the unit is turned off, the DVD VIDEO lamp on the unit goes off. English Common Operations the minute, then press SET. PRESET NEXT PREV.
English Adjusting the Volume Reinforcing the Bass Sound You can adjust the volume level only while the unit is turned on. This function only affects the playback sound, but does not affect your recording. Turn the VOLUME control clockwise to increase the volume or counterclockwise to decrease it. • The volume level can be adjusted in 32 steps (VOL MIN, VOL 1 — VOL 30, and VOL MAX). Turn the SUBWOOFER LEVEL control clockwise to increase the subwoofer sound or counterclockwise to decrease it.
English Selecting the Sound Modes * Surround elements are added to the SEA elements to create a being-there feeling in your room. When one of these modes is selected, the SOUND MODE indicator lights up as — This function only affects the playback sound, but does not affect your recording. You can select one of the 6 preset sound modes (3 surround modes and 3 SEA — Sound Effect Amplifier — modes). To select the sound modes, turn the SOUND MODE control until the sound mode you want appears on the display.
English Listening to FM and AM Broadcasts Tuning in a Station On the unit ONLY: 1 Tune in the station you want to preset. 1 Press FM/AM. • See “Tuning in a Station” on the left column. The unit automatically turns on and tunes in the previously tuned station (either FM or AM). • Each time you press the button, the band alternates between FM and AM. 2 Press SET. SET 2 Start searching for stations. On the unit: Press and hold TUNING + or TUNING – for more than 1 second.
This unit has been designed to play back the following discs: DVD, Video CD, Audio CD, CD-R, and CD-RW. Discs you can play: Disc Type Mark (Logo) Video Format DVD Video Region Code Number* 1 ALL NTSC Video CD Audio CD COMPACT English Disc Introduction—DVD/VCD/CD Disc structure — DVD, Video CD (VCD) and Audio CD (CD) A DVD disc consists of Titles, and each title may be divided into some Chapters. (See Example 1.
English Basic Disc Operations Loading Discs Playing Back Discs 1 Press 0. You can play a disc(s). • If a menu appears while playing a DVD or VCD with PBC function, see page 19 (for DVD) or page 23 (for VCD). The unit automatically turns on and the carrousel comes out. 2 Place one or two discs correctly on the front slots of the carrousel, with its label side up. 1 Load a disc(s). 2 Press one of the disc number buttons (DVD1, DVD2, and DVD3) for the disc you want to play.
English When playing back CDs and VCD without PBC function, all loaded discs can be played continuously When 3 discs are loaded on the disc trays, they are played in one of the following sequences. • When DVD1 is pressed : DVD1 ] DVD2 ] DVD3 (then stops) • When DVD2 is pressed : DVD2 ] DVD3 ] DVD1 (then stops) • When DVD3 is pressed : DVD3 ] DVD1 ] DVD2 (then stops) – When only 2 discs are loaded, they are played in the same order, but the disc tray without a disc is skipped.
English DVD Playback Some DVDs contain several audio languages, subtitles, and multi-angle views. When you find the following marks on the DVD or its package, you can select these elements recorded on the DVD. 3 3 3 Subtitles are recorded on the disc. The number inside the mark indicates the total number of the recorded subtitles. Several audio languages are recorded on the disc. The number inside the mark indicates the total number of the recorded audio languages.
Selecting the Subtitles Selecting the Multi-Angle Views While playing a disc containing subtitles in different languages, you can select the subtitle to be displayed on the TV screen. • You can set your favorite subtitle language as the initial language shown on the TV screen. (See page 28.) While playing a disc containing multi-angle views, you can view the same scene at different angles. On the remote control ONLY: To select the subtitle language, press SUBTITLE repeatedly.
English Disc Menu-Driven Playback Moving to a Particular Portion Directly Disc menu-driven playback is possible while playing back a DVD with menus. • When operating a disc using the disc menu, refer also to the instructions supplied with the disc. You can move to another title, chapter, or particular scene in the chapter directly. DVD discs generally have their own menus or title lists. A menu usually contains various information about the disc and playback selections.
7 A-B Repeat Searching for a Particular Point You can search for a particular portion while playing a disc— Variable Speed Forward/Reverse Search. • No sound comes out during Variable Speed Forward/ Reverse Search. While playing, you can also select a portion you want to repeat. • A-B repeat is not performed between different titles. Example: 7 Variable Speed Forward Search To fast-forward the chapter, press ¡ during play.
English 5 Press Cursor 3 or 2 (or Programming the Playing Order of the Chapters—Program Play number button) to select a chapter number, then ENTER. You can arrange the chapter playback order before you start playing. You can program up to 20 steps. • Before making a program, make sure that the TV is turned on and the correct input is selected on the TV. TITLE CHAPT 1 2 3 4 5 On the remote control ONLY: 1 Load a disc.
English To modify the program 7 Slow Motion Playback You can modify the program while the PROGRAM MENU screen is shown on the TV screen. To erase a step: press Cursor ∞ (or 5) to select (highlight) an unwanted program step, then press CLEAR. To modify a step: press Cursor ∞ (or 5) to select (highlight) a program step you want to modify, then perform steps 4 to 5 on page 21. (Before entering a new number, press CLEAR repeatedly until “– –” appears on number entry position.
English VCD/CD Playback When a menu appears, select a desired item on the disc menu. For basic disc operations such as inserting discs, starting playback, and moving to another tracks, see “Basic Disc Operations” on pages 15 and 16. • When a list of items is displayed on the screen, press the number buttons to select an item. (To use the number buttons, see “To go to another chapter or track directly using the number buttons” on page 16.
Moving to a Particular Portion Directly Searching for a Particular Point You can move to a particular portion in the track directly. You can search for a particular portion while playing a disc— Variable Speed Forward/Reverse Search. • No sound comes out during Variable Speed Forward/ Reverse Search on a VCD. On the remote control ONLY: 1 Press GO TO during play or pause. 7 Variable Speed Forward Search • Each time you press the button, the following indication appears on the TV screen.
English Repeating Playback 7 A-B Repeat 7 Repeat Play While playing, you can also select a portion you want to repeat. • A-B repeat may not be used on some VCDs with the PBC function. • Repeat play cannot be used on a VCD with the PBC function. To repeat playback, press REPEAT repeatedly during play. • Each time you press the button, repeat mode changes as follows: REPEAT Example: REP. A– REP. ONE REP. ALL REP. OFF REP. A–B • REP. ONE : Current track will be repeated.
English Continued Programming the Playing Order of the Tracks—Program Play You can arrange the track playback order before you start playing. You can program up to 20 steps. • Before making a program, make sure that the TV is turned on and the correct input is selected on the TV. 5 Repeat step 4 to program other tracks you want. • After 10 steps are programed, “NEXT «” is selected (highlighted). If you want to program more steps, press ENTER. 6 Press DVD 6.
English 2 Press STILL repeatedly to advance To check the programed contents the picture frame by frame. You can check the programed contents by pressing PLAY MODE. The PROGRAM MENU screen appears on the TV screen. • If you press the button during play, the program play will stop. • Each time you press the button, the picture advances frame by frame.
On the Setup menu, you can perform two important settings—language selection (LANGUAGE) and system setting (SYSTEM). • Setup menu can only be displayed while a disc is not playing. (The DVD player must be selected as the playback source.) • You can only use the remote control for Setup menu operations. Continued Language selecting procedure Ex.: To select “FRENCH” as the initial language for “AUDIO.” 1 Press SETUP. Language selection menu appears on the TV screen.
English Setting the DVD Preference (System) Preference (System) setting procedure Ex.: To select “16:9” for “TV SCREEN.” You can set the DVD preference to match it to your usage and operating circumstances. On the system setting menu, you can set the following: VIDEO OUTPUT : You can select the video output jack on the rear to use. 1 Press SETUP. Language selection menu appears on the TV screen. 2 Press Cursor 3 (or 2) to select (highlight) the system setting menu.
English 6 Press Cursor ∞ (or 5) to select Setting the Parental Lock Using this function, you can restrict playback of DVD containing violent scenes and those not suitable for your family members. Nobody can play such a disc unless this function is canceled. (“PARENTAL LEVEL” appears on the display if you try to play back such a disc.) • This setting takes effect only for the DVDs containing the rating level information—Level 1 (most restrictive) to Level 8 (least restrictive).
English Playing Back Tapes Playing Back a Tape You can play back only type I tape. When the tape plays to the end, the deck automatically stops if the Reverse Mode is canceled. (See “To play both sides repeatedly — Reverse Mode.”) 1 Press EJECT (0) for the deck you want to To stop during play, press 7. use. To operate the other deck, press TAPE A or TAPE B (or TAPE A/B on the remote control), then TAPE 2 3. To fast wind to the left or to the right, press 1 or ¡.
Continued Recording a Tape on Deck B IMPORTANT: • It should be noted that it may be unlawful to re-record pre-recorded tapes, records, or discs without the consent of the owner of copyright in the sound or video recording, broadcast or cable programme and in any literary, dramatic, musical, or artistic embodied therein. • The recording level is automatically set correctly, so it is not affected by the VOLUME control, the SOUND MODE control, and the SUBWOOFER LEVEL control.
English Dubbing Tapes CD Synchronized Recording When dubbing on tapes, it is recommended to dub on the tapes of the same length and of the same quality as used for source tapes. You can easily record a disc onto a tape. • You can also record the tracks in order you have made the program. On the unit ONLY: On the unit ONLY: 1 Press TAPE 2 3, then 7. 1 Put a recordable cassette into deck B. 2 Place a disc correctly on the circle of the disc tray, with its label side up.
English Using the Timers Continued There are three timers available — Daily Timer, Recording Timer, and Sleep Timer. 2 Press CLOCK/TIMER again. CLOCK / TIMER “ON TIME” appears for 2 seconds, then the unit enters on-time setting mode. Before using the timers, you need to set the clock built in the unit. (See “Setting the Clock” on page 10.) Using Daily Timer With Daily Timer, you can wake to your favorite music or radio program. You can set the timer whether the unit is on or off.
English 6 When you have selected “TUNER FM” or “TUNER AM” in step 5, select a preset station number. NEXT PREV. With Recording Timer, you can make a tape of a radio broadcast automatically. You can set the timer whether the unit is on or off. Press 4 or ¢ to select the preset station number, then press SET. The unit enters volume setting mode. 7 Press 4 or ¢ to set the volume level. Using Recording Timer PRESET How Recording Timer actually works SET PRESET NEXT PREV.
English 4 Set the on-time you want the unit to turn on. NEXT PREV. With Sleep Timer, you can fall asleep to music. You can set Sleep Timer when the unit is turned on. 1) Press 4 or ¢ to set the hour, then press SET. 2) Press 4 or ¢ to set the minute, then press SET. “OFF TIME” appears for 2 seconds, then the unit enters off-time setting mode. How Sleep Timer actually works The unit automatically turns off after the specified time length passes.
English Maintenance To get the best performance of the unit, keep your discs, tapes, and mechanism clean. Handling discs Handling cassette tapes • Remove the disc from its case by holding it at the edge while pressing the center hole lightly. • Do not touch the shiny surface of the disc, or bend the disc. • Put the disc back in its case after use to prevent warping. • Be careful not to scratch the surface of the disc when placing it back in its case.
If you are having a problem with your unit, check this list for a possible solution before calling for service. If you cannot solve the problem from the hints given here, or the unit has been physically damaged, call a qualified person, such as your dealer, for service. Symptom Hard to listen to broadcasts because of noise. FM/AM DISC GENERAL • Antennas are disconnected. • Reconnect the antennas correctly and securely. • Change the position and direction of the AM loop antenna.
English Glossary Dolby Digital This is a digital audio compression format that was developed by Dolby Laboratories. Dolby Digital encoding method (socalled discrete 5.1 channel digital audio format) records and compresses the left front channel, right front channel, center channel, left rear channel, right rear channel, and LFE channel (total 6 channels, but LFE channel is counted as 0.1 channel, therefore called 5.1 channels) signals digitally.
Design and specifications are subject to change without notice. Amplifier section — CA-MXDVA5 Output Power SUBWOOFERS: MAIN SPEAKERS: 80 W per channel, min. RMS, driven into 6 Ω at 63 Hz with no more than 10% total harmonic distortion. 40 W per channel, min. RMS, driven into 4 Ω at 1 kHz with no more than 10% total harmonic distortion. Audio input sensitivity/Impedance (at 1 kHz, measured at MAIN SPEAKERS) AUX IN: 400 mV/50 kΩ Audio output level/Impedance LINE OUT: 400 mV/4.
VICTOR COMPANY OF JAPAN, LIMITED V 0901KSMMDWSAM EN, FR MX-DVA5[C]COVER_f J 2 01.8.