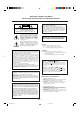
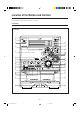
COMPACT COMPONENT SYSTEM SYSTEME DE COMPOSANTS COMPACT MX-DVA9 — Consists of CA-MXDVA9, SP-MXG79, and SP-DS99TN (SP-DSC99TN and SP-DSS99TN) — Composé du CA-MXDVA9, SP-MXG79 et SP-DS99TN (SP-DSC99TN et SP-DSS99TN) SP-MXG79 CA-MXDVA9 SP-MXG79 SP-DS99TN (SP-DSC99TN) (SP-DSS99TN) INSTRUCTIONS MANUEL D’INSTRUCTIONS For Customer Use: Enter below the Model No. and Serial No. which are located either on the rear, bottom or side of the cabinet. Retain this information for future reference. Model No.
Warnings, Cautions and Others Mises en garde, précautions et indications diverses CAUTION Note to CATV system installer: This reminder is provided to call the CATV system installer’s attention to Section 820-40 of the NEC which provides guidelines for proper grounding and, in particular, specifies that the cable ground shall be connected to the grounding system of the building, as close to the point of cable entry as practical.
IMPORTANT PRODUCTS SAFETY INSTRUCTION (Statement in accordance with the UL standards) 1) Read Instructions — Read carefully this instructions for your safe use before this product is installed, wire-connected, and operated. 2) Retain Instructions — For your future reference, retain this instruction. 3) Heed Warnings — Heed warnings on the product and in the operating instructions. 4) Follow Instructions — Follow and obey all warnings, cautions and instructions marked on this product and this instruction.
Introduction We would like to thank you for purchasing one of our JVC products. Before operating this unit, read this manual carefully and thoroughly to obtain the best possible performance from your unit, and retain this manual for future reference. About This Manual Power sources This manual is organized as follows: • When unplugging from the wall outlet, always pull the plug, not the AC power cord. • The manual mainly explains operations using the buttons and controls on the unit.
Contents Location of the Buttons and Controls ....................... 3 DVD/VCD Special Effect Playback ......................... 25 Front Panel ................................................................. 3 Remote Control .......................................................... 5 Still Picture/Frame-by-Frame Playback ................... 25 Viewing Continuous Still Pictures—Strobe ............. 25 Slow Motion Playback—Slow ................................. 25 Zoom in the Picture—Zoom .............
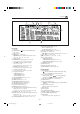
Location of the Buttons and Controls Become familiar with the buttons and controls on your unit. Front Panel Front Panel 1 2 3 o ; 4 a 5 s d f 6 7 8 9 p q w l e / r t y z u x i c g h j k –3– EN01-13.MX-DVA9[J,C]_f 3 01.7.
Continued Display Window 1 2 34 5 67 8 9 p q See pages in the parentheses for details. Front Panel 1 Disc trays 2 STANDBY/ON button and STANDBY lamp (10, 39, 40) 3 Remote sensor 4 PRESET + / – control (13) 4 / ¢ (reverse search/forward search) control (10, 12, 17, 18, 21, 23, 31, 38 – 40) 5 Display window 6 TAPE 2 3 button and lamp (10, 27, 29, 30) Pressing this button also turns on the unit. 7 DVD 3¥8 (play/pause) button and lamp (10, 16 – 18, 21, 23) Pressing this button also turns on the unit.
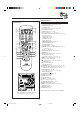
Remote Control Remote Control y u i o 1 2 3 4 5 ; a s 6 7 8 9 p q w e d f g h j r t 1 FM/AM button (10, 13) Pressing this button also turns on the unit. FM MODE button* (13) 2 AUX button (10 ) Pressing this button also turns on the unit.
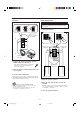
Getting Started Continued Supplied Accessories Connecting Antennas Make sure that you have all the following items. The number in the parentheses indicates the quantity of the pieces supplied. FM antenna • • • • • A ENN ANT AM loop antenna (1) FM antenna (1) Remote control (1) Batteries (2) Composite video cord (1) FM antenna (supplied) EXT AM LOOP 5 FM 7 IAL X COA If anything is missing, consult your dealer immediately.
Connecting Speakers AM antenna IMPORTANT: Use only speakers with the same speaker impedance as indicated by the speaker terminals on the rear of the unit.
Continued To connect a center speaker and rear speakers Connecting Other Equipment By connecting a center speaker and rear speakers to the SURROUND SPEAKERS jacks, you can enjoy Dolby Digital multichannel sound and the DSP Surround modes (see page 28). You can connect both analog and digital equipment. • DO NOT connect any equipment while the unit is on. • DO NOT plug in any equipment until all connections are complete.
To connect a TV To connect audio equipment with an optical digital input terminal—such as digital decoder You can connect a digital decoder such as an MD recorder or a CD recorder by using an optical digital cord (not supplied). • See “About sounds output through the rear terminals” below. Connect your TV and this unit using the composite video cord (supplied) or an S-video cord (not supplied). • You can also use JVC’s AV COMPU LINK control system. For details, see page 42.
Common Operations Continued Turning On or Off the Power 3 Turn 4 / ¢ to adjust the minute, then To turn on the unit, press STANDBY/ON so that the STANDBY lamp goes off. STANDBY/ON To turn off the unit (on standby), press STANDBY/ON again so that the STANDBY lamp lights up. STANDBY/ON press SET. STANDBY To check the clock time STANDBY Press and hold SET while playing any source. • Pressing SET, the source indication appears again.
Adjusting the Volume Reinforcing the Bass Sound You can adjust the volume level only while the unit is turned on. The volume level can be adjusted in 32 steps (VOL MIN, VOL 01—VOL 30, and VOL MAX). You can select one of the 4 subwoofer levels. This function only affects the playback sound, but does not affect your recording. The subwoofer level can be adjusted in 4 steps— LEVEL 1, LEVEL 2, LEVEL 3, and LEVEL 4 (MAX LEVEL).
D.CLUB*: Increases resonance and bass. HALL*: Adds depth and brilliance to the sound. STADIUM*: Adds clarity and spreads the sound, like in an outdoor stadium. SEA (Sound Effect Amplifer) modes: ROCK: Boosts low and high frequency. Good for acoustic music. POP: Good for vocal music. CLASSIC: Good for classical music. Current level appears. 3 Adjust the SEA pattern. 1) Turn 4 / ¢ to select the frequency range to adjust (LOW, MID or HIGH). Manual modes: MANUAL 1/2/3: Your individual mode stored in memory.
Listening to FM and AM Broadcasts Tuning into a Station On the unit ONLY: 1 Tune into the station you want to preset. 1 Press FM/AM. • See “Tuning into a Station.” The unit automatically turns on and tunes into the previously received station (either FM or AM). • Each time you press the button, the band alternates between FM and AM. 2 Press SET. 2 Start searching for stations. On the unit: Press and hold TUNING + or – for more than 1 second.
Playing Back Discs—Introduction IMPORTANT: Discs you can play This unit has been designed to playback discs having the marks listed below. Disc Type Mark (Logo) Video Format Region Code Number* 1 ALL DVD Video Before performing any operations for DVD and VCD, make sure of the following. • Check the connection with the TV. • Turn on the TV and select the correct input on the TV to view the pictures or on-screen menus/indications on the TV screen.
DVD Features Selecting the Audio Language Some DVDs contain several multi-angle views, audio languages and subtitles. When you find the following marks on the DVD or its package, you can select these elements recorded on the DVD. While playing a disc containing audio languages (sound tracks), you can also select the language (sound) to listen to. • You can set your favorite audio language as the initial audio language (see page 33). Multi-angle views are recorded on the disc.
Basic Disc Playback Continued This unit cannot accept any disc operations while reading disc contents. Loading Discs On the unit ONLY: VCD/CD playback sequence during Continuous play When 3 VCDs or CDs are loaded on the disc trays, they are played in one of the following sequences.
While playing back a disc encoded with Dolby Digital, the DOLBY DIGITAL lamp on the front panel lights up. You can also confirm the current channel setting by pressing DISPLAY on the unit (see page 45 for details). • If it has multichannel signals—5.1 ch, Surround mode is automatically activated, and the SURROUND lamp also lights up. • Using the on-screen menus, you can adjust the speaker settings for 5.1ch Surround mode depending on your room situation. (See page 34.
Continued DISC 3 TITLE To stop playing, press 7. • This unit can memorize the stop point of VCD, and when you start VCD playback again by pressing DVD 3¥8 (or DVD 3 on the remote control), playback starts from where it has been stopped—Resume play. When using Resume play on VCD with the PBC function, the playback starts from the earlier point you stop. To use Resume play, you need to turn on the Resume function (see page 36). • To stop completely, press 7 twice. 3 CHAP. 2 TIME 1:33:33 BITRATE 3.
3 Reverse Search Enter desired playing time by pressing the number buttons. • You can only use Time Search within a currently playing track. • To enter the time of “03:45,” press 0, 3, 4, 5. (Always enter all 4 digits.) To fast-reverse the chapter or track, press 1 while playing a disc. Each time you press the button, the search speed changes as follows: To cancel mis-entry for Time Search, press CONTROL −. Each time you press the button the last number you entry is erased. 4 Press ENTER.
Menu-Driven Playback—DVD/VCD with PBC Function Menu Operations To cancel the PBC function Menu-driven playback is possible while playing back a DVD with menu-driven features or a VCD with the Playback Control (PBC) function. 7 When playing a DVD DVD discs generally have their own menus or title lists. A menu usually contains various information about the disc and playback selections. On the other hand, a title list usually contains titles of movies and of songs recorded.
Selecting Playback Modes This unit cannot accept any disc operations while reading disc contents. 4 Turn 4 / ¢ to select a title or track number, then press SET. Programming the Playing Order of the Titles and Tracks—Program Play You can arrange the order in which the titles (for DVD) and tracks (for VCD and CD) play before you start playing. You can program up to 18 steps. • When you use Program play for a VCD with the PBC function activated, the PBC function is turned off.
Continued On the remote control: 6 To program another title or track from the 1 Load discs. same disc, repeat step 5. To program another title or track from a different disc, repeat steps 4 and 5. • If the current playing source is not the DVD/VCD/CD player press DVD 3, then 7 before going to the next step. Each time you select a title or track, the program item is added up to 18 steps. 2 Press PLAY MODE. The play mode screen appears on the TV.
Playing at Random—Random Play The titles and tracks of all loaded discs are played at random. • When you use Random play for a VCD with the PBC function activated, the PBC function is turned off. • Random Play cannot be used on some DVD discs. On the unit: 1 Load discs. • If the current playing source is not the DVD/VCD/CD player, press DVD 3¥8, then 7 before going to the next step. 2 Press RANDOM so that “RANDOM” To stop playing, press 7.
A-B Repeat When a DVD is a played back. While playing, you can also select a portion you want to repeat. • During Program play, Random play or Repeat play A-B Repeat play cannot be selected. • A-B Repeat is not performed between different chapters or different titles on a DVD. REPEAT A-B REPEAT TIME SEARCH CHAP. SEARCH REPEAT CHAPTER TITLE Canceled CHAPTER On the remote control ONLY: • TITLE: Current title will be repeated. • CHAPTER: Current chapter will be repeated.
DVD/VCD Special Effect Playback Still Picture/Frame-by-Frame Playback Slow Motion Playback—Slow You can still a picture and advance the still picture frame by frame. You can enjoy slow motion playback. • Reverse slow motion playback cannot be used on some VCDs. Still picture On the remote control ONLY: On the remote control ONLY: Press 8 once during play. 1 Press 8 once during play. A still picture appears on the TV screen. A still picture appears on the TV screen.
Viewing the Desired Chapters/Tracks—Digest You can view 9 opening scenes of chapters or tracks at a time and select desired scene from those displayed on the TV screen directly. • You can not use this function on VCD with the PBC function. On the remote control ONLY: 1 Press DIGEST while holding down SHIFT when stopped playing or during playback. + The opening scene appears in sequence (up to 9 pictures at a time) on the TV screen.
Playing Back Tapes You can play back type I, type II, and type IV tapes without changing any settings. Playing Back a Tape To play both sides repeatedly—Reverse Mode Reverse Mode works for both decks at the same time. When it is in use, the tape automatically reverses at the end of a side and the unit starts playing for the other side of the tape, and repeats the same process. To use Reverse Mode, press REVERSE MODE so that the Reverse Mode indicator on the display lights up like— .
Using DSP Surround Mode 3 Press LEVEL + / – to adjust the delay time. In order to reproduce a more acoustic sound field in your listening room while playing any source, you can use following DSP Surround modes. • DSP Surround mode can be also used for a disc encoded with Dolby Digital 5.1ch. • Each time you press the button, the delay time changes as follows. You can select one of the following DSP Surround modes according to your preference.
Recording Recording a Tape on Deck B IMPORTANT: • It should be noted that it may be unlawful to re-record pre-recorded tapes, records, or discs without the consent of the owner of copyright in the sound or video recording, broadcast or cable programme and in any literary, dramatic, musical, or artistic embodied therein. • The recording level is automatically set correctly, so it is not affected by the VOLUME, the SUBWOOFER LEVEL, the SOUND MODE, and DSP Surround controls.
Continued Dubbing Tapes VCD/CD Direct Recording You can record from one tape to another. You can easily record sound of a VCD without the PBC function or CD onto a tape. • You can also record the tracks in order you have made the program. • This function cannot be used for recording DVDs. On the unit ONLY: 1 Press TAPE 2 3, then 7. On the unit ONLY: 1 Put a recordable cassette into deck B. 2 Load discs with its label side up.
Auto Edit Recording 4 Press SET. • Each time you press the button, the tracks to be recorded on the front side (“SIDE-A”) and on the reverse side (“SIDE-B”) alternate. By using Auto Edit Recording, you can record disc tracks to fit the tape. Auto Edit Recording makes a program by selecting disc tracks in numerical order. However, to prevent the end of the last track on the front side from being cut off, the last track is selected so as to fit on the remaining tape length.
Operating the On-Screen Menu Continued Using the on-screen menus, you can store the initial selection for subtitle languages and audio languages (sound) for DVD playback as well as other settings. • The on-screen menu disappears if no operation is done for five minutes.
Changing the Initial Language Settings Changing the Various Audio Settings On LANGUAGE menu, you can select the following initial languages. On AUDIO menu, you can change the following sound settings. MENU LANGUAGE ENGLISH DIGITAL AUDIO OUTPUT AUDIO LANGUAGE ENGLISH DOWN MIX SUBTITLE ENGLISH COMPRESSION ON SCREEN LANGUAGE ENGLISH SPEAKER SETTING OFF EXIT PRESS STREAM/PCM OFF 5.1CHANNEL EXIT KEY PRESS • MENU LANGUAGE : Select the DVD menu language.
Continued More about “SPEAKER SETTING” “EXPERT” adjustment procedure The following example shows the ideal speaker locations for surround reproduction in your listening room. 7 Adjusting the delay time for the center and rear speakers You can adjust the delay time of the sounds from the center speaker and from the rear speakers, comparing to that of the sound from the front speakers.
7 Adjusting the center and rear speaker output levels You can adjust the speaker output level for the center speaker and rear speakers. You can adjust the output level while listening to the test tone. • Make adjustments so that the sound level of the selected speaker is set at the same level as that of the front speakers. • To output test tone properly, turn off the sound mode and the DSP Surround mode before entering on-screen menu. 1 Display EXPERT SPEAKER SETTING menu. • See page 32.
7 Monitor types Changing the System Settings • 4:3 LB (Letter Box) : Select this when viewing on TV whose aspect ratio is 4:3. While viewing a wide screen picture, the black bars appear on the top and the bottom of the screen. On SYSTEM menu, you can change the following settings. AUTO STANDBY RESUME OFF AV COMPULINK MODE • 16:9 WIDE: Select this when viewing on TV whose aspect ratio is 16:9.
Using the Parental Lock Setting the Parental Lock Level 6 Press ENTER. The parental lock level is set and PARENTAL LOCK screen disappears from the TV. Using this function, you can restrict playback of DVD containing violent scenes (and those not suitable for your family members). • This function is only possible for the DVDs containing such rating level information (Level 1 to Level 8). To exit from PARENTAL LOCK screen any time during the above procedure, press ENTER while holding down 7.
Using the Timers Continued On the unit ONLY: There are three timers available — Daily Timer, Recording Timer, and Sleep Timer. Before using the timers, you need to set the clock built in the unit. (See page 10.) 1 Press CLOCK/TIMER repeatedly until “DAILY” appears on the display. indicator lights up and DAILY (Daily Timer) indicator also starts flashing on the display. Using Daily Timer With Daily Timer, you can wake to your favorite music or radio program.
5 Turn 4 / ¢ to select the source to play, 9 Press STANDBY/ON to turn off the unit (on standby) if you have set the Daily Timer with the unit turned on. then press SET. • The source changes as follows: TUNER FM AUX TUNER AM TAPE STANDBY/ON STANDBY DISC– – – TUNER FM: tunes into a specified preset FM station. = Go to step 6. TUNER AM: tunes into a specified preset AM station. = Go to step 6. DISC– – –: plays a disc from a specified title or track of a specified disc. = Go to step 6.
Continued 4 Set the on-time you want the Using Recording Timer unit to turn on at. With Recording Timer, you can make a tape of a radio broadcast automatically. You can set the timer whether the system is on or off. 1) Turn 4 / ¢ to set the hour, then press SET. 2) Turn 4 / ¢ to set the minute, then press SET. “OFF TIME” appears for 2 seconds on the display, then the unit enters off-time setting mode.
To turn off or on Recording Timer after its setting is done Timer Priority 1 Press CLOCK/TIMER repeatedly until “REC” appears on the display. Since each timer can be set separately, you may wonder what happens if the setting for these timers overlaps. Here are examples. 2 To turn off the Recording Timer, press CANCEL/DEMO. indicator and the REC (Recording Timer) indicator go off from the display (“OFF” appears for a while).
Using AV COMPU LINK Control System The AV COMPU LINK control system allows you to use JVC’s TV with simple operations. To use AV COMPU LINK control system, you need to connect this unit and a TV through the AV COMPU LINK terminals. • You can connect a TV that have AV COMPU LINK II or AV COMPU LINK EX terminals. AV COMPU LINK Connection Connect a TV by using a video cord (see page 9) then also connect it by using a cord with monaural mini-plugs (not supplied).
Appendix A—Maintenance To get the best performance of the unit, keep your discs, tapes, and mechanism clean. Handling discs Handling cassette tapes • Remove the disc from its case by holding it at the edge while pressing the center hole lightly. • Do not touch the shiny surface of the disc, or bend the disc. • Put the disc back in its case after use to prevent warping. • If the tape is loose in its cassette, take up the slack by inserting a pencil in one of the reels and rotating.
Appendix B—Troubleshooting If you are having a problem with your unit, check this list for a possible solution before calling for service. If you cannot solve the problem from the hints given here, or the unit has been physically damaged, call a qualified person, such as your dealer, for service. Symptom Cause Action Unable to cancel the display demonstration. Other buttons are pressed to cancel the display demonstration. Press CANCEL/DEMO on the unit. (See page 9.) No sound is heard.
Appendix C—Output Signals Through the OPTICAL DIGITAL OUTPUT Terminal They differ according to the “DIGITAL AUDIO OUTPUT” setting (see page 33). DIGITAL AUDIO OUT Output Signals Playback disc STREAM/PCM DOLBY DIGITAL/PCM DVD with 48 kHz, Linear PCM 48 kHz, Linear PCM 48 kHz, Linear PCM with 96 kHz, Linear PCM 48 kHz, Linear PCM 48 kHz, Linear PCM with Dolby Digital Dolby Digital bitstream Dolby Digital bitstream with DTS Digital Surround DTS bitstream 48 kHz, Linear PCM Video CD, Audio CD 44.
Appendix E—Language Code for On-Screen Menu This code list is used when you select a language of on-screen menus (see page 33).
Appendix F—Country Code for Parental Lock This code list is used when you set a country code for parental lock (see page 37).
Code Language Code Language Code Language LI Liechtenstein PE Peru TJ Tajikistan LK Sri Lanka PF French Polynesia TK Tokelau LR Liberia PG Papua New Guinea TM Turkmenistan LS Lesotho PH Philippines TN Tunisia LT Lithuania PK Pakistan TO Tonga LU Luxembourg PL Poland TP East Timor LV Latvia PM Saint Pierre and TR Turkey LY Libyan Arab Jamahiriya Miquelon TT Trinidad and Tobago MA Morocco PN Pitcairn TV Tuvalu MC Monaco PR Puerto Rico TW Taiwan,
Appendix G—Glossary 4:3 Letter Box screen DTS Digital Surround This is one method for displaying a wide screen picture on a conventional sized (4:3) TV. While viewing a wide screen picture, the black bars appear on the top and the bottom of the screen. Another discrete 5.1 channel digital audio format, available on CD, LD, and DVD software, developed by Digital Theater Systems, Inc. Compared to Dolby Digital, audio compression rate is relatively low.
Specifications Design and specifications are subject to change without notice. MX-DVA9 Speaker section Amplifier section — CA-MXDVA9 Output Power FRONT SUBWOOFERS: 100 W per channel, min. RMS, driven into 6 Ω at 63 Hz with no more than 10% total harmonic distortion. MAIN SPEAKERS: 55 W per channel, min. RMS, driven into 6 Ω at 1 kHz with no more than 10% total harmonic distortion. SURROUND (REAR and CENTER) SPEAKERS: 30 W per channel, min.
Authorized Service Centers ® QUALITY SERVICE HOW TO LOCATE YOUR JVC SERVICE CENTER TOLL FREE: 1 (800) 537-5722 http://www.jvc.com Dear Customer, In order to receive the most satisfaction from your purchase,please read the instruction booklet before operating the unit.In the event that repairs are necessary, please call 1 (800)537-5722 for your nearest authorized servicer or visit our website at www.JVC.com Remember to retain your Bill of Sale for Warranty Service.
LIMITED WARRANTY AUDIO-1 JVC COMPANY OF AMERICA warrants this product and all parts thereof, except as set forth below ONLY TO THE ORIGINAL PURCHASER AT RETAIL to be FREE FROM DEFECTIVE MATERIALS AND WORKMANSHIP from the date of original retail purchase for the period as shown below. ("The Warranty Period") PARTS 1 LABOR YR 1 YR THIS LIMITED WARRANTY IS VALID ONLY IN THE FIFTY (50) UNITED STATES, THE DISTRICT OF COLUMBIA AND IN COMMONWEALTH OF PUERTO RICO.
VICTOR COMPANY OF JAPAN, LIMITED V EN MX-DVA9[J]COVER_1 J 2 01.7.