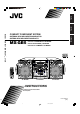
English Español SISTEMAS DE COMPONENTES COMPACTOS SISTEMA DE COMPONENTE COMPACTO COMPACT COMPONENT SYSTEM MX-GB5 Português MX-GB5 COMPACT COMPONENT SYSTEM —Consists of CA-MXGB5 and SP-MXGB5 —Consta de CA-MXGB5 y SP-MXGB5 —Consiste em CA-MXGB5 e SP-MXGB5 SP-MXGB5 CA-MXGB5 SP-MXGB5 INSTRUCTIONS MANUAL DE INSTRUCCIONES INSTRUÇÕES LVT1188-007A [UW] SAM Cover_MXGB5[UW].p65 3 04.4.
Warning, Cautions and Others Avisos, precauciones y otras notas Advertências, precauções e outras notas Caution –– STANDBY/ON button! Disconnect the mains plug to shut the power off completely. STANDBY/ON button in any position does not The disconnect the mains line. The power can be remote controlled. STANDBY/ON! Precaución –– Interruptor Desconectar el cable de alimentación para desactivar la alimentación totalmente.
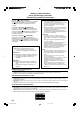
Caution: Proper Ventilation To avoid risk of electric shock and fire, and to prevent damage, locate the apparatus as follows: 1 Front: No obstructions and open spacing. 2 Sides/ Top/ Back: No obstructions should be placed in the areas shown by the dimensions below. 3 Bottom: Place on the level surface. Maintain an adequate air path for ventilation by placing on a stand with a height of 10 cm or more.
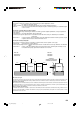
English Introduction We would like to thank you for purchasing one of our JVC products. Before operating this unit, read this manual carefully and thoroughly to obtain the best possible performance from your unit, and retain this manual for future reference. About This Manual Power sources This manual is organized as follows: • When unplugging from the wall outlet, always pull the plug, not the AC power cord. • The manual mainly explains operations using the buttons and controls on the unit.
English Contents Location of the Buttons and Controls ....................... 3 Front Panel ................................................................. 3 Remote Control .......................................................... 5 Getting Started ............................................................ 6 Unpacking .................................................................. 6 Putting the Batteries into the Remote Control ........... 6 Connecting Antennas ....................................
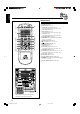
English Location of the Buttons and Controls Become familiar with the buttons and controls on your unit. Front Panel 1 2 3 y u 4 5 6 i 7 o 8 9 ; p q a w s e r d t f 3 EN_MXGB5[UW]_01-08.p65 3 04.3.
English Continued Display Window 1 2 3 GROUP TRACK 56 7 4 MP3 PRGM 0 8 9 RANDOM WOOFER REPEAT ALL 1 DISC MONO ST SOUND MODE = ~ ! See pages in the parentheses for details.
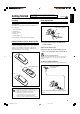
English Remote Control Remote Control 1 2 w 1 2 3 4 5 6 3 7 e 4 5 6 7 r t y u i 8 o 9 p q ; a 8 9 p q w e r t y u i o ; a BEEP ON/OFF button (11) SLEEP button (25) Number buttons (12, 16) TAPE A 3 (play) button (10, 20) Pressing this button also turns on the unit. VOLUME + button (10) FM/AM button (10, 12) Pressing this button also turns on the unit. AUX button (10) Pressing this button also turns on the unit.
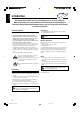
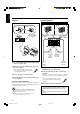
Do not connect the AC power cord until all other connections have been made. Unpacking Connecting Antennas After unpacking, check to be sure that you have all the following items. The number in the parentheses indicates the quantity of the pieces supplied. FM antenna • • • • • Continued FM antenna (supplied) NNA E ANT AM loop antenna (1) FM antenna (1) Remote control (1) Batteries (2) AC plug adaptor (1) English Getting Started AM ] M [75 F If any is missing, consult your dealer immediately.
English Connecting Speakers AM antenna 1 2, 3 1 Vinyl-covered wire (not supplied) ANTENNA AM FM [ 75 ] 2, 3 Speaker cord (blue/black) Black MAIN SPEAKER [ 4-8 ] Speaker cord (red/black) SUB WOOFER [ 6 -16 ] L L R R 4 Blue Black Speaker cord (blue/black) From right main speaker’s terminals AM loop antenna (supplied) 1 Press and hold the clamp of the AM terminal on the rear of the unit. 2 Insert the end of the AM loop antenna cord into the terminal.
English Connecting Other Equipment Adjusting the Voltage Selector You can connect audio equipment—used only as a playback device. Before plugging in the unit, set the correct voltage for your area with the voltage selector on the rear of the unit. • DO NOT connect any equipment while the power is on. • DO NOT plug in any equipment until all connections are complete.
English Common Operations Turning On or Off the Power To turn on the unit, press STANDBY/ON so that the standby lamp goes off. To turn off the unit (on standby), press STANDBY/ON again so that the standby lamp lights up. A little power is always consumed even while the unit is on standby. To switch off the power supply completely, unplug the AC power cord from the AC outlet.
English Continued Selecting the Sources Reinforcing the Bass Sound To listen to the radio, press FM/AM. (See page 12.) To play back CDs, press CD 6. (See pages 13 – 19.) To play back tapes, press TAPE A 3 or TAPE B 3. (See page 20.) To select the external equipment as the source, press AUX. This function only affects the playback sound, not your recording.
English Selecting the Sound Modes This function only affects the playback sound, not your recording. You can select one of the 6 preset sound modes (3 surround modes and 3 SEA—Sound Effect Amplifier—modes). When using the remote control, press SOUND MODE to select the sound mode. • First time you press the button, the current sound mode appears on the display. Each time you press the button while a sound mode appears on the display, the sound modes change as follows: D.
Before operating the tuner, make sure you have selected the correct AM Tuner interval spacing (see page 9). Tuning in to a Station—Auto Search English Listening to the Radio On the unit ONLY: 1 Tune in to the station you want to preset (in this example, of FM 87.50). • See “Tuning in to a Station—Auto Search.” 1 Press FM/AM. The unit automatically turns on and tunes in to the previously tuned station (either FM or AM). • Each time you press the button, the band alternates between FM and AM.
English Playing Back CDs This unit has been designed to playback the following CDs: • Audio CD • CD-R (CD-Recordable) • CD-RW (CD-ReWritable) • MP3 disc (MP3 files recorded on a CD-R or CD-RW)* When playing a CD-R or CD-RW • User-edited CD-Rs (CD-Recordable) and CD-RWs (CD-ReWritable) can be played back when they are already “finalized.” • Before playing back CD-Rs or CD-RWs, read their instructions or cautions carefully.
English Continued • Each time you press the button, the indication on the display changes as follows: ALL DISC 1 DISC • When the MP3 playback mode is the TRACK mode (See also page 17.) Current track title scrolls. REPEAT 1* (initial setting) REPEAT ALL DISC* MP3 REPEAT 1 DISC* * See page 19. ALL WOOFER 3 Press one of the disc number DISC When the track includes the ID3v1/1.1 tags, “Title” and “Artist” will scroll after the track title.
English One Disc play Basic CD Operations When 2 or 3 CDs are loaded on the disc trays, you can select one particular disc to be played back. While playing a CD, you can do the following operations. On the unit ONLY: To exchange CDs during playback of another 1 Load CDs. • If the current playing source is not the CD player, press CD 6, then 7 before going to the next step. 2 Press REPEAT repeatedly so that Press DISC CHANGE to change the CD and the carrousel comes out.
English Continued For MP3 disc: When the MP3 playback mode is the TRACK mode (See also page 17.) Press ¢ or 4 before or during playback. • ¢: Skips to the beginning of the next or succeeding tracks. • 4: Goes back to the beginning of the current or previous tracks. When using the remote control, press ¢/¡ or 4/1. If you press ¢ or 4 (or ¢/¡ or 4/1 on the remote control) to select a track while playback is stopped The selected track starts playback.
English Changing the MP3 Playback Mode Turning On or Off the Resume Play for MP3 Disc When playing an MP3 disc, you can choose the playback mode of the MP3 disc as follows: For MP3 disc, this unit can store the number of the track that you have stopped playback. By pressing CD 6, you can start playback again from the beginning of the same track— Resume play. You can turning on and off the resume play for MP3 discs. • TRACK mode: The unit recognizes only tracks (files).
English Continued Programming the Playing Order of the Tracks —–Program Play You can arrange the order in which the tracks play before you start playing. You can program up to 32 tracks. • To use Repeat play (see page 19) for Program play, press REPEAT after starting Program play. Playback and recording for Program play are not available to MP3 discs on this unit There may be a malfunction in case that you try to do such playback or recording.
English Playing at Random—–Random Play Repeating Tracks or CDs—–Repeat Play The tracks of the selected CD will play at random. • To use Random play, you have to cancel Program play. You can have all the CDs, the program or the individual track currently playing repeat as many times as you like. • Repeat play and Random play cannot be used at the same time. On the unit ONLY: 1 Load a CD. 2 Press one of the disc number On the unit ONLY: To repeat play, press REPEAT during or before playing.
English Playing Back Tapes Playing Back a Tape To stop during play, press 7. 1 Press 0 for the deck you want to use. To fast-forward the tape, press ¡ (or ¢/¡ on the remote control). The tape running indicator (3) starts flashing quickly. To rewind the tape, press 1 (or 4/1 on the remote control). The tape running indicator (2) starts flashing quickly. When you fast-forward or rewind the tape while the tape play is stopped You can fast-forward or rewind the tape in the deck currently selected.
English Recording Recording a Tape on Deck B IMPORTANT: • It may be unlawful to record or play back copyrighted material without the consent of the copyright owner. • The recording level is automatically set correctly, so it is not affected by the VOLUME, the SUBWOOFER LEVEL, the RHYTHM AX, and the SOUND MODE controls. Thus, during recording you can adjust the sound you are actually listening to without affecting the recording level.
English Dubbing Tapes CD Synchronized Recording On the unit ONLY: 1 Press TAPE A 3, then 7. 2 Put the source cassette in deck A, and a recordable cassette into deck B. 3 Press DUBBING. Dubbing starts. “DUBBING” appears, and the REC (recording) indicator lights up on the display. • The REC (recording) lamp also lights up during recording. You can easily record a CD onto a tape. • This function does not work for MP3 discs.
English Using the Timers There are three timers available—Daily Timer, Recording Timer, and Sleep Timer. Before using the timers, you need to set the clock built in the unit. (See “Setting the Clock” on page 9.) 2 Press CLOCK/TIMER again. “ON TIME” appears for 2 seconds, then the unit enters on-time setting mode. Using Daily Timer With Daily Timer, you can wake to your favorite music or radio program. You can set the timer whether the unit is on or off. How Daily Timer actually works Before you start..
English Continued 6 Select the preset station number. Press ¢ or 4 to select the preset station number, then press SET/DISPLAY. The unit enters volume setting mode. 7 Press ¢ or 4 to set the volume level. • You can select the volume level from VOL MIN, VOL 1 — VOL 30, and VOL MAX. WOOFER 8 Press SET/DISPLAY to complete the Daily Timer setting. The DAILY (daily timer) indicator stops flashing and remains lit. The settings you have done are shown on the display in sequence for your confirmation.
English 4 Set the on-time you want the unit to turn on. 1) Press ¢ or 4 to set the hour, then press SET/DISPLAY. 2) Press ¢ or 4 to set the minute, then press SET/DISPLAY. “OFF TIME” appears for 2 seconds, then the unit enters offtime setting mode. 5 Set the off-time you want the unit to turn off (on standby). 1) Press ¢ or 4 to set the hour, then press SET/DISPLAY. 2) Press ¢ or 4 to set the minute, then press SET/DISPLAY. The unit enters preset station selecting mode. 6 Select the preset station.
English Maintenance To get the best performance of the unit, keep your discs, tapes, and mechanism clean. Handling cassette tapes Cleaning the unit • Stains on the unit Should be wiped off with a soft cloth. If the unit is heavily stained, wipe it with a cloth soaked in water-diluted neutral detergent and wrung well, then wipe clean with a dry cloth. • Avoid the following since they may cause damage to the unit. - DO NOT wipe it with a hard cloth. - DO NOT wipe it strong.
English Troubleshooting If you are having a problem with your unit, check this list for a possible solution before calling for service. If you cannot solve the problem from the hints given here, or the unit has been physically damaged, call a qualified person, such as your dealer, for service. Symptom Cause Action Unable to cancel the display demonstration. Other buttons are pressed to cancel the display demonstration. Press CANCEL/DEMO on the unit. (See page 8.) No sound is heard.
Specifications English Design and specifications are subject to change without notice. Amplifier section—CA-MXGB5 Output Power SUBWOOFERS : 120 W per channel, min. RMS, driven into 6 Ω at 63 Hz with no more than 10% total harmonic distortion. (IEC268-3) MAIN SPEAKERS : 60 W per channel, min. RMS, driven into 4 Ω at 1 kHz with no more than 10% total harmonic distortion.
Mains (AC) Line Instruction (not applicable for Europe, U.S.A., Canada, Australia, and U.K.) Instrucción sobre la línea de la red (CA) (no aplicable para Europa, EE.UU., Canadá, Australia, ni el Grã-Bretanha) Instrução sobre a tensão da rede eléctrica (CA) (não aplicável para a Europa, os E.U.A.