MX-GB6/MX-GB5 COMPACT COMPONENT SYSTEM SYSTEME DE COMPOSANTS COMPACT COMPACT COMPONENT SYSTEM MX-GB6 MX-GB5 —Consists of CA-MXGB6 and SP-MXGB6 —Composé du CA-MXGB6 et SP-MXGB6 —Consists of CA-MXGB5 and SP-MXGB5 —Composé du CA-MXGB5 et SP-MXGB5 SP-MXGB6 CA-MXGB6 SP-MXGB6 SP-MXGB5 CA-MXGB5 SP-MXGB5 INSTRUCTIONS MANUEL D’INSTRUCTIONS For Customer Use: Enter below the Model No. and Serial No. which are located either on the rear, bottom or side of the cabinet.
Warnings, Cautions and Others Mises en garde, précautions et indications diverses CAUTION RISK OF ELECTRIC SHOCK DO NOT OPEN TO REDUCE THE RISK OF ELECTRIC SHOCK. DO NOT REMOVE COVER (OR BACK) NO USER SERVICEABLE PARTS INSIDE. REFER SERVICING TO QUALIFIED SERVICE PERSONNEL. CAUTION To reduce the risk of electrical shocks, fire, etc.: 1. Do not remove screws, covers or cabinet. 2. Do not expose this appliance to rain or moisture.
For Canada/pour le Canada CAUTION: TO PREVENT ELECTRIC SHOCK, MATCH WIDE BLADE OF PLUG TO WIDE SLOT, FULLY INSERT. ATTENTION: POUR EVITER LES CHOCS ELECTRIQUES, INTRODUIRE LA LAME LA PLUS LARGE DE LA FICHE DANS LA BORNE CORRESPONDANTE DE LA PRISE ET POUSSER JUSQUAU FOND.
English Introduction We would like to thank you for purchasing one of our JVC products. Before operating this unit, read this manual carefully and thoroughly to obtain the best possible performance from your unit, and retain this manual for future reference. About This Manual Power sources This manual is organized as follows: • When unplugging from the wall outlet, always pull the plug, not the AC power cord. • The manual mainly explains operations using the buttons and controls on the unit.
English Contents Location of the Buttons and Controls ....................... 3 Front Panel ................................................................. 3 Remote Control .......................................................... 5 Getting Started ............................................................ 6 Unpacking .................................................................. 6 Putting the Batteries into the Remote Control ........... 6 Connecting Antennas ....................................
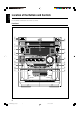
English Location of the Buttons and Controls Become familiar with the buttons and controls on your unit. Front Panel 1 2 3 y u 4 5 6 i 7 o 8 9 ; p q a w s e r d t f 3 EN_MXGB6&5[C]_01-08.p65 3 04.1.
English Continued Display Window 1 2 3 GROUP TRACK 56 7 4 MP3 PRGM 0 8 9 RANDOM WOOFER REPEAT ALL 1 DISC MONO ST SOUND MODE = ~ ! See pages in the parentheses for details.
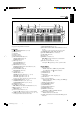
English Remote Control Remote Control 1 2 w 1 2 3 4 5 6 3 7 e 4 5 6 7 r t y u i 8 o 9 p q ; a 8 9 p q w e r t y u i o ; a BEEP ON/OFF button (11) SLEEP button (25) Number buttons (12, 16) TAPE A 3 (play) button (9, 20) Pressing this button also turns on the unit. VOLUME + button (10) FM/AM button (9, 12) Pressing this button also turns on the unit. AUX button (9) Pressing this button also turns on the unit.
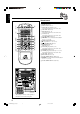
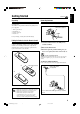
Continued Unpacking Connecting Antennas After unpacking, check to be sure that you have all the following items. The number in the parentheses indicates the quantity of the pieces supplied. FM antenna • • • • English Getting Started FM antenna (supplied) E NNA ANT AM loop antenna (1) FM antenna (1) Remote control (1) Batteries (2) AM ] M [75 F If any is missing, consult your dealer immediately.
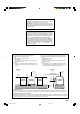
English Connecting Speakers AM antenna For MX-GB6: DO NOT carry the speaker by holding the tube duct (on the top of the speaker). 2, 3 1 1 2, 3 Vinyl-covered wire (not supplied) ANTENNA AM FM [ 75 ] Speaker cord (blue/black) Black MAIN SPEAKER [ 4-8 ] 4 L R R From right main speaker’s terminals on the rear of the unit. into the terminal. • If the AM loop antenna wire is covered with vinyl, remove the vinyl by twisting it as shown in the diagram. 3 Release the finger from the clamp.
English Connecting Other Equipment NOW you are ready to plug in the unit and other connected equipment. You can connect audio equipment—used only as a playback device. • DO NOT connect any equipment while the power is on. • DO NOT plug in any equipment until all connections are complete. To connect audio equipment Canceling the Display Demonstration When connecting the AC power cord into a wall outlet, the unit automatically starts the display demonstration.
English Common Operations Turning On or Off the Power To turn on the unit, press STANDBY/ON so that the standby lamp goes off. To turn off the unit (on standby), press STANDBY/ON again so that the standby lamp lights up. A little power is always consumed even while the unit is on standby. To switch off the power supply completely, unplug the AC power cord from the AC outlet.
English Continued Adjusting the Volume Reinforcing the Bass Sound You can adjust the volume level only while the unit is turned on. This function only affects the playback sound, not your recording. This function only affects the playback sound, not your recording. Turn the VOLUME control clockwise to increase the volume or counterclockwise to decrease it. • The volume level can be adjusted in 32 steps (VOL MIN, VOL 1 — VOL 30, and VOL MAX).
English Selecting the Sound Modes This function only affects the playback sound, not your recording. You can select one of the 6 preset sound modes (3 surround modes and 3 SEA—Sound Effect Amplifier—modes). When using the remote control, press SOUND MODE to select the sound mode. • First time you press the button, the current sound mode appears on the display. Each time you press the button while a sound mode appears on the display, the sound modes change as follows: D.
Tuning in to a Station—Auto Search English Listening to the Radio On the unit ONLY: 1 Tune in to the station you want to preset (in 1 Press FM/AM. this example, of FM 87.50). The unit automatically turns on and tunes in to the previously tuned station (either FM or AM). • Each time you press the button, the band alternates between FM and AM. 2 Start searching for stations. On the unit: Press and hold TUNING + or TUNING – for more than 1 second.
English Playing Back CDs This unit has been designed to playback the following CDs: • Audio CD • CD-R (CD-Recordable) • CD-RW (CD-ReWritable) • MP3 disc (MP3 files recorded on a CD-R or CD-RW)* When playing a CD-R or CD-RW • User-edited CD-Rs (CD-Recordable) and CD-RWs (CD-ReWritable) can be played back when they are already “finalized.” • Before playing back CD-Rs or CD-RWs, read their instructions or cautions carefully.
English Continued • Each time you press the button, the indication on the display changes as follows: ALL DISC 1 DISC • When the MP3 playback mode is the TRACK mode (See also page 17.) Current track title scrolls. REPEAT 1* (initial setting) REPEAT ALL DISC* MP3 REPEAT 1 DISC* * See page 19. ALL WOOFER 3 Press one of the disc number DISC When the track includes the ID3v1/1.1 tags, “Title” and “Artist” will scroll after the track title.
English One Disc play Basic CD Operations When 2 or 3 CDs are loaded on the disc trays, you can select one particular disc to be played back. While playing a CD, you can do the following operations. On the unit ONLY: To exchange CDs during playback of another 1 Load CDs. • If the current playing source is not the CD player, press CD 6, then 7 before going to the next step. 2 Press REPEAT repeatedly so that Press DISC CHANGE to change the CD and the carrousel comes out.
English Continued For MP3 disc: When the MP3 playback mode is the TRACK mode (See also page 17.) Press ¢ or 4 before or during playback. • ¢: Skips to the beginning of the next or succeeding tracks. • 4: Goes back to the beginning of the current or previous tracks. When using the remote control, press ¢/¡ or 4/1. If you press ¢ or 4 (or ¢/¡ or 4/1 on the remote control) to select a track while playback is stopped The selected track starts playback.
English Changing the MP3 Playback Mode Turning On or Off the Resume Play for MP3 Disc When playing an MP3 disc, you can choose the playback mode of the MP3 disc as follows: For MP3 disc, this unit can store the number of the track that you have stopped playback. By pressing CD 6, you can start playback again from the beginning of the same track— Resume play. You can turning on and off the resume play for MP3 discs. • TRACK mode: The unit recognizes only tracks (files).
English Continued Programming the Playing Order of the Tracks —–Program Play You can arrange the order in which the tracks play before you start playing. You can program up to 32 tracks. • To use Repeat play (see page 19) for Program play, press REPEAT after starting Program play. Playback and recording for Program play are not available to MP3 discs on this unit There may be a malfunction in case that you try to do such playback or recording.
English Playing at Random—–Random Play Repeating Tracks or CDs—–Repeat Play The tracks of the selected CD will play at random. • To use Random play, you have to cancel Program play. You can have all the CDs, the program or the individual track currently playing repeat as many times as you like. • Repeat play and Random play cannot be used at the same time. On the unit ONLY: 1 Load a CD. 2 Press one of the disc number On the unit ONLY: To repeat play, press REPEAT during or before playing.
English Playing Back Tapes Playing Back a Tape To stop during play, press 7. 1 Press 0 for the deck you want to use. To fast-forward the tape, press ¡ (or ¢/¡ on the remote control). The tape running indicator (3) starts flashing quickly. To rewind the tape, press 1 (or 4/1 on the remote control). The tape running indicator (2) starts flashing quickly. When you fast-forward or rewind the tape while the tape play is stopped You can fast-forward or rewind the tape in the deck currently selected.
English Recording Recording a Tape on Deck B IMPORTANT: • It may be unlawful to record or play back copyrighted material without the consent of the copyright owner. • The recording level is automatically set correctly, so it is not affected by the VOLUME, the SUBWOOFER LEVEL, the RHYTHM AX, and the SOUND MODE controls. Thus, during recording you can adjust the sound you are actually listening to without affecting the recording level.
English Dubbing Tapes CD Synchronized Recording On the unit ONLY: 1 Press TAPE A 3, then 7. 2 Put the source cassette in deck A, and a recordable cassette into deck B. 3 Press DUBBING. Dubbing starts. “DUBBING” appears, and the REC (recording) indicator lights up on the display. • The REC (recording) lamp also lights up during recording. You can easily record a CD onto a tape. • This function does not work for MP3 discs.
English Using the Timers There are three timers available—Daily Timer, Recording Timer, and Sleep Timer. Before using the timers, you need to set the clock built in the unit. (See “Setting the Clock” on page 9.) 2 Press CLOCK/TIMER again. “ON TIME” appears for 2 seconds, then the unit enters on-time setting mode. Using Daily Timer With Daily Timer, you can wake to your favorite music or radio program. You can set the timer whether the unit is on or off. How Daily Timer actually works Before you start..
English Continued 6 Select the preset station number. Press ¢ or 4 to select the preset station number, then press SET/DISPLAY. The unit enters volume setting mode. 7 Press ¢ or 4 to set the volume level. • You can select the volume level from VOL MIN, VOL 1 — VOL 30, and VOL MAX. WOOFER 8 Press SET/DISPLAY to complete the Daily Timer setting. The DAILY (daily timer) indicator stops flashing and remains lit. The settings you have done are shown on the display in sequence for your confirmation.
English 4 Set the on-time you want the unit to turn on. 1) Press ¢ or 4 to set the hour, then press SET/DISPLAY. 2) Press ¢ or 4 to set the minute, then press SET/DISPLAY. “OFF TIME” appears for 2 seconds, then the unit enters offtime setting mode. 5 Set the off-time you want the unit to turn off (on standby). 1) Press ¢ or 4 to set the hour, then press SET/DISPLAY. 2) Press ¢ or 4 to set the minute, then press SET/DISPLAY. The unit enters preset station selecting mode. 6 Select the preset station.
English Maintenance To get the best performance of the unit, keep your discs, tapes, and mechanism clean. Handling cassette tapes Cleaning the unit • Stains on the unit Should be wiped off with a soft cloth. If the unit is heavily stained, wipe it with a cloth soaked in water-diluted neutral detergent and wrung well, then wipe clean with a dry cloth. • Avoid the following since they may cause damage to the unit. - DO NOT wipe it with a hard cloth. - DO NOT wipe it strong.
English Troubleshooting If you are having a problem with your unit, check this list for a possible solution before calling for service. If you cannot solve the problem from the hints given here, or the unit has been physically damaged, call a qualified person, such as your dealer, for service. Symptom Cause Action Unable to cancel the display demonstration. Other buttons are pressed to cancel the display demonstration. Press CANCEL/DEMO on the unit. (See page 8.) No sound is heard.
Specifications Amplifier section—CA-MXGB6 Amplifier section—CA-MXGB5 Output Power SUBWOOFERS Output Power SUBWOOFERS Audio input sensitivity/Impedance (at 1 kHz, measured at MAIN SPEAKERS) AUX : 400 mV/50 kΩ Audio input sensitivity/Impedance (at 1 kHz, measured at MAIN SPEAKERS) AUX : 400 mV/50 kΩ : 170 W per channel, min. RMS, driven into 6 Ω at 63 Hz with no more than 10% total harmonic distortion. MAIN SPEAKERS: 80 W per channel, min.
Français Introduction Nous vous remercions d’avoir acheté un de nos produits JVC. Avant d’utiliser l’appareil veuillez lire entièrement et attentivement ce mode d’emploi afin d’obtenir les meilleures performances possibles, et conservez ce mode d’emploi à titre de référence. À propos de ce mode d’emploi Souces d’alimentations Ce mode d’emploi est organisé comme suit: • Pour débrancher l’appareil de la prise murale, tirez toujours sur la fiche et non pas sur le cordon d’alimentations secteur.
Table des matières Emplacement des touches et des commandes .......... 3 Panneau avant ............................................................. 3 Télécommande ........................................................... 5 Français Pour commencer ......................................................... 6 Déballage .................................................................... 6 Mise en place des piles dans la télécommande ............ 6 Connexion des antennes ....................................
Emplacement des touches et des commandes Familiarisez-vous avec les touches et les commandes de votre appareil. Français Panneau avant 1 2 3 y u 4 5 6 i 7 o 8 9 ; p q a w s e r d t f 3 FR01-08_MXGB6&5[C].p65 3 04.1.
À suivre Fenêtre d’affichage 2 3 GROUP TRACK 56 7 4 MP3 Français 1 PRGM 0 8 9 RANDOM WOOFER REPEAT ALL 1 DISC MONO ST SOUND MODE = ~ ! Référez-vous aux pages indiquées entre parenthèses pour plus d’informations.
Télécommande Télécommande Français 1 2 w 1 2 3 4 5 6 3 7 e 4 5 6 7 r t y u i 8 o 9 p q ; a 8 9 p q w e r t y u i o ; a Touche BEEP ON/OFF (11) Touche SLEEP (25) Touches numériques (12, 16) Touche TAPE A 3 (lecture) (9, 20) Appuyer sur cette touche met aussi l’appareil sous tension. Touche VOLUME + (10) Touche FM/AM (9, 12) Appuyer sur cette touche met aussi l’appareil sous tension. Touche AUX (9) Appuyer sur cette touche met aussi l’appareil sous tension.
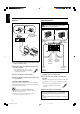
Pour commencer Déballage Connexion des antennes Après le déballage, vérifiez que tous les éléments suivants sont présents. Le nombre entre parenthèses indique la quantité de pièces fournie. Antenne FM • • • • Antenne FM (fournie) NNA E Antenne cadre AM (1) Antenne FM (1) Télécommande (1) Piles (2) Français À suivre ANT AM ] M [75 F Si quelque chose manquait, consultez votre revendeur immédiatement.
Connexion des enceintes Antenne AM 2, 3 1 Français Pour le MX-GB6: NE PORTEZ PAS les enceintes en les tenant par la gaine (au sommet des enceintes). 1 2, 3 Fil recouvert de vinyle (non fourni) ANTENNA AM FM [ 75 ] Cordon d’enceinte (bleu/noir) Noir MAIN SPEAKER [ 4-8 ] 4 1 Poussez sur le levier des prises AM à l’arrière de l’appareil. 2 Insérez l’extrémité du cordon de l’antenne cadre AM dans la prise.
Connexion d’un autre appareil MAINTENANT, vous pouvez brancher cet appareil et les appareils connectés au secteur. • NE RÉALISEZ AUCUNE connexion quand l’appareil est sous tension. • NE BRANCHEZ AUCUN appareil au secteur avant que toutes les connexions soient terminées. Pour connecter un appareil audio Annulation de la démonstration des affichages Quand le cordon d’alimentation secteur est connecté à une prise murale, l’appareil démarre automatiquement la démonstration des affichages.
Fonctionnement commun Français Mise sous ou hors tension de l’appareil Pour mettre l’appareil sous tension, appuyez sur STANDBY/ON de façon que le témoin d’attente s’éteigne. Pour mettre l’appareil hors tension, appuyez sur STANDBY/ON de façon que le témoin d’attente s’allume. Une petite quantité d’énergie est consommée en permanence même quand l’appareil est en attente. Pour mettre l’appareil complètement hors tension, débranchez le cordon d’alimentation secteur de la prise murale.
Ajustement du volume Renforcement des graves Vous pouvez ajuster le niveau de volume uniquement quand l’appareil est sous tension. Cette fonction n’affecte que le son de lecture et non pas votre enregistrement. Cette fonction n’affecte que le son de lecture et non pas votre enregistrement. Tournez le réglage VOLUME dans le sens des aiguilles d’une montre pour augmenter le volume ou dans le sens contraire pour le diminuer.
Sélection des modes sonores Français Cette fonction n’affecte que le son de lecture et non pas votre enregistrement. Vous pouvez choisir un des 6 modes sonores préréglés (3 modes Surround et 3 modes SEA—Amplificateur d’effet sonore). Pour choisir les modes sonores, poussez répétitivement vers le haut le réglage SOUND MODE jusqu’à ce que le mode souhaité apparaisse sur l’affichage. • Le témoin SOUND MODE s’allume aussi.
Écoute de la radio 1 Appuyez sur FM/AM. L’appareil se met automatiquement sous tension et accord automatiquement la dernière station écoutée (FM ou AM). • Chaque fois que vous appuyez sur la touche, la bande alterne entre FM et AM. Sur l’appareil UNIQUEMENT: 1 Accordez la station que vous souhaitez prérégler (FM 87,50, dans cet exemple). • Reportez-vous à “Accord ‘une station—Recheche automatique”. Français Accord ‘une station—Recheche automatique 2 Appuyez sur SET/DISPLAY.
Français Lecture d’un CD Cet appareil est conçu pour reproduire les types de CD suivants: • CD audio • CD-R (CD enregistrable) • CD-RW (CD réinscriptible) • Disque MP3 (fichiers MP3 enregistrés sur un CD-R ou CD-RW)* Lors de la reproduction d’un CD-R ou CD-RW • Les CD-R (enregistrable) et les CD-RW (réinscriptibles) édités par l’utilisateur peuvent être reproduits uniquement s’ils ont été “finalisés”. • Avant la lecture d’un CD-R ou CD-RW, lisez leurs instructions attentivement.
À suivre • Chaque fois que vous appuyez sur la touche, l’indication de l’affichage change comme suit: ALL DISC 1 DISC • Quand le mode de lecture MP3 est réglé sur le mode TRACK (Référez-vous aussi à la page 17.) Le titre de la plage actuelle défile. REPEAT 1* REPEAT ALL DISC* REPEAT 1 DISC* MP3 * Voir page 19. 3 Appuyez sur la touche de ALL WOOFER DISC Quand la plage comprend des balises ID3v1/1.1, le “Titre” et l’“Artiste” défilent sur l’affichage après le titre de la plage.
Fonctionnement de base du lecteur CD Lecture d’un seul disque Quand 2 ou 3 CD sont en place sur le plateau à disque, vous pouvez choisir le disque que vous souhaitez reproduire. Français Sur l’appareil UNIQUEMENT: 1 Insérez les CD. • Si la source de lecture actuelle n’est pas le lecteur de CD, appuyez sur CD 6, puis sur 7 avant de passer à l’étape suivante. 2 Appuyez répétitivement sur REPEAT de façon que l’indicateur 1 DISC s’allume sur l’affichage.
À suivre Lors de l’utilisation de la télécommande, appuyez sur ¢/ ¡ ou 4/1. Si vous appuyez sur ¢ ou 4 (ou ¢/¡ ou 4/ 1 sur la télécommande) pour choisir une plage pendant que la lecture est arrêtée La plage choisie est reproduite. Pour aller à un autre album sur un disque MP3 Quand le mode de lecture MP3 est réglé sur le mode ALBUM (Référez-vous aussi à la page 17.) Appuyez sur ¢ ou 4 avant ou pendant la lecture. • ¢: Saute au début de la première plage de l’album suivant.
Changement du mode de lecture MP3 Français Lors de la lecture d’un disque MP3, vous pouvez choisir le mode de lecture du disque MP3 de la façon suivante: • Mode TRACK: L’appareil reconnaît uniquement les plages (fichiers). Vous pouvez reproduire un disque MP3 de la même façon qu’un CD audio. • Mode ALBUM: L’appareil reconnaît les plages (fichiers) et les albums (dossiers) sur un disque MP3. Vous pouvez reproduire un disque MP3 en fonction de la façon dont ils sont regroupés.
Programmation de l’ordre de lecture des plages —–Lecture programmée 5 Programmez les autres plages souhaitées. Vous pouvez arranger l’ordre dans lequel vous souhaitez reproduire les plages. Vous pouvez programmer 32 plages maximum. • Pour utiliser la lecture répétée (voir page 19) pour la lecture programmée, appuyez sur REPEAT après avoir démarré la lecture programmée. 6 Appuyez sur CD 6.
Français Lecture dans un ordre aléatoire —Lecture aléatoire Répétition des plages ou des CD —Lecture répétée Les plages du CD choisi sont reproduites aléatoirement. • Pour utiliser le mode de lecture aléatoire, vous devez annuler d’abord le mode de lecture programmée. Vous pouvez répéter tous les CD, le programme ou la plage en cours de lecture autant de fois que vous le souhaitez. • La lecture répétée et la lecture aléatoire ne peuvent pas être utilisées en même temps.
Lecture d’une cassette Pour arrêter la lecture en cours, appuyez sur 7. 1 Appuyez sur 0 de la platine que vous Pour avancer rapidement la bande, appuyez sur ¡ (ou ¢/¡ sur la télécommande). L’indicateur de défilement de bande (3) clignote rapidement. souhaitez utiliser. Pour rebobiner la bande, appuyez sur 1 (ou 4/1 sur la télécommande). L’indicateur de défilement de bande (2) clignote rapidement.
Enregistrement Enregistrement d’une cassette sur la platine B Français IMPORTANT: • Notez qu’il peut être illégal d’enregistrer ou de reproduire un matériel protégé par des droits d’auteur sans la permission du propriétaire des droits. • Le niveau d’enregistrement est réglé correctement automatiquement et n’est pas affecté par les réglages VOLUME, SUBWOOFER LEVEL, RHYTHM AX et SOUND MODE. Par conséquence, vous pouvez ajuster le son écouté pendant l’enregistrement sans affecter le niveau d’enregistrement.
Sur l’appareil UNIQUEMENT: 1 Appuyez sur TAPE A 3, puis sur 7. 2 Mettez la cassette source dans la platine A et une cassette enregistrable dans la platine B. 3 Appuyez sur DUBBING. La copie démarre. “DUBBING” apparaît et l’indicateur REC (enregistrement) s’allume sur l’affichage. • Le témoin REC (enregistrement) s’allume aussi pendant l’enregistrement. Enregistrement synchronisé de CD Vous pouvez enregistrer facilement un CD sur une cassette.
Utilisation des minuteries Français Il y a trois minuteries disponibles—la minuterie quotidienne, d’enregistrement et d’arrêt. Avant d’utiliser les minuteries, vous devez régler l’horloge intégrée à l’appareil. (Voir “Réglage de l’horloge” à la page 9.) Utilisation de la minuterie quotidienne Avec la minuterie quotidienne, vous pouvez vous réveiller au son de votre musique ou émission de radio préférée. Vous pouvez régler la minuterie que l’appareil soit sous ou hors tension.
À suivre station préréglée. Appuyez sur ¢ ou 4 pour choisir le numéro de station préréglé, puis appuyez sur SET/ DISPLAY. L’appareil entre en mode de réglage du volume. 7 Appuyez sur ¢ ou 4 pour régler le niveau du volume. • Vous pouvez choisir un niveau de volume parmi VOL MIN, VOL 1—VOL 30, et VOL MAX. WOOFER 8 Appuyez sur SET/DISPLAY pour terminer le réglage de la minuterie quotidienne. L’indicateur DAILY (minuterie quotidienne) s’arrête de clignoter et reste allumé.
4 Réglez l’heure à laquelle vous souhaitez que l’appareil se mette sous tension. Français 1) Appuyez sur ¢ ou 4 pour régler les heures, puis appuyez sur SET/DISPLAY. 2) Appuyez sur ¢ ou 4 pour régler les minutes, puis appuyez sur SET/DISPLAY. “OFF TIME” apparaît pendant 2 secondes, puis l’appareil entre en mode d’attente de minuterie. 5 Réglez l’heure à laquelle vous souhaitez que l’appareil se mette hors tension (en attente). 1) Appuyez sur ¢ ou 4 pour régler les heures, puis appuyez sur SET/DISPLAY.
Entretien Pour obtenir les meilleures performances de votre appareil, gardez propres les disques, les cassettes et le mécanisme. • Tâches sur l’appareil Frottez-les avec un chiffon doux. Si l’appareil est très sale, frottez avec un chiffon imprégné d’une solution détergente neutre et bien essoré puis essuyez avec chiffon sec. • Évitez ce qui suit car cela pourrait endommager l’appareil. - NE FROTTEZ PAS avec un chiffon dur. - NE FROTTEZ PAS trop fort. - N’UTILISEZ PAS de diluant ou de benzine.
Guide de dépannage Français Si vous des problèmes avec votre appareil, cherchez d’abord une solution dans cette liste avant d’appeler un réparateur. Si vous ne pouvez pas résoudre le problème avec les conseils donnés ici, ou si l’appareil est physiquement endommagé, appelez une personne qualifiée, telle que votre revendeur, pour faire réparer l’appareil. Symptôme Cause Action Impossible d’annuler la démonstration des affichages.
La conception et les spécifications sont sujettes à changement sans notification. Section de l’amplificateur—CA-MXGB6 Section de l’amplificateur—CA-MXGB5 Puissance de sortie SUBWOOFERS : 170 W par canal, min. RMS, entraîné sur 6 Ω à 63 Hz avec moins de 10% de distorsion harmonique totale. MAIN SPEAKERS: 80 W par canal, min. RMS, entraîné sur 4 Ω à 1 kHz avec moins de 10% de distorsion harmonique totale. Puissance de sortie SUBWOOFERS : 160 W par canal, min.
MX-GB6/MX-GB5 COMPACT COMPONENT SYSTEM VICTOR COMPANY OF JAPAN, LIMITED EN, FR © 2004 VICTOR COMPANY OF JAPAN, LIMITED MXGB6&5[C]_Cover.p65 2 0204TMMMDWSAM 04.1.