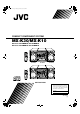
Cover.
Warning. fm Page1 Wedn esday, De cember 1 2, 2 001 10:4 3 AM Warnings, Cautions and Others CAUTION RISK OF ELECTRIC SHOCK DO NOT OPEN CAUTION: TO REDUCE THE RISK OF ELECTRIC SHOCK DO NOT REMOVE COVER (OR BACK) NO USER SERVICEABLE PARTS INSIDE REFER SERVICING TO QUALIFIED SERVICE PERSONNEL.
warning.fm Page 2 Monday, February 4, 2002 4:34 PM CLASS 1 LASER PRODUCT DANGER 1. Invisible laser radiation when open and interlock failed or defeated. Avoid direct exposure to beam. CAUTION 1. Do not open the top cover. There are no user serviceable parts inside the unit; leave all servicing to qualified service personnel. 2. Use of controls, adjustments or performance of procedures other than those specified herein may result in hazardous radiation exposure.
MX-K30&K10(J).book Page 1 Wednesday, December 12, 2001 11:07 AM Introduction Thank you for purchasing the JVC Compact Component System. We hope it will be a valued addition to your home, giving you years of enjoyment. Be sure to read this instruction manual carefully before operating your new stereo system. In it you will find all the information you need to set up and use the system. If you have a query that is not answered by the manual, please contact your dealer.
MX-K30&K10(J).book Page 2 Wednesday, December 12, 2001 11:07 AM Table of Contents Introduction ...................................................................................................................1 Features.................................................................................................................................................... 1 How This Manual Is Organized..............................................................................................................
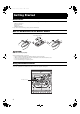
Page 3 Friday, January 4, 2002 7:17 PM Getting Started Accessories Make sure that you have all of the following items, which are supplied with the System. AM Loop Antenna (1) Remote Control (1) Batteries (2) FM Wire Antenna (1) If any of these items are missing, contact your dealer immediately. How To Put Batteries In the Remote Control Match the polarity (+ and –) on the batteries with the + and – markings in the battery compartment. R6P(SUM-3)/AA(15F) CAUTION: • Handle batteries properly.
Body.fm Page 4 Friday, March 1, 2002 5:45 PM Getting Started CAUTION: • Make all connections before plugging the System into an AC power outlet. Connecting the FM Antenna Using the Supplied Wire Antenna FM wire antenna (supplied) Extend the supplied FM Wire Antenna horizontally. Strip vinyl shield from cut line, twist wire core. Using an FM 75-Ohm Antenna Cable (not Supplied) If reception is poor, connect the outside antenna.
Body.fm Page 5 Friday, March 1, 2002 5:45 PM Getting Started Connecting the AM Antenna Rear Panel of the Unit Turn the loop until you have the best reception. AM loop antenna (Supplied) Attach the AM loop to its base by snapping the tabs on the loop into the slot in the base. AM antenna wire (not supplied) If reception is poor, connect the outside antenna. • Even when connecting an outside AM antenna, keep the indoor AM loop connected.
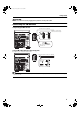
Body.fm Page 6 Friday, January 4, 2002 7:17 PM Getting Started Connecting External Equipment Connect a signal cord (not supplied) between the System’s AUX-IN terminals and the output terminals of the external MD recorder, tape deck, etc. You can then listen to the external source through the System. Signal cord (not supplied) Pin-plug x 2 MD recorder, tape deck, etc. (not supplied) Pin-plug x 2 Connecting to the Wall Outlet Plug the AC power cord into the wall outlet.
Body.
Body.fm Page 8 Friday, January 4, 2002 7:17 PM Basic Operations Fade-out Muting (FADE MUTING) You can mute the output with one touch operation. To muting the output, press the FADE MUTING button on the Remote Control. The output is faded out. To release muting, press the FADE MUTING button once again. The output is faded in to the previous level. • After Fade-out Muting, turning the VOLUME control on the unit or pressing the VOLUME button on the Remote Control will increase the volume from MIN.
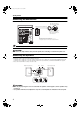
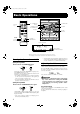
Page 9 Friday, January 4, 2002 7:17 PM Using the Tuner 3-CD PLAY & EXCHANGE COMPONENT SYSTEM REPEAT 1 BIT DUAL D/A SOUND MODE CONVERTER Numeric keys PROGRAM UM SLEEP P PO COMPACT RO C STANDBY/ON K CD-R/RW PLAYBACK PANDOM AUX CLA E S SIC VO L Body.fm STANDBY/ON STANDBY SET CANCEL IP FM /AM FM/AM FM MODE CD2 CD3 CD TAPE A/B TAPE DIS SET FM / AM AUX FM/AM CD SK 4 ¢ TAPE CD PHONES 3 TUNING REC START / STOP CD1 C PRESET / DEMO FM MODE ACTIVE BASS EX.
Body.fm Page 10 Friday, January 4, 2002 7:17 PM Using the Tuner CAUTION: • In AM broadcast, reception sensitivity will be changed by turning the AM loop antenna. Turn the AM loop antenna for best reception. • Even if the System is unplugged or if the power failure occurs, the preset stations will be stored for a few days. However, in case the preset stations are erased, you will need to preset the stations again. Presetting Stations You can preset up to 30 FM stations and up to 15 AM stations.
Body.
Body.fm Page 12 Thursday, March 7, 2002 5:39 PM Using the CD Player Example of indication: When CD door has ejected once and then CD-1 is pressed. (DISC1 is selected) Shows that this disc number is selected. 1 2 3 Shows that the disc is rotating. ❏ When you use an 8 cm (3'') CD, place it on the inner circle of the tray. ❏ You can load CDs while listening to the other source. ❏ When power is turned off with the tray opened, the tray is automatically closed.
Body.fm Page 13 Friday, January 4, 2002 7:17 PM Using the CD Player Basics of Using the CD PlayerNormal Play To Play CDs 1 2 • Removing/changing the CDs during playback While playing back a CD (e.g. CD-1), you can remove or change the other CDs (e.g. CD-2 and CD-3) by pressing the CD Open/ Close 0 button. After removing or changing, press the same button to close the tray. To Select a Track Load CDs. Press one of the Disc button (CD1-CD3) you want to play. The selected disc number (e.g.
Body.fm Page 14 Friday, January 4, 2002 7:17 PM Using the CD Player Programming the Playing Order of the Tracks You can program the playing order of the tracks on all the CDs. Note that you can only make a program when the CD Player is stopped. ❏ You can program up to 32 tracks in any desired order including the same tracks. To Make a Program 1 2 Load CDs In Stop mode, set the CD Player in Program Play mode. On the Unit Press the PROGRAM button to light the “PRGM” indicator on the display.
Body.fm Page 15 Friday, January 4, 2002 7:17 PM Using the CD Player Random Play Tray Lock Function The tracks of all the CDs will play in no special order when you use this mode. • To use Repeat Play for Random Play, press the REPEAT button to select “ALL” or “1” before starting playback. For details, see “Repeating Tracks”mentioned below. In order to safely keep the CD in the CD Player, the tray can be electronically locked.
Body.
Body.fm Page 17 Friday, March 1, 2002 5:48 PM Using the Cassette Deck (Recording) 3-CD PLAY & EXCHANGE CD-R/RW PLAYBACK SYSTEM REPEAT 1 BIT DUAL D/A SOUND MODE CONVERTER RO C COMPONENT 7 P PO COMPACT SLEEP K STANDBY/ON AUX PANDOM 7 FM MODE FM / AM ¢ CD1 CD2 CD3 CD /RANDOM SK IP DIS TAPE 3 CD PHONES TUNING REC START / STOP ACTIVE BASS EXTENSION CD REC START 2 CD ACTIVE BASS EX.
Body.fm Page 18 Friday, January 4, 2002 7:17 PM Using the Cassette Deck (Recording) Standard Recording This is the basic method for recording any source. The System also has special ways for recording CD to tape, and tape to tape, which save you time and effort, as well as give you some special effects.
Page 19 Friday, January 4, 2002 7:17 PM Using an External Equipment STANDBY/ON 3-CD PLAY & EXCHANGE CD-R/RW PLAYBACK SYSTEM REPEAT 1 BIT DUAL D/A SOUND MODE CONVERTER AUX PROGRAM UM FM MODE RO C COMPONENT P PO COMPACT AUX K SLEEP FM /AM PANDOM CLA E S SIC VO L Body.
Body.
Body.fm Page 21 Friday, January 4, 2002 7:17 PM Using the Timers 2. Press the ¢ or 4 button to set the minute, then press the SET button. Setting the Daily Timer Once you have set the Daily Timer, the timer will be activated at the same time every day. The Timer indicator ( ) on the display shows that the Daily Timer you have set is in effect. You can set the Daily Timer whether the System is turned on or off. • Perform each setting within 30 seconds.
Body.fm Page 22 Friday, January 4, 2002 7:17 PM Using the Timers Preparation for each music source: Perform the following operation according to the music source you have selected. Then, the System enters Volume Setting mode. When selecting TUNER FM or TUNER AM: Press the ¢ or 4 button to select the preset station number, then press the SET button. When selecting – CD – – – : 1. Press the ¢ or 4 button to select the disc number, then press the SET button.
Body.fm Page 23 Friday, January 4, 2002 7:17 PM Using the Timers Using the Unit You can set the time in the same way as for setting the Daily Timer. 1 Insert a blank or erasable tape into the Deck B and wind past the tape leader. 2 Press the CLOCK/TIMER button until “ ON TIME” immediately after “ REC” appears on the display. Then, the "REC" indicator blinks on the display.
Body.fm Page 24 Friday, January 4, 2002 7:17 PM Using the Timers Setting the SLEEP Timer Timer Priority Use the Sleep Timer to turn the System off after a certain number of minutes when it is playing. By setting the Sleep Timer, you can fall asleep to music and know that your System will turn off by itself rather than play all night. • You can only set the Sleep Timer when the System is on. Since each timer can be set independently, you may wonder what happens if the settings overlap.
Body.fm Page 25 Friday, January 4, 2002 7:17 PM Care And Maintenance Handle your CDs and tapes carefully, and they will last a long time. Cassette Tapes • If the tape is loose in its cassette, take up the slack by inserting a pencil in one of the reels and rotating. • If the tape is loose, it may get stretched, cut, or caught in the cassette. Compact Discs Recordable • Only CDs bearing these marks can be used with this System.
Body.fm Page 26 Friday, January 4, 2002 7:17 PM Troubleshooting • If you are having a problem with your System, check this list for a possible solution before calling for service. • If you cannot solve the problem from the hints given here, or the System has been physically damaged, call a qualified person, such as your dealer, for service. Symptom No sound is heard. Possible Cause • Headphones are connected. • Check all connections and make corrections. (See pages 4 to 6.
Body.fm Page 27 Friday, January 4, 2002 7:17 PM Authorized Service Centers ® QUALITY SERVICE HOW TO LOCATE YOUR JVC SERVICE CENTER TOLL FREE: 1 (800) 537-5722 http://www.jvc.com Dear Customer, In order to receive the most satisfaction from your purchase,please read the instruction booklet before operating the unit.In the event that repairs are necessary, please call 1 (800)537-5722 for your nearest authorized servicer or visit our website at www.JVC.
Body.fm Page 28 Friday, January 4, 2002 7:17 PM LIMITED WARRANTY AUDIO-1 JVC COMPANY OF AMERICA warrants this product and all parts thereof, except as set forth below ONLY TO THE ORIGINAL PURCHASER AT RETAIL to be FREE FROM DEFECTIVE MATERIALS AND WORKMANSHIP from the date of original retail purchase for the period as shown below.
Back cover.fm Page 1 Thursday, March 7, 2002 5:40 PM Specifications Amplifier Output Power CA-MXK30 80 W per channel, min. RMS, driven into 6 Ω at 1kHz, with no more than 10% total harmonic distortion CA-MXK10 40 W per channel, min.
Cover.
Warning(C).fm Page 1 Wednesday, January 23, 2002 9:41 PM Warnings, Cautions and Others / Mises en garde, précautions et indications diverses (For U.S.A) INFORMATION This equipment has been tested and found to comply with the limits for a Class B digital device, pursuant to Part 15 of the FCC Rules. These limits are designed to provide reasonable protection against harmful interference in a residential installation.
Warning(C).fm Page 2 Thursday, January 24, 2002 9:44 AM CLASS 1 LASER PRODUCT DANGER: 1. Invisible laser radiation when open and interlock failed or defeated. Avoid direct exposure to beam. CAUTION: 1. Do not open the top cover. There are no user serviceable parts inside the unit; leave all servicing to qualitied service personnel. 2. Use of controls or adjustments or performance of procedures other than those specified herein may result in radiation exposure. PRODUIT LASER CLASSE 1 ATTENTION: 1.
MX-K30&K10(J).book Page 1 Wednesday, January 23, 2002 5:10 PM English Introduction Thank you for purchasing the JVC Compact Component System. We hope it will be a valued addition to your home, giving you years of enjoyment. Be sure to read this instruction manual carefully before operating your new stereo system. In it you will find all the information you need to set up and use the system. If you have a query that is not answered by the manual, please contact your dealer.
ContentsTOC.fm Page 2 Wednesday, January 23, 2002 10:18 PM English Table of Contents Introduction ...................................................................................................................1 Features.................................................................................................................................................... 1 How This Manual Is Organized.........................................................................................................
Body.fm Page 3 Wednesday, January 23, 2002 10:07 PM Accessories Make sure that you have all of the following items, which are supplied with the System. AM Loop Antenna (1) Remote Control (1) Batteries (2) FM Wire Antenna (1) If any of these items are missing, contact your dealer immediately. How To Put Batteries In the Remote Control Match the polarity (+ and –) on the batteries with the + and – markings in the battery compartment. R6P(SUM-3)/AA(15F) CAUTION: • Handle batteries properly.
Body.fm Page 4 Friday, March 1, 2002 5:54 PM English Getting Started CAUTION: • Make all connections before plugging the System into an AC power outlet. Connecting the FM Antenna Using the Supplied Wire Antenna FM wire antenna (supplied) Extend the supplied FM Wire Antenna horizontally. Strip vinyl shield from cut line, twist wire core. Using an FM 75-Ohm Antenna Cable (not Supplied) If reception is poor, connect the outside antenna.
Body.fm Page 5 Friday, March 1, 2002 5:54 PM English Getting Started Connecting the AM Antenna Rear Panel of the Unit Turn the loop until you have the best reception. AM loop antenna (Supplied) Attach the AM loop to its base by snapping the tabs on the loop into the slot in the base. AM antenna wire (not supplied) If reception is poor, connect the outside antenna. • Even when connecting an outside AM antenna, keep the indoor AM loop connected.
Body.fm Page 6 Wednesday, January 23, 2002 10:07 PM Connecting External Equipment Connect a signal cord (not supplied) between the System’s AUX-IN terminals and the output terminals of the external MD recorder, tape deck, etc. You can then listen to the external source through the System. Signal cord (not supplied) Pin-plug x 2 MD recorder, tape deck, etc. (not supplied) Pin-plug x 2 Connecting to the Wall Outlet Plug the AC power cord into the wall outlet.
Body.
Body.fm Page 8 Wednesday, January 23, 2002 10:07 PM Fade-out Muting (FADE MUTING) You can mute the output with one touch operation. To muting the output, press the FADE MUTING button on the Remote Control. The output is faded out. To release muting, press the FADE MUTING button once again. The output is faded in to the previous level. • After Fade-out Muting, turning the VOLUME control on the unit or pressing the VOLUME button on the Remote Control will increase the volume from MIN. setting.
Body.
Body.fm Page 10 Wednesday, January 23, 2002 10:07 PM CAUTION: • In AM broadcast, reception sensitivity will be changed by turning the AM loop antenna. Turn the AM loop antenna for best reception. • Even if the System is unplugged or if the power failure occurs, the preset stations will be stored for a few days. However, in case the preset stations are erased, you will need to preset the stations again. Presetting Stations You can preset up to 30 FM stations and up to 15 AM stations.
Body.
Body.fm Page 12 Thursday, March 7, 2002 5:41 PM Example of indication: When CD door has ejected once and then CD-1 is pressed. (DISC1 is selected) Shows that this disc number is selected. 1 2 3 Shows that the disc is rotating. ❏ When you use an 8 cm (3'') CD, place it on the inner circle of the tray. ❏ You can load CDs while listening to the other source. ❏ When power is turned off with the tray opened, the tray is automatically closed.
Body.fm Page 13 Wednesday, January 23, 2002 10:07 PM English Using the CD Player Basics of Using the CD PlayerNormal Play To Play CDs 1 2 • Removing/changing the CDs during playback While playing back a CD (e.g. CD-1), you can remove or change the other CDs (e.g. CD-2 and CD-3) by pressing the CD Open/ Close 0 button. After removing or changing, press the same button to close the tray. To Select a Track Load CDs. Press one of the Disc button (CD1-CD3) you want to play. The selected disc number (e.
Body.fm Page 14 Wednesday, January 23, 2002 10:07 PM Programming the Playing Order of the Tracks You can program the playing order of the tracks on all the CDs. Note that you can only make a program when the CD Player is stopped. ❏ You can program up to 32 tracks in any desired order including the same tracks. To Make a Program 1 2 Load CDs In Stop mode, set the CD Player in Program Play mode. On the Unit Press the PROGRAM button to light the “PRGM” indicator on the display.
Body.fm Page 15 Wednesday, January 23, 2002 10:07 PM English Using the CD Player Random Play Tray Lock Function The tracks of all the CDs will play in no special order when you use this mode. • To use Repeat Play for Random Play, press the REPEAT button to select “ALL” or “1” before starting playback. For details, see “Repeating Tracks”mentioned below. In order to safely keep the CD in the CD Player, the tray can be electronically locked.
Body.
Body.fm Page 17 Friday, March 1, 2002 5:56 PM English Using the Cassette Deck (Recording) 3-CD PLAY & EXCHANGE CD-R/RW PLAYBACK SYSTEM REPEAT 1 BIT DUAL D/A SOUND MODE CONVERTER RO C COMPONENT 7 P PO COMPACT SLEEP K STANDBY/ON AUX PANDOM 7 FM MODE FM / AM ¢ CD1 CD2 CD3 CD /RANDOM SK IP DIS TAPE 3 CD PHONES TUNING REC START / STOP ACTIVE BASS EXTENSION CD REC START 2 CD ACTIVE BASS EX.
Body.fm Page 18 Wednesday, January 23, 2002 10:07 PM Standard Recording This is the basic method for recording any source. The System also has special ways for recording CD to tape, and tape to tape, which save you time and effort, as well as give you some special effects.
Body.
Body.
Body.fm Page 21 Wednesday, January 23, 2002 10:07 PM English Using the Timers 2. Press the ¢ or 4 button to set the minute, then press the SET button. Setting the Daily Timer Once you have set the Daily Timer, the timer will be activated at the same time every day. The Timer indicator ( ) on the display shows that the Daily Timer you have set is in effect. You can set the Daily Timer whether the System is turned on or off. • Perform each setting within 30 seconds.
Body.fm Page 22 Wednesday, January 23, 2002 10:07 PM Preparation for each music source: Perform the following operation according to the music source you have selected. Then, the System enters Volume Setting mode. When selecting TUNER FM or TUNER AM: Press the ¢ or 4 button to select the preset station number, then press the SET button. When selecting – CD – – –: 1. Press the ¢ or 4 button to select the disc number, then press the SET button.
Body.fm Page 23 Wednesday, January 23, 2002 10:07 PM English Using the Timers Using the Unit You can set the time in the same way as for setting the Daily Timer. 1 Insert a blank or erasable tape into the Deck B and wind past the tape leader. 2 Press the CLOCK/TIMER button until “ON TIME” immediately after “REC” appears on the display. Then, the "REC" indicator blinks on the display.
Body.fm Page 24 Wednesday, January 23, 2002 10:07 PM Setting the SLEEP Timer Timer Priority Use the Sleep Timer to turn the System off after a certain number of minutes when it is playing. By setting the Sleep Timer, you can fall asleep to music and know that your System will turn off by itself rather than play all night. • You can only set the Sleep Timer when the System is on. Since each timer can be set independently, you may wonder what happens if the settings overlap.
Body.fm Page 25 Wednesday, January 23, 2002 10:07 PM English Care And Maintenance Handle your CDs and tapes carefully, and they will last a long time. Cassette Tapes • If the tape is loose in its cassette, take up the slack by inserting a pencil in one of the reels and rotating. • If the tape is loose, it may get stretched, cut, or caught in the cassette. Compact Discs Recordable • Only CDs bearing these marks can be used with this System.
Body.fm Page 26 Wednesday, January 23, 2002 10:07 PM • If you are having a problem with your System, check this list for a possible solution before calling for service. • If you cannot solve the problem from the hints given here, or the System has been physically damaged, call a qualified person, such as your dealer, for service. Symptom No sound is heard. Possible Cause • Connections are incorrect, or loose. Action • Headphones are connected. • Check all connections and make corrections.
Back cover.