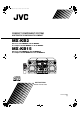
MX-KB2[C].
MX-KB2[C].book Page 1 Thursday, May 13, 2004 6:03 PM Warnings, Cautions and Others / Mises en garde, précautions et indications diverses (For U.S.A) INFORMATION This equipment has been tested and found to comply with the limits for a Class B digital device, pursuant to Part 15 of the FCC Rules. These limits are designed to provide reasonable protection against harmful interference in a residential installation.
MX-KB2[C].book Page 2 Thursday, May 13, 2004 6:03 PM IMPORTANT FOR LASER PRODUCTS IMPORTANT POUR LES PRODUITS LASER 1. CLASS 1 LASER PRODUCT 2. CAUTION: Do not open the top cover. There are no user serviceable parts inside the Unit; leave all servicing to qualified service personnel. 3. CAUTION: Visible and invisible laser radiation when open and interlock failed or defeated. Avoid direct exposure to beam. 4. REPRODUCTION OF LABEL: CAUTION LABEL, PLACED INSIDE THE UNIT. 1. PRODUIT LASER CLASSE 1 2.
MX-KB2[C].book Page 1 Thursday, May 13, 2004 6:03 PM English Introduction Thank you for purchasing the JVC Compact Component System. We hope it will be a valued addition to your home, giving you years of enjoyment. Be sure to read this instruction manual carefully before operating your new stereo system. In it you will find all the information you need to set up and use the system. If you have a query that is not answered by the manual, please contact your dealer.
MX-KB2[C].book Page 2 Thursday, May 13, 2004 6:03 PM English Table of Contents Introduction ...................................................................................................................1 Features.................................................................................................................................................... 1 How This Manual Is Organized...............................................................................................................
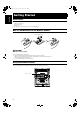
MX-KB2[C].book Page 3 Thursday, May 13, 2004 6:03 PM English Getting Started Accessories Make sure that you have all of the following items, which are supplied with the System. AM Loop Antenna (1) Remote Control (1) Batteries (2) If any of these items are missing, contact your dealer immediately. How To Put Batteries In the Remote Control Match the polarity (+ and –) on the batteries with the + and – markings in the battery compartment. R03 (UM-4)/AAA (24F) CAUTION: • Handle batteries properly.
MX-KB2[C].book Page 4 Thursday, May 13, 2004 6:03 PM English Getting Started CAUTION: • Make all connections before plugging the System into an AC power outlet. About the FM Antenna FM wire antenna FM wire antenna is supplied with the System. Connecting the AM Antenna Rear Panel of the Unit AM antenna wire (not supplied) If reception is poor, connect the outside antenna. Turn the loop until you have the best reception.
MX-KB2[C].book Page 5 Thursday, May 13, 2004 6:03 PM English Getting Started Connecting the Speakers Connect the right speaker to the RIGHT speaker terminals and the left speaker to the LEFT speaker terminals. “Right” / “Left” is labeled on the rear of the speaker. 1. Open each of the terminals to connect the speaker wire leads. 2. Connect the speaker cords to the Speaker terminals of the Unit.
MX-KB2[C].book Page 6 Thursday, May 13, 2004 6:03 PM English Getting Started Connecting to the Wall Outlet Plug the AC power cord into the wall outlet. Now, your System is at your command! DEMO Mode When the System is connected to the wall outlet, a DEMO mode displaying some of the system’s features automatically starts. To turn the DEMO display off, press any of the operation buttons. The DEMO display automatically stops. To turn the DEMO display on, press the DEMO button on the Unit.
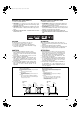
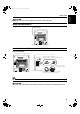
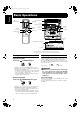
MX-KB2[C].book Page 7 Thursday, May 13, 2004 6:03 PM English Basic Operations ) STANDBY/ON STANDBY/ON Numeric keys Display STANDBY indicator FADE MUTING ACTIVE BASS EX. VOLUME +,– SOUND MODE ACTIVE BASS EX. PHONES VOLUME SOUND MODE/ SET Various information Sound Mode indicator ACTIVE BASS EX. indicator Level bar Status bar (Indicates various statuses.) * When the System is in use, the display shows other items as well. For simplicity, we show here only the items described in this section.
MX-KB2[C].book Page 8 Thursday, May 13, 2004 6:03 PM Fade-out Muting (FADE MUTING) You can mute the output with one touch operation. To muting the output, press the FADE MUTING button on the Remote Control. The output is faded out. To release muting, press the FADE MUTING button once again. The output is faded in to the previous level. • After Fade-out Muting, turning the VOLUME control on the unit or pressing the VOLUME button on the Remote Control will increase the volume from MIN. setting.
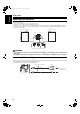
MX-KB2[C].book Page 9 Thursday, May 13, 2004 6:03 PM English Using the Tuner Numeric keys FM MODE FM/AM FM/AM SET 22 ¢ ¡ 4 Band display, Frequency display, Preset number FM mode indicators * When the System is in use, the display shows other items as well. For simplicity, we show here only the items described in this section. You can listen to FM and AM stations. Stations can be tuned in manually, automatically, or from preset memory storage.
MX-KB2[C].book Page 10 Thursday, May 13, 2004 6:03 PM CAUTION: • In AM broadcast, reception sensitivity will be chang-ed by turning the AM loop antenna. Turn the AM loop antenna for best reception. • Even if the System is unplugged or if the power failure occurs, the preset stations will be stored for a few days. However, in case the preset stations are erased, you will need to preset the stations again. Presetting Stations You can preset up to 10 FM stations and up to 10 AM stations.
MX-KB2[C].book Page 11 Thursday, May 13, 2004 6:03 PM English Using the CD Player CD Open/ Close 0 DISC SKIP REPEAT PROGRAM RANDOM Numeric keys MP3 CD 6 REPEAT PROGRAM /RANDOM 4/1 7 SOUND MODE/ SET CANCEL SET CD 6 CD1-CD3 ¢/¡ CD1-CD3 22 ¢ ¡ 7 4 Track number, Playing time, Program number, etc. Program indicator Disc indicators Repeat indicator Random indicator MP3 indicator * When the System is in use, the display shows other items as well.
MX-KB2[C].book Page 12 Thursday, May 13, 2004 6:03 PM About Disc Indicator: Selected Disc indicator Disc Number indicator English Using the CD Player To Unload CDs Take out the CD as shown below. 1 While the CD Player is stopped, press the CD Open/Close 0 button on the Unit to open the tray. 2 Remove the CD, then press the DISC SKIP button on the Unit. Disc Rotation indicator The Disc indicator consists of the following three kinds of indicators: Disc Number indicator: Lights all the time.
MX-KB2[C].book Page 13 Thursday, May 13, 2004 6:03 PM English Using the CD Player Basics of Using the CD PlayerNormal Play For MP3 disc Total group number Total track number To Play CDs 1 2 Load CDs. Press CD 6 button to play. The currently selected disc number (e.g. “CD DISC 1” ) appears on the display. The first track of the selected CD begins playing. When the first CD finishes playing, the next and the third CDs are continuously played back.
MX-KB2[C].book Page 14 Thursday, May 13, 2004 6:03 PM Programming the Playing Order of the Tracks You can program the playing order of the tracks on all the CDs. Note that you can only make a program when the CD Player is stopped. ❏ You can program up to 60 tracks in any desired order including the same tracks. To Make a Program 1 2 Repeat steps 3 and 4 to program other tracks on the same CD or the other CD. 6 To play the program, Press the CD 6 button.
MX-KB2[C].book Page 15 Thursday, May 13, 2004 6:03 PM English Using the CD Player Random Play • If you try to open the tray by pressing the 0 button, “LOCKED” appears on the display to let you know that the tray has been locked. The tracks of the selected CD will play in no special order when you use this mode. Unlocking the Tray 1 Repeat above steps 1 and 2. “UNLOCKED” appears on the display. In Stop mode, set the CD Player in Random Play mode.
MX-KB2[C].book Page 16 Thursday, May 13, 2004 6:03 PM English Using the Cassette Deck (Listening to a Tape) TAPE A 3 TAPE B 3 TAPE A 3 TAPE B 3 22 0 PUSH OPEN ¢/¡ (Deck A) 4/1 7 0 PUSH OPEN (Deck B) ¡ 7 3: Tape indicator Deck indicators * When the System is in use, the display shows other items as well. For simplicity, we show here only the items described in this section. The Cassette Deck allows you to play, record, and dub audio tapes.
MX-KB2[C].book Page 17 Thursday, May 13, 2004 6:03 PM English Using the Cassette Deck (Recording) TAPE A 3 TAPE B 3 REC START/STOP CD REC START DUBBING PROGRAM TAPE A 3 TAPE B 3 7 7 0 PUSH OPEN (Deck B) 0 PUSH OPEN (Deck A) Deck indicators REC indicator 3: Tape indicator * When the System is in use, the display shows other items as well. For simplicity, we show here only the items described in this section. Recording onto a cassette from any of the sound sources is simple.
MX-KB2[C].book Page 18 Thursday, May 13, 2004 6:03 PM Standard Recording 2 Insert a blank or erasable tape into the Deck B and wind past the tape leader. Press the CD REC START button on the Unit. This is the basic method for recording any source. The System also has special ways for recording CD to tape, and tape to tape, which save you time and effort, as well as give you some special effects.
MX-KB2[C].book Page 19 Thursday, May 13, 2004 6:03 PM English Using an External Equipment AUX AUX AUX jack Listening to the External Equipment You can listen to the external equipment such as MD recorder, cassette deck, or other auxiliary. ❏ First, make sure that the external equipment is properly connected to the System. (See page 5.) 1 Set the volume level to the minimum position. 2 Press the AUX button. “AUX” appears on the display. 3 4 Start playing the external equipment.
MX-KB2[C].book Page 20 Thursday, May 13, 2004 6:03 PM English Using the Timers SLEEP CLOCK/TIMER SET ¢ 4 SLEEP indicator Timer indicator DAILY Timer indicator REC (Recording) Timer indicator * When the System is in use, the display shows other items as well. For simplicity, we show here only the items described in this section. Three types of timers are available: DAILY Timer Use this timer to set wake up everyday to music from any source, instead of an alarm clock.
MX-KB2[C].book Page 21 Thursday, May 13, 2004 6:03 PM English Using the Timers 2. Press the ¢ or 4 button to set the minute, then press the SET button. Setting the Daily Timer Once you have set the Daily Timer, the timer will be activated at the same time every day. The Timer indicator ( ) and “DAILY” indicator on the display shows that the Daily Timer you have set is in effect. You can set the Daily Timer whether the System is turned on or off.
MX-KB2[C].book Page 22 Thursday, May 13, 2004 6:03 PM Preparation for each music source: Perform the following operation according to the music source you have selected. Then, the System enters Volume Setting mode. When selecting TUNER FM or TUNER AM: Press the ¢ or 4 button to select the preset station number, then press the SET button. When selecting CD : Press the ¢ or 4 button to select the disc number, then press the SET button.
MX-KB2[C].book Page 23 Thursday, May 13, 2004 6:03 PM English Using the Timers Using the Unit You can set the time in the same way as for setting the Daily Timer. 1 Insert a blank or erasable tape into the Deck B and wind past the tape leader. 2 Press the CLOCK/TIMER button until “ON TIME” immediately after “REC TU” appears on the display.
MX-KB2[C].book Page 24 Thursday, May 13, 2004 6:03 PM Setting the SLEEP Timer Timer Priority Use the Sleep Timer to turn the System off after a certain number of minutes when it is playing. By setting the Sleep Timer, you can fall asleep to music and know that your System will turn off by itself rather than play all night. • You can only set the Sleep Timer when the System is on. Since REC Timer and DAILY Timer can be set independently, you may wonder what happens if the settings overlap.
MX-KB2[C].book Page 25 Thursday, May 13, 2004 6:03 PM English Care And Maintenance Handle your CDs and tapes carefully, and they will last a long time. Cassette Tapes • If the tape is loose in its cassette, take up the slack by inserting a pencil in one of the reels and rotating. • If the tape is loose, it may get stretched, cut, or caught in the cassette. Compact Discs Recordable • Only CDs bearing these marks can be used with this System.
MX-KB2[C].book Page 26 Thursday, May 13, 2004 6:03 PM • If you are having a problem with your System, check this list for a possible solution before calling for service. • If you cannot solve the problem from the hints given here, or the System has been physically damaged, call a qualified person, such as your dealer, for service. Symptom No sound is heard. Possible Cause • Headphones are connected. • Check all connections and make corrections. (See pages 4 to 6.) • Disconnect the headphones.
MX-KB2[C].book Page 1 Thursday, May 13, 2004 6:03 PM Introduction Français Merci d'avoir fait l'acquisition de le système compacte par éléments de JVC. Nous espérons qu'elle apportera un plus considérable à votre foyer et que vous pourrez en profiter pendant de nombreuses années. Veuillez lire attentivement le présent manuel d'utilisation avant de faire fonctionner votre nouvelle système stéréo. Vous y trouverez toutes les informations nécessaires pour l'installation et l'utilisation de le système.
MX-KB2[C].book Page 2 Thursday, May 13, 2004 6:03 PM Table des matières Introduction ...................................................................................................................1 Fonctions ................................................................................................................................................. 1 Structure du manuel.................................................................................................................................
Body.fm Page 3 Thursday, May 13, 2004 8:00 PM Introduction Accessoires Français Vérifier si vous avez bien reçu tous les éléments suivants, livrés avec le système. Antenne cadre AM (1) Télécommande (1) Piles (2) Si un de ces éléments devait manquer, contacter immédiatement le revendeur. Comment insérer les piles dans la télécommande Faire correspondre la polarité (+ et –) des piles avec les repères + et – du logement des piles. R03 (UM-4)/AAA (24F) ATTENTION: • Manipuler les piles correctement.
Body.fm Page 4 Thursday, May 13, 2004 8:00 PM Introduction ATTENTION: • Effectuer tous les branchements avant de raccorder le système à une prise secteur. Français Au sujet de l’antenne FM Fil d'antenne FM Une antenne câblée FM est fournie avec le système. Branchement de l'antenne AM Dos de l'appareil Fil d'antenne AM (non livré) Si la réception est mauvaise, raccorder une antenne externe. Tourner le cadre pour avoir la meilleure réception possible.
MX-KB2[C].book Page 5 Thursday, May 13, 2004 6:03 PM Introduction Français Branchement des enceintes acoustiques Raccorder le haut-parleur droit à la prise de haut-parleur RIGHT, et le haut-parleur gauche à la prise de haut-parleur LEFT. “Right”/“Left” sont indiqués au dos des haut-parleurs. 1. Ouvrir chacune des bornes pour raccorder les fils des haut-parleurs. 2. Raccorder les câbles des haut-parleurs aux sorties pour haut-parleurs de le système.
MX-KB2[C].book Page 6 Thursday, May 13, 2004 6:03 PM Introduction Raccordement à une prise secteur Brancher le cordon d'alimentation secteur dans la prise. Le système est à présent à vos ordres! Français Mode DEMO Lors du branchement de le système à une prise secteur, le mode DEMO affiche automatiquement certaines des fonctions de le système. Pour éteindre l'affichage DEMO, appuyer sur une des touches de fonctionnement. L'affichage DEMO se coupe automatiquement.
MX-KB2[C].book Page 7 Thursday, May 13, 2004 6:03 PM Opérations de base ) STANDBY/ON Touches numériques Affichage Indicateur de veille STANDBY Français STANDBY/ON FADE MUTING ACTIVE BASS EX. SOUND MODE ACTIVE BASS EX. VOLUME +, – PHONES VOLUME SOUND MODE/ SET Informations diverses Indicateur du mode son Indicateur de graves ACTIVE BASS EX. Barre de niveau Barre d'état (indique les différents états de fonctionnement.
MX-KB2[C].book Page 8 Thursday, May 13, 2004 6:03 PM Opérations de base Vous pouvez assourdir la diffusion sonore par le biais d'une opération à une touche. Pour couper la diffusion du son, appuyer sur la touche FADE MUTING de la télécommande. Le son est alors fondu. Pour supprimer l'assourdissement, réappuyer sur la touche FADE MUTING. La diffusion sonore revient progressivement à son niveau préalable.
MX-KB2[C].book Page 9 Thursday, May 13, 2004 6:03 PM Utilisation du tuner Touches numériques FM MODE Français FM/AM FM/AM SET (PROGRAMMER) 1 ¢ ¡ 4 Affichage de bande, affichage de fréquence, numéro de présélection Indicateurs du mode FM * Lors de l'utilisation de le système, l'affichage indique également d'autres informations. Par souci de simplicité, nous ne montrons ici que les éléments décrits dans cette section. Vous pouvez écouter des émetteurs radio en FM et en AM.
MX-KB2[C].book Page 10 Thursday, May 13, 2004 6:03 PM Utilisation du tuner • En mode d'émission AM, vous pouvez changer la sensibilité de la réception en tournant l'antenne cadre AM. Tourner l'antenne cadre AM de manière à obtenir la meilleure réception possible. Présélection des stations Vous pouvez présélectionner jusqu'à 10 stations FM et 10 stations AM. • Des numéros de présélections peuvent avoir été réglés sur des fréquences de test à l'usine avant le transport. Il ne s'agit pas d'une anomalie.
MX-KB2[C].book Page 11 Thursday, May 13, 2004 6:03 PM Utilisation du lecteur CD Ouvrir/Fermer tiroir CD 0 DISK SKIP REPEAT PROGRAM RANDOM Français Touches numériques MP3 CD 6 REPEAT PROGRAM /RANDOM 4/22 7 SOUND MODE/SET CD1-CD3 ¢/¡ CANCEL SET CD 6 CD1-CD3 22 ¢ ¡ 7 4 Numéro de plage, temps de lecture, numéro du programme, etc.
MX-KB2[C].book Page 12 Thursday, May 13, 2004 6:03 PM Utilisation du lecteur CD Indicateur du disque sélectionné Indicateur du numéro du disque ❏ Vous pouvez charger des CD pendant que vous écoutez une autre source, ou pendant que vous écoutez le CD en cours de lecture. ❏ Lors de la mise hors tension alors que le tiroir est ouvert, celuici se referme automatiquement. ❏ Si le CD ne peut pas être lu correctement (parce qu’il est griffé, notamment), le CD est jugé en tant qu'aucun disque.
MX-KB2[C].book Page 13 Thursday, May 13, 2004 6:03 PM Utilisation du lecteur CD Notions de base pour l'utilisation du lecteur CD - Lecture normale Pour un disque MP3 Total du nombre de groupes Total du nombre de plages Français Pour écouter les CD 1 2 Charger les CD. Appuyer sur la touche CD 6 pour écouter. Le numéro du disque actuellement sélectionné (par ex. “CD DISC 1”) s’affiche. La lecture de la première plage du disque sélectionné démarre.
MX-KB2[C].book Page 14 Thursday, May 13, 2004 6:03 PM 5 Répéter les opérations 3 et 4 pour programmer d'autres plages du même CD ou d'un autre CD. Vous pouvez programmer l'ordre de lecture des plages sur tous les CD. Remarquer cependant que vous pouvez uniquement effectuer cette programmation lorsque le lecteur CD est à l'arrêt. ❏ Vous pouvez programmer jusqu'à 60 plages dans n'importe quel ordre, y compris en répétant les mêmes plages. 6 Pour écouter le programme, appuyer sur la touche CD 6.
MX-KB2[C].book Page 15 Thursday, May 13, 2004 6:03 PM Utilisation du lecteur CD Lecture aléatoire Les plages du CD sélectionnées seront jouées dans n'importe quel ordre lorsqu'on utilise ce mode. Français 1 Répétition des plages Vous pouvez répéter toutes les plages ou une plage individuelle autant de fois que vous le souhaitez. Appuyer sur la touche REPEAT.
MX-KB2[C].book Page 16 Thursday, May 13, 2004 6:03 PM Utilisation de la platine à cassette (écoute d'une cassette) TAPE A 3 TAPE B 3 4/22 7 ¢/¡ 22 0 PUSH OPEN (Platine A) 0 PUSH OPEN (Platine B) ¡ 7 3: Indicateur de cassette Indicateurs de platine * Lors de l'utilisation de le système, l'affichage indique également d'autres informations. Par souci de simplicité, nous ne montrons ici que les éléments décrits dans cette section.
MX-KB2[C].book Page 17 Thursday, May 13, 2004 6:03 PM Utilisation de la platine à cassette (enregistrement) REC START/STOP Français TAPE A 3 TAPE B 3 PROGRAM CD REC START DUBBING TAPE A 3 TAPE B 3 7 7 0 PUSH OPEN (Platine B) 0 PUSH OPEN (Platine A) Indicateurs de platine Indicateur d'enregistrement REC 3: Indicateur de cassette * Lors de l'utilisation de le système, l'affichage indique également d'autres informations.
MX-KB2[C].book Page 18 Thursday, May 13, 2004 6:03 PM Utilisation de la platine à cassette (enregistrement) Il s'agit de la méthode de base pour enregistrer n'importe quelle source. le système possède également des fonctions spéciales pour enregistrer un CD sur une cassette, une cassette sur une autre, afin de vous épargner du temps et des efforts et de vous permettre d'ajouter certains effets spéciaux.
MX-KB2[C].book Page 19 Thursday, May 13, 2004 6:03 PM Branchement d'équipements externes Français AUX AUX Jack AUX Ecoute d'équipements externes Vous pouvez écouter des équipements externes comme un enregistreur MD, une platine à cassette ou d'autres auxiliaires. ❏ Vérifier tout d'abord si l'équipement externe est correctement raccordé à le système. (Voir page 5.) 1 2 Régler le niveau de volume sur le minimum. Appuyer sur la touche AUX. L'indication “AUX” s'affiche.
MX-KB2[C].book Page 20 Thursday, May 13, 2004 6:03 PM Utilisation des minuteries Français SLEEP CLOCK/TIMER SET ¢ 4 Indicateur SLEEP (Bonsoir) Indicateur de la minuterie Indicateur de minuterie DAILY (Quotidienne) Indicateur de minuterie REC (Enregistrement) * Lors de l'utilisation de le système, l'affichage indique également d'autres informations. Par souci de simplicité, nous ne montrons ici que les éléments décrits dans cette section.
MX-KB2[C].book Page 21 Thursday, May 13, 2004 6:03 PM Utilisation des minuteries 2. Appuyer sur les touches ¢ ou 4 pour régler les minutes puis appuyer sur SET. Français Réglage de la minuterie DAILY (Quotidienne) Une fois que vous avez programmé la minuterie DAILY (Quotidienne), celle-ci se met en marche tous les jours à la même heure. L’indicateur de la minuterie ( ) et l’indicaeur “DAILY” que la minuterie quotidienne programmée est activée.
MX-KB2[C].book Page 22 Thursday, May 13, 2004 6:03 PM Utilisation des minuteries Sélection de la source de musique. Appuyer sur les touches ¢ ou 4 pour sélectionner la source de musique que vous voulez écouter puis appuyer sur SET. Chaque fois que vous appuyez sur la touche ¢ ou 4, l'affichage change comme illustré ci-dessous: TUNER FM = TUNER AM = CD = TAPE = AUX = (retour au début) L'opération suivante change en fonction de la source de musique sélectionnée.
MX-KB2[C].book Page 23 Thursday, May 13, 2004 6:03 PM Utilisation des minuteries Français Sur l'appareil Vous pouvez programmer l'heure comme pour la minuterie DAILY (Quotidienne). 1 Insérer une cassette vierge ou effaçable dans la platine B et bobiner l'amorce. 2 Appuyer sur la touche CLOCK/TIMER jusqu'à ce que l'indication “ON TIME” apparaisse immédiatement après “REC TU” sur l'affichage.
MX-KB2[C].book Page 24 Thursday, May 13, 2004 6:03 PM Utilisation des minuteries Utiliser la minuterie Bonsoir pour éteindre le système après un certain nombre de minutes d'écoute. La programmation de la minuterie Bonsoir vous permet de vous endormir en musique sans vous soucier de le système, qui s'éteint automatiquement. • Vous pouvez uniquement programmer la minuterie Bonsoir lorsque le système est sous tension.
MX-KB2[C].book Page 25 Thursday, May 13, 2004 6:03 PM Nettoyage et entretien Manipuler vos CD et vos cassettes avec grand soin, pour qu'ils durent plus longtemps. Français Disques compacts Recordable • Seuls les CD portant ces logos peuvent être utilisés sur le système. Cependant, l'utilisation continue de CD de formes irrégulières (en forme de coeur, octogonaux, etc.) risque d'endommager le système.
MX-KB2[C].book Page 26 Thursday, May 13, 2004 6:03 PM Guide de dépannage Cause possible Remède Pas de son. Symptôme • Les branchements ne sont pas corrects ou sont trop lâches. • Un casque d'écoute est branché. • Vérifier toutes les connexions et effectuer les corrections nécessaires. (Voir pages 4 à 6.) • Débrancher le casque d'écoute. Mauvaise réception radio. • L'antenne est débranchée. • L'antenne cadre AM est trop près de le système.
MX-KB2[C].