English MX-KC58[J]_EN.book Page 1 Monday, January 29, 2007 10:25 AM COMPACT COMPONENT SYSTEM MX-KC58 —Consists of CA-MXKC58 and SP-MXKC58 INSTRUCTIONS For Customer Use: Enter below the Model No. and Serial No. which are located either on the rear, bottom or side of the cabinet. Retain this information for future reference. Model No. Serial No.
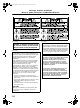
MX-KC58[J]_EN.book Page 1 Monday, January 29, 2007 10:25 AM Warnings, Cautions and Others Mises en garde, précautions et indications diverses (For U.S.A.) (For U.S.A.) WARNING: TO REDUCE THE RISK OF FIRE OR ELECTRIC SHOCK, DO NOT EXPOSE THIS APPLIANCE TO RAIN OR MOISTURE. (For U.S.A.) This equipment has been tested and found to comply with the limits for a Class B digital device, pursuant to part 15 of the FCC Rules.
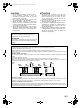
MX-KC58[J]_EN.book Page 2 Monday, January 29, 2007 10:25 AM CAUTION –– % STANDBY/ON button ! Disconnect the mains plug to shut the power off completely (all lamps and indications go off). When installing the product, ensure that the plug is easily accessible. The % STANDBY/ON button in any position does not disconnect the mains line. • When the unit is on standby, the STANDBY lamp lights red. • When the unit is turned on, the STANDBY lamp goes off. The power can be remote controlled.
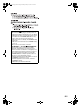
MX-KC58[J]_EN.book Page 3 Monday, January 29, 2007 10:25 AM IMPORTANT FOR LASER PRODUCTS / IMPORTANT POUR PRODUITS LASER 1. CLASS 1 LASER PRODUCT 2. CAUTION: Do not open the top cover or the cabinet. There are no user serviceable parts inside the unit; leave all servicing to qualified service personnel. 3. CAUTION: (For U.S.A.) Visible and/or invisible class II laser radiation when open. Do not stare into beam. (For Canada) Visible and/or invisible class 1M laser radiation when open.
MX-KC58[J]_EN.book Page 4 Monday, January 29, 2007 10:25 AM CAUTION ATTENTION 1. Do not block the ventilation openings or holes. (If the ventilation openings or holes are blocked by a newspaper or cloth, etc., the heat may not be able to get out.) 2. Do not place any naked flame sources, such as lighted candles, on the apparatus. 3. When discarding batteries, environmental problems must be considered and local rules or laws governing the disposal of these batteries must be followed strictly. 4.
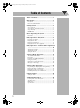
MX-KC58[J]_EN.book Page 1 Monday, January 29, 2007 10:25 AM Table of Contents Table of Contents ............................................ 1 Introduction ..................................................... 2 Precautions ......................................................................2 How to Read This Manual ..............................................3 Getting Started ................................................ 4 Step 1: Unpack ............................................................
MX-KC58[J]_EN.book Page 2 Monday, January 29, 2007 10:25 AM Introduction Thank you for purchasing a JVC product. Please read all instructions carefully before operation, to ensure your complete understanding and to obtain the best possible performance from the unit. Internal heat • A cooling fan is mounted on the rear panel to prevent heat buildup inside the main unit (see page G-4). For safety, observe the following carefully: • Make sure there is good ventilation around the main unit.
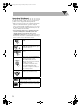
MX-KC58[J]_EN.book Page 3 Monday, January 29, 2007 10:25 AM How to Read This Manual To make this manual as simple and easy-to-understand as possible, we have adapted the following methods: • Button and control operations are explained as listed in the table below. In this manual, the operations using the remote control is mainly explained; however, you can use the buttons and controls on the main unit if they have the same (or similar) name and marks.
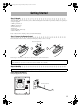
MX-KC58[J]_EN.book Page 4 Monday, January 29, 2007 10:25 AM Getting Started Step 1: Unpack After unpacking, check to be sure that you have all the following items. The number in parentheses indicates the quantity of each piece supplied. • AM Loop Antenna (1) • FM Wire Antenna (1) • Remote Control (1) • Batteries (2) • Connection Cable for iPod (1) • Stand for iPod (1) If any of these items are missing, contact your dealer immediately.
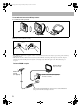
MX-KC58[J]_EN.book Page 5 Monday, January 29, 2007 10:25 AM To assemble and connect the AM loop antenna To assemble the AM loop antenna To connect the AM loop antenna Make sure to connect the wire correctly. 1 Hold 2 Insert 3 Release • If the AM loop antenna wire or speaker cords are covered with vinyl, remove the vinyl to expose the tip of the antenna by twisting the vinyl. • Make sure the antenna conductors do not touch any other terminals, connecting cords and power cord.
MX-KC58[J]_EN.book Page 6 Monday, January 29, 2007 10:25 AM To Connect the Speaker Cords Make sure the both speakers are connected correctly and firmly. Right side (rear view) Left side (rear view) Gray Gray with black stripe Gray Gray with black stripe 3 Release 1 Hold 2 Insert When connecting the speaker cords, match the polarity of the speaker terminals: The cord with black stripe to (–), the cord without stripe to (+). • DO NOT connect more than one speaker to each terminal.
MX-KC58[J]_EN.book Page 7 Monday, January 29, 2007 10:25 AM Before Operating the System Parts Index The numbers refer to the pages in which the parts are explained.
MX-KC58[J]_EN.book Page 8 Monday, January 29, 2007 10:25 AM The indications on the display teach you a lot of things while you are operating the System. Before operating the System, be familiar with when and how the indicator illuminates on the display. 1 2 3 4 5 1 Timer indicators • DAILY: Lights when Daily Timer stands by; flashes while working. • SLEEP: Lights when Sleep Timer is activated. 2 TRACK/GROUP mode indicators • TRACK: Lights when disc (CD, MP3 disc, WMA disc) is detected.
MX-KC58[J]_EN.book Page 9 Monday, January 29, 2007 10:25 AM Daily Operations—Playback 1 Turn on the power. 1 The STANDBY lamp on the main unit turns off. • Without pressing STANDBY/ON , the System turns on by pressing one of the source selecting buttons in the next step. 2 Select the source. Numeric keys FM MODE 2 4, 7, ¢ Playback automatically starts if the selected source is ready to start. • If you press AUX, start playback source on the external component. 3 Adjust the volume.
MX-KC58[J]_EN.book Page 10 Monday, January 29, 2007 10:25 AM Listening to the Radio To preset the stations To select the band (FM or AM) You can preset 30 FM and 15 AM stations. FM 1 Tune in to a station you want to preset. 2 Activate the preset number entry mode. AM To tune in to a station While FM or AM is selected... Remote control: Main unit: 1 sec. 1 sec. 3 4 • Finish the following process while the indication on the display is flashing. Select a preset number for the station you store.
MX-KC58[J]_EN.book Page 11 Monday, January 29, 2007 10:25 AM Main Unit ONLY To tune in to a preset station To insert a disc 1 Select a band (FM or AM). You can insert discs while playing another source. FM AM 2 Select a preset number for the station you store. See “How to Select Numbers” on page 9. • You can also use 4/¢ on the main unit. Playing Back a Disc Playable media and files This System can play back following types of media and files.
MX-KC58[J]_EN.book Page 12 Monday, January 29, 2007 10:25 AM Remote ONLY Changing the MP3/WMA Playback Mode To select a disc to be played back According to the MP3/WMA playback mode, 4/¢ or numeric keys work for the group selection or the track selection. Examples: When the MP3 play back mode is “GROUP.” • The same operation can be carried out using CD1 to CD3 on the system.
MX-KC58[J]_EN.book Page 13 Monday, January 29, 2007 10:25 AM Resume Play for Audio CD/MP3/WMA If you press 7 during playback, the position of the track where you stopped playback will be memorized by the unit. By pressing CD 6, you can start playback again from the point where you stoppped it. To activate/cancel resume play Main Unit ONLY When the source is a CD... 2 sec. memo • Changing the disc by pressing the disc selection keys will erase the track number for resume play.
MX-KC58[J]_EN.book Page 14 Monday, January 29, 2007 10:25 AM To Connect iPod Connect the iPod to the System using the supplied cable. Make sure the System is turned off when you connect it. To playback sounds on the iPod To start: To pause: 1 Connect the arrow of iPod terminal and the arrow of the connector facing each other.
MX-KC58[J]_EN.book Page 15 Monday, January 29, 2007 10:25 AM Playing Back from other equipment To connect other equipment By using an stereo mini plug cord (not supplied), you can connect equipment with analog audio output jacks such as a Digital Audio Player, or a TV, etc. Stereo mini plug cord (not supplied) Portable audio device, Game machine, etc.
MX-KC58[J]_EN.book Page 16 Monday, January 29, 2007 10:25 AM Daily Operations – Sound & Other Adjustment Adjusting the Volume Setting the Clock You can adjust the volume level to MIN, 1-30, MAX. Remote control: Main unit: Main Unit ONLY Without setting the built-in clock, you cannot use the Daily Timer (see page 24). • To exit from the clock setting, press CLOCK/TIMER as required. • To go back to the previous step, press CANCEL/DEMO. 1 Activate the clock setting mode.
MX-KC58[J]_EN.
MX-KC58[J]_EN.book Page 18 Monday, January 29, 2007 10:25 AM Antenna Aiming For XM Mini-Tuner Home Dock (not supplied) installation. memo • Place the XM Mini-Tuner Home Dock near a south-facing window or where “Channel 1” can be heard clearly (see below). • Make sure there is no obstruction between the XM MiniTuner Home Dock and the sky.
MX-KC58[J]_EN.book Page 19 Monday, January 29, 2007 10:25 AM Remote ONLY To tune in to channels Direct Channel Access You can tune in to the desired channel directly by entering the channel number. 1 Select “ALL SRCH.” The ALL indicator lights up. 1 Press DIRECT. ALL SRCH CAT SRCH 2 Press the numeric keys to enter the desired channel number while the channel number position is flashing. • To use the numeric keys, see “How to Select Numbers” on page 9. ALL indicator 2 Select the channel.
MX-KC58[J]_EN.book Page 20 Monday, January 29, 2007 10:25 AM To tune in a preset channel CH--- P--* Channel number/Preset number *Preset number is displayed only for the channels which are preset. CH NAME Channel name NAME Artist name/feature TITLE Track/program title CATEGORY Category name SIGNAL Signal strength 1 Select XM as the source. Remote control: Main unit: 2 Select a preset number for the channel you store. See “How to Select Numbers” on page 9.
MX-KC58[J]_EN.book Page 21 Monday, January 29, 2007 10:25 AM Advanced Disc Operations Numeric keys CD Open/ Close 0 ¢ CD1-CD3 7 4 CD1-CD3 DISC SKIP CANCEL/DEMO SET/RESUME CD 6 ¢ REPEAT PROGRAM RANDOM CD 6 MP3/WMA MODE REPEAT PROGRAM RANDOM 7 4 Programming the Playing Order—Program Play You can arrange the playing order of the tracks (up to 32) before you start playback. • You can repeat all the programmed tracks by pressing REPEAT.
MX-KC58[J]_EN.book Page 22 Monday, January 29, 2007 10:25 AM To check the programmed contents Remote ONLY While the PRGM indicator is shown on the display and before playback... In the programmed order. In the reverse order. To modify the program While the PRGM indicator is shown on the display and before playback... To erase the last step: To erase the entire program: To add steps in the program: Repeat steps 2 and 3 on page 21.
MX-KC58[J]_EN.book Page 23 Monday, January 29, 2007 10:25 AM Main Unit ONLY Playing Repeatedly—Repeat Play Prohibiting Disc Ejection—Child Lock You can repeat playback. You can lock the disc trays so that no one can eject the loaded discs. For CD/MP3/WMA (TRACK mode): While the disc trays are closed...
MX-KC58[J]_EN.book Page 24 Monday, January 29, 2007 10:25 AM Using the Timers SLEEP CANCEL/DEMO SET/RESUME CLOCK/TIMER ¢ 4 Setting the Timer Main Unit ONLY Using Daily Timer, you can wake up with music, etc. • To exit from the timer setting, press CLOCK/TIMER as required. • To correct a misentry during the process, press CANCEL/ DEMO. You can return to the previous step. 1 Select ON TIME.
MX-KC58[J]_EN.book Page 25 Monday, January 29, 2007 10:25 AM 3 Select the playback source—“TUNER FM,” “TUNER AM,” “CD,” “XM RADIO,” “iPod” or “AUX IN.” Main Unit ONLY To turn off the Timer after its setting is done Since Daily Timer is activated at the same time everyday, you may need to cancel it on some particular days. 1 Select DAILY. DAILY ON TIME Canceled Clock setting (see page 16) 2 Turn off the selected Timer.
MX-KC58[J]_EN.book Page 26 Monday, January 29, 2007 10:25 AM Additional Information Learning More about This System Daily Operations—Sound & Other Adjustments Daily Operations—Playback (see pages 9 to 15) Adjusting the Volume: Listening to the Radio: • If you store a new station into an occupied preset number, the previously stored station in that number will be erased. • When you unplug the AC power cord or if a power failure occurs, the preset stations will be erased in a few days.
MX-KC58[J]_EN.book Page 27 Monday, January 29, 2007 10:25 AM Troubleshooting If you are having a problem with your System, check this list for a possible solution before calling for service. General: Adjustments or settings are suddenly canceled before you finish. ] There is a time limit. Repeat the procedure again. Operations are disabled. ] The built-in microprocessor may malfunction due to external electrical interference. Unplug the AC power cord and then plug it back in.
MX-KC58[J]_EN.book Page 28 Monday, January 29, 2007 10:25 AM Power Specifications Specifications Power Requirements Power Consumption Amplifier Output Power 200 W per channel, min. RMS, driven into 6 Ω at 1kHz, with no more than 10% total harmonic distortion Terminals AUX IN Input Sensitivity/Impedance(1 kHz) 400 mV/50 kΩ Speaker terminals 6 Ω - 16 Ω Phones 32 Ω - 1 kΩ 17 mW/ch output into 32 Ω iPod Compatible iPod types See page 13 Bus Power supply Max.5 V/500 mA XM Bus Power supply Max.5V-5.
MX-KC58[J]_EN.book Page 29 Monday, January 29, 2007 10:25 AM TO OUR VALUED CUSTOMER THANK YOU FOR PURCHASING THIS JVC PRODUCT. WE WANT TO HELP YOU ACHIEVE A PERFECT EXPERIENCE. NEED HELP ON HOW TO HOOK UP? NEED ASSISTANCE ON HOW TO OPERATE? NEED TO LOCATE A JVC SERVICE CENTER? LIKE TO PURCHASE ACCESSORIES? IS HERE TO HELP! TOLL FREE: 1(800)252-5722 http://www.jvc.com Remember to retain your Bill of Sale for Warranty Service.
MX-KC58[J]_EN.book Page 30 Monday, January 29, 2007 10:25 AM LIMITED WARRANTY 1-1 USA ONLY ONLY FOR PRODUCT PURCHASED IN U.S.A. JVC Americas Corp. (JVC) warrants this product and all parts thereof, except as set forth below ONLY TO THE ORIGINAL RETAIL PURCHASER to be FREE FROM DEFECTIVE MATERIALS AND WORKMANSHIP from the date of original purchase for the period shown below.
MX-KC58[J]_EN.