PC CONNECTION KIT For Windows® JLIP VIDEO CAPTURE/ JLIP VIDEO PRODUCER ENGLISH For Customer Use: INSTRUCTIONS Enter below the Model No. and Serial No. Retain this information for future reference. Model No. Serial No.
EN CONTENTS JLIP VIDEO CAPTURE SOFTWARE SECTION .................................................................... 5 – 32 STARTING JLIP VIDEO CAPTURE 6 INITIALIZATION 7 Selecting the connected device ............................................................... 7 JLIP VIDEO CAPTURE WINDOWS 8 – 10 Index window .................................................................................... 8 DV Controller window ..........................................................................
EN 3 COPYING AN IMAGE 28 Copying an image into the clipboard ...................................................... 28 Pasting an image from the clipboard ...................................................... 28 EDITING AN IMAGE 29 CREATING AN HTML ALBUM 30 Saving images in HTML format ............................................................. 30 Viewing the HTML album ....................................................................
EN MEMO
EN JLIP VIDEO CAPTURE SOFTWARE SECTION You can find the latest information (in English) on the provided software program at our World Wide Web Server. http://www.jvc-victor.co.jp/english/index-e.
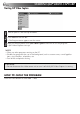
EN STARTING JLIP VIDEO CAPTURE Starting JLIP Video Capture 1 Turn on your PC and start up Windows . Start on the task bar. 2 •Click The Program menu appears on the screen. the mouse pointer over JLIP Video Capture and click to start the program. 3 •Move JLIP Video Capture starts up. ® NOTE • Close any other programs running on the PC. • Disable any programs that run in the background, such as screen savers, e-mail applications, virus checkers, schedulers, etc. • Turn off file and printer sharing.
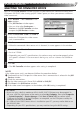
INITIALIZATION EN SELECTING THE CONNECTED DEVICE You can use the JLIP Devices window to select a video source unit connected to one of the COM ports (RS-232C) after starting up JLIP Video Capture, or when you connect a different video source unit. Select Window — DV Controller in the 1 Index window. • The JLIP Devices window opens. • You can also select Preferences — Devices in the DV Controller window to open the JLIP Devices window. the Serial Port (COM 1 to COM 4).
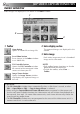
JLIP VIDEO CAPTURE WINDOWS EN INDEX WINDOW Index images are displayed as an album in the Index window. 1 2 3 1 Toolbar Open button Opens an album file or image file. 2 Index display section The captured images are displayed in this section. 3 Index image Save Album button Saves images in the Index window as an album file. DV Controller button Opens the DV Controller window for control of the connected video source unit from your PC.
EN 9 DV CONTROLLER WINDOW Select Window — DV Controller in the Index window to open the DV Controller window. This window is used to capture still images from a video source unit. 1 3 2 1 Counter Indicator (Time Code) The video source unit’s time code is displayed here.
EN JLIP VIDEO CAPTURE WINDOWS (cont.) IMAGE VIEWER WINDOW Select Window — Image Viewer in the Index window to open the Image Viewer window. This window is used to display images at full size, and to present images in an album as a slide show. Toolbar Close button Stop button Previous Image button Next Image button Slide Show button First Image button Last Image button Control window NOTE • Each toolbar button function can also be performed from the menu bar.
BASIC IMAGE CAPTURE EN 11 This section describes basic image capture operations. For more detailed instructions, see pages 13-15. 1 Set up your equipment. • If using a video camera, insert a videocassette into it. •␣ Connect the video source unit to your PC, and turn both on. •␣ Start up JLIP Video Capture. (see page 6) 2 Start playback. • Click Window — DV Controller to open the DV Controller window. • Click the Play button in the DV Controller window. 3 Capture the desired image.
EN BASIC IMAGE CAPTURE (cont.) the image in the Image Viewer 4 View window. • Double-click the thumbnail image in the Index window. • The image is displayed in the Image Viewer window at its captured size. • Click the Image Viewer window’s Close button to return to the Index window. 5 Save the image on your PC’s hard drive. • Click on the thumbnail image in the Index window to select it, then click File — Save Image As. For more details, refer to the Windows® 95/98 manual or your computer’s manual.
ADVANCED CAPTURE FUNCTIONS EN 13 IMPORTED IMAGE Squeeze/Cinema You can select Squeeze or Cinema when adding wide-screen images (with an aspect ratio of 16:9) to an album. Squeeze Squeezes the image’s aspect ratio from 16:9 to 4:3. Cinema Inserts a black or white mask at the top and bottom of the image to convert its aspect ratio to 4:3. 2 Image Size Preferences Preferences — Imported Image in the Index 1 Click window. 2 Select Squeeze or Cinema in Wide Image Format. 3 Click OK.
EN ADVANCED CAPTURE FUNCTIONS (cont.) AUTOMATIC CAPTURE You can capture images automatically according to your preferences. Automatic Capture cannot be performed in the time code range of 00:00:00:00 and 00:00:30:00. Automatic Capture Preferences the Play button in the DV 1 Click Controller window. 2 Click the Automatic Capture button. CAUTION • Depending your PC’s specifications and operating environment, the points where images are captured may not match what was set in the preferences.
EN 15 Interval You can capture images at specified intervals. This function is useful for summarizing the contents of a tape, or for watching time-lapse movies using the slide show. Interval in the Automatic Capture 1 Select window. the number of images to be 2 Select captured. 3 Select the length of the interval (in minutes and seconds). 4 Click Execute. 1 2 4 CAUTION • Automatic capture stops when the number of images in the Index window reaches 99 or the videotape ends.
EN VIEWING IMAGES SLIDE SHOW Slide Show Preferences You can select the display interval during a slide show. Preferences — Image Viewer 1 Select from the Image Viewer window. Make sure the Set Minimum box is 2 unchecked, and select the interval (in seconds) between images. • Check the Set Minimum box when you want to display images one after another quickly. •␣ You can select from 0 to 30 seconds.
EN IMAGE CORRECTION Preferences — Image Viewer in 1 Select the Image Viewer window. displaying images captured from 2 When a fast action sequence, select Movement in Image Correction. • Images in the displayed album will be corrected for camera shake. • To use less memory, select Field. • To use no image correction, select None. DISPLAY SIZE You can select between normal and full-screen display. For full-screen display, select View — 1 window.
EN VIEWING IMAGES (cont.) IMAGE VIEWER APPEARANCE You can toggle the display of the border (window frame and menu bar) and toolbar in the Image Viewer window. Hiding the Border View — Border in the Image 1 Select Viewer window to uncheck it. The window frame and menu bar disappear. •␣ You can toggle the border display by clicking the right mouse button in the Image Viewer window to bring up the View menu. Hiding the Toolbar View — Toolbar in the Image 1 Select Viewer window to uncheck it.
SELECTING A BACKGROUND COLOR You can select the background color in the Index window. Preferences — Background Color 1 inSelect the Index window or Image Viewer window. 2 Select the desired background color. 3 Click OK.
EN CHANGING THE IMAGE FORMAT You can select JPEG, Bitmap (BMP) or DVF format for saving images, and adjust their settings. JPEG Preferences JPEG images are saved with a high compression rate, making them ideal for Internet web pages. Preferences — Save Image in the 1 Select Index window or Image Viewer window. 2 Select JPEG in Image Format. 3 Select an image size in Image Size. • If the video footage was shot in the wide-screen mode, the image width is greater than in the standard mode.
EN 21 Bitmap Preferences Bitmap (BMP) is the standard format used by Windows®, and is supported by many software applications. Select Preferences — Save Image in the 1 Index window or Image Viewer window. 2 Select Bitmap in Image Format. 3 Select an image size in Image Size. • If the video footage was shot in the wide-screen mode, the image width is greater than in the standard mode. Image width in the widescreen mode is shown in brackets. the number of colors in Bitmap 4 Select Colors.
EN CHANGING THE IMAGE FORMAT (cont.) DVF Preferences DVF is the native format for storing still images from digital videotape. DVF images are saved without changing the data, so there is no loss of quality. Preferences — Save Image in the 1 Select Index window or Image Viewer window. 2 Select DVF in Image Format. 3 Click OK. images as desired.
SAVING AN IMAGE EN 23 SAVING INDEX IMAGES You can save index images separately from their album file. Before saving an image, set the desired image format and preferences. (see pages 20-22) the desired index image in the 1 Click Index window. • To select multiple index images, hold down the Ctrl key and click each index image that you wish to save. • To select multiple sequential index images, click the first index image. Then, hold down the Shift key and click the last index image that you wish to save.
EN SAVING AN IMAGE (cont.) SAVING IMAGES IN THE IMAGE VIEWER WINDOW File — Save Image As in the 1 Select Image Viewer window. 2 Enter a file name and click Save. ADDING IMAGE FILES TO THE INDEX WINDOW You can add JPEG, Bitmap (BMP) and DVF images to the Index window. • To add images to the Index window directly from a video source unit, see page 11. 1 Select File — Open. the desired image format in the 2 Select Files of type field. 3 Select the desired file and click Open.
SAVING IMAGES AS AN ALBUM SAVING IMAGES AS AN ALBUM You can save the images in the Index window as an album. create a new album, click the Save 1 ToAlbum button on the toolbar in the Index window. the desired file name and click 2 Enter Save. • To save a modified album, select File — Save Album. COPYING AN INDEX IMAGE You can copy images within the Index window. 1 Click the image you wish to copy.
EN DELETING AN INDEX IMAGE DELETING AN INDEX IMAGE You can delete images in the Index window. the image you wish to 1 Click delete. • To select multiple index images, hold down the Ctrl key and click each index image that you wish to delete. • To select multiple sequential index images, click the first index image. Then, hold down the Shift key and click the last index image that you wish to save. 2 Select Edit — Delete. • Alternatively, you can press the Del key.
ADDING IMAGES TO AN ALBUM EN 27 ADDING IMAGES TO AN ALBUM You can add images to an album by capturing them from a video source unit or by importing them from your PC’s hard disk (JPEG/Bitmap/DVF). capture images from a video source 1 Tounit... Open the album you wish to add images to, then capture the desired images (see pages 11, 14-15). To import images from your PC’s hard disk... Drag the desired image files to the Index window. Each file is added to the end of the index.
EN COPYING AN IMAGE COPYING AN IMAGE INTO THE CLIPBOARD You can copy an image displayed in the Image Viewer window into the clipboard for use in another application. 1 Select Edit — Copy. • Alternatively, you can press Ctrl-C. NOTE • Image data copied into the clipboard is resized to 640 x 480 (standard) or 848 x 480 (wide) pixels. PASTING AN IMAGE FROM THE CLIPBOARD You can paste an image from the clipboard into another application.
EDITING AN IMAGE EN 29 You can load an external image editor application to modify an image. Before using this function, an image editor application must be installed. Edit — Open Editor in the Image 1 Select Viewer window. CAUTION • Refer to the image editor application’s instructions for details about its operation. • The most recently installed image editor application starts up when Open Editor is selected. If you wish to link to a different image editor application, refer to Help in Windows®.
EN CREATING AN HTML ALBUM You can save images in the Index window as an HTML album, which can then be viewed using an Internet browser. SAVING IMAGES IN HTML FORMAT the images you would like to save 1 Select in the Index window. (see page 23) • If no index images are selected, all of them will be saved as an HTML album. 2 Select File — Make HTML Album. a name for the HTML file and click 3 Enter Save. a title for the HTML album in the 4 Enter Title Input field and click OK.
TROUBLESHOOTING Problem Cause The connected video source unit cannot be detected. The COM port cannot be set. • Confirm that your video source unit is connected to the AC adapter correctly. • Confirm that the cable is connected to your PC and video source unit correctly. • Turn on the power of the video source unit before starting up JLIP Video Capture. • If it is still not detected after clicking Scan in the JLIP Devices window two or three times, try turning off your PC and video source unit.
TROUBLESHOOTNG (cont.) EN Problem Cause Automatic capture does not function correctly. • This function may not operate correctly sometimes depending on your PC’s specifications and operating environment. Page 6, 9, 11,14 • This may occur␣ if you move the DV Controller window, operate its scroll bars or perform a file operation while capturing images. •␣ This may occur if correct data is not being transmitted due to damage on the videotape.
EN 33 JLIP VIDEO PRODUCER SOFTWARE SECTION You can find the latest information (in English) on the provided software program at our World Wide Web Server. http://www.jvc-victor.co.jp/english/index-e.
EN STARTING AND EXITING JLIP VIDEO PRODUCER Starting JLIP Video Producer the video source unit to the PC 1 Connect using the JLIP connection cable, then turn the video source unit on. 2 Turn on your PC and start up Windows . Start on the task bar. 3 Click •The Program menu appears on the ® screen. the mouse pointer over JLIP 4 Move VIDEO PRODUCER and click to start the program. •JLIP Video Producer starts up. NOTES: • Exit all other software applications before starting JLIP Video Producer.
EN 35 Initializing JLIP Devices Preferences — JLIP Devices. 1 Select Select the serial port to which the device is connected and click Scan.4 the player to be used by clicking 2 Select on it in the listbox and then click Select. •You do not need to perform the operation in step 2 when only one player is connected. the recorder deck to be used by 3 Select clicking on it in the listbox and then click Select.
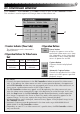
EN JLIP VIDEO PRODUCER WINDOW BUTTONS AND DISPLAYS JLIP VIDEO PRODUCER WINDOW 1 2 3 4 5 CONTROLLER 6 7 8 9 0 ) ( * & ^ ! %$# @
EN 1 P.AE/Effect buttons • Selects one of the 5 P.AE/Effects available per programmed scene. • To cancel the selected effect, click the EC (Effect Clear) button. 2 Fade/Wipe Effect buttons • Selects one of the 7 Picture Wipes or 10 Fades/Wipes available per scene transition. • To cancel the selected effect, click the TC (Transition Clear) button. 3 Elapsed Time • Displays the total elapsed time of all the programmed scenes. 37 8 Tape counter display • Displays the current tape position. ex.
EN JLIP VIDEO PRODUCER WINDOW BUTTONS AND DISPLAYS ! Jog/Shuttle @ Tape Operation buttons Jog/Shuttle Operation buttons Click these buttons to perform Jog/Shuttle operations. Jog Dial Select button Jog Dial mode is selected when the inner ring is lit. Shuttle Dial Select button Shuttle Dial mode is selected when the outer ring is lit. Jog Dial Lamp (Inner lamp)/Jog Dial • Jog Dial mode is selected when the jog dial lamp is lit by clicking with the mouse.
EN $ Preview button • Playback the video from the In point to Out point specified for a program. • Recording does not result from clicking this button. • The PC emits a sound when the application is started and exited. • When using a camera that includes transition functions such as wipe, the area before the In point and after Out point appears masked. This allows accurate confirmation of the video location to be edited. (This operation is not possible with some models.
EN JLIP VIDEO PRODUCER WINDOW BUTTONS AND DISPLAYS (cont.) * Entry button Editing Method when Using an Editing This button is used to enter the current Deck other than JLIP counter value for the In point and then Out point each time it is clicked. • This button is for specifying the In point and Out point for each scene. • Clicking Entry after clicking a button other than Bottom of Scene of the Program Select buttons will add a new program to the next number after the current position.
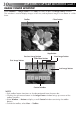
BASIC OPERATIONS EN 41 Operating the video source unit the video source unit to the Play 1 Set mode and insert a recorded tape. . 2 Click •The playback picture appears on the TV © monitor. Setting in/out points Entry set In/Out points, click Entry at the 1 Tobeginning and end of the scene you want to dub. •Set In/Out points so that the Out point comes after the In point. •If a scene has no Out point, program playback and dubbing will be disabled for that scene.
EN BASIC OPERATIONS (cont.) Playing back one programmed scene on the line where the In/Out points 1 Click you want to preview are displayed to highlight that line. Preview Preview. 2 Click •The video source unit locates the scene by going to a point prior to the In point, then starts playback at the In point. Playback stops after the Out point is passed. Playing back all programmed scenes Auto Edit.
EN 43 Dubbing You can record all programmed scenes onto a tape in the recorder. sure there is an erase protection 1 Make tab on the tape. Insert it into the recording deck and set the recording deck to the Record-Pause mode. Auto Edit. 2 Click When editing stops, the video source unit enters the Stop mode and the recording deck enters the Record-Pause mode. •When "Tape Change" occurs during dubbing, editing will stop and a message requesting tape change will appear. Change the tape and click OK.
EN BASIC OPERATIONS (cont.) Selecting a P.AE/Effect There are 5 P.AE/Effects available to spice up programmed scenes. You can select only one effect per programmed scene. on the scene where you want to 1 Click use a P.AE/Effect. the desired P.AE/Effect button. The 2 Click selected effect indication is displayed to the right of the In point. To cancel the selected P.AE/Effect . . . Click on the scene which has the effect you want to cancel, then click the EC (Effect Clear) button.
EN 45 P.AE/Effect and Fade/Wipe Effect buttons P.AE/Effect buttons Fade/Wipe Effect buttons SEPIA MOSAIC FADER Recorded scenes have a brownish tint like old photos. Combine this with the Cinema mode for a classic look. Fade in or out with a mosaic effect. DOOR WIPE Wipe in as the two halves of a black screen open to the left and right, revealing the scene, or wipe out and the black screen reappears from left and right to cover the scene.
EN BASIC OPERATIONS (cont.) Saving the program list File — Save As. 1 Select •The Save As dialog box appears. a file name in the File name field. 2 Enter •The extension .vpd will be appended to the file name. ex.: travel.vpd Save to save the program list as a 3 Click file. NOTES: • The programmed scene information that is saved includes only counter readings at In/ Out points, Fade/Wipe Effects, P.AE/Effects, Duration Time, and Memo. • Images are not saved.
EN 47 Opening a saved file Opening a file saved on floppy disk 1 Insert the floppy disk into the drive. 1 file names appear in the File name 2 Saved field. Click on the file name you want so Click in DRIVE to select the floppy 2 drive. that it appears in the field below. Open to load the file. steps 2 and 3 in Opening a saved 3 Click 3 Follow file on the left. •The JLIP Video Producer window Select File — Open. •The Open dialog box appears. Ä returns.
EN BASIC OPERATIONS (cont.) Correcting and cutting programmed counter data Correcting program counter data click on the line of the scene you 1 Double want to modify. OR . . . Select the line to be modified and click Modify Edit Points on the controller. •The Modify Edit Points dialog box will appear allowing the In point, Out point, memo or tape change to be changed. ¶Ä , or enter the desired numbers 2 Click from the keyboard, and then click OK.
EN 49 Adding a scene the scene you want to add and 1 Click select Edit — Add — Scene. the In and Out points you want to 2 Enter set, refering to Corrrecting program counter data on the page to the left. Dubbing onto one tape using two or more tapes the scene at which the tape is to be 1 Click changed and select Edit — Add — Change Tape. OR . . . Double click the scene you want to modify to display the Modify Edit Points dialog box and then put a check mark next to Change Tape.
EN BASIC OPERATIONS (cont.) Cutting all programmed scenes 1 Select Edit — Select All. Edit — Delete. 2 Select •The message "Delete (number) Scene(s)?" appears. To cut all the scenes, click Yes. NOTE: All scenes can be deleted by selecting Delete by clicking with the right mouse button. Copying a programmed scene to another position 1 Click on the scene you want to copy. 2 Select Edit — Copy. on the scene number you want to 3 Click paste. 4 Select Edit — Paste.
ADVANCED OPERATIONS EN 51 Changing the ID number You can change the ID number of the connected unit. The default ID number is 06. 1 To display the JLIP Devices dialog box, select Preferences — JLIP Devices. After selecting the number in the listbox, right-click the mouse to select Change ID, and 2 then change the number and press the Return key. NOTES: • Do not enter an ID number of 00 because JLIP Video Producer does not recognize ID 00.
ADVANCED OPERATIONS (cont.) EN Adjusting the gap between stored In/Out points on the PC and dubbed ones on the recorder During dubbing, the beginning of the scene stored on the PC may be missed, or the scene prior to the transition you chose for the In/Out points may be dubbed onto the recorder. When this occurs, adjust the gap for more accurate editing. dubbing (see page 43), play back 1 After the dubbed scene to check the In/Out point timing.
TROUBLESHOOTING SYMPTOM EN 53 TYPICAL SITUATION Cannot select serial port v Sometimes the RS-232C port cannot be used because the PC’s COM ports have all been assigned to internal modems, IrDA or other devices. To check port usage, right click on My Computer on the desktop, select Properties, click on the Device Manager tab, and look under the item Ports. If no ports are open, disable one of the modems, IrDA drivers or other devices to free up a COM port.
TROUBLESHOOTING (cont.) EN SYMPTOM TYPICAL SITUATION The video deck does not function v When the video deck is in Remote Pause mode or is being controlled by remote control, be sure to put the video deck in Record Pause mode before starting Auto Edit. v When the video deck is in Remote Pause mode or is being controlled by remote control, check that "Use Edit Terminal" has been selected on the JLIP Devices dialog box.
INDEX EN 55 A L Adding a scene ........................................ Z pg. 49 Adding images to an album ...................... Z pg. 27 Automatic Capture .................................... Z pg. 14 Automatic Capture button ...................... Z pg. 9,14 Last Image button ...................................... Z pg. 10 B Background Color ..................................... Z pg. 19 BMP (Bitmap) .......................... Z pg. 12, 21, 24, 29 Border ...........................................
EN JLIP VIDEO CAPTURE JLIP VIDEO PRODUCER VICTOR COMPANY OF JAPAN, LIMITED COPYRIGHT© 1999 VICTOR COMPANY OF JAPAN, LTD.