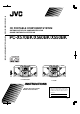
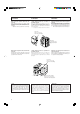
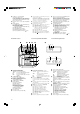
PC-X570BK/X560BK/X550BK CD PORTABLE COMPONENT SYSTEM SISTEMA PORTATIL DE COMPONENTES DE CD CHAINE PORTABLE A LECTEUR CD CD PORTABLE COMPONENT SYSTEM PC-X570BK/X560BK/X550BK PRESET TUNING /AUTO PRESET PLAY MODE CD TAPE — MULTI CONTROL — CD ONE TOUCH REC POWER ON/STANDBY CD PORTABLE COMPONENT SYSTEM 4 8 9 10 ACTIVE HYPER-BASS PRO POWER ON/STANDBY CD PORTABLE COMPONENT SYSTEM ACTIVE HYPER-BASS PRO PHONES POWER 3 7 ENTER/ MEMORY PRESET EQ POWER ON (AC) SLEEP 2 6 TUNER — MULTI CONTRO
ESPAÑOL ENGLISH FRANÇAIS Enhorabuena por la compra de este producto JVC. Lea detenidamente este manual de instrucciones antes de poner en funcionamiento la unidad a fin de obtener un óptimo rendimiento y mayor vida útil. Nous vous remercions d’avoir acheté cet appareil JVC. Veuillez lire consciencieusement ce manuel d’instructions avant de commencer à faire fonctionner l’appareil de façon à être sûr d’obtenir les performances optimales et la plus longue utilisation de cet appareil.
INFORMATION (For U.S.A) This equipment has been tested and found to comply with the limits for a Class B digital device, pursuant to Part 15 of the FCC Rules. These limits are designed to provide reasonable protection against harmful interference in a residential installation. This equipment generates, uses, and can radiate radio frequency energy and, if not installed and used in accordance with the instructions, may cause harmful interference to radio communications.
SAFETY PRECAUTIONS Prevention of Electric Shocks, Fire Hazards and Damage 1. Even when the POWER button is set to standby, a very small current will flow. To save power and for safety when not using the unit for an extended period of time, disconnect the power cord from the household AC outlet. 2. Do not handle the power cord with wet hands. 3. When unplugging from the wall outlet, always grasp and pull the plug, not the power cord. 4.
3. Condensation In the following cases, condensation may occur in the unit, in which case the unit may not operate correctly. • In a room where a heater has just been switched on. • In a place where there is smoke or high humidity. • When the unit is moved directly from a cold to a warm room. In these cases, set the POWER button to ON and wait 1 or 2 hours before use. 4. Volume setting Compact discs produce very little noise compared with analog records.
ATTACHING/DETACHING THE SPEAKERS When using the speakers attached to the main unit Align speaker protrusions A to slits B of main unit and slide the speaker forward till it is attached. The lock lever will catch and lock automatically. • Attach the other speaker in the same way.
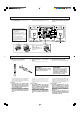
CONNECTIONS • Do not switch the power on until all connections are completed. • ER T AK LEF E SP T • NORM ~ 123 1.5 x 8 AC IN 7 3 8 5 1 6 4 2 SEE BOTTOM ER T AK LEF Connect the AC power cord. LEFT BEAT CUT ER T AK LEF E SP T A. Operation on household AC • Black cord marked with a white “---” line • Cordón negro marcado con una línea blancha “---” • Condon noir marqué d’une ligne blanc “---” E SP T H RIG ALIMENTACIÓN A. Funcionamiento alterna • ALIMENTATION concorriente A.
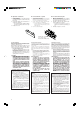
B. Operation on batteries B. Funcionamiento con pilas B. Fonctionnement sur piles • Loading batteries 1. Open the battery cover by pulling it toward you while pressing the sections marked by the arrows. 2. Insert eight ‘‘R20/D (13F)’’ size batteries as shown in the diagram. * Be careful to insert the batteries with the ª and · terminals positioned correctly. 3. Replace the cover. • Colocación de las pilas 1.
NAMES OF PARTS AND THEIR FUNCTIONS CD player/General section 1 2 3 NOMBRE DE LAS PARTES Y SUS FUNCIONES NOMENCLATURE DES PIECES ET LEURS FONCTIONS Sección de reproductor de CD/general Section lecteur CD/générale 4 5 6 7 e 1 2 PRESET TUNING /AUTO PRESET PLAY MODE CD TAPE 3 4 TUNER BAND ONE TOUCH REC — MULTI CONTROL — ENTER/ MEMORY 8 9 — VOLUME — PRESET EQ POWER ON SOUND POWER ON/STANDBY CD PORTABLE COMPONENT SYSTEM e ACTIVE HYPER-BASS PRO PHONES 0 q w SLEEP AHB PRO PROGRAM RAND
q Headphones jack (PHONES) (3.5 mm dia. stereo mini) Connect headphones (with impedance 16 Ω–1 kΩ) to this jack. The speakers are automatically switched off when the headphones are connected.
Rear panel Panel trasero Panneau arrière SPEAKER RIGHT LEFT NORM BEAT CUT ~ 123 1.5 x 8 AC IN 7 3 8 5 1 6 4 2 SEE BOTTOM 1 1 2 3 4 Telescopic antenna AC IN (AC Input) jack Battery compartment cover SPEAKER terminals Connect the provided speakers to these terminals.
REMOTE CONTROL UNIT (PC-X570/X560 only) UNIDAD DE CONTROL REMOTO (PC-X570/X560 exclusivamente) BOÎTIER DE TELECOMMANDE (PC-X570/X560 uniquement) Preparation before use Preparación previa Préparatifs avant utilisation • • • Installing batteries in the remote control unit 1. Remove the battery cover from the back of the remote control unit. 2. Insert two ‘‘R6/AA (15F)’’ size batteries (option). • Insert the batteries with the ª and · terminals matching the indication inside the battery compartment.
Las siguientes operaciones pueden realizarse utilizando la unidad de control remoto. The following operations can be performed using the remote control unit. • Check the functions of the operation buttons carefully and operate them correctly. • Le fonctionnement suivant peut être effectué en utilisant le boîtier de télécommande. • Bien étudier les fonctions des touches de fonctionnement et les utiliser correctement.
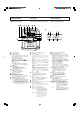
SWITCHING THE POWER ON/ STANDBY CONEXIÓN/PUESTA EN ESPERA DE LA ALIMENTACIÓN COMMUTATION MARCHE/ ATTENTE DE L’ALIMENTATION CD 6 button Botón CD 6 Touche CD 6 TAPE 3 button Botón TAPE 3 Touche TAPE 3 PRESET TUNING /AUTO PRESET PLAY MODE CD TAPE TUNER/BAND button Botón TUNER/BAND Touche TUNER/BAND TUNER BAND ONE TOUCH REC — MULTI CONTROL — ENTER/ MEMORY — VOLUME — PRESET EQ POWER ON SOUND POWER button Botón POWER Touche POWER POWER ON/STANDBY CD PORTABLE COMPONENT SYSTEM ACTIVE HYPER-BASS PRO
COMPU PLAY (only when AC power is used) Operación COMPU PLAY (sólo cuando se utiliza CA) COMPU PLAY (seulement lorsque l’alimentation CA est utilisée) Even when the power is set to standby, pressing the button shown below switches on the power and selects the source. Aun cuando la alimentación esté en espera, el presionar el botón mostrado abajo, conecta la alimentación y selecciona la fuente.
VOLUME, SOUND AND OTHER CONTROLS VOLUMEN, SONIDO Y OTROS CONTROLES VOLUME, SON ET AUTRES COMMANDES VOLUME buttons Botones VOLUME Touches de volume (VOLUME) + : Use to increase the volume. – : Use to decrease the volume. (Control range from VOL 0 to VOL 25.) + : Utilícelo para aumentar el volumen. – : Utilícelo para reducir el volumen. (Los límites de control van de VOL 0 a VOL 25). + : Utiliser pour augmenter le volume. – : Utiliser pour réduire le volume. (Gamme de commande de VOL 0 à VOL 25.
CONCERNING COMPACT DISCS Since dirty, damaged and warped discs may damage the unit, care should be taken of the following: 1. Usable compact discs Use compact discs with the mark shown. 2. Notes on handling discs • Do not touch the reflective recorded surface. • Do not stick anything to or write anything on the label side. • Do not bend compact discs. 3. Storage • After removing a disc from the unit, be sure to put it back in its case.
PLAYING COMPACT DISCS REPRODUCCIÓN DE DISCOS COMPACTOS LECTURE DE DISQUES AUDIONUMERIQUES The following example assumes a compact disc with 12 tunes and a total playing time of 48 minutes 57 seconds. Reproducción de un disco completo ... El siguiente ejemplo considera un disco compacto con 12 canciones y un tiempo de reproducción total de 48 minutos y 57 segundos. Lecture d’un disque entier ...
Notes: • The following indication may be shown when a disc is dirty or scratched, or when the disc is loaded upside down or not loaded. In such a case, check the disc and insert again after cleaning the disc or turning it over. Notas: • La siguiente indicación puede aparecer cuando el disco está sucio o rayado, o puesto al revés o sin cargar. En tal caso, verifique el disco e insértelo nuevamente después de haberlo limpiado o invertido.
Direct access playback (using the remote control) (PC-X570/X560 only) • Pressing any of the track number buttons will start play from the beginning of the designated tune, without your having to press the CD 6 button. (This function cannot be used during programmed play.
Programmed play (using the controls of the main unit) Reproducción programada (utilizando los controles de la unidad principal) • • Up to 20 tunes can be programmed to be played in any required order. The total playing time of programmed tunes is displayed (up to 99 minutes, 59 seconds). (Example: When programming the 2nd tune to be played first, the 6th tune next, and then the 12th tune, etc.) 1 2 Puede programarse la reproducción de hasta 20 canciones en cualquier orden deseado.
To confirm the details of a program ... After setting the program, press the ENTER/ MEMORY button; the tunes making up the program will be displayed in programmed order. Para confirmar el contenido de una programación ... Una vez fijado el programa, presione el botón ENTER/MEMORY; se visualizan las canciones que conforman el programa en el orden programado. Pour vérifier les détails d’un programme ...
Para anular las canciones programadas ... Presione el botón 7 /CLEAR antes de reproducir un disco. Presione dos veces este botón durante la reproducción programada. También puede presionar el botón PLAY MODE para fijar otro modo de reproducción además del modo PROGRAM. Al abrirse el portadisco del CD, se cancelan automáticamente las canciones programadas. Pour annuler les morceaux programmés ... Presser la touche 7/CLEAR avant de lire un disque.
Random playback (using the remote control) (PC-X570/X560 only) When the RANDOM button is pressed, every tune in a disc is played back once, in random order. Reproducción aleatoria (utilizando el controlador remoto) (PC-X570/X560 exclusivamente) Cuando se presiona el botón RANDOM, la unidad reproduce una vez todas las músicas de un disco en orden aleatorio. ALL Single tune Una canción Un seul morceau Repeat play (using the remote control) (PC-X570/X560 only) Press the REPEAT button before or during play.
CASSETTE PLAYBACK Operate in the order shown. REPRODUCCIÓN DE CASSETTES LECTURE DE CASSETTE Proceda en el orden indicado. Procéder dans l’ordre indiqué. 2 PRESET TUNING /AUTO PRESET PLAY MODE CD TAPE TUNER BAND ONE TOUCH REC — MULTI CONTROL — ENTER/ MEMORY 3 — VOLUME — PRESET EQ POWER ON SOUND POWER ON/STANDBY CD PORTABLE COMPONENT SYSTEM ACTIVE HYPER-BASS PRO PHONES 1 FULL LOGIC CONTROL CASSETTE DECK 1 Load a cassette tape. 2 Press to start playback.
RADIO RECEPTION Operate in the order shown. RADIORRECEPCIÓN RECEPTION RADIO Proceda en el orden indicado. Procéder dans l’ordre indiqué. CD 3 1 PRESET TUNING /AUTO PRESET PLAY MODE TAPE TUNER BAND ONE TOUCH REC — MULTI CONTROL — 2 ENTER/ MEMORY — VOLUME — PRESET EQ POWER ON SOUND POWER ON/STANDBY CD PORTABLE COMPONENT SYSTEM ACTIVE HYPER-BASS PRO PHONES FULL LOGIC CONTROL CASSETTE DECK 1 Press the TUNER/BAND button.
STEREO AUTO/MONO mode Modo STEREO AUTO/MONO Mode STEREO AUTO/MONO Auto mode: Set to this mode when listening to or recording an FM stereo broadcast. The STEREO indicator in the display window lights when the FM stereo broadcast is received. Modo automático: Ajústelo en esta modo cuando escuche o grabe una radioemisión estereofónica por FM. Se enciende el indicador STEREO en la ventanilla deindicación cuando se recibe una radioemisión estereofónica de FM.
Presetting stations (using the controls of the main unit) Presintonización de estaciones (utilizando la unidad de control remoto) Préréglage des stations (en utilisant les commandes de l’appareil principal) 15 stations in each band (FM and AM) can be preset as follows: Pueden presintonizarse 15 estaciones en cada banda (FM y AM) del siguiente modo: 15 stations dans chaque gamme (FM et AM) peuvent être préréglées comme suit : 1 Tune to the required station. 2 Press the ENTER/MEMORY button.
• Repeat the above procedure for each of the other stations, using a different preset button each time. Repeat the above procedure for the AM band. • Notes: • The previous preset station is erased when a new station is set as the new station’s frequency replaces the previous frequency in memory. • When listening to an AM broadcast, noise may be heard if the remote control is used.
Synchronized recording with the CD player Grabación sincronizada reproductor de CD • • In this system, the CD player starts playback when the cassette deck enters the recording mode. con el En este sistema, el reproductor de CD comenzará la reproducción cuando la platina de cassette se establezca en el modo de grabación. Proceda en el orden indicado. Operate in the order shown.
Note: • During CD synchro recording, the CD 6 and SEARCH (4/¢) buttons do not function. Nota: • Durante la grabación sincronizada de CD, no funcionarán los botones CD 6 y SEARCH (4/¢). Remarque : • Pendant l’enregistrement synchro CD, les touches CD 6 et SEARCH ( 4/ ¢) ne fonctionnent pas.
BEAT CUT switch (on the rear panel) Conmutador de supresión de batidos (BEAT CUT) (en el panel trasero) Interrupteur de coupure de battement (BEAT CUT) (sur le panneau arrière) Cuando graba un programa de AM, es posible que se produzcan compases que no serán escuchados cuando se escucha un programa. En tal caso, presione este conmutador después de colocar la platina en el modo de grabación para eliminar los compases. Normalmente coloque este conmutador en ‘‘NORM 1’’.
MAINTENANCE MANTENIMIENTO ENTRETIEN Cleaning is important! When the tape is running, magnetic powder and dust naturally accumulate on the heads, capstan and pinch roller. When they become too dirty ... • sound quality deteriorates. • the output sound level drops. • the previous sound is not completely erased. • recording is not performed satisfactorily. Because of this, you should clean the heads, etc. every 10 hours of use, so that perfect recording is possible.
• Cassette Deck Section 5. Playback sound is at a very low level. * Is the head dirty? 6. The ONE TOUCH REC button does not function. * Have the safety tabs of the cassette been broken off? • Tuner Section 7. Reception is noisy. * Try adjusting the antenna. • Timer Section Sección de la platina de cassette • 5. * 6. * El sonido de reproducción es muy bajo. ¿Está la cabeza sucia? No funciona el botón ONE TOUCH REC.
General Power output Generalidades Potencia de salida : 5,5 watios RMS mínimo por canal 3 W de 300 Hz a 15 kHz con no más de 10% de distorsión armónica total Jacks de salida : Auriculares (0–20 mW/canal, 32 Ω) (impedancia de adaptación 16 Ω –1 kΩ) Alimentación : CA 120 V, 60 Hz CC 12 V (pila ‘‘R20/D (13F)’’ x 8) Consumo : 20 W (con el botón POWER ON) (PC-X570) 18 W (con el botón POWER ON) (PC-X560/X550) 3 W (con el botón POWER en espera) Dimensiones : 612 (A) x 259 (Alt.) x 267 (P) mm.
A4-3C 95.6.