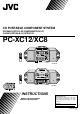
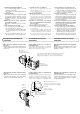
CD PORTABLE COMPONENT SYSTEM SISTEMA PORTATIL DE COMPONENTES DE CD CHAINE PORTABLE A LECTEUR CD PC-XC12/XC8 REC/ PLAY B PLAY A PLAY PLAY PC -XC12 CD PORTABLE COMPONENT SYSTEM ON ACTIVE HYPER-BASS PRO REMOTE SENSOR TUNER POWER BAND PRESET TUNING AUTO PRESET TIMER WAKE UP CD SEARCH SLEEP CD/TUNER MULTI DISPLAY BEAT CUT VOLUME ACTIVE HYPER-BASS PRO DOWN TUNING UP SOUND CD CD 3 -CD CD PLAY & EXCHANGE CONTINUE COMPACT DIGITAL AUDIO PC-XC12 PLAY PC-XC8 CD PORTABLE COMPONENT SYSTE
ENGLISH ESPAÑOL FRANÇAIS Thank you for purchasing this JVC product. Please read these instructions carefully before starting operation to be sure to obtain optimum performance and a longer service life from the unit. Le agradecemos la adquisición de este producto de JVC. Por favor lea detenidamente las instrucciones antes de comenzar la operación para obtener de esta unidad un rendimiento óptimo y una vida de servicio más larga. Nous vous remercions d’avoir acheté cet appareil JVC.
IMPORTANT FOR LASER PRODUCTS (For U.S.A. only) IDENTIFICATION LABEL AND CERTIFICATION LABEL PRECAUTIONS 1. CLASS 1 LASER PRODUCT 2. DANGER: Invisible laser radiation when open and interlock failed or defeated. Avoid direct exposure to beam. 3. CAUTION: Do not open the rear cover. There are no user serviceable parts inside the unit; leave all servicing to qualified service personnel. 4.
6. Do not modify the power cord in any manner. 7. To avoid accidents, do not remove screws to disassemble the unit and do not touch anything inside the unit. 8. Do not insert any metallic objects into the unit. 9. Unplug the power cord when there is a possibility of lightning. 10.If water gets inside the unit, unplug the power cord from the outlet and consult your dealer. 11. Do not block the unit's ventilation holes that allow heat to escape. Do not install the unit in a badly ventilated place. 12.
HANDLING PRECAUTIONS PRECAUCIONES DE MANIPULACION PRECAUTIONS DE MANIPULATION Do not use this unit in direct sunlight or leave the unit in closed automobiles (or yachts, etc.) where it would be exposed to high temperatures above 40°C (104°F). No utilice esta unidad bajo la luz directa del sol ni la deje en automóviles cerrados (o yates, etc.), donde podría quedar expuesta a temperaturas superiores a 40°C.
8. When listening with headphones ÷ Do not listen at high volumes as it could damage your hearing. ÷ For safety, do not drive while listening to this unit. 9. Carrying handle Do not raise or lower the carrying handle with the telescopic antenna extended, to avoid damaging the antenna. Place the carrying handle so that it does not interfere with operation. 10.When this unit is carried, switch the power OFF if possible Otherwise a malfunction may occur in the unit. 11.
Note: Since the speakers sound differently according to where they are placed, carefully place them for optimal effect within the length of the provided speaker cords. It is recommended that the left and right speakers be placed symmetrically in relation to the main unit. Nota: Como los altavoces suenan diferente de acuerdo a dónde sean colocados, ubíquelos con precaución para obtener un efecto óptimo dentro de la longitud de los cordones para altavoz suministrados.
POWER SUPPLY ALIMENTACION ALIMENTATION A. Operation on household AC A. Operación con CA en el hogar A. Fonctionnement sur secteur ÷ Connect the AC power cord after all other connections have been made. ÷ Conecte el cordón de CA después de haber terminado todas las conexiones. ÷ Brancher le cordon d’alimentation CA une fois que tous les autres raccordements ont été effectués. (For CANADA) CAUTION TO PREVENT ELECTRIC SHOCK, MATCH WIDE BLADE OF PLUG TO WIDE SLOT, FULLY INSERT.
Battery replacement When the battery ( ) indicator lights during battery operation, the batteries are nearly exhausted and should be replaced. (When the battery indicator stays lit for approx. one minute, the unit is switched off.) When making an important recording, use new batteries (preferably alkaline batteries with a longer service life) to avoid any possible failure.
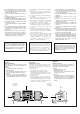
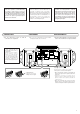
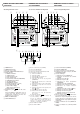
NAMES OF PARTS AND THEIR FUNCTIONS NOMBRES DE LAS PARTES Y SUS FUNCIONES NOMS DES PIECES ET LEURS FONCTIONS CD changer/General section Sección del cambiador de CD/general Section changeur CD/générale 1 2 3 4 REC/ PLAY 6 1 5 3 4 2 5 6 B PLAY A PLAY PLAY PLAY PC-XC8 PC -XC12 CD PORTABLE COMPONENT SYSTEM CD PORTABLE COMPONENT SYSTEM ON ON REMOTE SENSOR ACTIVE HYPER-BASS PRO REMOTE SENSOR ACTIVE HYPER-BASS PRO TUNER POWER TUNER POWER BAND PRESET TUNING BAND PRESET TUNING AUTO PR
REC/ PLAY B PLAY A PLAY PLAY PLAY PC-XC8 PC -XC12 CD PORTABLE COMPONENT SYSTEM CD PORTABLE COMPONENT SYSTEM ON ON REMOTE SENSOR REMOTE SENSOR ACTIVE HYPER-BASS PRO TUNER POWER ACTIVE HYPER-BASS PRO TUNER POWER BAND PRESET TUNING BAND PRESET TUNING AUTO PRESET TIMER AUTO PRESET TIMER WAKE UP WAKE UP CD SEARCH SLEEP BEAT CUT BEAT CUT CD/TUNER MULTI DISPLAY VOLUME ACTIVE HYPER-BASS PRO DOWN TUNING CD SEARCH SLEEP CD/TUNER MULTI DISPLAY DOWN TUNING UP UP ACTIVE HYPER-BASS PRO
Tuner/Deck section Sección del sintonizador/platina 3 1 2 REC/ PLAY 4 Section syntoniseur/platine 5 6 7 5 6 7 1 2 B PLAY A PLAY PLAY PLAY PC-XC8 PC -XC12 CD PORTABLE COMPONENT SYSTEM CD PORTABLE COMPONENT SYSTEM ON REMOTE SENSOR ON ACTIVE HYPER-BASS PRO REMOTE SENSOR ACTIVE HYPER-BASS PRO TUNER POWER TUNER POWER BAND PRESET TUNING BAND PRESET TUNING 8 9 AUTO PRESET TIMER WAKE UP CD SEARCH SLEEP BEAT CUT CD/TUNER MULTI DISPLAY DOWN TUNING VOLUME ACTIVE HYPER-BASS PRO UP
8 Display window 1 Tape (TAPE) mode display 2 Recording indicator (REC) 3 Band indicator 4 Radio frequency display 8 Ventanilla de indicación 1 Indicación del modo de cinta (TAPE) 2 Indicador de grabación (REC) 3 Indicador de banda 4 Indicación de frecuencia de radio 8 Fenêtre d’affichage 1 Affichage du mode de bande (TAPE) 2 Indicateur d’enregistrement (REC) 3 Indicateur de gamme 4 Affichage de la fréquence radio Affichage de station préréglée Indicación de estación presintonizada Preset station displa
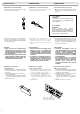
Using the remote control unit Utilización de la unidad de control remoto Utilisation du boîtier de télécommande ÷ Point at the REMOTE SENSOR and operate within about 7 m (approx. 23 ft). ÷ The remote control range is less when the unit is used at an angle. ÷ Do not expose the REMOTE SENSOR to strong direct sunlight or artificial lighting. ÷ Make sure that there are no obstacles between the REMOTE SENSOR and the unit. ÷ Apúntela hacia el sensor REMOTO SENSOR y hágala funcionar dentro de un radio de 7 m.
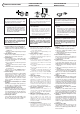
CONEXION/DESCONEXION DE LA ALIMENTACION SWITCHING THE POWER ON/OFF PLAY 3 button Botón PLAY 3 Touche PLAY 3 COMMUTATION MARCHE/ARRET DE L’ALIMENTATION PLAY 3 button Botón PLAY 3 Touche PLAY 3 TUNER/BAND button Botón sintonizador/banda (TUNER/BAND) Touche de syntoniseur/gamme (TUNER/BAND) TUNER/BAND button Botón sintonizador/banda (TUNER/BAND) Touche de syntoniseur/gamme (TUNER/BAND) CD play/pause (#8) button Botón de reproducción/pausa de CD (#8) Touche de lecture CD/pause (#8) REC/ PLAY CD play/pau
COMPU PLAY (solo cuando se usa CA) COMPU PLAY (only when AC power is used) Cuando la alimentación está colocada en espera, el presionar el botón mostrado abajo conecta la alimentación y selecciona la fuente. Even when the power is set to standby, pressing the button shown below switches on the power and selects the source.
VOLUME, TONE AND OTHER CONTROLS VOLUMEN, TONO Y OTROS CONTROLES VOLUME, TONALITE ET AUTRES COMMANDES VOLUME button + : Use to increase the volume. – : Use to decrease the volume. (Control range from VOL 0 to VOL 25.) Botón VOLUME + : Uselo para aumentar el volumen. – : Uselo para reducir el volumen. (Los límites de control van de VOL 0 a VOL 25.) Touche de volume (VOLUME) + : Utiliser pour augmenter le volume. – : Utiliser pour réduire le volume. (Gamme de commande de VOL 0 à VOL 25.
HANDLING CDs MANIPULACION DE CD MANIPULATION DES DISQUES AUDIONUMERIQUES Since dirty, damaged and warped CDs may damage the unit, take care regarding the following: Como los CD sucios, dañados o alabeados pueden dañar la unidad, tome precauciones en relación a lo siguiente: Comme la saleté, des disques endommagés ou gondolés peuvent provoquer des dommages à l’appareil, faire attention aux points suivants: 1. Usable CDs Use CDs with the mark shown. 1. CD utilizables Utilice CD con la marca indicada.
PLAYING CDs REPRODUCCION DE CD LECTURE DE DISQUES AUDIONUMERIQUES (Example: When playing back a CD loaded in the DISC 1 tray) (Ejemplo: Cuando reproduce un CD colocado en el portadisco DISC 1) (Exemple: En lisant un CD chargé dans le tiroir DISC 1) Operate in the order shown Opere en el orden mostrado Procéder dans l’ordre indiqué ON REMOTE SENSOR ACTIVE HYPER-BASS PRO TUNER POWER BAND PRESET TUNING AUTO PRESET TIMER WAKE UP CD SEARCH SLEEP CD/TUNER MULTI DISPLAY BEAT CUT DOWN TUNING VO
When the AC power cord is unplugged, never close the open tray by hand. To close it, plug the power cord in again and press the 0 button. Otherwise it may cause damage to the unit. Cuando se desenchufa el cordón de alimentación CA, nunca cierre el portadisco con la mano. Para cerrarlo, enchufe otra vez el cordón de alimentación y presione el botón 0. De lo contrario podrá dañar la unidad. Si le cordon d’alimentation secteur est débranché, ne jamais fermer un tiroir ouvert à la main.
Search play (to locate the required position on the CD) Reproducción con búsqueda (para localizar la posición deseada en el CD) Recherche en lecture (pour localiser la position voulue sur le disque) ÷ The required position can be located using fast-forward or reverse search while playing a CD. ÷ La posición deseada puede ser ubicada utilizando la búsqueda de avance rápido o invertida mientras reproduce un CD.
DISC CONTROL button Botón DISC CONTROL Touche DISC CONTROL ÷ Direct Disc Selection Press the CD CONTROL button (DISC 1 to DISC 3) corresponding to the No. of the required CD. ÷ Selección directa de disco Presione el botón (DISC 1 a DISC 3) de CD CONTROL correspondiente al No. del CD deseado. ÷ Sélection directe de disque Appuyer sur la touche CD CONTROL (DISC 1 à DISC 3) correspondant au No. du disque voulu.
Repeat play (Using the remote control unit) Press the REPEAT button before or during play. It is possible to perform repeat play of a single track, all tracks on one CD, or all tracks on all CDs in the CD changer. Each time the REPEAT button is pressed, the mode will change in the order from a single track ( ), to all tracks ( ALL), to clear mode. Repetición de reproducción (Utilizando la unidad de control remoto) Presione el botón REPEAT antes o durante la reproducción.
Programmed play (using the remote control unit) Reproducción programada (utilizando la unidad de control remoto) Lecture programmée (en utilisant la télécommande) ÷ Up to 20 tracks can be programmed to be played in any required order from one CD or all CDs in the CD changer. ÷ Es posible programar un máximo de 20 pistas para reproducirlas en cualquier orden deseado, de un CD o de todos los CD en el cambiador.
÷ Example 2: Programming tracks from 2 or more CDs in the order of disc 1 (track 3), disc 1 (track 6), and disc 3 (track 12). 1 2 / CLEAR 3 ÷ Exemple 2: Pour programmer des pistes à partir de 2 disques ou plus dans l’ordre disque 1 (piste 3), disque 1 (piste 6) et disque 3 (piste 12). 4 3-DISC CONTROL PROGRAM 3 1 PROGRAM ÷ Ejemplo 2: Programación de pistas de 2 o más CD en el siguiente orden: disco 1 (pista 3), disco 1 (pista 6), y disco 3 (pista 12).
HANDLING CASSETTE TAPES MANIPULACION DE CASSETTES DE CINTA Cassette tapes 1. Loose tape may cause trouble. Using a pencil or like object, gently tighten the tape as shown. 2. To prevent recordings from being erased accidentally, remove the tab(s) with a screwdriver, etc. Reseal the slots with adhesive tape to erase and re-record after the tabs have been removed. 3. C-120 cassettes are not recommended because they are prone to malfunction. Cassettes de cinta 1. La cinta floja puede causar problemas.
Note: ÷ When the power is turned off while the tape is still running, cassette operation buttons which are depressed do not return to their original positions. Press the 7/0 STOP/EJECT button to stop the tape running before turning off the power. Nota: ÷ Cuando se conecta la alimentación y la cinta está siendo transportada, los botones de operación del cassette que fueron presionados no vuelven a sus posiciones originales.
RADIO RECEPTION RADIORRECEPCION RECEPTION RADIO Operate in the order shown Opere en el orden mostrado Procéder dans l’ordre indiqué 4 ON REMOTE SENSOR 2 1 3 STEREO AUTO/MONO button Botón STEREO AUTO/MONO Touche STEREO AUTO/MONO ACTIVE HYPER-BASS PRO TUNER POWER BAND PRESET TUNING AUTO PRESET TIMER WAKE UP CD SEARCH SLEEP BEAT CUT CD/TUNER MULTI DISPLAY ACTIVE HYPER-BASS PRO VOLUME DOWN TUNING 3-DISC CONTROL 1 UP (AC) POWER 3 2 SOUND SLEEP STEREO AUTO/MONO CONTINUE RANDOM TUN
Notes: ÷ When seek tuning to the required station is not possible because the broadcast signal is too weak, press the UP or DOWN button momentarily to perform manual tuning. ÷ When the power is set to STANDBY, or another mode (TAPE or CD) is selected, the last tuned frequency is stored in memory. When the power is switched on again and TUNER/BAND button is pressed, the same station will be tuned to.
÷ To change preset stations Perform step 4 above after tuning to the required station. ÷ Cambio de estaciones presintonizadas Ejecute el paso 4 de arriba después de sintonizar la estación deseada. ÷ Pour changer les stations préréglées Effectuer l’étape 4 ci-dessus après avoir syntonisé la station voulue. Notes: ÷ The previous stored station is erased when a new station is stored, because the new station’s frequency replaces the previous frequency in memory.
RECORDING GRABACION ENREGISTREMENT ÷ During recording, the ALC (Automatic Level Control) circuit automatically optimizes the recording level, so manual recording level adjustment is unnecessary. ÷ Check that the safety tab on the cassette tape is not broken off. ÷ Durante la grabación, el circuito ALC (control automático de nivel), optimiza automáticamente el nivel de grabación, haciendo innecesario el ajuste manual del nivel de grabación.
÷ Non-recorded sections of approx. 4 seconds are automatically left between tunes. ÷ When the tape reaches the end first, the CD player stops automatically; when the CD player stops first, the tape continues running. In this case, press the 7/0 STOP/EJECT button to stop the tape. ÷ Before CD synchro recording of CD continuous play, press the CONTINUE button. (See page 21.) ÷ En la cinta quedan automáticamente sin grabar secciones de 4 segundos aprox..
BEAT CUT button Botón BEAT CUT Touche coupe-battement (BEAT CUT) When recording an AM broadcast, beats may be produced which are not heard when listening to the broadcast. In this case, press this button after the deck is set to the recording mode so that the beats are eliminated. This button should normally be set to “CUT-1”. Cuando graba una radiodifusión AM, puede producirse batido inaudible cuando escucha la radiodifusión.
WAKE UP TIMER OPERATIONS OPERACIONES DEL TEMPORIZADOR DESPERTADOR FONCTIONNEMENT DE LA MINUTERIE DE REVEIL Wake up timer can be set up to 12 hours in advance, starting timer playback of a CD, tape or broadcast at any 30-minute interval within the 12 hours. El temporizador desper tador puede ser ajustados 12 horas antes para activar la reproducción de un CD, cinta o recepción de radiodifusión, en cualquier intervalo de 30 minutos dentro de las 12 horas mencionadas.
Timer playback Reproducción por temporizador Lecture par minuterie ÷ Timer playback of tapes, broadcasts and CDs is possible. ÷ La reproducción por temporizador de cintas, radiodifusiones, y CD es posible. ÷ La lecture par minuterie de bandes, d’émissions et de CD est possible.
SLEEP TIMER OPERATIONS OPERACIONES DEL TEMPORIZADOR DE DESCONEXION Use this when you want to fall asleep while listening to a tape, broadcast or CD. Utilice este modo cuando desee dormirse escuchando una cinta, radiodifusión o CD. 1 Set to the required source and tune 1 Colóquelo en la fuente o música (radiodifusión) (broadcast) or play back (CD or tape). 2 Press the SLEEP button to set the sleep time. 2 Presione el botón SLEEP para ajustar la hora deseada, o en reproducción (CD o cinta).
MAINTENANCE MANTENIMIENTO ENTRETIEN Cleaning is important! When the tape is running, magnetic powder and dust naturally accumulate on the heads, capstan and pinch roller. When they become too dirty... ÷ Sound quality deteriorates. ÷ The output sound level drops. ÷ Previously recorded tape is not completely erased. ÷ Recording is not performed satisfactorily. Therefore, you should clean the heads, etc. after every 10 hours of use for optimal recording conditions.
TROUBLESHOOTING DETECCION DE PROBLEMAS EN CAS DE PANNES What appears to be trouble is not always serious. First make sure.... Lo que parece ser un problema no siempre es grave. Primero asegúrese..... Ce qui semble être une panne n’est pas toujours sérieux. S’en assurer d’abord.... ÷ When abnormal operation occurs. * Unplug the AC power cord from the AC outlet. Then reconnect and switch the power ON. ÷ Power cannot be turned on. * Is the power cord unplugged? ÷ No sound from the speakers.
SPECIFICATIONS ESPECIFICACIONES CD player section Type Signal detection system Number of channels Frequency response Signal-to-noise ratio Wow & flutter Sección del reproductor de CD Tipo : Reproductor de discos compactos Sistema de detección de señal : Captor óptico sin contacto Número de canales : 2 canales Respuesta de frecuencia : 20 Hz - 20.
PC-XC12/XC8 CD PORTABLE COMPONENT SYSTEM SISTEMA PORTATIL DE COMPONENTES DE CD Printed in Malaysia 0298MNMUIAJEM EN, SP, FR CHAINE PORTABLE A LECTEUR CD VICTOR COMPANY OF JAPAN, LIMITED