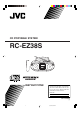
CD PORTABLE SYSTEM RC-EZ38S STANDBY/ ON / CD TAPE USB MENU/ FM MODE TUNER/ BAND STOP/ ENTER RANDOM REPEAT PROGRAM/ PRESET MUTING SLEEP EQ 1 2 4 5 7 8 9 0 3 6 VOL REMOTE CONTROL UNIT INSTRUCTIONS For Customer Use: Enter below the Model No. and Serial No. which are located either on the rear, bottom or side of the cabinet. Retain this information for future reference. Model No. Serial No. LVT1494-003A [J] 01_Cover.p65 1 06.6.
Warnings, Cautions and Others Mises en garde, précautions et indications diverses CAUTION RISK OF ELECTRIC SHOCK DO NOT OPEN DO NOT EXPOSE TO RAIN OR MOISTURE NE PAS EXPOSER À LA PLUIE NI À L’HUMIDITÉ ATTENTION:RISQUE DE CHOC ELECTRIQUE, NE PAS OUVRIR The lightning flash with arrowhead symbol, within an equilateral triangle is intended to alert the user to the presence of uninsulated “dangerous voltage” within the product’s enclosure that may be of sufficient magnitude to constitute a risk of electric sho
CAUTION To reduce the risk of electrical shocks, fire, etc.: 1. Do not remove screws, covers or cabinet. 2. Do not expose this appliance to rain or moisture. ATTENTION Afin d’èviter tout risque d’électrocution, d’lncendie. etc.: 1. Ne pas enlever les vis ni les panneaux et ne pas ouvrir le coffret de l’appareil. 2. Ne pas exposer l’appareil à la pluie ni à l’humidité. CAUTION –– STANDBY/ON button ! Disconnect the mains plug to shut the power off completely (all lamps and indications go off).
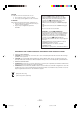
Caution: Proper Ventilation To avoid risk of electric shock and fire, and to prevent damage, locate the apparatus as follows: 1. Front: No obstructions and open spacing. 2. Sides/ Top/ Back: No obstructions should be placed in the areas shown by the dimensions below. 3. Bottom: Place on the level surface. Maintain an adequate air path for ventilation by placing on a stand with a height of 10 cm (3-15/16") or more.
Thank you for purchasing this JVC product. Please read these instructions carefully before starting operation to be sure to obtain optimum performance and a longer service life from the unit. CONTENTS FEATURES ................................................................. 1 SAFETY PRECAUTIONS ......................................... 1 HANDLING PRECAUTIONS ................................... 2 POWER SUPPLY ....................................................... 3 NAMES OF PARTS AND CONTROLS ............
HANDLING PRECAUTIONS Do not use this unit in direct sunlight or leave the unit in a closed automobile (or yacht, etc.) where it would be exposed to high temperatures above 40°C (104°F). 1 Avoid using the unit in the following places: • Where the temperature may become excessively high or low; the recommended temperature range is 5°C and 35°C (41°F and 95°F). • Where it could be subject to vibrations. • Where it is excessively humid, such as in a bathroom.
POWER SUPPLY Checking batteries Operation on household AC When the tape speed or output sound level decreases, or CD playback becomes intermittent, replace all batteries with fresh ones. When making an important recording, use new batteries (preferably alkaline batteries for a longer service life) to avoid any possible failure. Connect the AC power cord.
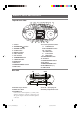
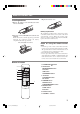
NAMES OF PARTS AND CONTROLS Top and front sides 1 2 3 4 5 6 7 8 9 10 11 12 13 14 15 1 2 3 4 5 6 7 8 9 10 11 12 13 16 17 21 20 18 19 14 Cassette operation buttons 8 PAUSE button § STOP/EJECT button ¡ FF button 1 REW button 3 PLAY button ¶ REC button 15 7 STOP/ENTER button 16 4 button 17 REPEAT/PRESET button 18 ¢ button 19 MENU/FM MODE button 20 VOLUME button (+/-) 21 USB terminal CD door button STANDBY/ON STANDBY indicator CLOCK button DISPLAY window USB 6 button CD 6 button TUNER/BAND button CASSETT
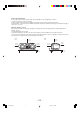
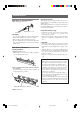
REMOTE CONTROL UNIT 3 Replace the battery cover. Installing batteries 1 Remove the battery cover from the back of the remote control unit. Battery replacement 2 Insert two AAA (UM-4)/R03-size batteries (not supplied). Insert the batteries with the ª and · terminals matching the indication inside the battery compartment. Insert the · ends first. AAA (UM-4)/R03-size batteries The maximum operating distance between the remote control unit and the remote sensor section of the unit is approximately 7 meters.
TURNING THE UNIT ON/OFF STANDBY/ON STANDBY/ON STANDBY/ ON / TAPE CD USB MENU/ FM MODE TUNER/ BAND STOP/ ENTER RANDOM REPEAT PROGRAM/ PRESET MUTING SLEEP EQ 1 2 3 4 5 6 7 8 9 0 VOL REMOTE CONTROL UNIT STANDBY/ON button Press the STANDBY/ON button on the unit to turn the unit on. button on You can also press the STANDBY/ON the remote control unit. The display window lights up when the unit is turned on.
SETTING THE CLOCK 1 2, 4, 6 3, 5 3, 5 1 STANDBY/ ON / CD 3, 5 TAPE USB MENU/ FM MODE TUNER/ BAND STOP/ ENTER RANDOM REPEAT PROGRAM/ PRESET MUTING SLEEP EQ 1 2 3 4 5 6 7 8 9 0 VOL REMOTE CONTROL UNIT Before operating the unit any further, first set the clock built in this unit. There is a time limit in doing the following steps. If the setting is canceled before you finish, start from step 2 again. To set the sleep timer 1 Press STANDBY/ON to turn on. 2 Press and hold CLOCK.
ADJUSTING THE SOUND PHONES (on the rear) EQ HBS VOLUME +/– EQ MUTING STANDBY/ ON / CD TAPE MENU/ FM MODE USB TUNER/ BAND STOP/ ENTER RANDOM REPEAT PROGRAM/ PRESET MUTING SLEEP EQ 1 2 3 4 5 6 7 8 9 0 VOL VOL 5/∞ REMOTE CONTROL UNIT Adjusting the volume Listening through headphones Press VOLUME + or VOLUME – to increase or decrease the volume. You can press VOL 5 or VOL ∞ on the remote control unit to increase or decrease the volume respectively.
PLAYING COMPACT DISCS Notes on compact discs This unit has been designed only to play back the following CDs. • Digital audio CD • Recordable digital audio CD (CD-R) • Rewritable digital audio CD (CD-RW) – Playback order of MP3/WMA tracks may be different from the one you have intended while recording. If a folder does not include MP3/WMA tracks, they are ignored.
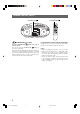
PLAYING COMPACT DISC 2 31 4 3 4 STANDBY/ ON / CD MENU/ FM MODE TAPE TUNER/ BAND USB STOP/ ENTER RANDOM REPEAT PROGRAM/ PRESET MUTING SLEEP EQ 1 2 3 4 5 6 7 8 9 0 VOL REMOTE CONTROL UNIT 1 Press PUSH OPEN/CLOSE to open the disc door. 2 Load a disc with the label side facing up and close the disc door. • 8-cm CD can be played on the unit without an adapter. The following indications are displayed. Track number 4 Adjust the volume.
To pause playback Press CD during playback. To resume playback, press the button again. CD CD Main unit Remote Selecting a desired track directly Use the number buttons on the remote control unit. Example: • To select track 8, press 8. • When the total number of tracks is double-digits: To select track 21, press 0 , 2 , then 1. • When the total number of tracks is triple-digits: To select track 21, press 0 , 0 , 2 , then 1. To select track 115, press 0 , 1 , 1 , then 5.
PLAYING USB Playing a USB Operate in the order shown 2 4 2 1 2 STANDBY/ ON / TAPE CD USB 4 MENU/ FM MODE TUNER/ BAND STOP/ ENTER RANDOM REPEAT PROGRAM/ PRESET MUTING SLEEP EQ 1 2 3 4 5 6 7 8 9 0 VOL REMOTE CONTROL UNIT 1 Open the USB terminal cover. 2 Insert a USB. • Press the USB 6 button to start play. 3 The track number is displayed. To stop play During playback, press the 7 button to stop play.
Repeat/Random playback (for CD mode or USB mode) REPEAT REPEAT STANDBY/ ON / CD TAPE USB MENU/ FM MODE TUNER/ BAND STOP/ ENTER RAN DOM RANDOM REPEAT PROGRAM/ PRESET MUTING SLEEP EQ 1 2 3 4 5 6 7 8 9 0 VOL REMOTE CONTROL UNIT Repeat playback Random playback Press REPEAT during playback. Press RANDOM in CD mode so that the RANDOM indicator lights up in the display window. You can press RANDOM on the remote control unit to select random playback. Tracks are played in random order.
Programmed playback (for CD mode or USB mode) Up to 32 tracks can be programmed to play in any desired order. 2 1, 7 1, 7 2 3, 5 4 STANDBY/ ON / TAPE CD USB MENU/ FM MODE TUNER/ BAND STOP/ ENTER RANDOM REPEAT PROGRAM/ PRESET MUTING SLEEP EQ 1 2 3 4 5 6 7 8 9 0 VOL REMOTE CONTROL UNIT 1 Press CD or USB to enter each mode, if the unit is in TUNER or TAPE mode. You can press CD or USB on the remote control unit to enter each mode. 2 Press STOP/ENTER to enter stop mode.
Confirm/Play MP3 or WMA files on a CD or a USB 1 Press MENU/FM MODE. Floders are displayed. ROOT USB ROOT ALBUM1 • Press 4 or ¢ to change to another folder on the same layer. • Press STOP/ENTER to change to a lower layer. • Press MENU/FM MODE to change to an upper layer. 2 Press 4 or ¢ to select a desired track(file). 3 Press STOP/ENTER to play. : Track : Folder 15 03_01-22_RC-EZ38S.p65 15 06.6.
RADIO RECEPTION Tuning in a station 21 3 2 123 STANDBY/ ON / CD TAPE USB MENU/ FM MODE TUNER/ BAND STOP/ ENTER RANDOM REPEAT PROGRAM/ PRESET MUTING SLEEP EQ 1 2 3 4 5 6 7 8 9 0 VOL REMOTE CONTROL UNIT 1 Press TUNER/BAND to select the band, FM or AM. You can press TUNER on the remote control unit to select the band. 2 Press and hold 4 or ¢ for more than 1 second. The unit starts searching and stops when a station of sufficient signal strength is tuned in.
Presetting stations You can preset 30 FM and 15 AM stations. 2, 4 3 3 2, 4 3 STANDBY/ ON / TAPE CD USB MENU/ FM MODE TUNER/ BAND STOP/ ENTER RANDOM REPEAT PROGRAM/ PRESET MUTING SLEEP EQ 1 2 3 4 5 6 7 8 9 0 VOL REMOTE CONTROL UNIT There is a time limit in doing the following steps. If the setting is canceled before you finish, start from step 3 again.
CASSETTE PLAYBACK Notes on cassette tapes Loading a cassette • Use only type-I normal tapes. The recording/playback characteristics of this unit are those for normal tapes, which have different characteristics from CrO2 and metal tapes. • The use of tapes longer than 120 minutes is not recommended, since characteristic deterioration may occur and these tapes easily jam in the pinch roller and the capstan. • Loose tape may cause trouble. Gently tighten the tape with a pencil as shown in the figure below.
RECORDING 1 3 2 1 STANDBY/ ON / CD 1 TAPE MENU/ FM MODE USB TUNER/ BAND STOP/ ENTER RANDOM REPEAT PROGRAM/ PRESET MUTING SLEEP EQ 1 2 3 4 5 6 7 8 9 0 VOL REMOTE CONTROL UNIT Standard recording 1 Prepare the recording source. • When recording from the radio: Set to the tuner mode and tune in a desired station. • When recording from a CD: Set to the CD mode and load a CD. 2 Load a blank or erasable cassette. Use only a type-I normal tape. 3 Press ¶ REC.
MAINTENANCE Cleaning the heads, capstan and pinch roller Cleaning is important! When the tape is running, magnetic powder and dust naturally accumulate on the heads, capstan and pinch roller. When they become too dirty; • Sound quality deteriorates. • The sound output level drops. • The previous recording is not completely erased. • Recording is not performed satisfactorily. To avoid these, clean the heads, capstan and pinch roller every 10 hours of use.
TROUBLESHOOTING • If you are having a problem with your unit, check this list for a possible solution before calling for service. Symptom • If you cannot solve the problem from the hints given here, or the unit has been physically damaged, call a qualified person, such as your dealer, for service. Possible cause Power cannot be turned on. The power cord is unplugged. When 3 PLAY is pressed, tape does not 8 PAUSE is pressed. move. Action Connect the power cord. Press 8 PAUSE again to release it.
SPECIFICATIONS CD player CD capacity Signal-to-noise ratio Dynamic range General : 1 CD : 60 dB : 60 dB Speakers Speaker impedance Output power Tuner FM tuning range AM tuning range Antennas : 87.5 MHz – 108.0 MHz : 520 kHz – 1 710 kHz : Telescopic antenna for FM Ferrite core antenna for AM Output terminals Power supply Power consumption Cassette deck Frequency response Wow & flutter Fast wind time : 100 Hz – 8 000 Hz : 0.35% (WRMS) : Approx. 170 sec.
WARRANTY REPAIR / REPLACEMENT FORM PLEASE COMPLETE THE FOLLOWING; PLEASE NOTE : P.O. BOXES ARE NOT ACCEPTABLE NAME: STREET ADDRESS: CITY: STATE ZIPCODE DAY TIME PHONE NUMBER: REASON FOR RETURN Please do not return your product to the retailer. Instead, please box the product carefully, preferably in the original carton, and ship, insured to the JVC repair/replacement facility nearest you.
03_01-22_RC-EZ38S.p65 24 06.6.
EN © 2006 Victor Company of Japan, Limited 99_AR-FCV_RC-EZ38S.p65 2 0606NSMCREMTS 06.6.