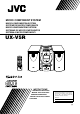
MICRO COMPONENT SYSTEM MIKRO-KOMPONENTEN-SYSTEM SYSTEME DE MICROCOMPOSANTS MIKRO KOMPONENTENSYSTEEM SISTEMAS DE MICROCOMPONENTES SISTEMA A MICROCOMPONENTI UX-V5R REMOTE CONTROL RM-RXUV5R DIMMER SLEEP DISPLAY FM MODE AHB PRO AUTO PRESET PROGRAM RANDOM BASS TREBLE MD/AUX CD REPEAT CANCEL UP SET DOWN PTY/EON TAPE DISPLAY MODE TUNER BAND CD VOLUME INSTRUCTIONS BEDIENUNGSANLEITUNG MANUEL D’INSTRUCTIONS GEBRUIKSAANWIJZING MANUAL DE INSTRUCCIONES ISTRUZIONI For Customer Use: Enter below the M
Warnings, Cautions and Others / Warnung, Achtung und sonstige Hinweise /Mises en garde, précautions et indications diverses /Waarschuwingen, voorzorgen en andere mededelingen/Avisos, precauciones y otras notas / Avvertenze e precauzioni da osservare Caution –– switch! Disconnect the mains plug to shut the power off completely. The switch in any position does not disconnect the mains line. The power can be remote controlled.
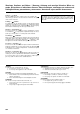
Caution: Proper Ventilation To avoid risk of electric shock and fire, and to prevent damage, locate the apparatus as follows: 1 Front: No obstructions and open spacing. 2 Sides/ Top/ Back: No obstructions should be placed in the areas shown by the dimensions below. 3 Bottom: Place on the level surface. Maintain an adequate air path for ventilation by placing on a stand with a height of 10 cm or more.
IMPORTANT FOR LASER PRODUCTS/ WICHTIGER HINWEIS FÜR LASER-PRODUKTE / IMPORTANT POUR LES PRODUITS LASER / BELANGRIJKE INFORMATIE VOOR LASERPRODUKTEN / IMPORTANTE PARA LOS PRODUCTOS LÁSER / IMPORTANTE PER I PRODOTTI LASER REPRODUCTION OF LABELS/ANBRINGUNGSORTE FÜR LASER-PRODUKTE/REPRODUCTION DES ETIQUETTES/VERKLARING VAN DE LABELS/REPRODUCCIÓN DE ETIQUETAS/RIPRODUZIONE DELLE ETICHETTE 1 CLASSIFICATION LABEL, PLACED ON EXTERIOR SURFACE 2 WARNING LABEL, PLACED INSIDE THE UNIT 1 KLASSIFIZIERUNGSHINWEIS BEFINDE
English Thank you for purchasing the JVC Micro Component System. We hope it will be a valued addition to your home, giving you years of enjoyment. Be sure to read this instruction manual carefully before operating your new stereo system. In it you will find all the information you need to set up and use the system. If you have a query that is not answered by the manual, please contact your dealer. Features Here are some of the things that make your System both powerful and simple to use.
English ■ ■ Getting Started Accessories Make sure that you have all of the following items, which are supplied with the System. Power Cord (1) AM Loop Antenna (1) Remote Control (1) Batteries (2) FM Wire Antenna (1) If any of these items are missing, contact your dealer immediately. How To Put Batteries In the Remote Control Match the polarity (+ and –) on the batteries with the + and – markings in the battery compartment. R6P(SUM-3)/AA(15F) CAUTION: Handle batteries properly.
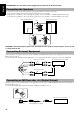
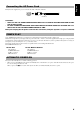
English CAUTION: Make all connections before plugging the System into an AC power outlet. Connecting the FM Antenna Using the Supplied Wire Antenna FM wire antenna (supplied) OPTICAL DIGITAL OUT Using the Coaxial Type Connector (Not Supplied) A 75-ohm antenna with coaxial type connector (IEC or DIN45 325) should be connected to the FM 75-ohm COAXIAL terminal. L R R L If reception is poor, connect the outside antenna.
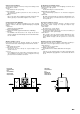
English CAUTION: Make all connections before plugging the System into an AC power outlet. Connecting the Speakers For each speaker, connect one end of the speaker wire to the speaker terminals on the back of the System. 1. Open each of the terminals and insert the speaker wires firmly, then close the terminals. 2. Connect the red (+) and black (–) wires of the right side speaker to the red (+) and black (–) terminals marked R on the System.
English Connecting the AC Power Cord Firmly insert the supplied AC power cord into the AC inlet on the back of the Unit. AC IN Power cord CAUTIONS: • • ONLY USE THE JVC POWER CORD PROVIDED WITH THIS SYSTEM TO AVOID MALFUNCTION OR DAMAGE TO THE SYSTEM. BE SURE TO UNPLUG THE POWER CORD FROM THE OUTLET WHEN GOING OUT OR WHEN THE SYSTEM IS NOT IN USE FOR AN EXTENDED PERIOD OF TIME.
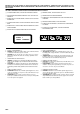
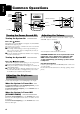
English ■ ■ Common Operations REMOTE CONTROL RM-RXUV5R DIMMER SLEEP DISPLAY FM MODE AHB PRO AUTO PRESET DIMMER DISPLAY AHB PRO PROGRAM RANDOM BASS TREBLE BASS TREBLE AUTO REVERSE MD/AUX CD AUTO TAPE SELECTOR REPEAT STANDBY/ON indicator CANCEL MD/AUX DOWN REC DOWN PTY/EON TAPE DISPLAY MODE TUNER BAND AHB PRO AHB PRO DISPLAY REV.
Showing the Time (DISPLAY) You can reinforce the bass sound to maintain rich, full bass at low volume (you can use this effect only for playback): To get the effect, press the AHB (Active Hyper Bass) PRO button. The “BASS” indicator lights up on the display. To cancel the effect, press the button again. The “BASS” indicator goes out. Tone Control (BASS/TREBLE) You can control the tone by changing the bass and treble. The analog clock acts to display the bass and treble settings.
English ■ ■ Using the Tuner REMOTE CONTROL RM-RXUV5R DIMMER SLEEP DISPLAY FM MODE AHB PRO AUTO PRESET STANDBY/ON MD/AUX PROGRAM RANDOM BASS TREBLE MD/AUX DOWN AUTO PRESET PHONES UP > REC CD 4 REV.
seconds to select the preset number. UP or > button: Increases the preset number by 1. DOWN or < button: Decreases the preset number by 1. • When the > or < button is kept pressed, the preset number changes rapidly. 5. Press the SET button within 5 seconds. ■ “STORED” appears and after 2 seconds, the display returns to the broadcast frequency display. 6. Repeat above steps 1 to 5 for each station ■ you want to store in memory with a preset number.
English On characters displayed When the display shows PS, PTY or RT signals: • The display shows upper case letters only. • The display cannot show accented letters; For example, “A” may represent accented “A’s” like “Á, Â, Ã, À, Ä and Å”. To search for a programme by PTY codes ———————————————— One of the advantages of the RDS service is that you can locate a particular kind of programme by specifying the PTY codes.
PTY/EON DOWN MULTI CONTROL UP PTY/EON 1.Press the EON button twice while listening ■ Caution: When the sound alternated intermittently between the station tuned in by the EON function and the current selected station, cancel the EON mode. This does not constitute malfunction of the unit. to an FM station. “EON SELECT” apears on the display. 2.Select the programme type with the 4 or ■ ¢ button (UP or DOWN button on the Remote Control) within 10 seconds.
English ■ ■ Using the CD Player REMOTE CONTROL RM-RXUV5R DIMMER SLEEP DISPLAY FM MODE AHB PRO AUTO PRESET PROGRAM RANDOM CD Cover MD/AUX CD REPEAT PROGRAM BASS TREBLE CANCEL SET UP UP < CD 0 REPEAT RANDOM STANDBY/ON MD/AUX TAPE DOWN BAND TUNER MULTI CONTROL CD OPEN/CLOSE CD UP ¢ 7 PHONES Track number, Playing time, Preset number 4 > SET CD OPEN/CLOSE 0 CD #¥8 DOWN PTY/EON TAPE DISPLAY MODE TUNER BAND CD 4 Repeat indicator DOWN CD #8 ¢ 7 Play mode indicator Music ca
Total track number Total playback time You can see the total playback time of programmed tracks on the display. Also, you can see the programmed tracks on the music calendar. 8. Press the CD #8 button. ■ During playback, press the 4 or ¢ (< or >) button to select the track you want. The selected track starts playing. • Press the ¢ or > button once to skip to the beginning of the next track. • Press the 4 or < button to skip to the beginning of the track being played.
English the Cassette Deck ■ ■ Using ■ ■ (Listening to a Tape) Cassette holder AUTO REVERSE AUTO TAPE SELECTOR REMOTE CONTROL RM-RXUV5R DIMMER SLEEP ) (EJECT) STANDBY/ON DISPLAY FM MODE MD/AUX MD/AUX DOWN AHB PRO AUTO PRESET TAPE BAND TUNER MULTI CONTROL CD OPEN/CLOSE TAPE @ # CD UP ¢ 7 4 CD PHONES PROGRAM RANDOM BASS TREBLE REPEAT CANCEL REC REV. MODE DISPLAY REV.
English the Cassette Deck ■ ■ Using ■ ■ (Recording) REMOTE CONTROL RM-RXUV5R DIMMER SLEEP DISPLAY FM MODE AHB PRO AUTO PRESET REC PROGRAM RANDOM BASS TREBLE MD/AUX REC AHB PRO REV. DISPLAY MODE PTY/EON MODE VOLUME CLOCK TIMER/ SNOOZE CD REPEAT CANCEL Tape Direction indicator UP SET DOWN DISPLAY MODE PTY/EON TAPE @ # TAPE TUNER BAND CD TAPE REC indicator Reverse Mode indicator 7 VOLUME When the System is in use, the display shows other items as well.
English Notes for using Reverse mode for recording When recording in Reverse mode, the System automatically stops when it reaches the end of the reverse 2 direction. To record on both sides of a tape, make sure that the recording direction for the tape inserted is forwards 3, and that the Tape Direction indicator is also forwards 3, before you start recording. To Stop at Any Time During the Recording Process Press the e button.
English ■ ■ Using External Equipments REMOTE CONTROL RM-RXUV5R DIMMER SLEEP DISPLAY FM MODE AHB PRO AUTO PRESET PROGRAM RANDOM MD/AUX MD/AUX CD REPEAT STANDBY/ON BASS TREBLE CANCEL MD/AUX DOWN TAPE BAND TUNER MULTI CONTROL CD MD/AUX OPEN/CLOSE CD UP UP PHONES SET DOWN PTY/EON TAPE DISPLAY MODE TUNER BAND CD VOLUME Listening to External Equipment You can listen to external equipment such as MD recorder, turntable or other auxiliary.
English ■ ■ Using the Timers REMOTE CONTROL RM-RXUV5R DIMMER STANDBY/ON SLEEP MD/AUX SLEEP DISPLAY FM MODE AHB PRO AUTO PRESET PROGRAM RANDOM BASS TREBLE DOWN REC MD/AUX CD AHB PRO DISPLAY REV.
1. Press the TIMER/SNOOZE button on the Unit. The current volume setting blinks on the display. 2. Press the ¢ or 4 button to select the volume level. -: The current volume level will be used. 0 to 50: When the timer is turned on, the Volume will be automatically set to the selected level. Setting the SLEEP Timer Use the Sleep Timer to turn the System off after a certain number of minutes when it is playing.
English ■ ■ Care And Maintenance Handle your CDs carefully, and they will last a long time. • Compact Discs • Only CDs bearing this mark can be used with this System. However, continued use of irregular shape CDs (heart-shape, octagonal, etc.) can damage the System. • Remove the CD from its case by holding it at the edges while pressing the case’s center hole lightly. Do not touch the shiny surface of the CD, or bend the CD. If there are fingerprints, etc.
• • If you are having a problem with your System, check this list for a possible solution before calling for service. If you cannot solve the problem from the hints given here, or the System has been physically damaged, call a qualified person, such as your dealer, for service. Symptom No sound is heard. Possible Cause Action • Connections are incorrect, or loose. • • Headphones are connected. • Check all connections and make corrections. (See pages 4- 5.) Disconnect the headphones.
English ■ ■ Specifications Amplifier Output Power 34 W (17 W + 17 W) at 4 ohms (Max.) 24 W (12 W + 12 W) at 4 ohms (10% THD) Input Sensitivity/Impedance (1 kHz) LINE IN (AUX) Output Sensitivity/Impedance (1 kHz) LINE OUT Optical out Speaker terminals Phones 500 mV/65 kohms 500 mV/4.3 kohms –21 dBm - –15 dBm 4 - 16 ohms 16 ohms - 1 kohms 0 - 15 mW/ch output into 32 ohms Cassette Deck Frequency Response TypeII (CrO2) 50 Hz - 15 kHz Wow and Flutter 0.
VICTOR COMPANY OF JAPAN, LIMITED EN, GE, FR, NL, SP, IT 0299MNMCREJSC