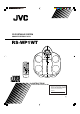
CD PORTABLE SYSTEM CHAINE PORTABLE A CD RS-WP1WT VOLUM CD E CD PORTABLE SYSTEM RS-WP1 STANDBY PE TA VOLUM T T I- S K PRO A . P.
English Warnings, Cautions and Others / Mises en garde, précautions et indications diverses (For U.S.A) CAUTION RISK OF ELECTRIC SHOCK CAUTION: TO REDUCE THE RISK OF ELECTRIC SHOCK WARNING: TO REDUCE THE RISK OF FIRE OR ELECTRIC SHOCK, DO NOT EXPOSE THIS APPLIANCE TO RAIN OR MOISTURE. DO NOT REMOVE COVER (OR BACK) NO USER SERVICEABLE PARTS INSIDE REFER SERVICING TO QUALIFIED SERVICE PERSONNEL.
CAUTION: TO PREVENT ELECTRIC SHOCK, MATCH WIDE BLADE OF PLUG TO WIDE SLOT, FULLY INSERT. THIS DIGITAL APPARATUS DOES NOT EXCEED THE CLASS B LIMITS FOR RADIO NOISE EMISSIONS FROM DIGITAL APPARATUS AS SET OUT IN THE INTERFERENCE-CAUSING EQUIPMENT STANDARD ENTITLED “DIGITAL APPARATUS,” ICES-003 OF THE DEPARTMENT OF COMMUNICATIONS. PRECAUTION: POUR EVITER LES CHOCS ELECTRIQUES, INTRODUIRE LA LAME LA PLUS LARGE DE LA FICHE DANS LA BORNE CORRESPONDANTE DE LA PRISE ET POUSSER JUSQUAU FOND.
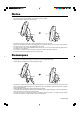
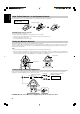
Notes • This Unit may generate noise depending on the positioning of the AC adaptor. Place the Unit and AC adaptor as shown in the figure. • This Unit has two remote sensors, one on the front panel and the other on the rear panel. When remote controlling this Unit while carrying it piggyback, point the Remote Control to the remote sensor on the rear panel. The Remote Control of this Unit uses the infrared transmission system.
English Thank you for purchasing the JVC CD Portable System. We hope it will be a valued addition to your home as well as your outdoor life, giving you years of enjoyment. Be sure to read this instruction manual carefully before operating your new stereo system. In it you will find all the information you need to set up and use the system. If you have a query that is not answered by the manual, please contact your dealer.
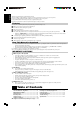
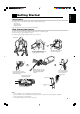
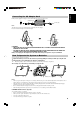
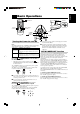
English Getting Started Accessories Check that you have all of the following items, which are supplied with the System. AC adaptor (1) Remote Control (1) Shoulder Strap (1) If any of these items are missing, contact your dealer immediately. How To Carry the System To carry the System, attach the supplied shoulder strap to the System as shown in the figure. To remove the strap, reverse the attaching procedure. The shoulder strap is adjustable in length and has the remote control case.
Match the polarity (+ and –) on the batteries with the + and – markings in the battery compartment. Batteries are not supplied with this system. R6P(SUM-3)/AA(15F) CAUTION: Handle batteries properly. To avoid battery leakage or explosion: • Remove batteries when the Remote Control will not be used for a long time. • When you need to replace the batteries, replace both batteries at the same time with new ones. • Don’t use an old battery with a new one. • Don’t use different types of batteries together.
English Connecting the AC Adaptor Cord Firmly insert the supplied AC adaptor cord into the DC IN jack on the back of the System. 12V AC adaptor cord DC IN To wall outlet Note: This Unit may generate noise depending on the positioning of the AC adaptor. Place the Unit and AC adaptor as shown in the figure. CAUTIONS: • ONLY USE THE JVC AC ADAPTOR PROVIDED WITH THIS SYSTEM TO AVOID MALFUNCTION OR DAMAGE TO THE SYSTEM.
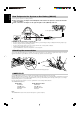
English How To Operate the System on Car Battery (DC12V) You can operate the System on car battery (DC12V). 1. First, connect the car adaptor to the DC IN jack on the back of the System, to avoid a short-circuit of the car adaptor. 2. Next, connect the car adaptor to the cigarette lighter socket (DC12V) of the car.
CLOCK TIMER TIMER ON/OFF STAND BY/ON English Basic Operations STANDBY/ON PHONES SLEEP DOWN UP SET PROGRAM RANDOM AUTO PRESET PHONES REPEAT TUNER AUX CD TAPE REVERSE MODE REW MULTI CONTROL BAND FM MODE FF DISPLAY DISPLAY AHB PRO BASS/ TREBLE BASS/TREBLE VOLUME + / – AHB PRO VOLUME VOLUM CD E RM-SRSWP1U REMOTE CONTROL CD PORTABLE SYSTEM RS-WP1 STANDBY VOLUM TU E STANDBY indicator PE TA VOLUME +/– STANDBY/ON R NE AUX BAND STANDBY/ON ASP C RE ONE MULTI CONTROL UC
English Adjusting the Volume You can adjust the volume level between 0 and 50. Press the VOLUME + button to increase the volume or press the VOLUME – button to decrease it. When you keep pressed the VOLUME + or – button, the volume changes rapidly. CAUTION: DO NOT start playing any source without first setting the volume to minimum, as a sudden blast of sound can damage your hearing, speakers and/or headphones. For private listening Connect a pair of headphones to the PHONES jack.
CLOCK TIMER TIMER ON/OFF English Using the Tuner STAND BY/ON SLEEP DOWN UP SET PROGRAM Number keys RANDOM AUTO PRESET AUX CD REPEAT TUNER TAPE BAND FM MODE REVERSE MODE REW MULTI CONTROL FF VOLUM CD E 4 AUTO PRESET TUNER BAND ¢ CD PORTABLE SYSTEM RS-WP1 STANDBY DISPLAY PE TA VOLUME TU E BASS/ TREBLE AHB PRO VOLUM TUNER BAND Band, Frequency, Preset number STANDBY/ON R NE AUX BAND REW OP E 4 ASP UCH TO C RE REMOTE CONTROL ONE MULTI CONTROL RM-SRSWP1U FF A
English Presetting Stations You can preset up to 30 FM stations and up to 15 AM stations. Note: Preset numbers may have been set to factory test frequencies prior to shipment. This is not a malfunction. You can preset the stations you want into memory by following one of the presetting methods below: Manual Presetting 1. Select a band (either AM or FM/FM-MONO) by pressing the TUNER BAND button. TUNER BAND FM MODE 2. Press the 4 or ¢ button to tune in a station. REW MULTI CONTROL FF 3.
CLOCK TIMER TIMER ON/OFF English Using the CD Player STAND BY/ON SLEEP DOWN UP SET Number keys PROGRAM RANDOM AUTO PRESET CD 6 4 REPEAT TUNER AUX CD TAPE REVERSE MODE REW MULTI CONTROL BAND FM MODE FF PROGRAM RANDOM REPEAT 7 ¢ DISPLAY CD 6 VOLUM CD E BASS/ TREBLE Track number, Playing time, Preset number CD PORTABLE SYSTEM RS-WP1 STANDBY PE TA TRACK VOLUM TU VOLUME RM-SRSWP1U Repeat indicator STANDBY/ON R NE AUX BAND REMOTE CONTROL ASP UCH TO C RE REW OP E ONE
English To Select a Track ———————— During playback, press the 4 or ¢ button to select the track you want. The selected track starts playing. • Press the ¢ button once to skip to the beginning of the next track. • Press the 4 button to skip to the beginning of the track being played. Press the 4 button twice quickly to skip to the beginning of the previous track. You can also select a track in Stop mode with the same buttons.
CLOCK TIMER TIMER ON/OFF English Using the Cassette Deck (Listening to a Tape) STAND BY/ON SLEEP DOWN UP Reverse mode indicator SET PROGRAM Reverse Forward Tape direction indicator RANDOM AUTO PRESET CD TAPE REVERSE MODE REW MULTI CONTROL TAPE ` 7 ¢ BAND FM MODE FF DISPLAY VOLUM CD E 4 REVERSE MODE REPEAT TUNER AUX BASS/ TREBLE CD PORTABLE SYSTEM RS-WP1 STANDBY TAPE ` TU VOLUME VOLUM E AHB PRO PE TA AUX 7 REMOTE CONTROL ASP UCH TO C RE REW OP E ONE MULTI CONTROL
English Using the Cassette Deck (Recording) CLOCK TIMER TIMER ON/OFF Reverse mode indicator STAND BY/ON SLEEP DOWN UP SET PROGRAM REC RANDOM AUTO PRESET CD TAPE REW MULTI CONTROL BAND FM MODE FF DISPLAY BASS/ TREBLE TUNER BAND TAPE ` CD 6 7 AHB PRO STANDBY VOLUM STANDBY/ON R NE AUX BAND MULTI CONTROL ASP UCH TO REW FF Things To Know Before You Start Recording ———————————— ■ It should be noted that it may be unlawful to re-record pre-recorded tapes, records, or discs without
2. If you want to record on both sides of the tape, press the REVERSE MODE button on the Remote Control to set the System in Reverse mode. Press the button until indicator is lit. before starting Even when the reverse mode is set to recording, the tape stops automatically at the end of the reverse side of tape. is indicated during recording. 3. Prepare the source, by, for example, tuning in a radio station or turning on the connected auxiliary equipment. 3. Set a CD.
English Listening to an Auxiliary Equipment CLOCK TIMER TIMER ON/OFF STAND BY/ON SLEEP DOWN UP SET PROGRAM RANDOM AUTO PRESET REPEAT TUNER AUX CD TAPE REVERSE MODE REW MULTI CONTROL BAND VOLUM CD E AUX FM MODE FF CD PORTABLE SYSTEM RS-WP1 STANDBY PE TA VOLUM E DISPLAY TU BASS/ TREBLE STANDBY/ON R NE AUX AUX BAND AHB PRO VOLUME RM-SRSWP1U ASP C RE ONE MULTI CONTROL UCH TO REMOTE CONTROL OP E REW Listening to Auxiliary Equipment You can listen to an auxiliary equ
TIMER CLOCK DOWN UP CLOCK TIMER TIMER ON/OFF STAND BY/ON SLEEP DOWN UP SET PROGRAM TIMER ON/OFF SET SLEEP RANDOM AUTO PRESET REPEAT English Using the Timers ON time/OFF time indicator TIMER indicator SLEEP indicator CLOCK indicator TIMER REC indicator REC ON SLEEP CLOCK OFF TUNER AUX CD TAPE REVERSE MODE REW MULTI CONTROL BAND FM MODE FF DISPLAY BASS/ TREBLE ON time, OFF time, Source, Volume AHB PRO VOLUME RM-SRSWP1U When the System is in use, the display shows other items as we
English 3. Setting the OFF time (Example: PM1:30). ■ 1. Set the OFF time by pressing the UP or DOWN button. Pressing and holding the button will change the time rapidly. OFF CAUTION: If no battery is loaded in the unit and it left with the AC adaptor unplugged (or power failure) for more than 5 minutes, timer settings will be erased from memory. If this happens, set the current time (clock) and perform the timer setting again. Setting the Sleep Timer 2. Press the SET button.
English Care And Maintenance Handle your CDs carefully, and they will last a long time. Compact Discs Moisture Condensation • Only CDs bearing this mark can be used with this System. However, continued use of irregular shape CDs (heart-shape, octagonal, etc.) can damage the System. • Remove the CD from its case by holding it at the edges while pressing the case’s center hole lightly. Do not touch the shiny surface of the CD, or bend the CD.
English Troubleshooting • • If you are having a problem with your System, check this list for a possible solution before calling for service. If you cannot solve the problem from the hints given here, or the System has been physically damaged, call a qualified person, such as your dealer, for service. Symptom No sound is heard. Possible Cause Action • Connections are incorrect, or loose. • • Headphones are connected. • Check all connections and make corrections. (See page 4.
Amplifier Output Power 12 W per channel, min. RMS, at 4 Ω from 150 Hz to 15 kHz with no more than 10% total harmonic distortion (for U.S.A.) (Max.) 26 W (13 W + 13 W) at 4 Ω (full range) (for Canada) Input Sensitivity/Impedance (1 kHz) AUX IN 380 mV/47 kΩ Output Sensitivity/Impedance (1 kHz) Phones 16 Ω - 1 kΩ 0 - 12 mW/ch output into 32 Ω Cassette Deck Frequency Response TypeII (CrO2) 60 Hz - 14 kHz Wow and Flutter 0.15% (WRMS) CD Player Wow and Flutter Unmeasurable Tuner FM Tuner Tuning Range 87.
VICTOR COMPANY OF JAPAN, LIMITED EN 0201SKMWSTJEM