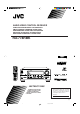
AUDIO/VIDEO CONTROL RECEIVER AUDIO/VIDEO-RECEIVER MIT STEUEREINHEIT AMPLI/TUNER DE COMMANDE AUDIO/VIDEO GEINTEGREERDE AUDIO/VIDEO-VERSTERKER RECEPTOR DE CONTROL DE AUDIO/VÍDEO RICEVITORE DI CONTROLLO AUDIO/VIDEO RX-774RBK RM-SR774RU REMOTE CONTROL TV/CATV VCR DVD MULTI DVD /DBS AUDIO SLEEP VCR TV/DBS TAPE/MD PHONO CD SEA CNTR TONE MODE MENU 2 4 3 MASTER VOLUME REAR (L) 5 SOUND EFFECT CONTROL 6 RX-774R AUDIO/VIDEO CONTROL RECEIVER – (REAR R) 7/P CD DISC FM/AM CNTR 1 SURROUND TES
Warnings, Cautions and Others/Warnung, Achtung und sonstige Hinweise/ Mises en garde, précautions et indications diverses/Waarschuwingen, voorzorgen en andere mededelingen/Avisos, precauciones y otras notas/ Avvertenze e precauzioni da osservare IMPORTANT for the U.K. DO NOT cut off the mains plug from this equipment.
English ACHTUNG Zur Verhinderung von elektrischen Schlägen, Brandgefahr, usw: 1. Keine Schrauben lösen oder Abdeckungen enternen und nicht das Gehäuse öffnen. 2. Dieses Gerät weder Regen noch Feuchtigkeit aussetzen. PRECAUCIÓN Para reducir riesgos de choques eléctricos, incendio, etc.: 1. No extraiga los tornillos, los cubiertas ni la caja. 2. No exponga este aparato a la lluvia o a la humedad. ATTENTION Afin d’éviter tout risque d’électrocution, d’incendie, etc.: 1.
Caution –– POWER switch and STANDBY/ON button! This apparatus is provided with a POWER switch to be able to minimize power consumption for safe use. Therefore, 1. When doing initial setting, complete all the connections required, connect the mains plug into the wall outlet, and set the POWER switch to ON. After these, it will be available to operate STANDBY/ ON button and so on. 2. When not in use, set the POWER switch to OFF. 3. Disconnect the mains plug to shut the power off completely.
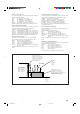
Caution: Proper Ventilation To avoide risk of electric shock and fire and to protect from damage. Locate the apparatus as follows: Front: No obstructions open spacing. Sides: No obstructions in 10 cm from the sides. Top: No obstructions in 10 cm from the top. Back: No obstructions in 15 cm from the back Bottom: No obstructions, place on the level surface. In addition, maintain the best possible air circulation as illustrated.
English Table of Contents Parts Identification ...................................................................................... 3 Easy Set Up & Operations ............................................................................ 5 Getting Started........................................................................................... 9 Before Installation .............................................................................................................................................
English Using the SEA Modes ................................................................................ 36 Selecting Your Favorite SEA Mode ...................................................................................................................................... 36 Creating Your Own SEA Mode ............................................................................................................................................. 37 Using the DSP Modes ....................................
English Parts Identification Become familiar with the buttons and controls on the receiver before use.
English Ÿ RM-SR774RU REMOTE CONTROL VCR TV/CATV ¢ § ¶ • ª SLEEP /DBS ⁄ DVD MULTI ∞ AUDIO CD DVD VCR TV/DBS TAPE/MD PHONO SEA CNTR TONE MODE 1 4 3 REAR (L) 5 SOUND EFFECT CONTROL 6 (REAR R) 7/P 8 9 0 +10 ¤ DELAY 10 RETURN FM MODE/MUTE º MENU 2 SURROUND TEST ENTER MODE CD DISC FM/AM CNTR AUDIO/TV /VCR 100+ E M VOLU ‹ CATV /DBS EL CHANN › TE – MU ARCH PTY SE PLAY – PTY EW /R 4 PTY + FF / ¢ STOP ≠ PAUSE REC Y MODE LUME TV VO DISPLA IDEO TV/V fi fl ‡ C
English Easy Set Up & Operations If you are already familiar with audio components, following four pages just you opened give you enough information to operate your RX-774RBK for enjoyment of surround sound in your listening room.
English MASTER VOLUME RX-774R AUDIO/VIDEO CONTROL RECEIVER – + STANDBY DOLBY SURROUND EON TA/NEWS/INFO PTY SEARCH DISPLAY MODE DVD CD TV SOUND/DBS PHONO VCR TAPE/MD FM STANDBY/ON AM POWER _ ON — OFF SOURCE SELECTOR MULTI JOG DSP MODE DVD MULTI/2CH SEA MODE FM/AM TUNING TUNER PRESET TUNER/SEA MEMORY FM MODE SPEAKERS PHONES 1 BALANCE/SURROUND ADJUST 2 SEA ADJUST SETTING SOUND SELECT LOUDNESS ONE TOUCH OPERATION SOURCE NAME COMPULINK Remote ENHANCED COMPULINK CONTROL SYSTEM
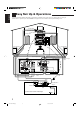
English Easy Set Up & Operations For Reproducing DVD MULTI playback with your DVD player TV To video input To S-video input Center Speaker Front Speaker Front Speaker MASTER VOLUME RX-774R AUDIO/VIDEO CONTROL RECEIVER – + STANDBY DOLBY SURROUND DVD EON TA/NEWS/INFO PTY SEARCH DISPLAY MODE CD TV SOUND/DBS PHONO VCR TAPE/MD FM STANDBY/ON AM POWER _ ON — OFF SOURCE SELECTOR MULTI JOG DSP MODE SEA MODE BALANCE/SURROUND ADJUST SEA ADJUST DVD MULTI/2CH FM/AM TUNNING TUNER PRESET TU
English MASTER VOLUME RX-774R AUDIO/VIDEO CONTROL RECEIVER – + STANDBY DOLBY SURROUND EON TA/NEWS/INFO PTY SEARCH DISPLAY MODE DVD CD TV SOUND/DBS PHONO VCR TAPE/MD FM STANDBY/ON AM POWER _ ON — OFF SOURCE SELECTOR MULTI JOG DSP MODE DVD MULTI/2CH SEA MODE FM/AM TUNING TUNER PRESET TUNER/SEA MEMORY FM MODE SPEAKERS PHONES 1 BALANCE/SURROUND ADJUST 2 SEA ADJUST SETTING SOUND SELECT LOUDNESS ONE TOUCH OPERATION SOURCE NAME COMPULINK Remote ENHANCED COMPULINK CONTROL SYSTEM
English Getting Started This section explains how to connect audio/video components and speakers to the receiver, and how to connect the power supply. Before Installation General • • • Be sure your hands are dry. Turn the power off to all components. Read the manuals supplied with the components you are going to connect. Locations • • • Install the receiver in a location that is level and protected from moisture. The temperature around the receiver must be between –5˚ and 35˚ C (23˚ and 95˚ F).
English Connecting the FM and AM (MW/LW) Antennas FM Antenna Connections A B A NN TE AN 75 FMAXIAL A NN TE AN CO 75 FMAXIAL CO D D GN GN D D GN GN AM OP AM OP AM T EX LO LO AM T EX FM Antenna Extend the supplied FM antenna horizontally. ANTENNA FM 75 COAXIAL GND Note: Outside FM Antenna Cable GND AM LOOP AM EXT A. Using the Supplied FM Antenna The FM antenna provided can be connected to the FM 75Ω COAXIAL terminal as temporary measure. B.
English Getting Started Connecting the Speakers You can connect the following speakers: • Two pairs of front speakers to produce normal stereo sound. • One pair of rear speakers to enjoy the surround effect. • One center speaker to produce more effective surround effect (to emphasize human voices). • One subwoofer to enhance the bass. IMPORTANT: After connecting the speakers listed above, set the speaker setting information properly to obtain the best possible surround effect. For details, see page 24.
English Connecting the rear and center speakers Cut, twist and remove the insulation at the end of each speaker signal cable first, and then, connect rear speakers to the REAR SPEAKERS terminals and a center speaker to the CENTER SPEAKER terminals by using the cables. CENTER SPEAKER REAR SPEAKERS RIGHT LEFT Center speaker Left rear speaker Right rear speaker 1 Open the terminal and then insert the speaker signal cable. 2 Close the terminal.
English Getting Started About the speaker impedance CAUTION: CASE 1 When you connect only one set of front speakers Front speaker 1 When connecting speakers, use speakers with the same SPEAKER IMPEDANCE indicated by the speaker terminals. Front speaker 1 Note: The required speaker impedance of the front speakers does differ depending on whether both the FRONT SPEAKERS 1 and FRONT SPEAKERS 2 terminals are used or only one of them is used. Use front speakers with 4 — 16 ohm impedance.
English Connecting Audio/Video Components You can connect the following audio/video components to this receiver using cables with RCA pin plugs (not supplied). Refer also to the manuals supplied with your components. If you want to connect a component not listed in the table below, refer to the manual supplied with it.
English Getting Started Video component connections Use the cables with RCA pin plugs (not supplied). Connect the white plug to the audio left jack, the red plug to the audio right jack, and the yellow plug to the video jack. If DVD player and TV have S-video (Y/C-separation) terminals, connect them using Svideo cables (not supplied). Connecting these video components through the S-video input/output terminals will give you better picture playback quality.
English DVD player connection • When you connect the DVD player with stereo output jacks: To S-video output (for better playback picture quality) DVD player To front left/right channel audio output (or to audio mixed output if necessary) DVD RIGHT LEFT GND AUDIO RIGHT LEFT VIDEO S-VIDEO PHONO DVD To composite video output TV SOUND /DBS CD OUT (REC) OUT (REC) TAPE /MD VCR IN (PLAY) IN (PLAY) CENTER SUB WOOFER DVD SUBWOOFER OUT • MONITOR OUT When you connect the DVD player with its a
English Getting Started TV (as the sound source) or DBS tuner connection You can connect either the TV or DBS tuner to the TV SOUND/DBS jacks. RIGHT LEFT GND AUDIO Note: RIGHT LEFT VIDEO S-VIDEO VIDEO S-VIDEO PHONO DVD TV TV SOUND /DBS CD To audio output OUT (REC) When connecting the TV to the TV SOUND/DBS jacks, DO NOT connect the TV’s video output to the video input terminal of the TV SOUND/DBS jacks.
English VCR connection RIGHT GND LEFT AUDIO RIGHT LEFT VIDEO S-VIDEO PHONO DVD To video input VCR TV SOUND /DBS CD OUT (REC) VHS To audio input OUT (REC) TAPE /MD VCR IN (PLAY) IN (PLAY) CENTER To audio output SUB WOOFER DVD SUBWOOFER OUT MONITOR OUT To video output 18 EN01-19.RX-774R[E]/1 18 98.3.
English Getting Started Connecting the Power Cord Before plugging the receiver into an AC outlet, make sure that all connections have been made. 1. Plug the power cord into an AC outlet. 2. Press POWER to set it in the _ON position. The STANDBY lamp lights up. A small amount of power is always consumed. POWER _ ON — OFF To shut off the power completely Press POWER to set it in the —OFF position.
English Basic Operations The following operations are commonly used when you play any sound source. AUDIO/TV /VCR CATV /DBS IMPORTANT: When using the Remote Control, check to see if its remote control mode selector is set to the correct position: To operate an audio system, TV, and VCR, set it to “AUDIO/TV/ VCR.” To operate a CATV converter and DBS tuner, set it to “CATV/ DBS.” Turning the Power On and Off (Standby) On the front panel: STANDBY To turn on the power, press STANDBY/ON .
English Basic Operations From the remote control: Press one of the source selecting buttons directly. DVD MULTI CD DVD MULTI DVD VCR TV/DBS CD* TAPE/MD* PHONO* FM/AM* DVD VCR TAPE/MD PHONO Note: TV/DBS FM/AM Select the DVD player for viewing the digital video disc using the analog discrete output mode (5.1CH reproduction) on the DVD player. Each time you press the button, the source alternates between “DVD” and “DVD MULTI.
English Selecting the Front Speakers On the front panel only: SPEAKERS 1 2 Note: If you use any of the DSP modes other than the 3DPHONIC modes and “HEADPHONE” with both front speakers activated, the speakers connected to the FRONT SPEAKERS 2 terminals are deactivated. When you have connected two pairs of the front speakers, you can select which to use. Press SPEAKERS 1 or SPEAKERS 2 to select the speaker to use. Each time you press the button, the lamp on the respective button turns on and off.
English Basic Settings Some of the following settings are required after connecting and positioning your speakers in your listening room, while others will make operations easier. AUDIO/TV /VCR CATV /DBS IMPORTANT: When using the Remote Control, check to see if its remote control mode selector is set to the correct position: To operate this receiver, set it to “AUDIO/TV/VCR (except when selecting the DBS tuner as the source).
English Using the Sleep Timer Using the Sleep Timer, you can fall asleep to music and know the receiver will turn off by itself rather than play all night. From the remote control only: Press SLEEP repeatedly. The shut-off time on the display changes as follows, and the SLEEP indicator lights up on the display. SLEEP 10min. SLEEP 20min. SLEEP SLEEP 30min. SLEEP 40min. SLEEP 00min. (Canceled) SLEEP 50min. SLEEP 90min. SLEEP 80min. SLEEP 70min. SLEEP 60min.
English Basic Settings Rear Speaker Setting Register whether you have connected the rear speakers or not. Note: On the front panel only: 1. Press SETTING repeatedly until “REAR SPK” (Rear Speaker) appears on the display. The display changes to show the current setting. 2. Turn MULTI JOG to register whether you have connected the rear speaker or not, while the indication of the previous step is still on the display. As you turn it, the rear speaker setting alternates between “YES” and “NO.
English One Touch Operation This receiver can memorize the optimum sound settings for each playing source. About the One Touch Operation JVC’s One Touch Operation function is used to assign and store different sound settings for each different playing source. By using this function, you don’t have to change the settings every time you change the source. The stored settings for the newly selected source are automatically recalled.
English Receiving Radio Broadcasts You can browse through all the stations or use the preset function to go immediately to a particular station. AUDIO/TV /VCR CATV /DBS IMPORTANT: When using the Remote Control, check to see if its remote control mode selector is set to the correct position: To operate this receiver, set it to “AUDIO/TV/VCR (except when selecting the DBS tuner as the source).” Tuning in Stations Manually On the front panel only: 1. Press FM/AM TUNING to select the band.
English 4. Press TUNER/SEA MEMORY again while the selected channel number is flashing on the display. The selected channel number stops flashing. The station is assigned to the selected channel number. TUNER/SEA MEMORY 5. Repeat steps 1 to 4 until you store all the stations you want. To erase a stored preset station Storing a new station on a used number erases the previously stored one. To tune in a preset station On the front panel: TUNER PRESET 1. Press TUNER PRESET. 2.
English Receiving Radio Broadcasts Selecting the FM Reception Mode On the front panel: Note: When an FM stereo broadcast is hard to receive or noisy, set the FM reception mode to MONO. (When shipped from the factory, this mode has been set to AUTO.) You can change the FM reception mode while receiving an FM broadcast. You can store the FM reception mode for each preset station. Press FM MODE to select the FM reception mode.
English Assigning Names to Preset Stations You can assign a name of up to four characters to each preset station. When a preset station is tuned in, its assigned name will appear on the display. On the front panel only: 1. Tune in a preset station. See page 28 for details. TUNER/SEA MEMORY 2. Press TUNER/SEA MEMORY. The preset channel number starts flashing for about 5 seconds. TUNER PRESET 3. Press TUNER PRESET, while the preset channel number is flashing. The first character position starts flashing.
English Receiving Radio Broadcasts Using the RDS (Radio Data System) to Receive FM Stations RDS allows FM stations to send an additional signal along with their regular program signals. For example, the stations send their station names, as well as information about what type of program they broadcast, such as sports or music, etc. When tuned to an FM station which provides the RDS service, the RDS indicator lights up on the display. With the receiver, you can receive the following types of RDS signals.
English Searching for a Program by PTY Codes One of the advantages of the RDS service is that you can locate a particular kind of program from the preset channels by specifying the PTY codes. To search for a program using the PTY codes Note: FM stations must be preset to use the PTY search. On the front panel: 1. Press PTY SEARCH while listening to an FM station. “PTY SELECT” flashes on the display. PTY SEARCH MULTI JOG 2.
English Receiving Radio Broadcasts From the remote control: Before starting the procedure below, make sure you have selected FM station only using the remote control. If not, the following RDS operating buttons do not work for tuner operation. (Pressing FM/AM activates the remote control for tuner operation.) 1. Press PTY SEARCH while listening to an FM station. “PTY SELECT” flashes on the display. EARCH PTY S Y PLA Note: When selecting the PTY codes by pressing PTY +, NEWS always appears first.
English Switching to a Broadcast Program of Your Choice Temporarily Another convenient RDS service is called “EON (Enhanced Other Network).” The EON indicator lights up while receiving a station with the EON code. This allows the receiver to switch temporarily to a broadcast program of your choice (NEWS, TA, and/or INFO) from a different station except in the following cases: • When you are listening to a non-RDS stations (all AM — MW/LW and some FM stations).
English Receiving Radio Broadcasts CASE 2 If there is a station broadcasting the program you have selected The receiver changes the source (all sources except AM (MW/LW)), and tunes in the station. The indicator of received PTY code starts flashing. ‘ When the program is over, the receiver goes back to the previously selected source, but still remains in EON standby mode. The indicator of received PTY code stops flashing and remains lit.
English Using the SEA Modes The SEA (Sound Effect Amplifier) modes give you control of the way your music sounds. AUDIO/TV /VCR CATV /DBS IMPORTANT: When using the Remote Control, check to see if its remote control mode selector is set to the correct position: To operate this receiver, set it to “AUDIO/TV/VCR (except when selecting the DBS tuner as the source).” Selecting Your Favorite SEA Mode On the front panel: SEA MODE • The SEA modes cannot be used for recording.
English Using the SEA Modes Creating Your Own SEA Mode You can adjust and store your own SEA adjustment into memory (SEA USERMODE). On the front panel only: If you do not want to store your adjustment, but rather want to adjust the SEA temporarily, skip step 4 below. 1. Press SEA ADJUST repeatedly until the frequency range (100Hz, 1kHz or 10kHz) you want appears on the display. SEA SEA ADJUST FR VOLUME 100 1k SEA FR 10k VOLUME 100 1k 10k MULTI JOG 2.
The built-in Surround Processor provides three types of the DSP (Digital Signal Processor) mode — 3DPHONIC mode, DAP (Digital Acoustic Processor) mode and Surround mode (Dolby Pro Logic and Theater Surround.) On 3D-PHONIC mode The 3D-PHONIC mode gives you such a nearly surround effect as it is reproduced through the Dolby Surround decoder, which is widely used to reproduce sounds with a feeling of movement like those experienced in movie theaters.
English Using the DSP Modes AUDIO/TV /VCR CATV /DBS IMPORTANT: When using the Remote Control, check to see if its remote control mode selector is set to the correct position: To operate this receiver, set it to “AUDIO/TV/VCR (except when selecting the DBS tuner as the source).” Using the 3D-PHONIC Modes When using JVC’s 3D-PHONIC modes, you need only two front speakers to reproduce DOLBY SURROUND .
English 5. Select and play a sound source which was processed with Dolby Surround and DOLBY SURROUND mark. is labeled with To cancel the 3D-PHONIC mode Turn MULTI JOG until “DSP OFF” appears in step 2. The 3D-PHONIC, DSP and PRO LOGIC indicators go off from the display. Note: Once you have adjusted the effect level, it is memorized for each 3D-PHONIC mode. From the remote control: 1. Press SURROUND MODE repeatedly until the mode (3D ACTION, 3D DRAMA, or 3D THEATER) you want appears on the display.
English Using the DSP Modes Using the DAP Modes Notes: You can use five DAP modes — “Live Club, Dance Club, Hall, Pavilion, and Headphones.” Among the DAP modes, “Headphones” is very special. It can create the same stereo sound as you listen through the speakers off air while listening to a source using headphones. So, you can feel as if you were not using the headphones and listening to music in a room. On the front panel: DSP MODE 1. Press DSP MODE. The current DSP mode appears on the display. 2.
English 5. Press BALANCE/SURROUND ADJUST repeatedly until “DSP EFFECT” appears on the display. The display changes to show the current setting. 6. Turn MULTI JOG to select the effect level, while the indication of the previous step is still on the display. As you turn it, the effect level changes as follows: DSP EFFECT 1 DSP EFFECT 2 DSP EFFECT 5 BALANCE/SURROUND ADJUST MULTI JOG DSP EFFECT 3 DSP EFFECT 4 As the number increases, the selected DAP mode becomes stronger.
English Using the DSP Modes From the remote control: SURROUND MODE 1. Press SURROUND MODE repeatedly until the mode you want appears on the display. The DSP indicator also lights up on the display.
English Preparing for Surround Modes The receiver memorizes two types of Surround modes adjustments; one for Dolby Pro Logic and the other for Theater Surround. To do the adjustment procedure, use the remote control. From the remote control: SURROUND MODE 1. Press SURROUND MODE until “PRO LOGIC” or “THEATER” appears on the display. When “PRO LOGIC” is selected, the PRO LOGIC indicator also lights up on the display.
English Using the DSP Modes 4. If necessary, adjust the speaker output level as follows: • To adjust the center speaker output level, press CNTR +/–. • To adjust the rear speaker output level, press REAR•(L) +/–. CNTR 2 MENU 3 Notes: ENTER REAR (L) 5 6 Pressing – decreases the output level up to –10 dB. Pressing + increases the output level up to +10 dB. TEST 4 5. Press TEST again to stop the test tone. 6. Press CNTR TONE to select the center tone level you want.
English On the front panel: You can also use the buttons on the front panel to adjust the Surround modes. However, no test tone is available when using the buttons on the front panel. So, make adjustments while listening to the sound of the source played back. 1. For Dolby Pro Logic: Press DOLBY SURROUND so that the lamp on the button lights up and “PRO LOGIC” appears on the display. The PRO LOGIC indicator also lights up. Each time you press the button, the Dolby Pro Logic mode turns on and off.
English Using the DSP Modes BALANCE/SURROUND ADJUST 4. Press BALANCE/SURROUND ADJUST repeatedly until “CENTER TONE” appears on the display. The display changes to show the current setting. Note: The center tone cannot be adjusted when “CENTER SPK” is set to “NONE” (see page 24). 5. Turn MULTI JOG to select the center tone level you want, while the indication of the previous step is still on the display.
English Using Surround Modes Once you have finished adjustments for Dolby Pro Logic and Theater Surround, you can use the same adjustments every time you want to use these modes. On the front panel: 1. For Dolby Pro Logic: Press DOLBY SURROUND so that the lamp on the button lights up and “PRO LOGIC” appears on the display. The PRO LOGIC indicator also lights up. Each time you press the button, the Dolby Pro Logic mode turns on and off. For Theater Surround: 1) Press DSP MODE.
English Using the DVD MULTI Playback Mode This receiver provides the DVD MULTI playback mode for reproducing the analog discrete output mode of the DVD player. Before playing back a DVD, refer also to the manual supplied with the DVD player. Speaker Arrangements for DVD MULTI Playback The following illustrations show how to obtain the optimum sound environment for the DVD MULTI playback mode. Try to find the speaker direction and location to create the optimum sound field.
English MULTI JOG 4. Turn MULTI JOG to adjust the center speaker output level (from –10 dB to +10 dB), while the indication of the previous step is still on the display. 5. Press BALANCE/SURROUND ADJUST repeatedly until “REAR L LEVEL” appears on the display. The display changes to show the current setting. BALANCE/SURROUND ADJUST You cannot adjust the left rear speaker level when “REAR SPK” is set to “NO” (see page 25). MULTI JOG 6.
English Using the DVD MULTI Playback Mode AUDIO/TV /VCR CATV /DBS IMPORTANT: When using the Remote Control, check to see if its remote control mode selector is set to the correct position: To operate this receiver, set it to “AUDIO/TV/VCR (except when selecting the DBS tuner as the source).” From the remote control: 1. Press DVD MULTI so that “DVD MULTI” appears on the display. Each time you press the button, the source alternates between “DVD” and “DVD MULTI.” DVD MULTI 2.
English Using the On-Screen Menus You can use the Menus on the TV screen to control the receiver. To use this function, you need to connect the TV to the MONITOR OUT jack on the rear panel (see page 15), and set the TV’s input mode to the proper position to which the receiver is connected. Selecting the Source to Play (Also see page 20) Notes: 1. Press any button of ON SCREEN CONTROL % / fi / @ / # once. The MAIN MENU appears on the TV.
English Using the On-Screen Menus Adjusting the Front Speaker Output Balance (Also see page 23) 1. Press any button of ON SCREEN CONTROL % / fi / @ / # once. The MAIN MENU appears on the TV. MAIN MENU 2. Press ON SCREEN CONTROL % / fi to move then press @ / #. The SOUND CONTROL menu appears. to “SOUND CONTROL,” 3. Press ON SCREEN CONTROL % / fi to move to “BAL.” (Balance). SOUND CONTROL menu 4. Press ON SCREEN CONTROL @ / # to adjust the balance. 5.
English 6. Press ON SCREEN CONTROL % / fi to move to the item you want to set or adjust, then press ON SCREEN CONTROL @ / #. On these adjustment menus, you can do the following: For 3D-PHONIC modes: “DSP EFFECT”: Select the effect level. Example: SURROUND LEVEL menu for Theater surround For DAP modes (LIVE CLUB, DANCE CLUB, HALL, PAVILION): “REAR LEVEL”: Adjust the rear speaker output level. * “DSP EFFECT”: Select the effect level. For Dolby Pro Logic surround mode: “TEST TONE”: Output a test tone.
English Using the On-Screen Menus Creating Your Own SEA Mode (Also see page 37) MAIN MENU 1. Press any button of ON SCREEN CONTROL % / fi / @ / # once. The MAIN MENU appears on the TV. 2. Press ON SCREEN CONTROL % / fi to move then press @ / #. The SOUND CONTROL menu appears. to “SOUND CONTROL,” 3. Press ON SCREEN CONTROL % / fi to move The SEA menu appears. to “SEA,” then press @ / #. 4. Press ON SCREEN CONTROL % / fi to move press @ / #. The SEA ADJUST menu appears. to “SEA ADJUST,” then 5.
English Setting the Rear Speaker (Also see page 25) 1. Press any button of ON SCREEN CONTROL % / fi / @ / # once. The MAIN MENU appears on the TV. MAIN MENU 2. Press ON SCREEN CONTROL % / fi to move @ / #. The SETTING menu appears. to “SETTING,” then press 3. Press ON SCREEN CONTROL % / fi to move Speaker). to “REAR SPK” (Rear SETTING menu 4. Press ON SCREEN CONTROL @ / # to set your rear speakers. 5. When you finish, press EXIT repeatedly until the menu disappears from the TV.
English Using the On-Screen Menus Storing the Preset Stations (Also see page 27) 1. Press any button of ON SCREEN CONTROL % / fi / @ / # once. The MAIN MENU appears on the TV. 2. Press ON SCREEN CONTROL % / fi to move then press @ / #. The TUNER CONTROL menu appears. MAIN MENU to “TUNER CONTROL,” 3. Tune into a station on the TUNER CONTROL menu, referring to “Operating the Tuner”. 4. Press ON SCREEN CONTROL % / fi to move then press @ / #. The PRESET MEMORY menu appears. to “PRESET MEMORY,” 5.
English 7. Press ON SCREEN CONTROL % / fi / @ / # to move in front of a character you want. You can also select the following: SPACE: To enter space CANCEL: To erase the character : To go back to the previous character position or go to the next character position PRESET MEMORY menu: Character entry screen 8. Press SET to enter the selected character. 9. Repeat steps 7 and 8 to enter up to four characters. 10. Press ON SCREEN CONTROL % / fi / @ / # to move NAME,” then press SET to store the setting.
English COMPU LINK Remote Control System The COMPU LINK remote control system allows you to operate JVC audio components through the remote sensor on the receiver. To use this remote control system, you need to connect JVC audio components through the COMPU LINK-3 (SYNCHRO) jacks (see below) in addition to the connections using cables with RCA pin plugs (see page 14). • Make sure that the AC power cords of these components are unplugged before connection.
The TEXT COMPU LINK remote control system has been newly developed to deal with the disc information recorded in the CD Text* and MDs. Using these information in the discs, you can operate the CD player or MD recorder equipped with the TEXT COMPU LINK remote control system through the receiver. CONNECTIONS: *What is a CD Text? In a CD Text, some information about the disc (its disc title, performer, composer, arranger, etc.) is recorded.
English TEXT COMPU LINK Remote Control System OPERATIONS Notes: To use this remote control system, you need to connect the TV to the MONITOR OUT jack on the rear panel (see page 15), and set the TV’s input mode to the proper position to which the receiver is connected. Make sure you have connected the CD player or MD recorder equipped with the TEXT COMPU LINK remote control system. If not, you cannot use the following functions. Showing the Disc Information on the TV Screen 1.
English Searching a Disc (Only for the CD player) Search a disc by its performer: 1. Display the disc information screen by following the procedure on page 61. 2. Press ON SCREEN CONTROL % / fi to move press SET. The DISC SEARCH screen appears on the TV. to “SEARCH,” then 3. Press ON SCREEN CONTROL % / fi to move press SET. The PERFORMER SEARCH screen appears. to “PERFORMER”, then DISC SEARCH screen PERFORMER SEARCH screen 4.
English TEXT COMPU LINK Remote Control System 5. Press SET again. Disc search starts, then the SEARCH RESULT screen, showing the disc titles, appears. SEARCH RESULT screen 6. On the SEARCH RESULT screen, you can do the following: • Changing the indication of the disc information: Press ON SCREEN CONTROL % / fi to move to a searched disc, then press @ / #. Each time you press @ / #, the disc information alternates between its disc title and its performer.
English Using the User File (Only for the CD Player with the User File Function) You can use the User File function through this receiver. For the User File function, refer to the manual supplied with your CD player. Using your own User Files: 1. Display the disc information screen by following the procedure on page 61. 2. Press ON SCREEN CONTROL % / fi to move press SET. The USER FILE screen appears on the TV.
English TEXT COMPU LINK Remote Control System Entering the Disc Information For the CD Player with the disc memory function: You can use the disc memory function through this receiver. The disc information (its performer, disc title, and its music genre) of normal audio CDs will be stored into the memory built in the CD player. For the disc memory function, refer to the manual supplied with your CD player. • The performer, disc title, and music genre information are usually recorded in a CD Text.
English 7. Press ON SCREEN CONTROL % / fi / @ / # to move FAVORITE (in this example),” then press SET. The TITLE INPUT: DISC 1 GENRE screen appears. 8. Press ON SCREEN CONTROL % / fi to move then press SET. The Disc Information screen appears again. to “DISC1: MY TITLE INPUT: DISC 1 GENRE screen to the genre you want, To show the unseen genres, press ON SCREEN CONTROL % / fi until they appear. For the MD recorder: You can write the disc information (disc title and song titles) into the disc.
English Operating JVC’s Audio/Video Components You can operate JVC’s audio and video components with this receiver’s remote control, since control signals for JVC components are preset in the remote control. IMPORTANT: To operate JVC’s audio components using this remote control: • You need to connect JVC audio components through the COMPU LINK-3 (SYNCHRO) jacks (see page 59) in addition to the connections using cables with RCA pin plugs (see page 14).
English VCR DVD MULTI AUDIO SLEEP DVD VCR TV/DBS TAPE/MD PHONO CD SEA CNTR TONE MODE 1 MENU 2 4 3 REAR (L) 5 SOUND EFFECT CONTROL 6 (REAR R) 7/P CD DISC FM/AM CNTR SURROUND TEST ENTER MODE 8 9 0 +10 DELAY 10 RETURN FM MODE/MUTE AUDIO/TV /VCR 100+ ME VOLU CATV /DBS L CHANNE TE MU ARCH PTY SE PLAY – PTY EW /R 4 PTY + FF / ¢ STOP PAUSE REC DE ME AY MO DISPL TV VOLU IDEO TV/V CONTROL VCR TAPE SET N O After pressing CD (with the remote control mode selector set to
English Operating JVC’s Audio/Video Components IMPORTANT: To operate JVC’s video components using this remote control: • Aim the remote control directly at the remote sensor on the VCR, DVD player or TV, not on the receiver. • Some JVC VCRs can accept two types of the control signals — remote code “A” and “B.” Before using this remote control, make sure that the remote control code of the VCR connected to the VCR jacks is set to code “A.
English Operating Other Manufactures’ Components This remote control supplied with the receiver can transmit control signals for other manufacturers’ VCRs, TVs, CATV converters and DBS tuners. By changing the transmittable signals from preset ones to the other manufacturers’, you can operate the other manufacturer’s components using this remote control. When operating the other manufacturers’ components, refer also to the manuals supplied with them.
English Operating Other Manufactures’ Components To change the transmittable signals for operating a CATV converter or DBS tuner 1. Set the remote control mode selector to “CATV/DBS.” RM-SR774RU REMOTE CONTROL VCR TV/CATV 2. Press and hold TV/CATV/DBS . DVD MULTI 3. Press TV/DBS. DVD VCR TV/DBS TAPE/MD PHONO CD SEA MODE 4. Enter the manufacturer’s code (three digits) using buttons 1 – 9, and 0. See the lists on page 74 to find the code.
English To change the transmittable signals for operating another manufacturer’s VCR 1. Set the remote control mode selector to “AUDIO/TV/ VCR.” RM-SR774RU REMOTE CONTROL VCR TV/CATV 2. Press and hold VCR . DVD MULTI DVD VCR SEA CNTR TONE MODE 1 4 3 REAR (L) 5 6 (REAR R) 7/P 8 9 0 +10 DELAY 10 RETURN FM MODE/MUTE AUDIO/TV /VCR 5. Release VCR .
English Manufacturers’ codes for TV Acura Admiral Adyson Akai Akura Alba Amplivision Amstrad Anitech Arcam ASA Asuka Audiosonic Autovox Bang & Olufsen Basic Line Baur Beon Binatone Blaupunkt Blue Sky Blue Star Bondstec Boots BPL Brandt Brionvega Bruns BTC Bush Carrefour Cascade Cathay Centurion Century CGE Cimline Clarivox Clatronic Contec Crosley Crown CTC Cybertron Daewoo Dainichi Dansai Dayton De Graaf Decca Dixi Dual Dual Tec Dumont Elin Elite Elta Emerson Erres Ferguson Fidelity Finlandia Finlux First
010, 036, 037, 217, 512 217 100, 163, 214, 250, 340 009 032 087, 247 037, 043, 087 087 037, 087 163 009 321 009, 037, 217, 247 010, 011, 037, 070, 512 036 037 037 087 036 070, 089 201 037 163 087 009, 218 037, 043 036, 217 087, 177 087, 163, 335 257 009, 011, 177, 211, 235, 354 163 009, 037, 217, 290 011, 036, 072, 146, 157, 208, 339 037, 218, 247 010 163, 362 035 036, 093 087 037, 157, 195 036 087 087, 177, 235 032, 163 208 009, 037 163, 208 037 010, 011, 036 037 009, 217, 218 163 321, 355 218 037 072, 163
English Manufacturers’ codes for VCR Aiwa Akai Alba Amstrad ASA Asuka Baird Basic Line Blaupunkt Brandt Bush CGE Crown Daewoo De Graaf Decca Dumont ESC Ferguson Fidelity Finlandia Finlux Firstline Fisher Funai GEC GoldStar Goodmans Graetz Granada Grandin Grundig Hanseatic Hitachi ITT ITV Imperial Interfunk JVC Kendo Lenco Loewe Luxor M Electronic Manesth Marantz Matsui Memorex Mitsubishi Multitech Murphy NEC Nechermann Nokia Nordmende Oceanic Orion Osaki Otto Versand Palladium Panasonic Pentax Perdio Phili
English Troubleshooting Use this chart to help you solve daily operational problems. If there is any problem you cannot solve, contact your JVC service center. PROBLEM POSSIBLE CAUSE SOLUTION The display does not light up. The power cord is not plugged in or the POWER switch pressed to set it in the —OFF position. Plug the power cord into an AC outlet and/or POWER to set it in the _ON press position. No sound from speakers. Speaker signal cables are not connected.
English Specifications Amplifier Output Power ............................................................ At Stereo operation ........................................................... 100 watts per channel, min. RMS, driven into 4 ohms, at 1 kHz with no more than 0.7 % total harmonic distortion. (IEC268-3/DIN) 50 watts per channel, min. RMS, driven into 8 ohms, at 1 kHz with no more than 0.7 % total harmonic distortion. (IEC268-3/DIN) At Surround operation Front Channels ...............................
English Video Video Input Sensitivity/Impedance .......................... Composite video: TV SOUND/DBS, VCR, DVD ........... 1 Vp-p/75 ohms S-video: DVD (Y: luminance): .............................................................. 1 Vp-p/75 ohms (C: chrominance, burst): ................................................ 0.286 Vp-p/75 ohms Video Output Level .................................................. Composite video: VCR, MONITOR OUT ...................... 1 Vp-p/75 ohms S-video: MONITOR OUT .......
VICTOR COMPANY OF JAPAN, LIMITED V EN, GE, FR, NL, SP, IT RX-774R[E]COVER J 2 98.3.