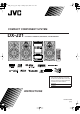
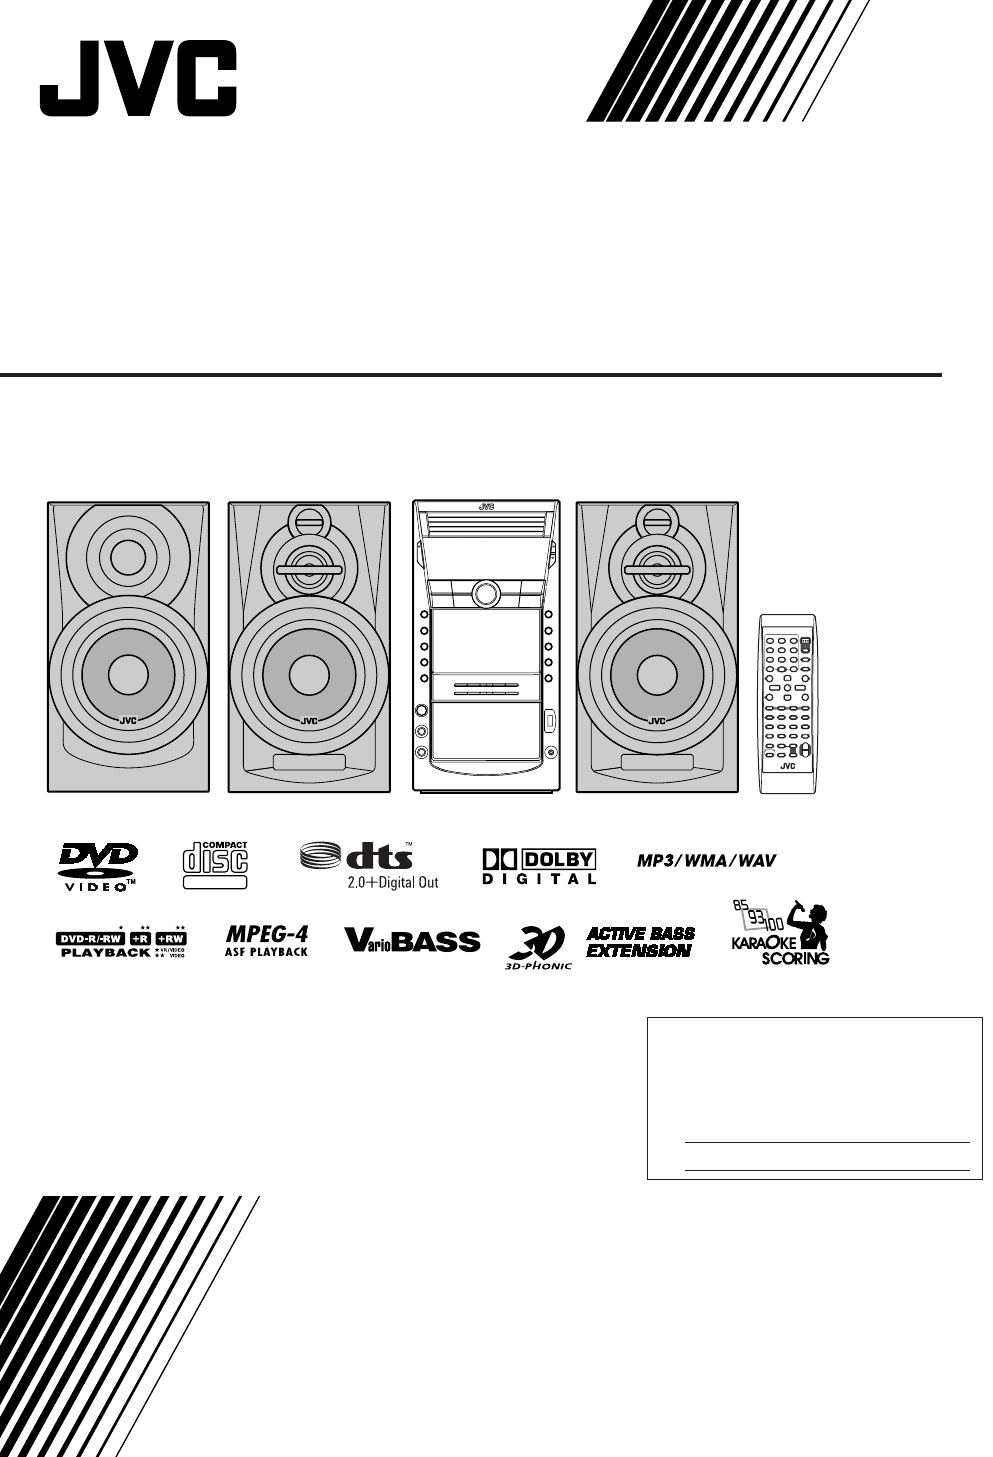
DXJ_Cover[J_C].fm Page 1 Monday, April 6, 2009 11:51 AM COMPACT COMPONENT SYSTEM DX-J21 —Consists of CA-DXJ21, SP-DXJ21F, and SP-DXJ21W SUPER VIDEO For Customer Use: Enter below the Model No. and Serial No. which are located either on the rear, bottom or side of the cabinet. Retain this information for future reference. Model No. Serial No.
Safety_DX-J21[J_C].fm Page 1 Monday, April 6, 2009 11:54 AM Warnings, Cautions and Others Mises en garde, précautions et indications diverses For U.S.A. Caution: Changes or modifications not expressly approved by party responsible for compliance could void the user’s authority to operate the equipment. Note: This equipment has been tested and found to comply with the limits for a Class B digital device, pursuant to Part 15 of the FCC Rules.
Safety_DX-J21[J_C].fm Page 2 Monday, April 6, 2009 11:54 AM For Canada/pour le Canada THIS DIGITAL APPARATUS DOES NOT EXCEED THE CLASS B LIMITS FOR RADIO NOISE EMISSIONS FROM DIGITAL APPARATUS AS SET OUT IN THE INTERFERENCE-CAUSING EQUIPMENT STANDARD ENTITLED “DIGITAL APPARATUS,” ICES-003 OF THE DEPARTMENT OF COMMUNICATIONS.
Safety_DX-J21[J_C].fm Page 3 Monday, April 6, 2009 11:54 AM CAUTION! CAUTION: To avoid personal injury or accidentally dropping the unit, have two persons unpack, carry, and install the unit. • Do not block the ventilation openings or holes. (If the ventilation openings or holes are blocked by a newspaper or cloth, etc., the heat may not be able to get out.) • Do not place any naked flame sources, such as lighted candles, on the apparatus.
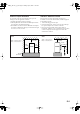
Safety_DX-J21[J_C].fm Page 4 Monday, April 6, 2009 11:54 AM Caution: Proper Ventilation Attention: Aération correcte To avoid risk of electric shock and fire, and to prevent damage, locate the apparatus as follows: 1. Front:No obstructions and open spacing. 2. Sides/Top/Back:No obstructions should be placed in the areas shown by the dimensions below. 3. Bottom:Place on the level surface. Maintain an adequate air path for ventilation by placing on a stand with a height of 10 cm (3-15/16”) or more.
DX-J21[J].book Page 1 Tuesday, April 8, 2008 11:32 AM Introduction Playable Disc/File Types INFO Note on Region Code DVD Video players and DVD Video discs have their own Region Code numbers. This system can play back DVD Video discs whose Region Code numbers include “1.” COMPACT DIGITAL VIDEO SUPER VIDEO DIGITAL AUDIO AV files Discs The “√” in the list below shows available disc/file types.
DX-J21[J].book Page 2 Tuesday, April 8, 2008 11:32 AM Precautions Contents Installation Connections.................................................................................... 3 Connecting a USB Mass storage class device ............................ 6 Preparing the Remote Control .................................................... 6 Canceling the Demonstration...................................................... 6 Changing the Color System ......................................................
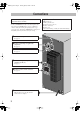
DX-J21[J].book Page 3 Tuesday, April 8, 2008 11:32 AM Connections Do not connect the AC power cord until all other connections have been made. • Connect VIDEO OUT directly to the video input of your TV. Connecting VIDEO OUT to a TV via a VCR may interfere with your viewing when playing back a copyprotected source. Connecting VIDEO OUT to an integrated TV/VCR system may interfere with your viewing. ~ From the video input of TV/monitor See page 4.
DX-J21[J].book Page 4 Tuesday, April 8, 2008 11:32 AM ~ TV/monitor ! AM/FM antenna To assemble the AM loop antenna Composite video cord (supplied) S-Video cord (not supplied) • Connect the VIDEO jack or S-VIDEO jack; whichever you want to use. – You can get better picture quality by connecting with S video cord. Ÿ Digital audio component To connect AM/FM antenna • If the antenna cord is covered with vinyl on the tip, twist and pull the vinyl off to remove.
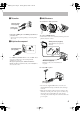
DX-J21[J].book Page 5 Tuesday, April 8, 2008 11:32 AM ⁄ Auxiliary equipment Red Stereo audio cord (not supplied) White @ Speakers and the subwoofer To connect the speaker cords • When connecting the speaker cords, match their polarity with that of the speaker terminals: blue/red to (+) and black to (–). • Use only speakers with the same speaker impedance as indicated by the speaker terminals on the rear of the System.
DX-J21[J].book Page 6 Tuesday, April 8, 2008 11:32 AM Connecting a USB Mass storage class device Canceling the Demonstration You can connect a USB mass storage class device such as a USB flash memory, hard disk drive, multimedia card reader, digital camera, etc. to this System. Main Unit ONLY 2 sec. DEMO OFF DEMO START USB cable (not supplied) To start the demonstration, select DEMO START. Main unit • You cannot connect a personal computer to the (USB MEMORY) terminal of the System.
DX-J21[J].book Page 7 Tuesday, April 8, 2008 11:32 AM Display Indication The indications on the display tell you a lot of things while you are operating the System. Before operating the System, be familiar with when and how the indicator illuminates on the display. 1 7 2 8 9p 3 q 1 Source signal indicators • DTS: lights when DTS signals are detected. • DIGITAL: lights when Dolby Digital signals are detected.
DX-J21[J].book Page 8 Tuesday, April 8, 2008 11:32 AM Daily Operations—Playback In this manual, the operations using the remote control are mainly explained; however, you can use the buttons and controls on the main unit if they have the same (or similar) name and marks. ¥ Turn on the power. The STANDBY lamp on the main unit goes off. • Without pressing AUDIO, the System also turns on by pressing one of the source selecting buttons in the next step. ø Select the source.
DX-J21[J].book Page 9 Tuesday, April 8, 2008 11:32 AM To preset stations Adjusting the Volume You can preset 30 FM and 15 AM stations. The volume level can be adjusted in 32 steps (VOLUME MIN, VOLUME 1 – VOLUME 30, and VOLUME MAX). Remote control: Remote ONLY 1 Tune in to a station you want to preset. Main unit: 2 To drop the volume in a moment Remote ONLY To restore the volume, press again or adjust the volume level. (while holding...
DX-J21[J].book Page 10 Tuesday, April 8, 2008 11:32 AM To play back disc/USB mass storage class device Playing Back a Disc/USB Mass Storage Class Device INFO To start: • IMPORTANT: Before playing a disc/USB mass storage class device, make sure of the following... • Turn on the TV and select an appropriate input mode on the TV to view the pictures or on-screen displays. • For disc/USB mass storage class device playback, you can change the initial setting to your preference.
DX-J21[J].book Page 11 Tuesday, April 8, 2008 11:32 AM To return to normal playback, press DVD/CD 3 or USB MEMORY 3. To select a disc Playback starts. (while holding...) Remote ONLY To select a title/group To select an item directly Remote ONLY You can select a title/chapter/track directly and start playback. • For DVD Video, you can select a title before starting playback, while you can select a chapter after starting playback. • To select a number, see “How to select a number” on page 8.
DX-J21[J].book Page 12 Tuesday, April 8, 2008 11:32 AM 7 For SVCD/VCD with PBC While playing a disc with PBC, “PBC” appears on the display instead of the playing time. When disc menu appears on the TV screen, select an item on the menu. Playback of the selected item starts. • To select a number, see “How to select a number” on page 8.
DX-J21[J].book Page 13 Tuesday, April 8, 2008 11:32 AM Daily Operations—Sound & Other Adjustments Adjusting the Speaker Output Remote Control Balance Remote ONLY You can adjust the speaker output balance. L–6 0 CLOCK/TIMER (while holding...) R–6 DIMMER CANCEL , , , , ENTER/SET DISPLAY BALANCE L–R SOUND MODE 3D PHONIC SHIFT Reinforcing the Bass Sound INFO You can adjust the Active Bass level from level 1 (minimum) to level 4 (maximum).
DX-J21[J].book Page 14 Tuesday, April 8, 2008 11:32 AM Selecting the Sound Modes 2 Select the SEA parameter you want to adjust. Remote ONLY 1 Adjust BASS. 2 Adjust MID (Mid-range). 3 Adjust TRE (Treble). You can select one of the preset Sound Modes. SEA Modes ROCK FLAT POP CLASSIC STADIUM DANCE HALL Surround Modes* SEA (Sound Effect Amplifier) Modes ROCK Boosts low and high frequency. Good for acoustic music (initial setting). POP Good for music with an emphasis on vocal.
DX-J21[J].book Page 15 Tuesday, April 8, 2008 11:32 AM Creating 3-Dimensional Sound Changing the Picture Tone Field—3D Phonic INFO This function is available only for disc/USB mass storage class device playback. While playing a disc/USB mass storage class device... Remote ONLY While viewing a playback picture on the TV, you can select the preset picture tone, or adjust it and store your own preference. To select a preset picture tone 1 While playing, display VFP setting screen.
DX-J21[J].book Page 16 Tuesday, April 8, 2008 11:32 AM To adjust the picture tone Setting the Clock 1 Select “USER1” or “USER2.” 2 Remote ONLY INFO Without setting the built-in clock, you cannot use any timers except the Sleep timer. • To exit from the clock setting, press CLOCK/TIMER as required. • To correct a misentry during the process, press CANCEL while holding SHIFT. You can return to the previous step. • Follow steps 1 and 2 on page 15. Select a parameter you want to adjust.
DX-J21[J].book Page 17 Tuesday, April 8, 2008 11:32 AM Unique Video Disc/File Operations Selecting the Audio Track Remote Control Remote ONLY INFO For DVD Video: While playing back a chapter containing audio languages, you can select the language to listen to. For DVD-VR/SVCD/VCD: While playing back a chapter/ track, you can select the audio channel to play. • You can also select the audio track using the on-screen bar (see page 24). , , , While playing DVD Video... DVD/CD ANGLE, AUDIO/MPX SHIFT Ex.
DX-J21[J].book Page 18 Tuesday, April 8, 2008 11:32 AM Selecting the Subtitle Language Remote ONLY For DVD Video: While playing back a chapter containing subtitles in different languages, you can select the subtitle language to display on the TV screen. For DVD-VR: While playing, you can turn the subtitle on or off. For SVCD: While playing, the SUB TITLE button functions even if no subtitles are recorded on the disc. • You can also select the subtitle language using the on-screen bar (see page 24).
DX-J21[J].book Page 19 Tuesday, April 8, 2008 11:32 AM Special Picture Playback Pause playback While playing... INFO Slow-motion playback • This function is available only for moving picture files except MPEG-1/MPEG-2/ASF. 1 While playing... Playback pauses. To resume normal playback, press DVD/CD 3 or USB MEMORY 3. Still picture appears. 2 Start slow-motion playback. Frame-by-frame playback • This function is not available for ASF file. 1 While playing... * Playback pauses.
DX-J21[J].book Page 20 Tuesday, April 8, 2008 11:32 AM Advanced Playback Operations Programming the Playing Order Remote Control —Program Play Remote ONLY INFO You can arrange the playing order of the chapters/tracks/ files (up to 99) before you start playback. • Program Play cannot be used for files in a USB mass storage class device, Video files/JPEG files on a disc and DVD-VR. Number buttons 1 Before starting playback, activate Program Play.
DX-J21[J].book Page 21 Tuesday, April 8, 2008 11:32 AM To pause: To skip: To stop*: Playing at Random—Random Play Remote ONLY You can play the contents of all the loaded discs at random. • Random Play cannot be used for files in a USB mass storage class device, Video files/JPEG files on a disc, DVD-VR and some DVDs. To release, press DVD/CD 3. 1 Before starting playback, activate Random Play. * Resume does not work for Program Play.
DX-J21[J].book Page 22 Tuesday, April 8, 2008 11:32 AM Playing Repeatedly—Repeat Play Remote ONLY You can repeat playback. • You can also select the repeat mode using the on-screen bar (except when playing back AV files or JPEG files). For onscreen operations, see page 25. • For Video file/JPEG file and DVD-VR, see page 28. • The indicator(s) lights on the display as follows to indicate the current repeat mode. • For Program Play: While playing or before playback...
DX-J21[J].book Page 23 Tuesday, April 8, 2008 11:32 AM On-Screen Operations On-screen Bar Information Remote control You can check the playback information and use some functions through the on-screen bar (except when playing back Audio files or JPEG files). On-screen bars DVD Video 1 Number buttons 2 DVD-VIDEO TIME PG DVD/CD OFF 3 DISC 1 TITLE 2 CHAP 3 TOTAL 1:01:58 CHAP. 1/3 1/3 1/1 PL , , , , ENTER/SET ON SCREEN USB MEMORY 4 DVD-VR 1 DVD-VR TIME REPEAT Dolby D 3/2.
DX-J21[J].book Page 24 Tuesday, April 8, 2008 11:32 AM 1 Disc type/source type 2 Playback information Indication Meanings Operations Using the On-screen Bar Remote ONLY INFO Dolby D/ DTS/ LPCM Audio format 3/2.1 ch/ 2/0.0 ch Channel number Basic operation procedures through the on-screen bar are as follows: Ex.: Selecting a subtitle (French) for DVD Video: While a disc is selected as the source... PROGRAM/ RANDOM Current play mode 1 Display the on-screen bar with the pull-down menu.
DX-J21[J].book Page 25 Tuesday, April 8, 2008 11:32 AM To change the time information 4 Select the repeat mode you want. You can change the time information in the on-screen bar and the display window on the main unit. ALL Repeats all discs or all programmed tracks. 1 Display the on-screen bar with the pull-down menu. A-B Repeats a desired portion (see below). TITLE Repeats the current title. DISC Repeats the disc (except for DVD). CHAPTER Repeats the current chapter. Dolby D 3/2.
DX-J21[J].book Page 26 Tuesday, April 8, 2008 11:32 AM Chapter Search 6 Select the end point (B). A-B Repeat starts. The selected portion plays repeatedly. To cancel A-B Repeat, repeat steps 1 to 3, and select “OFF” in step 4. For DVD Video/DVD-VR only: You can search for the chapter number to play. 1 While playing a disc, display the on-screen bar with the pull-down menu. 2 Select CHAP. . 3 Display the pop-up window.
DX-J21[J].book Page 27 Tuesday, April 8, 2008 11:32 AM Control screen for AV files/JPEG files Operations Using the Control Screen Remote ONLY For DVD-VR, JPEG file and AV files: You can search for and play the desired items through the control screen. Control screen for DVD-VR The control screen is superimposed on the TV screen when you call up Original Program (PG) or Play List (PL) screens.
DX-J21[J].book Page 28 Tuesday, April 8, 2008 11:32 AM To start playback For JPEG files: The selected file (still picture) is displayed until you change it. To repeat slide-show for JPEG files While playing or before starting playback... • When repeating JPEG file on disc: ( DISC/ REPEAT DISC) ( GROUP/ REPEAT GROUP) Canceled Slide-show playback starts. Each file (still picture) is shown on the screen for a few seconds, then changes one after another.
DX-J21[J].book Page 29 Tuesday, April 8, 2008 11:32 AM Recording Operations Recording onto a Tape Main unit Main Unit ONLY INFO You can use type I tapes for recording. • To play a tape, see page 12. 1 Insert a recordable cassette into deck B. Push USB MEMORY TAPE-A Insert Close TAPE-B Deck A DISC 1-5 DUBBING USB/DISC REC START REC START/STOP 2 Check the tape running direction and Reverse Mode settings on the display.
DX-J21[J].book Page 30 Tuesday, April 8, 2008 11:32 AM 4 Start recording. 2 Check the tape running direction and Reverse Mode 3 To stop recording settings on the display. • See step 2 of “Recording onto a Tape” on page 29. Select the source you want to record. When recording from the disc: • Select the disc number you want to start recording from. or Dubbing Tapes Main Unit ONLY When recording from the USB mass storage class device: You can record a tape from deck A to deck B.
DX-J21[J].book Page 31 Tuesday, April 8, 2008 11:32 AM Enjoying Karaoke Remote control Number buttons CANCEL MIC MIX RESERVE VOCAL MASKING Source selecting buttons SHIFT IMPORTANT • Always set MIC LEVEL to “0” when connecting or disconnecting the microphone. • MIC LEVEL adjustment is valid for both microphones connected to the MIC 1 and MIC 2 jacks. • MIC LEVEL and MICVOL mentioned in this Instruction Book carry the same meaning. VOCAL SUPP.
DX-J21[J].book Page 32 Tuesday, April 8, 2008 11:32 AM 2 Connect the microphone(s) (not supplied) to the Adjusting the Sound Track for Karaoke Remote ONLY INFO You can adjust the sound track for Karaoke. For stereo (2-channel) source: By selecting VOCAL MASK, you can reduce the lead vocal—Vocal Masking. For Karaoke disc: By selecting L CHANNEL or R CHANNEL, you can select the audio channel to play. While Mic Mixing is activated... VOCAL MASK L CHANNEL OFF R CHANNEL (Canceled) (while holding...
DX-J21[J].book Page 33 Tuesday, April 8, 2008 11:32 AM You can change five settings for Karaoke. • To escape from Karaoke setting, wait for several seconds after the setting is done. To apply an echo to your voice 1 MICVOL ECHO * FANFARE 2 Remote ONLY To change the scoring level Changing the Karaoke Setting You can change the scoring level of Karaoke Scoring. • This function is available only for disc/USB mass storage class device playback. 1 Select “DVD/CD” or “USB” as the source.
DX-J21[J].book Page 34 Tuesday, April 8, 2008 11:32 AM To change the mic volume 5 Select songs you want for Karaoke Program Play. Remote ONLY Press the number buttons to select a song in the following order. 1 Select a disc. 2 Select a title/group. 3 Select a chapter/track/file. 1 MICVOL ECHO FANFARE * 2 KEYCON * SCORE LVL* • To select a number, see “How to select a number” on page 8. • To cancel the procedure, press RESERVE while holding SHIFT. The PROGRAM indicator disappears.
DX-J21[J].book Page 35 Tuesday, April 8, 2008 11:32 AM Timer Operations 1 Select one of the timer setting modes—ON for Recording Timer or Daily Timer. Remote control Recording Timer Daily Timer REC TIMER ON Canceled Clock setting DAILYTIMER ON (while holding...) AUDIO CLOCK/TIMER SLEEP CANCEL 2 Make the timer setting as you want. , , ENTER/SET Repeat the procedure for the following setting until finished. 1 Set the hour then minute for on-time. 2 Set the hour then minute for off-time.
DX-J21[J].book Page 36 Tuesday, April 8, 2008 11:32 AM 3 Turn off the System (on standby) if you have set the timer with the System turned on. To turn on the timer again, repeat step 1 and press ENTER/SET in step 2. Turning Off the Power Automatically With Sleep Timer, you can fall asleep while listening to music. How Recording Timer works When Recording Timer has been set, the timer indicator ( ) and the REC indicator are lit on the display. Recording Timer works only once.
DX-J21[J].book Page 37 Tuesday, April 8, 2008 11:32 AM Setup Menu Operations Basic Procedure Remote Control You can change the setting of the System. • The setup menu can be used only when “DVD/CD” or “USB” is selected as the source. 1 Press SET UP while playback is stopped. LANGUAGE MENU LANGUAGE ENGLISH AUDIO LANGUAGE ENGLISH SUBTITLE ENGLISH ON SCREEN LANGUAGE ENGLISH , , , , ENTER/SET SET UP 2 3 4 5 Press (or ) to select the menu. Press (or ) to select the item. Press ENTER/SET.
DX-J21[J].book Page 38 Tuesday, April 8, 2008 11:32 AM AUDIO menu Item Contents DIGITAL AUDIO OUTPUT Set this item correctly when using the OPTICAL DIGITAL OUTPUT terminal on the rear. PCM ONLY: When connecting to audio equipment which is compatible with only linear PCM signals. DOLBY DIGITAL/PCM: When connecting to a Dolby Digital decoder or an amplifier with built-in Dolby Digital decoder. STREAM/PCM: When connecting to a DTS/MPEG Audio decoder or an amplifier with built-in DTS/MPEG Audio decoder.
DX-J21[J].book Page 39 Tuesday, April 8, 2008 11:32 AM Operating the TV You can operate JVC’s TV using the remote control supplied for this System. Remote control To turn on or To select the input mode (either TV or VIDEO): off the TV: TV TV/VIDEO (while holding...) To adjust TV volume: TV CH +,– SHIFT (while holding...) TV VOL +,– To select the TV channel: (while holding...
DX-J21[J].book Page 40 Tuesday, April 8, 2008 11:32 AM Additional Information Learning More about This System Connections (see pages 3 to 6) Changing the Color System: • If you play back an NTSC disc/file with the color system set to “PAL,” the disc/file will be reproduced using “PAL 60” format; however, if the TV does not support this format, the screen may not display properly.
DX-J21[J].book Page 41 Tuesday, April 8, 2008 11:32 AM • For JPEG playback... – This System can play back JPEG files with the extension code <.jpg> or <.jpeg> (regardless of the letter case— upper/lower). – It is recommended that you record a file at 640 x 480 resolution. (If a file has been recorded at a resolution of more than 640 x 480, it will take a long time to be shown.) – This System can play only baseline JPEG files*. Progressive JPEG files* or lossless JPEG files* cannot be played.
DX-J21[J].book Page 42 Tuesday, April 8, 2008 11:32 AM On-Screen Operations (see pages 23 to 28) Operations Using the On-screen Bar: • A-B Repeat is possible only within the same title or within the same track. Recording Operations (see pages 29 to 30) General: • You cannot change the source during recording. • There is leader tape which cannot be recorded onto at the start and the end of cassette tapes.
DX-J21[J].book Page 43 Tuesday, April 8, 2008 11:32 AM Timer Operations (see pages 35 to 36) Handling cassette tapes Setting the Timer: • If you do not specify the preset station or track number correctly while setting a timer, the currently selected station or the first track will be played when timer is activated. • When you unplug the AC power cord or if a power failure occurs, the timer will be canceled. You need to set the clock first, then the timer again.
DX-J21[J].book Page 44 Tuesday, April 8, 2008 11:32 AM Troubleshooting If you are having a problem with your System, check this list for a possible solution before calling for service. General: Adjustments or settings are suddenly canceled before you finish. ] There is a time limit. Repeat procedure again. Operations are disabled. ] The built-in microprocessor may malfunction due to external electrical interference. Unplug the AC power cord and then plug it back in.
DX-J21[J].
DX-J21[J].
SPEC.fm Page 47 Tuesday, April 8, 2008 1:31 PM Specifications Amplifier section—CA-DXJ21 Subwoofer (SP-DXJ21W) Output Power: MAIN SPEAKERS: 105 W per channel, min. RMS, driven into 6 Ω at 1 kHz with no more than 10% total harmonic distortion. SUBWOOFER: 105 W, min. RMS, driven into 6 Ω at 63 Hz with no more than 10% total harmonic distortion.
DX-J21[J].book Page 48 Tuesday, April 8, 2008 11:32 AM Parts Index Remote control Button AUDIO TV 7 ¡,1 ¢,4 8 , , , ENTER/SET a s w c r e z , 8 Page 8, 36 39 10, 12, 21, 28, 32 9, 11, 12 11, 21 10, 19, 21 18 6, 9, 11, 14 –16, 18, 21, 24 – 28, 34, 35, 37 MIC MIX MENU/PL ON SCREEN NTSC/PAL PREV.
Do not attempt to service the product yourself
DXJ_Cover[J_C].