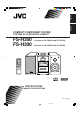
English Français COMPACT COMPONENT SYSTEM SYSTEME DE COMPOSANTS COMPACT FS-H350 FS-H300 –Consists of CA-FSH350 and SP-FSH350 –Consists of CA-FSH300 and SP-FSH300 INSTRUCTIONS MANUEL D’INSTRUCTIONS LVT1193-002A [C] FS-H300[C]cover1.p65 1 04.3.
Warnings, Cautions and Others CAUTION RISK OF ELECTRIC SHOCK DO NOT OPEN CAUTION: TO REDUCE THE RISK OF ELECTRIC SHOCK. DO NOT REMOVE COVER (OR BACK) NO USER SERVICEABLE PARTS INSIDE. REFER SERVICING TO QUALIFIED SERVICE PERSONNEL. The lightning flash with arrowhead symbol, within an equilateral triangle is intended to alert the user to the presence of uninsulated “dangerous voltage” within the product's enclosure that may be of sufficient magnitude to constitute a risk of electric shock to persons.
1 CLASS 1 LASER PRODUCT 2 CAUTION: Do not open the top cover. There are no user serviceable parts inside the Unit; leave all servicing to qualified service personnel. 3 CAUTION: Visible and invisible laser radiation when open and interlock failed or defeated. Avoid direct exposure to beam. 4 REPRODUCTION OF LABEL: CAUTION LABEL, PLACED INSIDE UNIT. For Canada/pour le Canada CAUTION: TO PREVENT ELECTRIC SHOCK, MATCH WIDE BLADE OF PLUG TO WIDE SLOT, FULLY INSERT.
English Introduction We would like to thank you for purchasing one of our JVC products. Before operating this unit, read this manual carefully and thoroughly to obtain the best possible performance from your unit, and retain this manual for future reference. About This Manual This manual is organized as follows: • This manual mainly explains operations using the buttons on the remote control.
English Contents Location of the Buttons and Controls ............................. 3 Main Unit .................................................................................. 3 Remote Control ......................................................................... 5 Getting Started .................................................................. 6 Unpacking ................................................................................. Connecting AM and FM Antennas ...............................
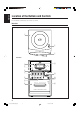
English Location of the Buttons and Controls Become familiar with the buttons and controls on your unit. Main Unit Top view 1 COMPACT DIGITAL AUDIO OPEN 2 D A I L Y T I M E R / S N O O Z E 3 Front view q 4 COMPACT DIGITAL AUDIO 5 STANDBY VOLUME 6 – CD 7 TAPE FM/AM + AUX w #/8 PHONES DOWN 4 UP ¢ 7 AUX REC 8 e r 9 p PUSH OPEN A U T O R E V E R S E t C O M PAC T C O M P O N E N T S Y S T E M 3 01-05_FS-H350&H300[C]2.p65 3 04.3.
English Continued Display window 1 234 5 6 7 8 9 REC SLEEP SNOOZE MONO ST p q MP3 SOUND BASS REC ON OFF DAILY 123 MHz kHz ALL GR. PRGM RANDOM e r w ty u i TOTAL REMAIN A.STANDBY o ; a See pages in parentheses for details.
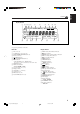
English Remote Control See pages in parentheses for details. w STANDBY/ON DISPLAY FM MODE A.
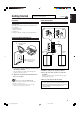
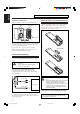
Do not connect the AC power cord until all other connections have been made. English Getting Started Continued Unpacking Connecting Speakers After unpacking, check to be sure that you have all the following items. The number in parentheses indicates the quantity of each piece supplied. • AM loop antenna (1) • Remote control (1) • Batteries (2) If any item is missing, consult your dealer immediately. You can connect the speakers using the speaker cords.
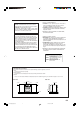
English Do not connect the power cord until all other connections have been made. Putting the Batteries into the Remote Control To remove the speaker grilles The speaker grilles are removable as the illustration below. Projections Holes Insert the batteries—AAA/UM-4/R03—into the remote control by matching the polarity (+ and –) on the batteries with the + and – marking on the battery compartment. When the remote control can no longer operate the unit, replace both batteries at the same time.
English Common Operations Continued Setting the Clock To adjust the clock Before operating the unit any further, first set the unit’s clock. When you plug in the power cord, “AM 12:00” starts flashing on the display. You can set the clock when the unit is either turned on or in standby mode. On the remote control ONLY: CLOCK /TIMER to show the current time indication. The hour indication and AM (or PM) start flashing. CLOCK /TIMER The hour indication and AM (or PM) start flashing.
English Selecting the Source Selecting the Sound Modes To select the source, press CD 6, TAPE 2 3, FM/AM, or AUX. • When you select CD as the source, playback starts automatically. To operate the CD player, see pages 10 to 13. To operate the tape deck, see page 14. To operate the tuner (FM or AM), see pages 15 and 16. To record on a tape, see pages 17 and 18. To use an external equipment, see page 16. You can select one of the 4 sound modes. • This function also affects the sound from headphones.
This unit has been designed to play back the following discs—CD, CD-R, and CD-RW. You can play back the discs containing the tracks in music CD format or MP3 files in ISO 9660 format. • In this instruction, we call a disc recorded MP3 files “MP3 disc,” and “file” is also referred to as “track.” When playing CD-Rs or CD-RWs • Before playing CD-Rs or CD-RWs, read their instructions or cautions carefully.
English To remove the disc, press ) OPEN on the unit, then take out the disc by holding it at the edges while pressing the unit’s pivot lightly. To locate a particular point in a track During play, press and hold ¢ or 4 (or UP ¢ or DOWN 4 on the unit). UP PRESET GROUP • ¢ (UP ¢): • If the disc cannot be read correctly (because it is scratched, for example) or an unreadable CD-R or CD-RW is inserted Playback will not start. • If no disc is inserted “NO DISC” appears on the display.
English Continued 4 Repeat step 3 to program other tracks you want. 5 Press CD 3/8. CD The tracks are played in the order you have programed. Repeating Tracks—Repeat Play You can have all the tracks, the program or individual track currently playing, repeat as many times as you like. 3/8 On the remote control ONLY: Press REPEAT repeatedly before or during playback.
English Playing at Random—Random Play Displaying the Remaining Time during Playback You can play the tracks at random. You can display the remaining time of the current track/disc and the elapsed time of the current track/disc during playing. On the remote control ONLY: RANDOM Press RANDOM. The RANDOM indicator lights up on the display. On the remote control ONLY: Press REMAIN repeatedly. REMAIN When playing back audio CD: RANDOM To exit from Random Play, press 7 or RANDOM.
English Playing Back Tapes Playing Back a Tape You can play back type I tapes only. If no cassette is inserted when you press TAPE ¤ ‹ “NO TAPE” appears on the display. 1 Press PUSH OPEN. To stop playing, press 7. The cassette holder opens. UP PUSH OPEN PRESET GROUP DOWN PRESET GROUP DOWN 4 2 Put a cassette in with the exposed part of the tape down. UP ¢ 7 UP ¢ UP To fast-wind to the left or to the right, press ¢ or 4 (or UP ¢ or DOWN 4 on the unit).
English Listening to FM and AM Broadcasts Tuning in to a Station Presetting Stations You can preset 25 FM and 15 AM stations manually. 1 Press FM/AM to select either “FM” FM/AM or “AM.” The unit automatically turns on and tunes in to the previously received station—either FM or AM. • Each time you press the button, the band alternates between FM and AM. • There is a time limit in doing the following steps. If the setting is canceled before you finish, start again from step 2.
English Tuning in to a Preset Station To tune in to a preset station directly using the number buttons On the remote control ONLY: 1 Press FM/AM to select either “FM” On the remote control ONLY: FM/AM or “AM.” The unit automatically turns on and tunes in to the previously received station—either FM or AM. • Each time you press the button, the band alternates between FM and AM. 2 Press PRESET GROUP or PRESET GROUP repeatedly to select a preset number.
English Recording IMPORTANT: • It may be unlawful to record or play back copyrighted material without the consent of the copyright owner. • The recording level is automatically set correctly, so it is not affected by the other sound settings. Thus, during recording you can adjust the sound you are actually listening to without affecting the recording level. • If recordings you have made have excessive noise or static, the unit may be too close to a TV. Increase the distance between the TV and the unit.
English Recording Discs —Disc Synchronized Recording To stop recording for a moment, press REC. Both the CD playback and tape recording are paused. To resume recording, press TAPE ¤ ‹. REC You can start disc play and recording at the same time. On the unit ONLY: 1 Put a recordable cassette in with the exposed To stop recording, press 7. The recording stops and the CD playback is paused. DOWN 4 UP ¢ 7 part of the tape down. • See also page 14.
English Using the Timers There are four timers available—Daily Timer, Recording Timer, Snooze Timer, and Sleep Timer. • Before using these timers, make sure the built-in clock is set correctly (see page 8). Using Daily Timer and Recording Timer You can set the timer whether the unit is on or off. How the Timer actually works When the on-time comes, the unit automatically turns on (the [timer] indicator flashes and continues flashing while the timer is operating).
English Continued 3 For the Recording Timer ONLY: Set the off-time you want the unit to turn off. REC OFF To deactivate the timer, press and hold DAILY TIMER/SNOOZE. • Each time you press and hold the button, the timer setting changes as follows: DAILY 1 DAILY 2 Canceled (1) Press UP or DOWN to set the hour, then press SET. (2) Press UP or DOWN to set the minute, then press SET. If you want to change the time setting, press CANCEL. • The Recording Timer is activated.
English Using Sleep Timer With Sleep Timer, you can fall asleep to your favorite music or radio program. • You can set Sleep Timer only when the unit is turned on. • You can also turn off the unit automatically by using Auto Standby. (See page 8.) How the Sleep Timer actually works When you set the Sleep Timer after the Daily Timer starts playing the selected source The unit turns off with either timer having an earlier shut-off time.
English Maintenance To get the best performance of the unit, keep your discs, tapes and mechanism clean. General Notes Handling cassette tapes In general, you will have the best performance by keeping your discs, tapes and the mechanism clean. • Store discs and tapes in their cases, and keep them in cabinets or on shelves. • If the tape is loose in its cassette, take up the slack by inserting a pencil in one of the reels and rotating.
English Troubleshooting If you are having a problem with your unit, check this list for a possible solution before calling for service. If you cannot solve the problem from the hints given here, or the unit has been physically damaged, call a qualified person, such as your dealer for service. Symptom Possible Cause Action Power does not come on. The power cord is not connected to an AC outlet. Insert the plug into the socket. No sound is heard. • Connections are incorrect or loose.
Design and specifications are subject to change without notice. Amplifier Section Output Power: 20 W per channel, min. RMS, driven into 4 Ω at 1 kHz with no more than 10% total harmonic distortion. Audio input sensitivity/Impedance (at 1 kHz) AUX: 500 mV/50 kΩ Speakers Impedance: 4 Ω – 16 Ω Tuner FM tuning range: AM tuning range: 87.5 MHz—108.
Français Introduction Nous vous remercions pour avoir acheté un de nos produits JVC. Avant d’utiliser cet appareil, lisez attentivement ce mode d’emploi afin d’obtenir les meilleures performances de l’appareil, et conservez-le à titre d’information. À propos de ce mode d’emploi Ce mode d’emploi est organisé de la façon suivante: • Ce mode d’emploi explique principalement le fonctionnement de l’appareil en utilisant les touches de la télécommande.
Table des matières Emplacement des touches et des réglages ....................... 3 Appareil ..................................................................................... 3 Télécommande .......................................................................... 5 Déballage ................................................................................... Connexion des antennes AM et FM .......................................... Connexion des enceintes ...............................................
Emplacement des touches et des réglages Familiarisez-vous avec les touches et les réglages de votre appareil. Français Appareil Vue de dessus 1 COMPACT DIGITAL AUDIO OPEN 2 D A I L Y T I M E R / S N O O Z E 3 Vue avant q 4 COMPACT DIGITAL AUDIO 5 STANDBY VOLUME 6 – CD 7 TAPE FM/AM + AUX w #/8 PHONES DOWN 4 UP ¢ 7 AUX REC 8 e r 9 p PUSH OPEN A U T O R E V E R S E t C O M PAC T C O M P O N E N T S Y S T E M 3 FR_01-05_FS-H350&H300[C]4.p65 3 04.3.
À suivre Fenêtre d’affichage 7 8 9 REC SLEEP SNOOZE MONO ST p q MP3 SOUND BASS REC ON OFF DAILY 123 MHz kHz ALL GR. PRGM RANDOM e r w Français 1 234 5 6 ty u i TOTAL REMAIN A.STANDBY o ; a Référez-vous aux pages entre parenthèses pour plus de détails.
Télécommande Français Référez-vous aux pages entre parenthèses pour plus de détails. w STANDBY/ON DISPLAY FM MODE A. STANDBY 1 2 3 4 5 6 7 8 1 SLEEP 2 3 4 5 6 7 8 1 2 3 4 5 6 e r CLOCK /TIMER t 7 8 9 SET 9 OVER CANCEL y 0 CD TAPE FM/AM AUX PROGRAM REPEAT REMAIN 3/8 RANDOM UP u i PRESET GROUP 9 VOLUME o DOWN PRESET GROUP SOUND/HBS BEAT CUT REV.
Ne connectez pas le cordon d’alimentation secteur avant que toutes les connexions soient terminées. À suivre Déballage Connexion des enceintes Après le déballage, vérifiez que vous avez bien tous les accessoires suivants. Le nombre entre parenthèses indique le nombre de pièces fournies. • Antenne cadre AM (1) • Télécommande (1) • Piles (2) Si quelque chose manquait, consultez immédiatement votre revendeur. Vous pouvez connecter les enceintes en utilisant les cordons d’enceinte.
Ne connectez pas le cordon d’alimentation secteur avant que toutes les connexions soient terminées. Mise en place des piles dans la télécommande Retrait des grilles des enceintes Les grilles des enceintes peuvent être retirées de la façon montrée sur l’illustration ci-dessous. Projections Français Trous Insérez les piles—AAA/UM-4/R03—dans la télécommande, en faisant correspondre les polarités (+ et –) des piles avec les marques + et – du compartiment à piles.
Fonctionnement commun Réglage de l’horloge Pour ajuster l’horloge 1 Appuyez sur CLOCK/TIMER. CLOCK /TIMER L’indication des heures et AM (ou FM) clignotent. • Si vous maintenez pressée UP ou DOWN, l’indication des heures change de façon continue. Le chiffre les minutes commence à clignoter. pour ajuster les minutes, puis appuyez sur SET. • Si vous maintenez pressée UP ou DOWN, l’indication des minutes change de façon continue. L’horloge intégrée démarre.
Français Sélection de la source Sélection des modes sonores Pour choisir la source, appuyez sur CD 6, TAPE 2 3, FM/AM ou sur AUX. • Quand vous choisissez CD comme source, la lecture démarre automatiquement. Pour utiliser le lecteur de CD, référez-vous aux pages 10 à 13. Pour utiliser la platine cassette, référez-vous à la page 14. Pour utiliser le tuner (FM ou AM), référez-vous aux pages 15 et 16. Pour enregistrer une cassette, référez-vous aux pages 17 et 18.
Lecture de disques À suivre Cet appareil est conçu pour reproduire les disques suivants— CD, CD-R et CD-RW. Vous pouvez reproduire les disques contenant des plages au format CD musical ou des fichiers MP3 au format ISO 9660. • Dans ces instructions, nous appelons un disque enregistré avec des fichiers MP3, un “disque MP3” et les “fichiers” sont aussi appelés “plages”.
Français Pour retirer le disque, appuyez sur ) OPEN sur l’appareil, puis retirez les disque en le tenant par ses arêtes tout en poussant légèrement sur l’axe central. Pour localiser un point particulier sur une plage Pendant la lecture, maintenez pressée ¢ ou 4 (ou UP ¢ ou DOWN 4 sur l’appareil). UP PRESET GROUP • ¢ (UP ¢): • Si le disque ne peut pas être lu correctement (parce qu’il est rayé par exemple) ou si un CD-R ou CD-RW illisible est inséré La lecture ne démarre pas.
À suivre 4 Répétez l’étape 3 pour programmer les Répétition des plages—Lecture répétée 5 Appuyez sur CD 3/8. CD Vous pouvez répéter toutes les plages, le programme ou la plage en cours de lecture autant de fois que vous le souhaitez. Français autres plages souhaitées. 3/8 Les plages sont reproduites dans l’ordre programmé. Sur la télécommande UNIQUEMENT: REPEAT Appuyez répétitivement sur REPEAT avant ou pendant la lecture.
Français Lecture dans un ordre aléatoire—Lecture aléatoire Affichage de la durée restante pendant la lecture Vous pouvez reproduire les plages dans un ordre aléatoire. Vous pouvez afficher la durée restante de la plage ou du disque actuel et la durée écoulée de la plage ou du disque actuel pendant la lecture. Sur la télécommande UNIQUEMENT: Appuyez sur RANDOM. RANDOM L’indicateur RANDOM s’allume sur l’affichage. Sur la télécommande UNIQUEMENT: Appuyez répétitivement sur REMAIN.
Lecture de cassettes Lecture d’une cassette Vous pouvez reproduire uniquement des cassettes de type I. Si aucune cassette ne se trouve dans l’appareil quand vous appuyez sur TAPE ¤ ‹ “NO TAPE” apparaît sur l’affichage. UP Le compartiment à cassette s’ouvre. Pour arrêter la lecture, appuyez sur 7. Français 1 Appuyez sur PUSH OPEN. PRESET GROUP PUSH OPEN DOWN PRESET GROUP DOWN 4 2 Mettez une cassette à l’intérieur, la partie exposée dirigée vers le bas.
Écoute d’émissions FM et AM Accord d’une station Préréglage des stations 1 Appuyez sur FM/AM pour choisir FM/AM Français “FM” ou “AM”. L’appareil se met automatiquement sous tension et accorde la dernière station reçue—FM ou AM. • Chaque fois que vous appuyez sur la touche, la bande alterne entre FM et AM. MHz • Si la dernière station choisie est mémorisée sur un numéro de préréglage, le numéro apparaît à la place de “FM” ou “AM”.
Accord d’une station préréglée Pour accorder une station préréglée directement en utilisant les touches numériques Sur la télécommande UNIQUEMENT: “FM” ou “AM”. L’appareil est mis automatiquement sous tension et accorde la dernière station reçue—FM ou AM. • Chaque fois que vous appuyez sur la touche, la bande alterne entre FM et AM. 2 Appuyez répétitivement sur PRESET GROUP ou PRESET GROUP pour choisir un numéro de préréglage.
Enregistrement Français IMPORTANT: • Notez qu’il peut être illégal d’enregistrer ou de reproduire un matériel protégé par des droits d’auteur sans la permission du propriétaire des droits. • Le niveau d’enregistrement est réglé automatiquement et n’est donc pas affecté par les autres réglages sonores. C’est pourquoi, vous pouvez ajuster le son que vous écoutez pendant un enregistrement sans affecter le niveau d’enregistrement.
Pour arrêter l’enregistrement momentanément, REC appuyez sur REC. La lecture du CD et l’enregistrement sur la casette sont tout les deux mises en mode de pause. Pour reprendre l’enregistrement, appuyez sur TAPE ¤ ‹. Vous pouvez démarrer la lecture d’un disque et l’enregistrement en même temps. Sur l’appareil UNIQUEMENT: 1 Insérez une cassette enregistrable avec la partie exposée de la bande dirigée vers le bas. Pour arrêter l’enregistrement, appuyez sur 7.
Français Utilisation des minuteries Il y a quatre minuteries disponibles—la minuterie quotidienne, la minuterie d’enregistrement, la minuterie à rappel d’alarme et la minuterie d’arrêt. • Avant d’utiliser ces minuteries, assurez-vous que l’horloge intégrée est intégrée correctement (voir page 8). Utilisation de la minuterie quotidienne et d’enregistrement Vous pouvez régler la minuterie que l’appareil soit sous ou hors tension.
À suivre UNIQUEMENT: Réglez l’heure à laquelle vous souhaitez que l’appareil se mette hors tension. REC OFF Pour mettre la minuterie hors service, maintenez pressée DAILY TIMER/SNOOZE. • Chaque fois que vous maintenez pressée la touche, le réglage de la minuterie change comme suit: DAILY 1 Annulé (1) Appuyez sur UP ou DOWN pour régler l’heure, puis appuyez sur SET. (2) Appuyez sur UP ou DOWN pour régler les minutes, puis appuyez sur SET.
Français Utilisation de la minuterie d’arrêt Avec la minuterie d’arrêt, vous pouvez vous endormir au son de votre musique ou émission de radio préférée. • Vous pouvez régler la minuterie d’arrêt uniquement quand l’appareil est sous tension. • Vous pouvez aussi mettre l’appareil automatiquement hors tension en utilisant la mise en attente automatique. (Voir page 8.) Fonctionnement de la minuterie d’arrêt L’appareil se met automatiquement hors tension après une période donnée.
Entretien Pour obtenir les meilleures performances de l’appareil, gardez vos disques, vos cassettes et le mécanisme propres. Vous obtiendrez les meilleures performances en gardant vos disques, vos cassettes et le mécanisme propres. • Rangez vos disques et vos cassettes dans leurs boîtes et conservez-les dans des meubles ou sur des étagères. Manipulation des cassettes • Si la bande est lâche dans la cassette, retirez le mou en insérant un stylo dans l’une des bobines et en tournant.
Guide de dépannage Français Si vous rencontrez des problèmes avec cet appareil, consultez cette liste avant d’appeler un réparateur. Si vous ne pouvez pas résoudre le problème avec les conseils donnés ci-dessous, ou si l’appareil a été endommagé physiquement, appelez une personne qualifiée, telle que votre revendeur, pour faire réparer l’appareil. Symptôme Possible Cause Action Il n’y a pas d’alimentation. Le cordon d’alimentation n’est pas connecté à une prise secteur murale.
Spécifications La conception et les spécifications sont sujettes à changement sans notification. Section de l’amplificateur Français Puissance de sortie: 20 W par canal, min. RMS, entraîné sur 4 Ω à 1 kHz avec moins de 10% de distorsion harmonique totale.
FS-H350/FS-H300 COMPACT COMPONENT SYSTEM VICTOR COMPANY OF JAPAN, LIMITED EN, FR 0304AIMMDWORI © 2004 VICTOR COMPANY OF JAPAN, LIMITED FS-H300[C]cover1.p65 2 04.3.