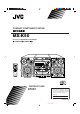
COMPACT COMPONENT SYSTEM MX-K50 Consists of CA-MXK50 and SP-MXK50 CA-MXK50 SP-MXK50 DISC CHANGE 3 2 3 CD CD STANDBY/ON CD CD 1 STANDBY CD-R/RW PLAYBACK SOUND MODE MX-K50 CLOCK /TIMER STANDBY/ON DISPLAY 1 2 4 5 7 8 3 SLEEP ACTIVE BASS EX.
Warnings, Cautions and Others Caution –– switch! Disconnect the mains plug to shut the power off completely. The switch in any position does not disconnect the mains line. The power can be remote controlled. – G-1 – MX-K50[U]safety.pm6 1 02.5.
English CAUTION To reduce the risk of electrical shocks, fire, etc.: 1. Do not remove screws, covers or cabinet. 2. Do not expose this appliance to rain or moisture. CAUTION • Do not block the ventilation openings or holes. (If the ventilation openings or holes are blocked by a newspaper or cloth, etc., the heat may not be able to get out.) • Do not place any naked flame sources, such as lighted candles, on the apparatus.
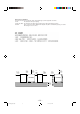
Caution: Proper Ventilation To avoid risk of electric shock and fire, and to prevent damage, locate the apparatus as follows: 1 Front: No obstructions and open spacing. 2 Sides/ Top/ Back: No obstructions should be placed in the areas shown by the dimensions below. 3 Bottom: Place on the level surface. Maintain an adequate air path for ventilation by placing on a stand with a height of 10 cm or more. 1 cm 15 cm 15 cm 15 cm 1 cm 15 cm 15 cm CA-MXG50 CA-MXG50 10 cm – G-3 – MX-K50[U]safety.
IMPORTANT FOR LASER PRODUCTS / REPRODUCTION OF LABELS / 1 CLASSIFICATION LABEL, PLACED ON ON EXTERIOR SURFACE CLASS LASER 1 PRODUCT 2 WARNING LABEL, PLACED INSIDE THE UNIT DANGER: Invisible laser radiation when open and interlock failed or defeated. AVOID DIRECT EXPOSURE TO BEAM. (e) VARNING: Osynlig laserstrålning när denna del är öppnad och spärren är urkopplad. Betrakta ej strålen. (s) ADVARSEL: Usynlig laserstråling ved åbning, når sikkerhedsafbrydere er ude af funktion.
English Introduction We would like to thank you for purchasing one of our JVC products. Before operating this unit, read this manual carefully and thoroughly to obtain the best possible performance from your unit, and retain this manual for future reference. About This Manual Power sources This manual is organized as follows: • When unplugging from the wall outlet, always pull the plug, not the AC power cord. • The manual mainly explains operations using the buttons and controls on the unit.
English Contents Location of the Buttons and Controls ....................... 3 Front Panel ................................................................. 3 Remote Control .......................................................... 5 Getting Started ............................................................ 6 Unpacking .................................................................. 6 Putting the Batteries into the Remote Control ........... 6 Connecting Antennas ....................................
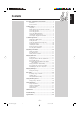
English Location of the Buttons and Controls Become familiar with the buttons and controls on your unit. Front Panel i DISC CHANGE 3 2 CD STANDBY/ON CD 1 CD 1 STANDBY 2 3 CD 3 4 5 6 SOUND MODE MX-K50 7 8 9 p q w CD-R/RW PLAYBACK f CLOCK /TIMER DISPLAY g ACTIVE BASS EXTENTION h AUX PHONES e r FM /AM REPEAT CD TAPE j PROGRAM REC START /STOP RANDOM CD REC START TAPE A TAPE B ACTIVE BASS EX.
Display Window 1 3 2 4 5 6 q 7 8 9 See pages in the parentheses for details.
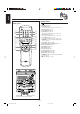
English Remote Control Remote Control STANDBY/ON 1 2 1 2 3 4 5 6 7 8 SLEEP ACTIVE BASS EX. LEVEL q SOUND MODE AUX 3 w 9 FM MODE 4 5 6 7 8 ECHO KARAOKE TAPE FM/AM e r t +10 10 TAPE A/B FADE MUTING y u i o DISC SKIP CD + VOLUME 9 ; p VOLUME – 1 STANDBY/ON button (9) 2 SLEEP button (23) 3 AUX button (10) Pressing this button also turns on the unit. 4 Number buttons (12, 14) 5 KARAOKE button (20) 6 TAPE 3 button (10, 17) Pressing this button also turns on the unit.
Continued Unpacking Connecting Antennas After unpacking, check to be sure that you have all the following items. The number in the parentheses indicates the quantity of the pieces supplied. FM antenna • • • • • FM antenna (supplied) A ENN AM loop antenna (1) FM antenna (1) Remote control (1) Batteries (2) AC plug adaptor (1) ANT AM ] M [75 F If any is missing, consult your dealer immediately.
English Connecting Speakers AM antenna 2, 3 1 1 Vinyl-covered wire (not supplied) ANTENNA FM [ 75 ] 2, 3 AM Red SPEAKER [ 6-16 ] Speaker cord (red/black) Speaker cord (red/black) Black AM loop antenna (supplied) 1 Press and hold the clamp of the AM terminal From right speaker’s terminals on the rear of the unit. From left speaker’s terminals 2 Insert the end of the AM loop antenna cord into the terminal.
English NOW, you can plug in the unit and other connected equipment FINALLY! Connecting Other Equipment You can connect an audio equipment. Canceling the Display Demonstration • DO NOT connect any equipment while the power is on. • DO NOT plug in any equipment until all connections are complete. When connecting the AC power cord into a wall outlet, the unit automatically starts display demonstration.
English Common Operations 3 Press 4 or ¢ to adjust the Turning On or Off the Power To turn on the unit, press STANDBY/ ON so that the STANDBY lamp goes off. minute, then press SET. STANDBY STANDBY/ON SET To turn off the unit (on standby), press STANDBY/ON again so that the STANDBY lamp lights up. STANDBY STANDBY/ON To check the clock time Press DISPLAY while playing any source. • Each time you press the button, the source indication and the clock time alternate on the display.
Setting the AM Tuner Interval Spacing Adjusting the Volume Some countries space AM stations 9 kHz apart, and some countries use 10 kHz spacing. • This function works only when the unit is turned off. • 9 kHz spacing is the initial setting. You can adjust the volume level only while the unit is turned on. Turn the VOLUME control clockwise to increase the volume or counterclockwise to decrease it. • The volume level can be adjusted in 32 steps (VOL MIN, VOL 1 — VOL 30, and VOL MAX).
English Reinforcing the Bass Sound • As you turn the control, the sound modes change as follows: This function only affects the playback sound, not your recording. The ACTIVE BASS EX. (extension) LEVEL control provided for this unit can maintain the richness and fullness of the bass sound while listening to any source at low volume. Turn the ACTIVE BASS EX. LEVEL control clockwise to increase the bass sound or counterclockwise to decrease it. ACTIVE BASS EX. LEVEL D.
English Listening to the Radio On the unit ONLY: Before operating the tuner, make sure you have selected the correct AM Tuner interval spacing (see page 10). 1 Tune in the station you want to preset (in this example, of FM 87.50). Tuning in a Station • See “Tuning in a Station”. 1 Press FM/AM. The unit automatically turns on and tunes in the previously tuned station (either FM or AM). • Each time you press the button, the band alternates between FM and AM. FM /AM 2 Press SET.
English . Playing Back CDs This unit has been designed to playback the following CDs: Audio CD, CD-R, and CD-RW. When playing a CD-R or CD-RW User-edited CD-Rs (CD-Recordable) and CD-RWs (CD-ReWritable) can be played back when they are already “finalized.” • You can play back your original CD-Rs or CD-RWs recorded in music CD format ONLY. (If CD-RWs have been recorded in different format, erase all the data on CD-RWs completely before re-recording on the discs.
3 Press one of the disc number CD 2 1 CD CD buttons (CD1, CD2 or CD3) for the disc you want to start to play from. 3 Basic CD Operations While playing a CD, you can do the following operations. To exchange CDs during playback of another CD play starts from the first track of the selected disc. • Pressing CD 6 instead of the disc number buttons starts playing back if a CD is on the trays. To stop during play, press 7. Press DISC CHANGE to change the CD and the carrousel comes out.
English 5 Program other tracks you want. Programing the Playing Order of the Tracks —–Program Play You can arrange the order in which the tracks play before you start playing. You can program up to 32 tracks. • To use Repeat play (see page 16) for Program play, press REPEAT after starting Program play. On the unit ONLY: • To program tracks from the same disc, repeat step 4. • To program tracks from a different disc, repeat steps 3 and 4. 6 Press CD 6.
English The tracks of the selected CD will play at random. • To use Random play, you have to cancel the Program play. You can have all the CDs, the program or the individual track currently playing repeat as many times as you like. • Repeat play and Random play cannot be used at the same time. 3 Press RANDOM so that “RANDOM” AM CD 2 CD buttons (CD1, CD2, and CD3) for the disc you want to play, then press 7. CD 1 Load a CD.
English Playing Back Tapes To stop during play, press 7. Playing Back a Tape To operate the other deck, press TAPE A or TAPE B (or TAPE A/B on the remote control), then TAPE 3. 1 Press EJECT (0) for the deck you want to To fast-forward the tape, press ¡ (or ¢/¡ on the remote control). The tape running indicator (3) starts flashing quickly. use. To rewind the tape, press 1 (or 4/1 on the remote control). The tape running indicator (2) starts flashing quickly.
English Recording Continued Recording a Tape on Deck B IMPORTANT: • It may be unlawful to record or playback copyrighted material without the consent of the copyright owner. • The recording level is automatically set correctly, so it is not affected by the VOLUME, the ACTIVE BASS EX. LEVEL, and the SOUND MODE controls. Thus, during recording you can adjust the sound you are actually listening to without affecting the recording level.
English Dubbing Tapes CD Synchronized Recording On the unit ONLY: You can easily record a CD onto a tape. • You can also record the tracks in order you have made the program. 1 Press TAPE 3, then 7. On the unit ONLY: 1 Put a recordable cassette into deck B. 2 Place a disc correctly on the recess of the disc TAPE tray, with its label side up. 2 Put the source cassette in deck A, and a 3 Press one of the disc number buttons (CD1, CD2, and CD3) to select the disc, then 7.
English Using the Microphones To apply an echo to your voice You can enjoy singing along (Karaoke) and microphone mixing. Press ECHO on the remote control so that the echo ( ) indicator lights up on the display. Each time you press the button, the echo level changes as follows: IMPORTANT: • Always set the MIC LEVEL to MIN when connecting or disconnecting the microphone. • When you do not use the microphone, keep the microphones unconnected.
English Using the Timers There are three timers available—Daily Timer, Recording Timer, and Sleep Timer. 2 Press CLOCK/TIMER again. CLOCK / TIMER “ON TIME” appears for 2 seconds, then the unit enters on-time setting mode. Before using the timers, you need to set the clock built in the unit. (See “Setting the Clock” on page 9.) Using Daily Timer With Daily Timer, you can wake to your favorite music or radio program. You can set the timer whether the unit is on or off.
English Continued Using Recording Timer 6 Select the preset station number. With Recording Timer, you can make a tape of a radio broadcast automatically. You can set the timer whether the unit is on or off. Press 4 or ¢ to select the preset station number, then press SET. The unit enters volume setting mode.
English 4 Set the on-time you want the unit to Using Sleep Timer turn on. With Sleep Timer, you can fall asleep to music. You can set Sleep Timer when the unit is turned on. 1) Press 4 or ¢ to set the hour, then press SET. 2) Press 4 or ¢ to set the minute, then press SET. “OFF TIME” appears for 2 seconds, then the unit enters off-time setting mode. How Sleep Timer actually works The unit automatically turns off after the specified time length passes.
English Maintenance To get the best performance of the unit, keep your discs, tapes, and mechanism clean. Handling cassette tapes Cleaning the unit • Stains on the unit Should be wiped off with a soft cloth. If the unit is heavily stained, wipe it with a cloth soaked in water-diluted neutral detergent and wrung well, then wipe clean with a dry cloth. • Avoid the following since they may cause damage to the unit. - DO NOT wipe it with a hard cloth. - DO NOT wipe it strong.
English Troubleshooting If you are having a problem with your unit, check this list for a possible solution before calling for service. If you cannot solve the problem from the hints given here, or the unit has been physically damaged, call a qualified person, such as your dealer, for service. Symptom Cause Action Unable to cancel the display demonstration. Other buttons are pressed to cancel the display demonstration. Press CANCEL/DEMO on the unit. (See page 8.) No sound is heard.
English Specifications Amplifier section — CA-MXK50 Output Power: 100 W per channel, min. RMS, driven into 6 Ω at 1 kHz with no more than 10% total harmonic distortion. Audio input sensitivity/Impedance (at 1 kHz) AUX: 400 mV/50 kΩ MIC: 5 mV/5 kΩ Speakers/Impedance: 6 Ω – 16 Ω Tuner FM tuning range: AM tuning range: 87.50 MHz – 108.
Mains (AC) Line Instruction (not applicable for Europe, U.S.A., Canada, Australia, and U.K.
COMPACT COMPONENT SYSTEM SISTEMAS DE COMPONENTES COMPACTOS SISTEMA DE COMPONENTE COMPACTO MX-K50 Consists of CA-MXK50 and SP-MXK50. Consta del CA-MXK50 el SP-MXK50 Consta do CA-MXK50 e SP-MXK50 DISC CHANGE 3 2 3 CD CD STANDBY/ON CD CD 1 STANDBY CD-R/RW PLAYBACK SOUND MODE MX-K50 CLOCK /TIMER STANDBY/ON 1 2 3 SLEEP 4 5 6 7 8 +10 ACTIVE BASS EXTENSION SOUND MODE AUX 10 DISPLAY ACTIVE BASS EX.
Warning, Cautions and Others Avisos, precauciones y otras notas Advertências, precauções e outras notas Caution –– STANDBY/ON button! Disconnect the mains plug to shut the power off completely. The STANDBY/ON switch in any position does not disconnect the mains line. The power can be remote controlled. Precaución –– Interruptor STANDBY/ON! Desconectar el cable de alimentación para desactivar la alimentación totalmente.
English PRECAUCIÓN Para reducir riesgos de choques eléctricos, incendio, etc.: 1. No extraiga los tornillos, los cubiertas ni la caja. 2. No exponga este aparato a la lluvia o a la humedad. PRECAUCIÓN • No obstruya las rendijas o los orificios de ventilación. (Si las rendijas o los orificios de ventilación quedan tapados con un periódico, un trozo de tela, etc., no se podrá disipar el calor). • No ponga sobre el aparato ninguna llama al descubierto, como velas encendidas.
Caution: Proper Ventilation To avoid risk of electric shock and fire, and to prevent damage, locate the apparatus as follows: 1 Front: No obstructions and open spacing. 2 Sides/ Top/ Back: No obstructions should be placed in the areas shown by the dimensions below. 3 Bottom: Place on the level surface. Maintain an adequate air path for ventilation by placing on a stand with a height of 10 cm or more.
IMPORTANT FOR LASER PRODUCTS IMPORTANTE PARA PRODUCTOS LÁSER IMPOTANTE PARA PRODUCTOS LASER REPRODUCTION OF LABELS / REPRODUCCIÓN DE ETIQUETAS / REPRODUÇÃO DE ETIQUETAS 1 CLASSIFICATION LABEL, PLACED ON EXTERIOR SURFACE 2 WARNING LABEL, PLACED INSIDE THE UNIT 1 ETIQUETA DE CLASIFICACION, PROVISTA SOBRE LA SUPERFICIE EXTERIOR 2 ETIQUETA DE ADVERTENCIA, PEGADA EN EL INTERIOR DE LA UNIDAD 1 ETIQUETA DE CLASSIFICAÇÃO LOCALIZADA NA PARTE POSTERIOR DA CAIXA DO APARELHO 2 ETIQUETA DE ADVERTÊNCIA LOCALIZADA NA
English Introduction We would like to thank you for purchasing one of our JVC products. Before operating this unit, read this manual carefully and thoroughly to obtain the best possible performance from your unit, and retain this manual for future reference. About This Manual Power sources This manual is organized as follows: • When unplugging from the wall outlet, always pull the plug, not the AC power cord. • The manual mainly explains operations using the buttons and controls on the unit.
English Contents Location of the Buttons and Controls ....................... 3 Front Panel ................................................................. 3 Remote Control .......................................................... 5 Getting Started ............................................................ 6 Unpacking .................................................................. 6 Putting the Batteries into the Remote Control ........... 6 Connecting Antennas ....................................
English Location of the Buttons and Controls Become familiar with the buttons and controls on your unit. Front Panel i DISC CHANGE 3 2 CD STANDBY/ON CD 1 CD 1 STANDBY 2 3 CD 3 4 5 6 SOUND MODE MX-K50 7 8 9 p q w CD-R/RW PLAYBACK f CLOCK /TIMER DISPLAY g ACTIVE BASS EXTENTION h AUX PHONES e r FM /AM REPEAT CD TAPE j PROGRAM REC START /STOP RANDOM CD REC START TAPE A TAPE B ACTIVE BASS EX.
Display Window 1 3 2 4 5 6 q 7 8 9 See pages in the parentheses for details.
English Remote Control Remote Control STANDBY/ON 1 2 1 2 3 4 5 6 7 8 SLEEP ACTIVE BASS EX. LEVEL q SOUND MODE AUX 3 w 9 FM MODE 4 5 6 7 8 ECHO KARAOKE TAPE FM/AM e r t +10 10 TAPE A/B FADE MUTING y u i o DISC SKIP CD + VOLUME 9 ; p VOLUME – 1 STANDBY/ON button (9) 2 SLEEP button (23) 3 AUX button (10) Pressing this button also turns on the unit. 4 Number buttons (12, 14) 5 KARAOKE button (20) 6 TAPE 3 button (10, 17) Pressing this button also turns on the unit.
Continued Unpacking Connecting Antennas After unpacking, check to be sure that you have all the following items. The number in the parentheses indicates the quantity of the pieces supplied. FM antenna • • • • • FM antenna (supplied) A ENN AM loop antenna (1) FM antenna (1) Remote control (1) Batteries (2) AC plug adaptor (1) ANT AM ] M [75 F If any is missing, consult your dealer immediately.
English Connecting Speakers AM antenna 2, 3 1 1 Vinyl-covered wire (not supplied) ANTENNA FM [ 75 ] 2, 3 AM Red SPEAKER [ 6-16 ] Speaker cord (red/black) Speaker cord (red/black) Black AM loop antenna (supplied) 1 Press and hold the clamp of the AM terminal From right speaker’s terminals on the rear of the unit. From left speaker’s terminals 2 Insert the end of the AM loop antenna cord into the terminal.
English NOW, you can plug in the unit and other connected equipment FINALLY! Connecting Other Equipment You can connect an audio equipment. Canceling the Display Demonstration • DO NOT connect any equipment while the power is on. • DO NOT plug in any equipment until all connections are complete. When connecting the AC power cord into a wall outlet, the unit automatically starts display demonstration.
English Common Operations 3 Press 4 or ¢ to adjust the Turning On or Off the Power To turn on the unit, press STANDBY/ ON so that the STANDBY lamp goes off. minute, then press SET. STANDBY STANDBY/ON SET To turn off the unit (on standby), press STANDBY/ON again so that the STANDBY lamp lights up. STANDBY STANDBY/ON To check the clock time Press DISPLAY while playing any source. • Each time you press the button, the source indication and the clock time alternate on the display.
Setting the AM Tuner Interval Spacing Adjusting the Volume Some countries space AM stations 9 kHz apart, and some countries use 10 kHz spacing. • This function works only when the unit is turned off. • 10 kHz spacing is the initial setting. You can adjust the volume level only while the unit is turned on. Turn the VOLUME control clockwise to increase the volume or counterclockwise to decrease it. • The volume level can be adjusted in 32 steps (VOL MIN, VOL 1 — VOL 30, and VOL MAX).
English Reinforcing the Bass Sound • As you turn the control, the sound modes change as follows: This function only affects the playback sound, not your recording. The ACTIVE BASS EX. (extension) LEVEL control provided for this unit can maintain the richness and fullness of the bass sound while listening to any source at low volume. Turn the ACTIVE BASS EX. LEVEL control clockwise to increase the bass sound or counterclockwise to decrease it. ACTIVE BASS EX. LEVEL D.
English Listening to the Radio On the unit ONLY: Before operating the tuner, make sure you have selected the correct AM Tuner interval spacing (see page 10). 1 Tune in the station you want to preset (in this example, of FM 87.50). Tuning in a Station • See “Tuning in a Station”. 1 Press FM/AM. The unit automatically turns on and tunes in the previously tuned station (either FM or AM). • Each time you press the button, the band alternates between FM and AM. FM /AM 2 Press SET.
English . Playing Back CDs This unit has been designed to playback the following CDs: Audio CD, CD-R, and CD-RW. When playing a CD-R or CD-RW User-edited CD-Rs (CD-Recordable) and CD-RWs (CD-ReWritable) can be played back when they are already “finalized.” • You can play back your original CD-Rs or CD-RWs recorded in music CD format ONLY. (If CD-RWs have been recorded in different format, erase all the data on CD-RWs completely before re-recording on the discs.
3 Press one of the disc number CD 2 1 CD CD buttons (CD1, CD2 or CD3) for the disc you want to start to play from. 3 Basic CD Operations While playing a CD, you can do the following operations. To exchange CDs during playback of another CD play starts from the first track of the selected disc. • Pressing CD 6 instead of the disc number buttons starts playing back if a CD is on the trays. To stop during play, press 7. Press DISC CHANGE to change the CD and the carrousel comes out.
English 5 Program other tracks you want. Programing the Playing Order of the Tracks —–Program Play You can arrange the order in which the tracks play before you start playing. You can program up to 32 tracks. • To use Repeat play (see page 16) for Program play, press REPEAT after starting Program play. On the unit ONLY: • To program tracks from the same disc, repeat step 4. • To program tracks from a different disc, repeat steps 3 and 4. 6 Press CD 6.
English The tracks of the selected CD will play at random. • To use Random play, you have to cancel the Program play. You can have all the CDs, the program or the individual track currently playing repeat as many times as you like. • Repeat play and Random play cannot be used at the same time. 3 Press RANDOM so that “RANDOM” AM CD 2 CD buttons (CD1, CD2, and CD3) for the disc you want to play, then press 7. CD 1 Load a CD.
English Playing Back Tapes To stop during play, press 7. Playing Back a Tape To operate the other deck, press TAPE A or TAPE B (or TAPE A/B on the remote control), then TAPE 3. 1 Press EJECT (0) for the deck you want to To fast-forward the tape, press ¡ (or ¢/¡ on the remote control). The tape running indicator (3) starts flashing quickly. use. To rewind the tape, press 1 (or 4/1 on the remote control). The tape running indicator (2) starts flashing quickly.
English Recording Continued Recording a Tape on Deck B IMPORTANT: • It may be unlawful to record or playback copyrighted material without the consent of the copyright owner. • The recording level is automatically set correctly, so it is not affected by the VOLUME, the ACTIVE BASS EX. LEVEL, and the SOUND MODE controls. Thus, during recording you can adjust the sound you are actually listening to without affecting the recording level.
English Dubbing Tapes CD Synchronized Recording On the unit ONLY: You can easily record a CD onto a tape. • You can also record the tracks in order you have made the program. 1 Press TAPE 3, then 7. On the unit ONLY: 1 Put a recordable cassette into deck B. 2 Place a disc correctly on the recess of the disc TAPE tray, with its label side up. 2 Put the source cassette in deck A, and a 3 Press one of the disc number buttons (CD1, CD2, and CD3) to select the disc, then 7.
English Using the Microphones To apply an echo to your voice You can enjoy singing along (Karaoke) and microphone mixing. Press ECHO on the remote control so that the echo ( ) indicator lights up on the display. Each time you press the button, the echo level changes as follows: IMPORTANT: • Always set the MIC LEVEL to MIN when connecting or disconnecting the microphone. • When you do not use the microphone, keep the microphones unconnected.
English Using the Timers There are three timers available—Daily Timer, Recording Timer, and Sleep Timer. 2 Press CLOCK/TIMER again. CLOCK / TIMER “ON TIME” appears for 2 seconds, then the unit enters on-time setting mode. Before using the timers, you need to set the clock built in the unit. (See “Setting the Clock” on page 9.) Using Daily Timer With Daily Timer, you can wake to your favorite music or radio program. You can set the timer whether the unit is on or off.
English Continued Using Recording Timer 6 Select the preset station number. With Recording Timer, you can make a tape of a radio broadcast automatically. You can set the timer whether the unit is on or off. Press 4 or ¢ to select the preset station number, then press SET. The unit enters volume setting mode.
English 4 Set the on-time you want the unit to Using Sleep Timer turn on. With Sleep Timer, you can fall asleep to music. You can set Sleep Timer when the unit is turned on. 1) Press 4 or ¢ to set the hour, then press SET. 2) Press 4 or ¢ to set the minute, then press SET. “OFF TIME” appears for 2 seconds, then the unit enters off-time setting mode. How Sleep Timer actually works The unit automatically turns off after the specified time length passes.
English Maintenance To get the best performance of the unit, keep your discs, tapes, and mechanism clean. Handling cassette tapes Cleaning the unit • Stains on the unit Should be wiped off with a soft cloth. If the unit is heavily stained, wipe it with a cloth soaked in water-diluted neutral detergent and wrung well, then wipe clean with a dry cloth. • Avoid the following since they may cause damage to the unit. - DO NOT wipe it with a hard cloth. - DO NOT wipe it strong.
English Troubleshooting If you are having a problem with your unit, check this list for a possible solution before calling for service. If you cannot solve the problem from the hints given here, or the unit has been physically damaged, call a qualified person, such as your dealer, for service. Symptom Cause Action Unable to cancel the display demonstration. Other buttons are pressed to cancel the display demonstration. Press CANCEL/DEMO on the unit. (See page 8.) No sound is heard.
English Specifications Amplifier section — CA-MXK50 Output Power: 100 W per channel, min. RMS, driven into 6 Ω at 1 kHz with no more than 10% total harmonic distortion. Audio input sensitivity/Impedance (at 1 kHz) AUX: 400 mV/50 kΩ MIC: 5 mV/5 kΩ Speakers/Impedance: 6 Ω – 16 Ω Tuner FM tuning range: AM tuning range: 87.50 MHz – 108.
Mains (AC) Line Instruction (not applicable for Europe, U.S.A., Canada, Australia, and U.K.) Instrucción sobre la línea de la red (CA) (no aplicable para Europa, EE.UU., Canadá, Australia, ni el Grã-Bretanha) Instrução sobre a tensão da rede eléctrica (CA) (não aplicável para a Europa, os E.U.A.