Español English Cover.fm Page 1 Monday, February 28, 2005 11:17 AM COMPACT COMPONENT SYSTEM SISTEMAS DE COMPONENTES COMPACTOS SISTEMA DE COMPONENTES COMPACTOS Português MX-KC2 Consists of CA-MXKC2 and SP-MXKC2 Consiste de CA-MXKC2, y SP-MXKC2 Consiste em CA-MXKC2, e SP-MXKC2 ¡ATENCION! Antes de operar su equipo, lea cuidadosamente este instructivo.
Warning.fm Page 1 Monday, February 28, 2005 11:18 AM Warnings, Cautions and Others Avisos, precauciones y otras notas Advertências, precauções e outras notas CAUTION To reduce the risk of electrical shocks, fire, etc.: 1. Do not remove screws, covers or cabinet. 2. Do not expose this appliance to rain or moisture. PRECAUCIÓN Para reducir riesgos de choques eléctricos, incendio, etc.: 1. No extraiga los tornillos, los cubiertas ni la caja. 2. No exponga este aparato a la lluvia o a la humedad.
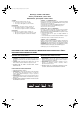
Warning.fm Page 2 Monday, February 28, 2005 11:18 AM Caution: Proper Ventilation To avoid risk of electric shock and fire, and to prevent damage, locate the apparatus as follows: 1 Front: No obstructions and open spacing. 2 Sides/ Top/ Back: No obstructions should be placed in the areas shown by the dimensions below. 3 Bottom: Place on the level surface. Maintain an adequate air path for ventilation by placing on a stand with a height of 10 cm or more.
LVT1346-001A_E.book Page 1 Wednesday, May 4, 2005 11:38 AM English Introduction Thank you for purchasing the JVC Compact Component System. We hope it will be a valued addition to your home, giving you years of enjoyment. Be sure to read this instruction manual carefully before operating your new stereo system. In it you will find all the information you need to set up and use the system. If you have a query that is not answered by the manual, please contact your dealer.
LVT1346-001A_E.book Page 2 Wednesday, May 4, 2005 11:38 AM English Table of Contents Introduction ...................................................................................................................1 Features.................................................................................................................................................... 1 How This Manual Is Organized............................................................................................................
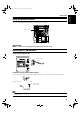
LVT1346-001A_E.book Page 3 Wednesday, May 4, 2005 11:38 AM English Getting Started Accessories Make sure that you have all of the following items, which are supplied with the System. AM Loop Antenna (1) FM Wire Antenna (1) Remote Control (1) Batteries (2) AC Plug Adaptor (1) If any of these items are missing, contact your dealer immediately. Set the VOLTAGE SELECTOR Switch To avoid damaging the System, set the voltage before plugging in the System.
LVT1346-001A_E.book Page 4 Wednesday, May 4, 2005 11:38 AM English Getting Started Using the Remote Control The Remote Control makes it easy to use many of the functions of the System from a distance of up to 7m away. You need to point the Remote Control at the remote sensor on the System’s front panel. Remote sensor CAUTION: • Make all connections before plugging the System into an AC power outlet.
LVT1346-001A_E.book Page 5 Wednesday, May 4, 2005 11:38 AM English Getting Started Connecting the AM Antenna Rear Panel of the Unit AM antenna wire (not supplied) If reception is poor, connect the outside antenna. Turn the loop until you have the best reception. AM loop antenna (Supplied) Attach the AM loop to its base by snapping the tabs on the loop into the slot in the base. • Even when connecting an outside AM antenna, keep the indoor AM loop connected.
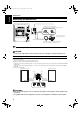
LVT1346-001A_E.book Page 6 Wednesday, May 4, 2005 11:38 AM Connecting External Equipment Connect a signal cord with stereo mini plugs (not supplied) between the System’s AUX IN jack on the front panel and the audio output jack or output terminals of the external portable CD, MD player, STB, etc. You can then listen to the external source through the System. White Signal cord (not supplied) Lch To audio output of external equipment.
LVT1346-001A_E.book Page 7 Wednesday, May 4, 2005 11:38 AM English Basic Operations ) STANDBY/ON Numeric keys ACTIVE BASS EX. SOUND MODE Display (STANDBY/ON) ECO VOLUME STANDBY indicator PHONES FADE MUTING ACTIVE BASS EX. VOLUME +, – SOUND MODE Various information Sound Mode indicator ACTIVE BASS EX. indicator Level bar Status bar (Indicates various statuses.) * When the System is in use, the display shows other items as well.
LVT1346-001A_E.book Page 8 Wednesday, May 4, 2005 11:38 AM For private listening Connect a pair of headphones to the PHONES jack. No sound comes out of the speakers. Be sure to turn down the volume before connecting or putting on headphones. Fade-out Muting (FADE MUTING) Entering the Number with the Remote Control (Numeric Keys) You will use the number keys on the Remote Control to enter numbers for presetting stations, recalling the preset stations, or programming the playing tracks on CDs.
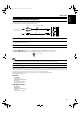
LVT1346-001A_E.book Page 9 Wednesday, May 4, 2005 11:38 AM English Using the Tuner Numeric keys FM/AM FM MODE 4 ¢ 22 Á FM/AM SET/DISPLAY Band display, Frequency display, Preset number FM mode indicators * When the System is in use, the display shows other items as well. For simplicity, we show here only the items described in this section. You can listen to FM and AM stations. Stations can be tuned in manually, automatically, or from preset memory storage.
LVT1346-001A_E.book Page 10 Wednesday, May 4, 2005 11:38 AM 2 Select a station using one of the following methods. • Manual Tuning Briefly press the 22 or Á button to move from frequency to frequency until you find the station you want. OR • Auto Tuning If you hold down the 22 or Á button for 1 second or more and then release it, the frequency changes down, or up, automatically until a station is found.
LVT1346-001A_E.book Page 11 Wednesday, May 4, 2005 11:38 AM English Using the CD Player Numeric keys CD Open/ Close 0 DISC SKIP CD1-CD3 MP3 7 4/1 ¢/Á CD1-CD3 CD 6 ¢ 4 Á 22 CD 6 CANCEL/DEMO SET/DISPLAY 7 REPEAT PROGRAM /RANDOM Track number, Playing time, Program number, etc. Program indicator Disc indicators Repeat indicator Random indicator MP3 indicator * When the System is in use, the display shows other items as well.
LVT1346-001A_E.book Page 12 Wednesday, May 4, 2005 11:38 AM About Disc Indicator: English Using the CD Player To Unload CDs Selected Disc indicator Disc Number indicator Take out the CD as shown below. 1 While the CD Player is stopped, press the CD Open/Close 0 button on the Unit to open the tray. 2 Remove the CD, then press the DISC SKIP button on the Unit. Disc Rotation indicator The Disc indicator consists of the following three kinds of indicators: Disc Number indicator: Lights all the time.
LVT1346-001A_E.book Page 13 Wednesday, May 4, 2005 11:38 AM English Using the CD Player Basics of Using the CD PlayerNormal Play For MP3 disc Total track number To Play CDs 1 2 Load CDs. Press CD 6 button to play. The currently selected disc number (e.g. “CD DISC 1”) appears on the display. The first track of the selected CD begins playing. When the first CD finishes playing, the next and the third CDs are continuously played back.
LVT1346-001A_E.book Page 14 Wednesday, May 4, 2005 11:38 AM Programming the Playing Order of the Tracks You can program the playing order of the tracks on all the CDs. Note that you can only make a program when the CD Player is stopped. ❏ You can program up to 32 tracks in any desired order including the same tracks. For MP3 discs • If you try to select a MP3 disc that has once been read or played, “MP3 DISC” appears on the display and it can not be programmed.
LVT1346-001A_E.book Page 15 Wednesday, May 4, 2005 11:38 AM English Using the CD Player Random Play Tray Lock Function The tracks of the selected CD will play in no special order when you use this mode. In order to safely keep the CD in the CD Player, the tray can be electronically locked. 1 In Stop mode, set the CD Player in Random Play mode. On the Remote Control ONLY Press the PROGRAM/RANDOM button until the “RANDOM” indicator lights up.
LVT1346-001A_E.book Page 16 Wednesday, May 4, 2005 11:38 AM English Using the Cassette Deck (Listening to a Tape) Á 22 TAPE A 3 4/1 7 TAPE B 3 ¢/Á 7 0 PUSH OPEN (Deck A) 0 PUSH OPEN (Deck B) TAPE B 3 TAPE A 3 3: Tape indicator Deck indicators * When the System is in use, the display shows other items as well. For simplicity, we show here only the items described in this section. The Cassette Deck allows you to play, record, and dub audio tapes.
LVT1346-001A_E.book Page 17 Wednesday, May 4, 2005 11:38 AM English Using the Cassette Deck (Recording) TAPE A 3 7 TAPE B 3 7 PROGRAM /RANDOM REC START/STOP 0 PUSH OPEN (Deck A) CD REC START TAPE B 3 TAPE A 3 0 PUSH OPEN (Deck B) DUBBING Deck indicators REC indicator 3: Tape indicator * When the System is in use, the display shows other items as well. For simplicity, we show here only the items described in this section. Recording onto a cassette from any of the sound sources is simple.
LVT1346-001A_E.book Page 18 Wednesday, May 4, 2005 11:38 AM Standard Recording This is the basic method for recording any source. The System also has special ways for recording CD to tape, and tape to tape, which save you time and effort, as well as give you some special effects.
LVT1346-001A_E.book Page 19 Wednesday, May 4, 2005 11:38 AM English Using an External Equipment AUX AUX IN AUX Listening to the External Equipment You can listen to the external equipment such as MD recorder, cassette deck, or other auxiliary. ❏ First, make sure that the external equipment is properly connected to the System. (See page 6.) 1 Set the volume level to the minimum position. 2 Press the AUX button. “AUX IN” appears on the display. 3 4 Start playing the external equipment.
LVT1346-001A_E.book Page 20 Wednesday, May 4, 2005 11:38 AM English Using the Timers SLEEP 4 ¢ SET/DISPLAY CLOCK TIMER SLEEP indicator Timer indicator DAILY Timer indicator REC (Recording) Timer indicator * When the System is in use, the display shows other items as well. For simplicity, we show here only the items described in this section. Three types of timers are available: DAILY Timer Use this timer to set wake up everyday to music from any source, instead of an alarm clock.
Body.fm Page 21 Monday, May 16, 2005 1:21 PM English Using the Timers 2. Press the ¢ or 4 button to set the minute, then press the SET/DISPLAY button. Setting the Daily Timer Once you have set the Daily Timer, the timer will be activated at the same time every day. The Timer indicator ( ) and “DAILY” indicator on the display shows that the Daily Timer you have set is in effect. You can set the Daily Timer whether the System is turned on or off.
LVT1346-001A_E.book Page 22 Wednesday, May 4, 2005 11:38 AM Preparation for each music source: Perform the following operation according to the music source you have selected. Then, the System enters Volume Setting mode. When selecting TUNER FM or TUNER AM: Press the ¢ or 4 button to select the preset station number, then press the SET/DISPLAY button. When selecting CD : Press the ¢ or 4 button to select the disc number, then press the SET/DISPLAY button.
Body.fm Page 23 Monday, May 16, 2005 1:22 PM English Using the Timers Using the Unit You can set the time in the same way as for setting the Daily Timer. 8 Press the STANDBY/ON button to turn off the System, if necessary. 1 Insert a blank or erasable tape into the Deck B and wind past the tape leader. The Timer indicator ( ) and “REC” indicator are lit on the display, showing that the REC Timer is set to on.
LVT1346-001A_E.book Page 24 Wednesday, May 4, 2005 11:38 AM Setting the SLEEP Timer Timer Priority Use the Sleep Timer to turn the System off after a certain number of minutes when it is playing. By setting the Sleep Timer, you can fall asleep to music and know that your System will turn off by itself rather than play all night. • You can only set the Sleep Timer when the System is on. Since REC Timer and DAILY Timer can be set independently, you may wonder what happens if the settings overlap.
LVT1346-001A_E.book Page 25 Wednesday, May 4, 2005 11:38 AM English Care And Maintenance Handle your CDs and tapes carefully, and they will last a long time. Cassette Tapes • If the tape is loose in its cassette, take up the slack by inserting a pencil in one of the reels and rotating. • If the tape is loose, it may get stretched, cut, or caught in the cassette. Compact Discs • Remove the CD from its case by holding it at the edges while pressing the case’s center hole lightly.
Body.fm Page 26 Friday, May 13, 2005 2:48 PM • If you are having a problem with your System, check this list for a possible solution before calling for service. • If you cannot solve the problem from the hints given here, or the System has been physically damaged, call a qualified person, such as your dealer, for service. Symptom Possible Cause Action No sound is heard. • Connections are incorrect, or loose. • Headphones are connected. • Check all connections and make corrections. (See pages 4 to 6.
Back cover.fm Page 1 Wednesday, April 27, 2005 9:03 AM MX-KC2 Mains (AC) Line Instruction (not applicable for Europe, U.S.A., Canada, Australia, and U.K.) Instrucción sobre la línea de la red (CA) (no aplicable para Europa, EE.UU., Canadá, Australia, ni el Grã-Bretanha) Instrução sobre a tensão da rede eléctrica (CA) (não aplicável para a Europa, os E.U.A.