English 中 MICRO COMPONENT SYSTEM 文 UX-G45 —Consists of CA-UXG45 and SP-UXG45 — CA-UXG45 SP-UXG45 INSTRUCTIONS LVT1520-005B [US/UB]
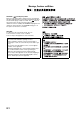
Warnings, Cautions and Others CAUTION— (standby/on) button! Disconnect the mains plug to shut the power off completely (all lamps and indications go off). When installing the product, ensure that the plug is easily accessible. The button in any position does not disconnect the mains line. • When the unit is on standby, the STANDBY lamp lights in red. • When the unit is turned on, the STANDBY lamp goes off. The power can be remote controlled. CAUTION To reduce the risk of electrical shocks, fire, etc.: 1.
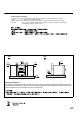
Caution: Proper Ventilation To avoid risk of electric shock and fire, and to prevent damage, locate the apparatus as follows: 1. Front: No obstructions and open spacing. 2. Sides/ Top/ Back: No obstructions should be placed in the areas shown by the dimensions below. 3. Bottom: Place on the level surface. Maintain an adequate air path for ventilation by placing on a stand with a height of 10 cm or more.
IMPORTANT FOR LASER PRODUCTS 1. CLASS 1 LASER PRODUCT 2. CAUTION: Do not open the top cover. There are no user serviceable parts inside the Unit; leave all servicing to qualified service personnel. 3. CAUTION: VISIBLE AND / OR INVISIBLE CLASS 1M LASER RADIATION WHEN OPEN. DO NOT STARE INTO BEAM OR VIEW DIRECTLY WITH OPTICAL INSTRUMENTS. 4. REPRODUCTION OF LABEL: CAUTION LABEL, PLACED INSIDE UNIT.
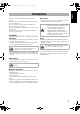
UX-G45[US].BOOK Page 1 Thursday, June 15, 2006 4:16 PM English English Contents Introduction .................................................... 2 Precautions...................................................................... 2 How to Read This Manual.............................................. 3 Getting Started ............................................... 4 Step 1: Unpack................................................................ 4 Step 2: Prepare the Remote Control ....................
UX-G45[US].BOOK Page 2 Thursday, June 15, 2006 4:16 PM Thank you for purchasing the JVC Micro Component System. We hope it will be a valued addition to your home, giving you years of enjoyment. Be sure to read this instruction manual carefully before operating your new stereo system. In it you will find all the information you need to set up and use the system. If you have a query that is not answered by the manual, please contact your dealer.
English UX-G45[US].BOOK Page 3 Thursday, June 15, 2006 4:16 PM How to Read This Manual To make this manual as simple and easy-to-understand as possible, we have adapted the following methods: • Button and control operations are explained as listed in the table below. In this manual, the operations using the remote control is mainly explained; however, you can use the buttons and controls on the main unit if they have the same (or similar) name and marks.
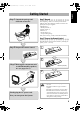
UX-G45[US].BOOK Page 4 Thursday, June 15, 2006 4:16 PM Step 1:Unpack the package and check the accessories. English Getting Started Step 1: Unpack After unpacking, check to be sure that you have all the following items. The number in parentheses indicates the quantity of each piece supplied. • FM antenna (1) • AM loop antenna (1) • Remote control (1) • Batteries (2) • AC plug adapter (1) (except for Hong Kong) If any item is missing, consult your dealer immediately.
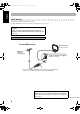
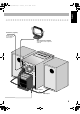
English UX-G45[US].BOOK Page 5 Thursday, June 15, 2006 4:16 PM Step 3: Hook Up If you need more detailed information, see page 7. For more detailed information on connecting external equipment, see page 13. Illustrations of the input/output terminals below are typical examples. When you connect other components, refer also to their manuals since the terminal names actually printed on the rear may vary. Turn the power off to all components before connections.
Page 6 Thursday, June 15, 2006 4:16 PM English UX-G45[US].BOOK FM antenna (supplied) Extend it so that you can obtain the best reception. AM loop antenna (supplied) Turn it until the best reception is obtained.
English UX-G45[US].BOOK Page 7 Thursday, June 15, 2006 4:16 PM To assemble and connect the AM loop antenna To connect the speaker cords To assemble the AM loop antenna Make sure the both speakers are connected correctly and firmly. 3 Release 1 Hold To connect the AM loop antenna Make sure to connect the wire correctly: The white end to AM EXT, the black end to GND.
UX-G45[US].BOOK Page 8 Thursday, June 15, 2006 4:16 PM English Before Operating the System The indications on the display teach you a lot of things while you are operating the System. Before operating the System, be familiar with when and how the indicator illuminates on the display.
UX-G45[US].BOOK Page 9 Thursday, June 15, 2006 4:16 PM English Daily Operations—Playback 1 Turn on the power. 1 Numeric buttons SET/ RESUME DISPLAY MP3 MODE PRESET UP, PRESET DOWN 4/1, 7,Á/¢ 2 QP LINK FM MODE DIMMER 3 The STANDBY lamp on the main unit turns off. • Without pressing STANDBY/ON , the System turns on by pressing one of the source selecting buttons in the next step. 2 Select the source. Playback automatically starts if the selected source is ready to start.
Page 10 Thursday, June 15, 2006 4:16 PM English UX-G45[US].BOOK Listening to the Radio To select the AM tuner interval spacing Remote ONLY If the received FM station is hard to listen Some countries space AM stations 9 kHz spacing, and other countries use 10 kHz spacing. FM MODE Remote ONLY MONO STEREO You can change the AM tuner intervals while the System is on stand by. 1 2 sec. 2 • Current interval setting appears on the display.
English UX-G45[US].BOOK Page 11 Thursday, June 15, 2006 To tune in to a preset station 4:16 PM Remote ONLY To start: To pause: To stop: 1 Select a band (FM or AM). FM AM To release, press again. 2 Select a preset number for the station you store. 1 2 3 4 5 6 7 8 9 0 10 To select a track/group* • You can also use the PRESET UP or PRESET DOWN. Increases the track/group* numbers. Decreases the track/group* numbers.
Page 12 Thursday, June 15, 2006 4:16 PM English UX-G45[US].BOOK IMPORTANT • Always set volume to “VOL MIN” when connecting or disconnecting the other equipment. • Connect the USB Memory or DAP directly to the front panel of the unit. Connecting via a USB hub may result in malfunction. • USB Memory and DAPs compatible with the USB mass storage class specifications are connectable. • Some DAPs are not compatible with the unit. • Coded or encrypted tracks in a special method cannot be played on the unit.
English UX-G45[US].BOOK Page 13 Thursday, June 15, 2006 4:16 PM To adjust the sound input level from other equipment Playing Back a Tape To insert a tape You can adjust the sound input level from the connected equipment, if the incoming signal is too small or too large. You can play back type I tapes. Push Insert Close 1 Select AUX for the source. 2 Adjust the input level. 2 sec. SET/RESUME With the tape side facing front To start: To stop: To rewind tape: Wind forward the tape.
Page 14 Thursday, June 15, 2006 Quick Portable Link (QP Link) 4:16 PM English UX-G45[US].BOOK Remote ONLY If you connect other equipment such as a digital audio player to the AUX terminal and play it back, the source automatically changes to AUX. QP LINK QP Link Canceled (No indication) The QP Link indicator is lit while QP Link is activated. When QP Link is activated... • If an audio input is received at AUX when the System is turned on, the source automatically switches to AUX.
UX-G45[US].BOOK Page 15 Thursday, June 15, 2006 4:16 PM English Daily Operations—Sound & Other Adjustments Adjusting the Volume Remote control You can adjust the volume level from level 0 (VOL-MIN) to level 31 (VOL-MAX). Remote control: Main unit: VOLUME SET/RESUME CANCEL CLOCK/ TIMER VOLUME DISPLAY PRESET UP, PRESET DOWN To drop the volume in a moment Remote ONLY To restore the volume, press again, or adjust the volume level. FADE MUTING DIMMER A.
Page 16 Thursday, June 15, 2006 4:16 PM Changing the Display Brightness—DIMMER English UX-G45[US].BOOK 3 Adjust the minute. PRESET UP SET/RESUME Remote ONLY You can dim the display window. DIMMER PRESET DOWN DIM ON DIM OFF (Canceled) “CLOCK OK” appears and the built-in clock starts working. To check the current time during play Setting the Clock Remote ONLY Without setting the built-in clock, you cannot use the Daily Timer and Recording Timer (see page 23).
English UX-G45[US].BOOK Page 17 Thursday, June 15, 2006 4:16 PM Turning Off the Power Automatically Remote ONLY To turn off the System after playback is over— Auto Standby This function works only when the source is CD or tape. A.STANDBY A.STBY Canceled (No indication) When Auto Standby is in use, the A.STBY indicator lights on the display. When the disc and tape playback stops, the A.STBY indicator starts flashing.
UX-G45[US].BOOK Page 18 Thursday, June 15, 2006 4:16 PM English Advanced Disc/USB Memory/DAP Operations Programming the Playing Order— Remote control Remote ONLY Program Play You can arrange the playing order of the tracks (up to 32) before you start playback. • Program play can be used only in MP3 TRACK mode. • You can repeat all the programmed tracks by pressing REPEAT. Numeric buttons 1 Before starting playback, press PROGRAM.
English UX-G45[US].BOOK Page 19 Thursday, June 15, 2006 4:16 PM To check the programmed contents While the PRGM indicator is shown on the display and before playback... In the programmed order. In the reverse order. Playing at Random—Random Play Remote ONLY You can play back all the tracks on the selected disc, USB Memory or DAP at random. • You can repeat All tracks (PALL) by pressing REPEAT. Press RANDOM.
Page 20 Thursday, June 15, 2006 Playing Repeatedly—Repeat Play 4:16 PM Remote ONLY You can repeat playback. Main Unit ONLY You can lock the disc trays so that no one can eject the loaded discs. • This is possible while the System is on standby. For CD/MP3(TRACK mode): REPEAT Prohibiting Disc Ejection—Child Lock 1 ALL While the disc trays are closed...
UX-G45[US].BOOK Page 21 Thursday, June 15, 2006 4:16 PM English Advanced Tape Operations IMPORTANT It may be unlawful to record or play back copyrighted material without the consent of the copyright owner. Remote control Recording on a Tape You can use type I tapes for recording. • To play a tape, see page 13. 1 Insert a recordable cassette.
Page 22 Thursday, June 15, 2006 4:16 PM Synchronized Disc Recording You can start and stop both disc, USB memory and DAP playback and tape recording at the same time. To record the entire disc Set “RESUME” on (see page 12). 1 2 If the beat is heard while recoding an AM broadcast FM MODE English UX-G45[US].BOOK Remote ONLY BEAT 1 BEAT 2 • Select “BEAT 1” or “BEAT 2” to reduce the beat. Load a disc and insert a recordable cassette.
UX-G45[US].BOOK Page 23 Thursday, June 15, 2006 4:16 PM English Timer Operations Setting the Timer Remote control STANDBY/ON SET/RESUME CLOCK/ TIMER CANCEL PRESET UP, PRESET DOWN Remote ONLY Using Daily Timer, you can wake up with music, etc. On the other hand, with Recording Timer, you can make a tape of a radio broadcast automatically. • You can store three Daily Timer settings and one Recording Timer setting; however, you can activate only one of the four settings above at the same time.
1 Page 24 Thursday, June 15, 2006 4:16 PM Select one of the timer setting modes you want to set— Daily 1 Timer, Daily 2 Timer, Daily 3 Timer, or Recording Timer. CLOCK /TIMER Daily 1 Timer Canceled Daily 2 Timer Clock setting English UX-G45[US].BOOK For Recording Timer: 1 Set the hour then the minute for on-time. PRESET UP SET/RESUME Daily 3 Timer Recording Timer PRESET DOWN (see page 16) 2 Set the hour then minute for off-time in the same manner. 3 Select “TUNER FM” or “TUNER AM.
English UX-G45[US].BOOK Page 25 Thursday, June 15, 2006 4:16 PM To turn off the Timer after its setting is done Since Daily Timer is activated at the same time everyday, you may need to cancel it on some particular days. 1 Select the Timer you want to cancel. CLOCK /TIMER Daily 1 Timer Canceled Daily 2 Timer Clock setting Daily 3 Timer Recording Timer (see page 16) 2 Turn off the selected Timer. CANCEL The indicator corresponding to the Timer is turned off.
Page 26 Thursday, June 15, 2006 4:16 PM Additional Information Learning More about This System Daily Operations—Playback (see pages 9 to 14) Listening to the Radio: • If you store a new station into an occupied preset number, the previously stored station in that number will be erased. • When you unplug the AC power cord or if a power failure occurs, the preset stations will be erased in a few days. If this happens, preset the stations again.
English UX-G45[US].BOOK Page 27 Thursday, June 15, 2006 4:16 PM ] The batteries are exhausted. Timer Operations (see pages 23 to 25) • When you unplug the AC power cord or if a power failure occurs, the timer will be canceled. You need to set the clock first, then the timer again. • Without Stopping the recording, you cannot change the source after Recording Timer starts recording. • You cannot use the SLEEP timer while activating the Recording timer.
Page 28 Thursday, June 15, 2006 4:16 PM Maintenance Specifications To get the best performance of the System, keep your discs, and mechanism clean. Amplifier section Output Power: Handling discs • When removing the disc from its case, hold it at the edge while pressing the center hole lightly. • Do not touch the shiny surface of the disc, or bend the disc. • Put the disc back in its case after use to prevent warping. • Be careful not to scratch the surface of the disc.
Page 29 Thursday, June 15, 2006 4:16 PM Parts Index Refer to the pages to see how to use the buttons and controls. Remote control 9, 24 10, 12, 13, 16, 24 STANDBY/ON 19, 23, 25 10, 11, 18 1 2 3 4 5 6 SET/RESUME 16 CANCEL 7 8 0 10 9 16, 23, 25 DISPLAY 12 MP3 MODE CLOCK /TIMER IIV English UX-G45[US].
Page 30 Thursday, June 15, 2006 4:16 PM English UX-G45[US].
Mains (AC) Line Instruction (not applicable for Europe, U.S.A., Canada, Australia, and U.K.) UX-G45 PU MICRO COMPONENT SYSTEM SH OP EN ANTE AM LOOP NNA AM EXT GND CAUTION for mains (AC) line BEFORE PLUGGING IN, do check that your mains (AC) line voltage corresponds with the position of the voltage selector switch provided on the outside of this equipment and, if different, reset the voltage selector switch, to prevent from a damage or risk of fire/electric shock.
English English UX-G45(UW)_Cover.fm Page 1 Wednesday, June 7, 2006 7:52 PM SISTEMAS DE MICROCOMPONENTES SISTEMA DE MICRO COMPONENTES UX-G45 —Consists of CA-UXG45 and SP-UXG45 —Consta de CA-UXG45 y SP-UXG45 —Consiste em CA-UXG45 e SP-UXG45 Português Español MICRO COMPONENT SYSTEM ¡ATENCION! Antes de operar su equipo, lea cuidadosamente este instructivo.
UX-G45_Safty[UW].fm Page 1 Sunday, June 4, 2006 6:47 PM Warnings, Cautions and Others Avisos, precauciones y otras notas Advertências, precauções e outras notas CAUTION— (standby/on) button! Disconnect the mains plug to shut the power off completely (all lamps and indications go off). When installing the product ensure that the plug is easily accessible. The button in any position does not disconnect the mains line. • When the unit is on standby, the STANDBY/ON lamp lights in red.
UX-G45_Safty[UW].fm Page 2 Sunday, June 4, 2006 6:47 PM CAUTION: Proper Ventilation To avoid risk of electric shock and fire, and to prevent damage, locate the apparatus as follows: 1. Front: No obstructions and open spacing. 2. Sides/ Top/ Back: No obstructions should be placed in the areas shown by the dimensions below. 3. Bottom: Place on a level surface. Maintain an adequate air path for ventilation by placing on a stand with a height of 10 cm or more.
UX-G45_Safty[UW].fm Page 3 Sunday, June 4, 2006 6:47 PM IMPORTANT FOR LASER PRODUCTS 1. CLASS 1 LASER PRODUCT 2. CAUTION: Do not open the top cover. There are no user serviceable parts inside the unit; leave all servicing to qualified service personnel. 3. CAUTION: Visible and invisible laser radiation when open and interlock failed or defeated. Avoid direct exposure to beam. 4. REPRODUCTION OF LABEL: CAUTION LABEL, PLACED INSIDE UNIT. IMPORTANTE PARA PRODUCTOS LÁSER 1. PRODUCTO LÁSER CLASE 1 2.
UX-G45[UW].BOOK Page 1 Tuesday, May 30, 2006 2:07 AM English English Contents Introduction .................................................... 2 Precautions...................................................................... 2 How to Read This Manual.............................................. 3 Getting Started ............................................... 4 Step 1: Unpack................................................................ 4 Step 2: Prepare the Remote Control .........................
UX-G45[UW].BOOK Page 2 Tuesday, May 30, 2006 2:07 AM Thank you for purchasing the JVC Micro Component System. We hope it will be a valued addition to your home, giving you years of enjoyment. Be sure to read this instruction manual carefully before operating your new stereo system. In it you will find all the information you need to set up and use the system. If you have a query that is not answered by the manual, please contact your dealer.
English UX-G45[UW].BOOK Page 3 Tuesday, May 30, 2006 2:07 AM How to Read This Manual To make this manual as simple and easy-to-understand as possible, we have adapted the following methods: • Button and control operations are explained as listed in the table below. In this manual, the operations using the remote control is mainly explained; however, you can use the buttons and controls on the main unit if they have the same (or similar) name and marks.
UX-G45[UW].BOOK Page 4 Tuesday, May 30, 2006 2:07 AM Step 1:Unpack the package and check the accessories. English Getting Started Step 1: Unpack After unpacking, check to be sure that you have all the following items. The number in parentheses indicates the quantity of each piece supplied. • FM antenna (1) • AM loop antenna (1) • Remote control (1) • Batteries (2) • AC plug adapter (1) If any item is missing, consult your dealer immediately.
English UX-G45[UW].BOOK Page 5 Tuesday, May 30, 2006 2:07 AM Step 3: Hook Up If you need more detailed information, see page 7. For more detailed information on connecting external equipment, see page 13. Illustrations of the input/output terminals below are typical examples. When you connect other components, refer also to their manuals since the terminal names actually printed on the rear may vary. Turn the power off to all components before connections.
English UX-G45[UW].BOOK Page 6 Tuesday, May 30, 2006 2:07 AM FM antenna (supplied) Extend it so that you can obtain the best reception. AM loop antenna (supplied) Turn it until the best reception is obtained.
English UX-G45[UW].BOOK Page 7 Tuesday, May 30, 2006 2:07 AM To assemble and connect the AM loop antenna To connect the speaker cords To assemble the AM loop antenna Make sure the both speakers are connected correctly and firmly. 3 Release 1 Hold To connect the AM loop antenna Make sure to connect the wire correctly: The white end to AM EXT, the black end to GND.
UX-G45[UW].BOOK Page 8 Tuesday, May 30, 2006 2:07 AM English Before Operating the System The indications on the display teach you a lot of things while you are operating the System. Before operating the System, be familiar with when and how the indicator illuminates on the display.
UX-G45[UW].BOOK Page 9 Tuesday, May 30, 2006 2:07 AM English Daily Operations—Playback 1 Turn on the power. 1 Numeric buttons SET/ RESUME DISPLAY MP3 MODE PRESET UP, PRESET DOWN 4/1, 7,¡/¢ 2 QP LINK FM MODE DIMMER 3 The STANDBY lamp on the main unit turns off. • Without pressing STANDBY/ON , the System turns on by pressing one of the source selecting buttons in the next step. 2 Select the source. Playback automatically starts if the selected source is ready to start.
English UX-G45[UW].BOOK Page 10 Tuesday, May 30, 2006 2:07 AM Listening to the Radio To select the AM tuner interval spacing Remote ONLY If the received FM station is hard to listen Some countries space AM stations 9 kHz spacing, and other countries use 10 kHz spacing. FM MODE Remote ONLY MONO STEREO You can change the AM tuner intervals while the System is on stand by. 1 2 sec. 2 • Current interval setting appears on the display.
English UX-G45[UW].BOOK Page 11 Tuesday, May 30, 2006 2:07 AM To tune in to a preset station Remote ONLY To start: To pause: To stop: 1 Select a band (FM or AM). FM AM To release, press again. 2 Select a preset number for the station you store. 1 2 3 4 5 6 7 8 9 0 10 To select a track/group* • You can also use the PRESET UP or PRESET DOWN. Increases the track/group* numbers. Decreases the track/group* numbers. * For details about the group selection, see “For MP3 playback” on page 12.
English UX-G45[UW].BOOK Page 12 Tuesday, May 30, 2006 2:07 AM IMPORTANT • Always set volume to “VOL MIN” when connecting or disconnecting the other equipment. • Connect the USB Memory or DAP directly to the front panel of the unit. Connecting via a USB hub may result in malfunction. • USB Memory and DAPs compatible with the USB mass storage class specifications are connectable. • Some DAPs are not compatible with the unit. • Coded or encrypted tracks in a special method cannot be played on the unit.
English UX-G45[UW].BOOK Page 13 Tuesday, May 30, 2006 2:07 AM To adjust the sound input level from other equipment Playing Back a Tape To insert a tape You can adjust the sound input level from the connected equipment, if the incoming signal is too small or too large. You can play back type I tapes. Push Insert Close 1 Select AUX for the source. 2 Adjust the input level. 2 sec.
Quick Portable Link (QP Link) English UX-G45[UW].BOOK Page 14 Tuesday, May 30, 2006 2:07 AM Remote ONLY If you connect other equipment such as a digital audio player to the AUX terminal and play it back, the source automatically changes to AUX. QP LINK QP Link Canceled (No indication) The QP Link indicator is lit while QP Link is activated. When QP Link is activated... • If an audio input is received at AUX when the System is turned on, the source automatically switches to AUX.
UX-G45[UW].BOOK Page 15 Tuesday, May 30, 2006 2:07 AM English Daily Operations—Sound & Other Adjustments Adjusting the Volume Remote control You can adjust the volume level from level 0 (VOL-MIN) to level 31 (VOL-MAX). Remote control: Main unit: VOLUME SET/RESUME CANCEL CLOCK/ TIMER VOLUME DISPLAY PRESET UP, PRESET DOWN To drop the volume in a moment Remote ONLY To restore the volume, press again, or adjust the volume level. FADE MUTING DIMMER A.
Changing the Display Brightness—DIMMER English UX-G45[UW].BOOK Page 16 Tuesday, May 30, 2006 2:07 AM 3 Adjust the minute. PRESET UP SET/RESUME Remote ONLY You can dim the display window. DIMMER PRESET DOWN DIM ON DIM OFF (Canceled) “CLOCK OK” appears and the built-in clock starts working. To check the current time during play Setting the Clock Remote ONLY DISPLAY Without setting the built-in clock, you cannot use the Daily Timer and Recording Timer (see page 23).
English UX-G45[UW].BOOK Page 17 Tuesday, May 30, 2006 2:07 AM Turning Off the Power Automatically Remote ONLY To turn off the System after playback is over— Auto Standby This function works only when the source is CD or tape. A.STANDBY A.STBY Canceled (No indication) When Auto Standby is in use, the A.STBY indicator lights on the display. When the disc and tape playback stops, the A.STBY indicator starts flashing.
UX-G45[UW].BOOK Page 18 Tuesday, May 30, 2006 2:07 AM English Advanced Disc/USB Memory/DAP Operations Programming the Playing Order— Remote control Remote ONLY Program Play You can arrange the playing order of the tracks (up to 32) before you start playback. • Program play can be used only in MP3 TRACK mode. • You can repeat all the programmed tracks by pressing REPEAT. Numeric buttons 1 Before starting playback, press PROGRAM.
English UX-G45[UW].BOOK Page 19 Tuesday, May 30, 2006 2:07 AM To check the programmed contents While the PRGM indicator is shown on the display and before playback... In the programmed order. In the reverse order. Playing at Random—Random Play Remote ONLY You can play back all the tracks on the selected disc, USB Memory or DAP at random. • You can repeat All tracks (PALL) by pressing REPEAT. Press RANDOM.
Playing Repeatedly—Repeat Play Remote ONLY You can repeat playback. Main Unit ONLY You can lock the disc trays so that no one can eject the loaded discs. • This is possible while the System is on standby. For CD/MP3(TRACK mode): REPEAT Prohibiting Disc Ejection—Child Lock 1 ALL While the disc trays are closed... Canceled (No indication) For MP3 (GROUP mode): REPEAT 1 Canceled ALL (at the same time) (No indication) To cancel the prohibition, repeat the same procedure.
UX-G45[UW].BOOK Page 21 Tuesday, May 30, 2006 2:07 AM English Advanced Tape Operations IMPORTANT It may be unlawful to record or play back copyrighted material without the consent of the copyright owner. Remote control Recording on a Tape You can use type I tapes for recording. • To play a tape, see page 13. 1 Insert a recordable cassette.
Synchronized Disc Recording You can start and stop both disc, USB memory and DAP playback and tape recording at the same time. To record the entire disc Set “RESUME” on (see page 12). 1 2 If the beat is heard while recoding an AM broadcast FM MODE English UX-G45[UW].BOOK Page 22 Tuesday, May 30, 2006 2:07 AM Remote ONLY BEAT 1 BEAT 2 • Select “BEAT 1” or “BEAT 2” to reduce the beat. Load a disc and insert a recordable cassette.
UX-G45[UW].BOOK Page 23 Tuesday, May 30, 2006 2:07 AM English Timer Operations Setting the Timer Remote control STANDBY/ON SET/RESUME CLOCK/ TIMER CANCEL PRESET UP, PRESET DOWN Remote ONLY Using Daily Timer, you can wake up with music, etc. On the other hand, with Recording Timer, you can make a tape of a radio broadcast automatically. • You can store three Daily Timer settings and one Recording Timer setting; however, you can activate only one of the four settings above at the same time.
1 Select one of the timer setting modes you want to set— Daily 1 Timer, Daily 2 Timer, Daily 3 Timer, or Recording Timer. CLOCK /TIMER Daily 1 Timer Canceled Daily 2 Timer Clock setting English UX-G45[UW].BOOK Page 24 Tuesday, May 30, 2006 2:07 AM For Recording Timer: 1 Set the hour then the minute for on-time. PRESET UP SET/RESUME Daily 3 Timer Recording Timer PRESET DOWN (see page 16) 2 Set the hour then minute for off-time in the same manner. 3 Select “TUNER FM” or “TUNER AM.” PRESET UP Ex.
English UX-G45[UW].BOOK Page 25 Tuesday, May 30, 2006 2:07 AM To turn off the Timer after its setting is done Since Daily Timer is activated at the same time everyday, you may need to cancel it on some particular days. 1 Select the Timer you want to cancel. CLOCK /TIMER Daily 1 Timer Canceled Daily 2 Timer Clock setting Daily 3 Timer Recording Timer (see page 16) 2 Turn off the selected Timer. CANCEL The indicator corresponding to the Timer is turned off.
Additional Information Learning More about This System Daily Operations—Playback (see pages 9 to 14) Listening to the Radio: • If you store a new station into an occupied preset number, the previously stored station in that number will be erased. • When you unplug the AC power cord or if a power failure occurs, the preset stations will be erased in a few days. If this happens, preset the stations again.
English UX-G45[UW].BOOK Page 27 Tuesday, May 30, 2006 2:07 AM ] The batteries are exhausted. Timer Operations (see pages 23 to 25) • When you unplug the AC power cord or if a power failure occurs, the timer will be canceled. You need to set the clock first, then the timer again. • Without Stopping the recording, you cannot change the source after Recording Timer starts recording. • You cannot use the SLEEP timer while activating the Recording timer.
Maintenance Specifications To get the best performance of the System, keep your discs, and mechanism clean. Amplifier section Output Power: Handling discs • When removing the disc from its case, hold it at the edge while pressing the center hole lightly. • Do not touch the shiny surface of the disc, or bend the disc. • Put the disc back in its case after use to prevent warping. • Be careful not to scratch the surface of the disc. • Avoid exposure to direct sunlight, temperature extremes, and moisture.
Parts Index Refer to the pages to see how to use the buttons and controls. Remote control 9, 24 10, 12, 13, 16, 24 STANDBY/ON 19, 23, 25 10, 11, 18 1 2 3 4 5 6 SET/RESUME 16 CANCEL 7 8 0 10 9 16, 23, 25 DISPLAY 12 MP3 MODE CLOCK /TIMER IIV English UX-G45[UW].
English UX-G45[UW].
UX-G45(UW)_Cover.fm Page 2 Sunday, June 4, 2006 6:18 PM Mains (AC) Line Instruction (not applicable for Europe, U.S.A., Canada, Australia, and U.K.) Instrucción sobre la línea de la red (CA) (no aplicable para Europa, EE.UU., Canadá, Australia, ni el Grã-Bretanha) Instrução sobre a tensão da rede eléctrica (CA) (não aplicável para a Europa, os E.U.A.