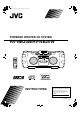
RV-NB20[J].book Page 1 Tuesday, August 22, 2006 3:28 PM POWERED WOOFER CD SYSTEM RV-NB20B/RV-NB20W INSTRUCTIONS For Customer Use: Enter below the Model No. and Serial No. which are located either on the rear, bottom or side of the cabinet. Retain this information for future reference. Model No. Serial No.
RV-NB20[J].book Page 1 Tuesday, August 22, 2006 3:28 PM Warnings, Cautions and Others Mises en garde, précautions et indications diverses (For U.S.A.) (For U.S.A.) The lightning flash with arrowhead symbol, within an equilateral triangle is intended to alert the user to the presence of uninsulated “dangerous voltage” within the product’s enclosure that may be of sufficient magnitude to constitute a risk of electric shock to persons.
RV-NB20[J].book Page 2 Tuesday, August 22, 2006 3:28 PM IMPORTANT FOR LASER PRODUCTS 1. CLASS 1 LASER PRODUCT 2. CAUTION: Do not open the top cover. There are no user serviceable parts inside the unit; leave all servicing to qualified service personnel. 3. CAUTION: (For U.S.A.) Visible and/or invisible class II laser radiation when open. Do not stare into beam. (For Canada) Visible and/or invisible class 1M laser radiation when open. Do not view directly with optical instruments. 4.
RV-NB20[J].book Page 1 Tuesday, August 22, 2006 3:28 PM Thank you for purchasing the JVC Powered Woofer CD System. Before operating this system, read this manual carefully and thoroughly to obtain the best possible performance from your system, and retain this manual for future reference. Features Here are some of the things that make your system both powerful and simple to use.
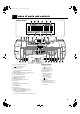
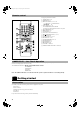
RV-NB20[J].book Page 2 Tuesday, August 22, 2006 3:28 PM Index of parts and controls Display window How to open the cover See pages in parentheses for details. 1 ON/STANDBY button (7) 2 Shoulder strap hooks (4) 3 AUX button (3, 14) • Pressing this button also turns on the system.
RV-NB20[J].book Page 3 Tuesday, August 22, 2006 3:28 PM Remote control See pages in parentheses for details. 1 Number buttons (9, 11) 2 SLEEP button (15) 3 Multi control buttons (9, 11, 15, 16) • GROUP UP, GROUP DOWN • 4, 7, x 4 Source buttons (3, 9 – 14) • iPod 6, CD 6, AUX, FM/AM Pressing one of these buttons also turns on the system.
RV-NB20[J].book Page 4 Tuesday, August 22, 2006 3:28 PM Carrying the system Using the carrying handles Be sure to hold both handles when you carry the system. If you carry the system by only one handle, because of the length of the system, the end may drag on the ground and be damaged as a result. Do not lift the system by the woofer ducts, and do not insert any foreign objects into them.
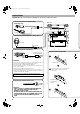
RV-NB20[J].book Page 5 Tuesday, August 22, 2006 3:28 PM Connections CAUTION: Make all connection before plugging the system into an AC power outlet. Connecting the microphone/guitar (See page 15.) Rear view (Not supplied) (Not supplied) Connecting the headphones (See page 7.
RV-NB20[J].book Page 6 Tuesday, August 22, 2006 3:28 PM Connecting the iPod (See page 13.) Connecting the auxiliary equipment (See page 14.) To headphones jack To dock connector Stereo mini plug cable (not supplied) iPod cable (supplied) iPod stand (supplied) Auxiliary equipment (not supplied) Disconnecting the auxiliary equipment When disconnecting the auxiliary equipment, make sure the system is turned off.
RV-NB20[J].book Page 7 Tuesday, August 22, 2006 3:28 PM Basic operations ON/STANDBY DISPLAY SUPER WOOFER VOLUME +/– VOLUME +/– SOUND SUPER WOOFER VOLUME +/– MUTING SOUND ACS VOLUME +/– ON/STANDBY STANDBY lamp ACTIVE CLEAR SOUND ACS ON/LEVEL indicator Turning the power on and off Note: The lighting condition for the STANDBY lamp and for the display differs depending on the power source. Power source STANDBY lamp/display • AC power • The STANDBY lamp lights when power is turned off.
RV-NB20[J].book Page 8 Tuesday, August 22, 2006 3:28 PM Turning off the sound temporarily Using the remote control only Press MUTING. “MUTING” appears on the display. Selecting the sound mode Sound modes can be selected to enhance the type of music being played. Press SOUND to select the sound mode. Each time you press the button, the sound mode changes as follows: On remote control To restore the sound, press MUTING again or adjust the volume (see page 7).
RV-NB20[J].book Page 9 Tuesday, August 22, 2006 3:28 PM Listening to the radio Number buttons 4 SET x FM/AM FM/AM PRESET TUNING FM MODE FM MODE x 4 You can listen to FM and AM stations. Stations can be tuned in manually, automatically, or from preset memory storage. Before listening to the radio, fully extend the FM telescopic antenna.
RV-NB20[J].book Page 10 Tuesday, August 22, 2006 3:28 PM 4. Press the number buttons to select the preset number you want. Presetting stations You can preset up to 30 FM stations and 15 AM stations. • To select 5, press 5. • To select 15, press +10 then 5. • To select 20, press +10 once then press 10. Note: Preset numbers may have been set to factory test frequencies prior to shipment. This is not a malfunction. You can preset the stations you want into memory as follows: 5. Press SET.
RV-NB20[J].book Page 11 Tuesday, August 22, 2006 3:28 PM Using the disc player—Normal Play 1. Set a disc. 2. Press CD 6. The first track of the disc starts playing. For CDs: Playback time For MP3 discs: Press and hold 4 or x to fast forward/ reverse the disc during playback. MP3 indicator To stop playing the disc, press 7. The following information for the disc is displayed.
RV-NB20[J].book Page 12 Tuesday, August 22, 2006 3:28 PM Programming the playing order of the tracks Random play The tracks will play in no special order when you use this mode. Using the remote control only Using the remote control only You can program up to 50 tracks in any desired order including the same tracks. You can only make a program when the system is stopped. While making a program, you cannot specify a group number to select a track. 1. Set a disc. 2. Press CD 6. 3.
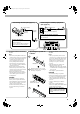
RV-NB20[J].book Page 13 Tuesday, August 22, 2006 3:28 PM Listening to the iPod iPod 6 x 4 x 4 iPod 6 You can operate an iPod through the system. • Before connecting your iPod to the system, check its type and software version (see page 4). • Remember you cannot send any data to your iPod from the system. • You can also operate the iPod directly even while it is connected to the system. For details of the operation, refer to the instructions of your iPod.
RV-NB20[J].book Page 14 Tuesday, August 22, 2006 3:28 PM Listening to auxiliary equipment AUX AUX QP LINK You can listen to auxiliary equipment. First make sure that the auxiliary equipment is properly connected to the system. (See pages 5 and 6.) Note: For operation of the auxiliary equipment, refer to its instructions. Listening to auxiliary equipment 1. Set the volume level to minimum. 2. Press AUX. “AUX” appears on the display.
RV-NB20[J].book Page 15 Tuesday, August 22, 2006 3:28 PM Using the microphone/guitar 3. Connect a microphone or a guitar into the MIC/GUITAR INPUT jack on the rear of the Microphone/guitar mixing Using a microphone or a guitar (not supplied), you can mix its sound with a source sound. 1. Make sure the MIC/GUITAR LEVEL control on the rear of the system is properly set. • When using a microphone, make sure the knob is pressed in ( ). • When using a guitar, make sure the knob is released ( ). 2.
RV-NB20[J].book Page 16 Tuesday, August 22, 2006 3:28 PM 2. Set the length of time you want the source to play before shutting off. Each time you press the button, it changes the number of minutes shown on the display in this sequence: 10 = 20 = 30 = 60 = 90 = 120 = OFF = (back to the beginning) After setting the number of minutes for the sleep timer, the indication will stop flashing and go off. The system is now set to turn off after the number of minutes you set.
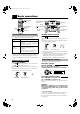
RV-NB20[J].book Page 17 Tuesday, August 22, 2006 3:28 PM Care and maintenance Handle your discs carefully, and they will last a long time. Cleaning the lens Compact discs • This system can play back the following discs: – Audio CD – Finalized CD-R/CD-RW recorded in audio CD format or MP3 format However, continued use of irregular shape discs (heart-shape, octagonal, etc.) can damage the system. If the lens in the pickup is dirty, dropout, etc., could degrade sound.
RV-NB20[J].book Page 18 Tuesday, August 22, 2006 3:28 PM Symptom Possible cause Action • The track skips. • The disc is dirty or scratched. • Clean or replace the disc. • The disc does not play (“NO PLAY” or “NO DISC” appears). • The disc is upside down. • The disc is dirty or scratched. • Put the disc in with the label side up. • Change the disc. • Specific files (tracks) on an MP3 disc are not played. • Files other than MP3 are included in the disc. • They cannot be played.
RV-NB20[J].book Page 1 Tuesday, August 22, 2006 3:28 PM For U.S.A.
RV-NB20[J].book Page 2 Tuesday, August 22, 2006 3:28 PM For U.S.A.
RV-NB20[J].
Français English RV-NB20[C].
RV-NB20[C].book Page 1 Tuesday, August 22, 2006 3:31 PM Warnings, Cautions and Others Mises en garde, précautions et indications diverses (For U.S.A.) (For U.S.A.) The lightning flash with arrowhead symbol, within an equilateral triangle is intended to alert the user to the presence of uninsulated “dangerous voltage” within the product’s enclosure that may be of sufficient magnitude to constitute a risk of electric shock to persons.
RV-NB20[C].book Page 2 Tuesday, August 22, 2006 3:31 PM IMPORTANT FOR LASER PRODUCTS 1. CLASS 1 LASER PRODUCT 2. CAUTION: Do not open the top cover. There are no user serviceable parts inside the unit; leave all servicing to qualified service personnel. 3. CAUTION: (For U.S.A.) Visible and/or invisible class II laser radiation when open. Do not stare into beam. (For Canada) Visible and/or invisible class 1M laser radiation when open. Do not view directly with optical instruments. 4.
English RV-NB20[C].book Page 1 Tuesday, August 22, 2006 3:31 PM Thank you for purchasing the JVC Powered Woofer CD System. Before operating this system, read this manual carefully and thoroughly to obtain the best possible performance from your system, and retain this manual for future reference. Features Here are some of the things that make your system both powerful and simple to use.
English RV-NB20[C].book Page 2 Tuesday, August 22, 2006 3:31 PM Index of parts and controls Display window How to open the cover See pages in parentheses for details. 1 ON/STANDBY button (7) 2 Shoulder strap hooks (4) 3 AUX button (3, 14) • Pressing this button also turns on the system.
English RV-NB20[C].book Page 3 Tuesday, August 22, 2006 3:31 PM Remote control See pages in parentheses for details. 1 Number buttons (9, 11) 2 SLEEP button (15) 3 Multi control buttons (9, 11, 15, 16) • GROUP UP, GROUP DOWN • 4, 7, x 4 Source buttons (3, 9 – 14) • iPod 6, CD 6, AUX, FM/AM Pressing one of these buttons also turns on the system.
RV-NB20[C].book Page 4 Tuesday, August 22, 2006 3:31 PM Using the carrying handles Be sure to hold both handles when you carry the system. If you carry the system by only one handle, because of the length of the system, the end may drag on the ground and be damaged as a result. Do not lift the system by the woofer ducts, and do not insert any foreign objects into them.
English RV-NB20[C].book Page 5 Tuesday, August 22, 2006 3:31 PM Connections CAUTION: Make all connection before plugging the system into an AC power outlet. Connecting the microphone/guitar (See page 15.) Rear view (Not supplied) (Not supplied) Connecting the headphones (See page 7.
English RV-NB20[C].book Page 6 Tuesday, August 22, 2006 3:31 PM Connecting the iPod (See page 13.) Connecting the auxiliary equipment (See page 14.) To headphones jack To dock connector Stereo mini plug cable (not supplied) iPod cable (supplied) iPod stand (supplied) Auxiliary equipment (not supplied) Disconnecting the auxiliary equipment When disconnecting the auxiliary equipment, make sure the system is turned off.
English RV-NB20[C].book Page 7 Tuesday, August 22, 2006 3:31 PM Basic operations ON/STANDBY DISPLAY SUPER WOOFER VOLUME +/– VOLUME +/– SOUND SUPER WOOFER VOLUME +/– MUTING SOUND ACS VOLUME +/– ON/STANDBY STANDBY lamp ACTIVE CLEAR SOUND ACS ON/LEVEL indicator Turning the power on and off Note: The lighting condition for the STANDBY lamp and for the display differs depending on the power source.
RV-NB20[C].book Page 8 Tuesday, August 22, 2006 3:31 PM Using the remote control only Press MUTING. “MUTING” appears on the display. Selecting the sound mode English Turning off the sound temporarily Sound modes can be selected to enhance the type of music being played. Press SOUND to select the sound mode. Each time you press the button, the sound mode changes as follows: On remote control To restore the sound, press MUTING again or adjust the volume (see page 7).
English RV-NB20[C].book Page 9 Tuesday, August 22, 2006 3:31 PM Listening to the radio Number buttons 4 SET x FM/AM FM/AM PRESET TUNING FM MODE FM MODE x 4 You can listen to FM and AM stations. Stations can be tuned in manually, automatically, or from preset memory storage. Before listening to the radio, fully extend the FM telescopic antenna.
RV-NB20[C].book Page 10 Tuesday, August 22, 2006 3:31 PM You can preset up to 30 FM stations and 15 AM stations. • To select 5, press 5. • To select 15, press +10 then 5. • To select 20, press +10 once then press 10. Note: Preset numbers may have been set to factory test frequencies prior to shipment. This is not a malfunction. You can preset the stations you want into memory as follows: 5. Press SET. “STORED” appears on the display and the station is stored.
English RV-NB20[C].book Page 11 Tuesday, August 22, 2006 3:31 PM Using the disc player—Normal Play 1. Set a disc. 2. Press CD 6. The first track of the disc starts playing. For CDs: Playback time For MP3 discs: Press and hold 4 or x to fast forward/ reverse the disc during playback. MP3 indicator To stop playing the disc, press 7. The following information for the disc is displayed.
Programming the playing order of the tracks Random play The tracks will play in no special order when you use this mode. Using the remote control only Using the remote control only You can program up to 50 tracks in any desired order including the same tracks. You can only make a program when the system is stopped. While making a program, you cannot specify a group number to select a track. 1. Set a disc. 2. Press CD 6. 3. Press 7 to stop the disc. 4.
English RV-NB20[C].book Page 13 Tuesday, August 22, 2006 3:31 PM Listening to the iPod iPod 6 x 4 x 4 iPod 6 You can operate an iPod through the system. • Before connecting your iPod to the system, check its type and software version (see page 4). • Remember you cannot send any data to your iPod from the system. • You can also operate the iPod directly even while it is connected to the system. For details of the operation, refer to the instructions of your iPod.
English RV-NB20[C].book Page 14 Tuesday, August 22, 2006 3:31 PM Listening to auxiliary equipment AUX AUX QP LINK You can listen to auxiliary equipment. First make sure that the auxiliary equipment is properly connected to the system. (See pages 5 and 6.) Note: For operation of the auxiliary equipment, refer to its instructions. Listening to auxiliary equipment 1. Set the volume level to minimum. 2. Press AUX. “AUX” appears on the display.
English RV-NB20[C].book Page 15 Tuesday, August 22, 2006 3:31 PM Using the microphone/guitar 3. Connect a microphone or a guitar into the MIC/GUITAR INPUT jack on the rear of the Microphone/guitar mixing Using a microphone or a guitar (not supplied), you can mix its sound with a source sound. 1. Make sure the MIC/GUITAR LEVEL control on the rear of the system is properly set. • When using a microphone, make sure the knob is pressed in ( ).
RV-NB20[C].book Page 16 Tuesday, August 22, 2006 3:31 PM Each time you press the button, it changes the number of minutes shown on the display in this sequence: 10 = 20 = 30 = 60 = 90 = 120 = OFF = (back to the beginning) After setting the number of minutes for the sleep timer, the indication will stop flashing and go off. The system is now set to turn off after the number of minutes you set. To confirm the sleep time: When SLEEP is pressed, the remaining sleep time is displayed.
English RV-NB20[C].book Page 17 Tuesday, August 22, 2006 3:31 PM Care and maintenance Handle your discs carefully, and they will last a long time. Cleaning the lens Compact discs • This system can play back the following discs: – Audio CD – Finalized CD-R/CD-RW recorded in audio CD format or MP3 format However, continued use of irregular shape discs (heart-shape, octagonal, etc.) can damage the system. If the lens in the pickup is dirty, dropout, etc., could degrade sound.
RV-NB20[C].book Page 18 Tuesday, August 22, 2006 3:31 PM Possible cause Action • The track skips. • The disc is dirty or scratched. • Clean or replace the disc. • The disc does not play (“NO PLAY” or “NO DISC” appears). • The disc is upside down. • The disc is dirty or scratched. • Put the disc in with the label side up. • Change the disc. • Specific files (tracks) on an MP3 disc are not played. • Files other than MP3 are included in the disc. • They cannot be played.
RV-NB20[C].
Cover_RV-NB20[B].
RV-NB20[B].book Page 1 Monday, August 28, 2006 5:04 PM Warnings, Cautions and Others IMPORTANT FOR LASER PRODUCTS IMPORTANT for the U.K. DO NOT cut off the mains plug from this equipment. If the plug fitted is not suitable for the power points in your home or the cable is too short to reach a power point, then obtain an appropriate safety approved extension lead or consult your dealer. BE SURE to replace the fuse only with an identical approved type, as originally fitted.
RV-NB20[B].book Page 2 Monday, August 28, 2006 5:04 PM SAFETY INSTRUCTIONS “SOME DOS AND DON’TS ON THE SAFE USE OF EQUIPMENT” This equipment has been designed and manufactured to meet international safety standards but, like any electrical equipment, care must be taken if you are to obtain the best results and safety is to be assured. Do read the operating instructions before you attempt to use the equipment.
EN01-06_RV-NB20[B].fm Page 1 Tuesday, September 12, 2006 11:58 AM Thank you for purchasing the JVC Powered Woofer CD System. Before operating this system, read this manual carefully and thoroughly to obtain the best possible performance from your system, and retain this manual for future reference. Features Here are some of the things that make your system both powerful and simple to use.
RV-NB20[B].book Page 2 Monday, August 28, 2006 5:04 PM Index of parts and controls Display window How to open the cover See pages in parentheses for details. 1 ON/STANDBY button (7) 2 Shoulder strap hooks (4) 3 AUX button (3, 14) • Pressing this button also turns on the system.
RV-NB20[B].book Page 3 Monday, August 28, 2006 5:04 PM Remote control See pages in parentheses for details. 1 Number buttons (9, 11) 2 SLEEP button (15) 3 Multi control buttons (9, 11, 15, 16) • GROUP UP, GROUP DOWN • 4, 7, x 4 Source buttons (3, 9 – 14) • iPod 6, CD 6, AUX, FM/AM Pressing one of these buttons also turns on the system.
RV-NB20[B].book Page 4 Monday, August 28, 2006 5:04 PM Carrying the system Using the carrying handles Be sure to hold both handles when you carry the system. If you carry the system by only one handle, because of the length of the system, the end may drag on the ground and be damaged as a result. Do not lift the system by the woofer ducts, and do not insert any foreign objects into them.
RV-NB20[B].book Page 5 Monday, August 28, 2006 5:04 PM Connections CAUTION: Make all connection before plugging the system into an AC power outlet. Connecting the microphone/guitar (See page 15.) Rear view (Not supplied) (Not supplied) Connecting the headphones (See page 7.
RV-NB20[B].book Page 6 Monday, August 28, 2006 5:04 PM Connecting the iPod (See page 13.) Connecting the auxiliary equipment (See page 14.) To headphones jack To dock connector Stereo mini plug cable (not supplied) iPod cable (supplied) iPod stand (supplied) Auxiliary equipment (not supplied) Disconnecting the auxiliary equipment When disconnecting the auxiliary equipment, make sure the system is turned off.
RV-NB20[B].book Page 7 Monday, August 28, 2006 5:04 PM Basic operations ON/STANDBY DISPLAY SUPER WOOFER VOLUME +/– VOLUME +/– SOUND SUPER WOOFER VOLUME +/– MUTING SOUND ACS VOLUME +/– ON/STANDBY STANDBY lamp ACTIVE CLEAR SOUND ACS ON/LEVEL indicator Turning the power on and off Note: The lighting condition for the STANDBY lamp and for the display differs depending on the power source. Power source STANDBY lamp/display • AC power • The STANDBY lamp lights when power is turned off.
RV-NB20[B].book Page 8 Monday, August 28, 2006 5:04 PM Turning off the sound temporarily Using the remote control only Press MUTING. “MUTING” appears on the display. Selecting the sound mode Sound modes can be selected to enhance the type of music being played. Press SOUND to select the sound mode. Each time you press the button, the sound mode changes as follows: On remote control To restore the sound, press MUTING again or adjust the volume (see page 7).
EN07-18_RV-NB20[B].fm Page 9 Tuesday, September 12, 2006 12:05 PM Listening to the radio Number buttons 4 SET x FM/AM FM/AM PRESET TUNING FM MODE FM MODE x 4 You can listen to FM and AM stations. Stations can be tuned in manually, automatically, or from preset memory storage. Before listening to the radio, fully extend the FM telescopic antenna.
EN07-18_RV-NB20[B].fm Page 10 Tuesday, September 12, 2006 12:05 PM 4. Press the number buttons to select the preset number you want. Presetting stations You can preset up to 30 FM stations and 15 AM stations. • To select 5, press 5. • To select 15, press +10 then 5. • To select 20, press +10 once then press 10. Note: Preset numbers may have been set to factory test frequencies prior to shipment. This is not a malfunction. You can preset the stations you want into memory as follows: 5. Press SET.
RV-NB20[B].book Page 11 Monday, August 28, 2006 5:04 PM Using the disc player—Normal Play 1. Set a disc. 2. Press CD 6. The first track of the disc starts playing. For CDs: Playback time For MP3 discs: Press and hold 4 or x to fast forward/ reverse the disc during playback. MP3 indicator To stop playing the disc, press 7. The following information for the disc is displayed.
RV-NB20[B].book Page 12 Monday, August 28, 2006 5:04 PM Programming the playing order of the tracks Random play The tracks will play in no special order when you use this mode. Using the remote control only Using the remote control only You can program up to 50 tracks in any desired order including the same tracks. You can only make a program when the system is stopped. While making a program, you cannot specify a group number to select a track. 1. Set a disc. 2. Press CD 6. 3.
RV-NB20[B].book Page 13 Monday, August 28, 2006 5:04 PM Listening to the iPod iPod 6 x 4 x 4 iPod 6 You can operate an iPod through the system. • Before connecting your iPod to the system, check its type and software version (see page 4). • Remember you cannot send any data to your iPod from the system. • You can also operate the iPod directly even while it is connected to the system. For details of the operation, refer to the instructions of your iPod.
RV-NB20[B].book Page 14 Monday, August 28, 2006 5:04 PM Listening to auxiliary equipment AUX AUX QP LINK You can listen to auxiliary equipment. First make sure that the auxiliary equipment is properly connected to the system. (See pages 5 and 6.) Note: For operation of the auxiliary equipment, refer to its instructions. Listening to auxiliary equipment 1. Set the volume level to minimum. 2. Press AUX. “AUX” appears on the display.
RV-NB20[B].book Page 15 Monday, August 28, 2006 5:04 PM Using the microphone/guitar 3. Connect a microphone or a guitar into the MIC/GUITAR INPUT jack on the rear of the Microphone/guitar mixing Using a microphone or a guitar (not supplied), you can mix its sound with a source sound. 1. Make sure the MIC/GUITAR LEVEL control on the rear of the system is properly set. • When using a microphone, make sure the knob is pressed in ( ). • When using a guitar, make sure the knob is released ( ). 2.
RV-NB20[B].book Page 16 Monday, August 28, 2006 5:04 PM 2. Set the length of time you want the source to play before shutting off. Each time you press the button, it changes the number of minutes shown on the display in this sequence: 10 = 20 = 30 = 60 = 90 = 120 = OFF = (back to the beginning) After setting the number of minutes for the sleep timer, the indication will stop flashing and go off. The system is now set to turn off after the number of minutes you set.
RV-NB20[B].book Page 17 Monday, August 28, 2006 5:04 PM Care and maintenance Handle your discs carefully, and they will last a long time. Cleaning the lens Compact discs • This system can play back the following discs: – Audio CD – Finalized CD-R/CD-RW recorded in audio CD format or MP3 format However, continued use of irregular shape discs (heart-shape, octagonal, etc.) can damage the system. If the lens in the pickup is dirty, dropout, etc., could degrade sound.
EN07-18_RV-NB20[B].fm Page 18 Tuesday, September 12, 2006 11:59 AM Symptom Possible cause Action • The track skips. • The disc is dirty or scratched. • Clean or replace the disc. • The disc does not play (“NO PLAY” or “NO DISC” appears). • The disc is upside down. • The disc is dirty or scratched. • Put the disc in with the label side up. • Change the disc. • Specific files (tracks) on an MP3 disc are not played. • Files other than MP3 are included in the disc. • They cannot be played.
RV-NB20[B].