
INSTRUCTIONS(BASIC)


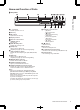

Table Of Contents

Name and Function of Parts
Front panel
.
A B C D E H
RQPON
J LGF MI K
A
[ A ] button
Switches operation on or off.
B
Disc tray
C
[ M ] button
Opens/closes the disc tray.
D
Display window
E
Remote control sensor
F
[RESET] switch
Reset the unit.
G
[REC MODE] button
Switches the recording mode.
H
[HDD] lamp
Lights up when in HDD mode.
The [REC] lamp lights up while recording/importing.
I
[INPUT SELECT] button
Switches the external input signals (SDI, HDMI, HDV/DV,
L-1).
J
[BD] lamp
Lights up when in BD/DVD mode.
The [REC] lamp lights up while recording/dubbing.
K
[MEDIA SELECT] button
Switches between HDD and BD/SD.
L
[DIRECT/MONITOR] lamp
Lights up in the MONITOR OUT mode.
M
[DIRECT/MONITOR] selection button
Switches the output of the rear SDI and HDMI output
terminals to
“DIRECT OUT”
or “MONITOR OUT”.
Memo :
0
When each of the [SET UP], [NAVIGATION
], [EDIT],
[INFORMATION CORRECT], [DUBBING], and [MEDIA
MANAGE] buttons is pressed, “ONSCREEN” appears in the
display window of the unit.
In this case, switching is possible only when the respective
top screens are displayed.
If a display other than the top screen appears, such as a pop-
up screen, switching may not be possible.
N
Playback control buttons
0
[ I ] button
Plays back the data.
0
[
o
] button
Stops playback/recording.
0
[
O ] button
Fast reverses playback.
0
[ N ] button
Fast forwards playback.
0
[ W ] button
Pauses playback.
O
[ R ] button
Starts recording.
P
[SD SLOT]
Used for inserting SD cards.
Q
[i.LINK(HDV/DV IN)] terminal
Connect a video camera using i.LINK (HDV/DV. IN).
R
[USB] terminal
For connecting using a USB cable.
Name and Function of Parts
9
Getting Started