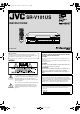
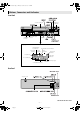
SR-V101US.fm Page 1 Friday, December 26, 2003 2:24 PM VIDEO CASSETTE RECORDER SR-V101US INSTRUCTIONS REW FF 24HR QUICK REC LINK PROGRAM POWER INSERT A.DUB S-VIDEO LPT0887-001A WARNING: Dear Customer, Thank you for purchasing the JVC S-VHS video cassette recorder. Before use, please read the safety information and precautions to ensure safe use of your new VCR. TO PREVENT FIRE OR SHOCK HAZARD, DO NOT EXPOSE THIS UNIT TO RAIN OR MOISTURE.
SR-V101US.fm Page 2 Saturday, December 27, 2003 9:40 AM NOTE: Changes or modifications not approved by JVC could void the user’s authority to operate the equipment. This equipment has been tested and found to comply with the limits for a Class B digital device, pursuant to Part 15 of the FCC Rules. These limits are designed to provide reasonable protection against harmful interference in a residential installation.
SR-V101US.fm Page 3 Friday, December 26, 2003 2:24 PM 3. Power Lines An outside antenna system should not be located in the vicinity of overhead power lines or other electric light or power circuits, or where it can fall into such power lines or circuits. When installing an outside antenna system, extreme care should be taken to keep from touching such power lines or circuits as contact with them might be fatal. USE 1.
SR-V101US.fm Page 4 Friday, December 26, 2003 2:24 PM CONTENTS Other Functions.......................................................................... 17 Timer warning display.......................................................... Checking tape position ........................................................ Changing display information .............................................. Function settings.................................................................. Satellite Auto Recording .........
SR-V101US.fm Page 5 Friday, December 26, 2003 2:24 PM Buttons, Connectors and Indicators Front Panel Cassette loading slot Advanced JOG dial REW FF 24HR QUICK REC LINK PROGRAM POWER INSERT A.
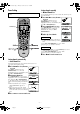
SR-V101US.fm Page 6 Friday, December 26, 2003 2:24 PM Remote On-screen display If you press OSD (OK) on the Remote when “ON SCREEN (REC) and ON SCREEN (PLAY)” are set to “ON” (墌 pg. 18), you can see the current VCR status on the TV screen. The indications are not recorded even if the VCR is in the recording mode.
SR-V101US.fm Page 7 Monday, December 29, 2003 10:19 AM . Connections and Plug&Play Setting S-video Connection (allows you to make the most of the S-VHS picture performance.) If your TV is equipped with a S-video input connector A Perform “RF Connection” previously described. B Connect the supplied S-video cable between the S-VIDEO OUT connector on the rear of the VCR and the S-video input connector on the TV.
SR-V101US.fm Page 8 Friday, December 26, 2003 4:20 PM E Select D.S.T. mode Initial Settings Press OK or SHUTTLE PLUS e to move the highlight bar to “D.S.T.”, then press SHUTTLE PLUS rt repeatedly until the desired setting is selected. AUTO: Select if you want to adjust your VCR’s clock automatically by the incoming signal from the host channel. (Auto Daylight Saving Time enables automatic adjustment of the VCR’s clock at the start and end of Daylight Saving Time.
SR-V101US.fm Page 9 Friday, December 26, 2003 2:45 PM Tuner Setting Turn on the VCR and TV, and select the VCR channel (or AV mode). Setting channels manually — Manual Channel Set You can add the channels you want or delete the channels you do not want manually. A Access Main Menu screen, then Tuner Set screen Press MENU on the Remote. Press SHUTTLE PLUS rt to move the highlight bar (arrow) to “TUNER SET”, then press OK or SHUTTLE PLUS e.
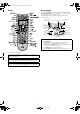
SR-V101US.fm Page 10 Saturday, January 3, 2004 9:19 AM Playback la Re p ve (3 steps) search No Pl r a teps) Reverse (1 (5 s Make sure the window side is up, the rear label side is facing you and the arrow on the front of the cassette is pointing towards the VCR. ● Do not apply too much pressure when inserting. ● The VCR turns on, and the counter on the on-screen display is reset, automatically. ● If the cassette’s record safety tab has been removed and “REC SAFETY” is set to “ON” (墌 pg.
SR-V101US.fm Page 11 Friday, December 26, 2003 2:24 PM ● To select the returning point (recording end or tape end), see “REC END RETURN” on 墌 page 19. Playback Features Turn on the VCR and TV, and select the VCR channel (or AV mode). Adjusting tracking condition — Tracking Adjustment Automatic tracking adjustment Whenever you insert a tape and start playback, automatic tracking starts working and continuously analyzes the signal to enable optimum picture quality during playback.
SR-V101US.fm Page 12 Friday, December 26, 2003 2:24 PM Recording Features Recording Turn on the VCR and TV, and select the VCR channel (or AV mode). It may be unlawful to record or play back copyrighted material without the consent of the copyright owner. Accidental erasure prevention To prevent accidental recording on a recorded cassette, remove its record safety tab and set “REC SAFETY” to “ON” (墌 pg. 19).
SR-V101US.fm Page 13 Friday, December 26, 2003 2:24 PM S-VHS (Super VHS), S-VHS ET or VHS Recording Mode Series Playback and Recording This VCR can record in S-VHS (Super VHS), S-VHS ET or VHS. ● To record in S-VHS: Set “S-VHS MODE” to “ON” (墌 pg. 19). Then, insert a cassette marked “S-VHS”. The S-VHS indicator lights up on the display panel. The S-VHS recording mode is selected. ● To record in S-VHS ET on a VHS cassette: Set “S-VHS ET” to “ON” (墌 pg. 19). Then, insert a cassette marked “VHS”.
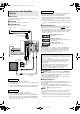
SR-V101US.fm Page 14 Friday, December 26, 2003 2:24 PM A Make connections Connect two sets of SR-V101US and a TV using AV cables as shown in the illustration. ● The mini-plug cable is a mono 3.5 mm mini-plug to mono 3.5 mm mini-plug connector. ● When playing back S-VHS recordings, it is recommended to use the S-VIDEO connection to minimize picture degradation.
SR-V101US.fm Page 15 Friday, December 26, 2003 2:24 PM A Make connections Connect two sets of SR-V101US to other equipment, antenna or cable as shown in the illustration. ● The mini-plug cable is a mono 3.5 mm mini-plug to mono 3.5 mm mini-plug connector. ● When connecting a camcorder or another VCR with an S-VIDEO output connector as recording source, it is recommended to use the S-VIDEO connection to minimize picture degradation.
SR-V101US.fm Page 16 Monday, December 29, 2003 2:04 PM VCR Plus+® Timer Programing The PlusCode programing numbers are the numbers next to the program in most TV listing. Load a cassette with the record safety tab intact. If not, set “REC SAFETY” to “OFF” (墌 pg. 19). The VCR turns on, and the counter is reset, automatically. C A Press PROG. on the Remote to access the PlusCode No. screen. D PLUSCODE NO. PRESS NUMBER KEY (0–9) PRESS (+/–) TO SET EXPRESS PROGRAMMING PRESS (PROG.
SR-V101US.fm Page 17 Friday, December 26, 2003 2:24 PM Checking, Canceling or Changing Program Settings Other Functions Timer warning display A Disengage timer –WARNING– A warning appears on the TV screen to tell TIMER RECORDING TO START SOON you that the timer-recording is to start in (CANCEL) 5 minutes if you are not in the timer recording standby mode at that time. Press TIMER to put the VCR into timer recording standby mode. To clear the display, press CANCEL on the Remote.
SR-V101US.fm Page 18 Friday, December 26, 2003 2:24 PM NOTE: 䡵 DIGITAL TBC/NR — ON/OFF Your VCR is equipped with a Digital TBC (Time Base Corrector) that removes jitter from fluctuating video signals to deliver a stable picture even with old tapes and rental cassettes. The on/off of Digital — DNR (Noise Reduction) which cuts noise and enables clear picture reproduction is also linked to this function.
SR-V101US.fm Page 19 Friday, December 26, 2003 2:24 PM NOTES: 䡵 2ND AUDIO RECORD — ON/OFF ● When this function is set to “ON”; If a SAP program is received, the SAP audio is recorded on both the normal and Hi-Fi tracks. The main audio is not recorded. If a non-SAP program is received, the main audio is recorded on both the Hi-Fi and normal tracks. ● When this function is set to “OFF”, the SAP audio cannot be recorded.
SR-V101US.fm Page 20 Friday, December 26, 2003 2:24 PM Satellite Auto Recording Child Lock You can automatically record a satellite program which is timerprogramed on your DBS receiver. You can disable the VCR operations. Turn on the VCR and TV, and select the VCR channel (or AV mode). Turn on the VCR and TV, and select the VCR channel (or AV mode). REW FF 24HR QUICK REC LINK PROGRAM POWER INSERT A.
SR-V101US.fm Page 21 Friday, December 26, 2003 2:24 PM Cable Box or DBS Receiver Brand Setting Multi-Brand Remote Control Turn on the VCR and TV, and select the VCR channel (or AV mode). This Remote can control some functions of remote controllable TVs, cable boxes or DBS (Direct Broadcast Satellite) receivers listed below. Without setting, you can control a JVC TV. A Turn on cable box or DBS receiver NOTES: ● Some unit’s brands have more than one code.
SR-V101US.fm Page 22 Friday, December 26, 2003 2:24 PM Changing Remote Control Code This Remote is capable of transmitting two control codes; one set to respond to A code control signals and another set to respond to B code control signals. This Remote control is preset to send A code signals because your VCR is initially set to respond to A code signals. You can easily modify your VCR and the Remote to respond to B code signals.
SR-V101US.fm Page 23 Friday, December 26, 2003 2:24 PM B Load cassettes ● Audio Dubbing is possible by using the audio input connectors on the front panel or on the rear panel. Insert the playback cassette into the playback VCR and the cassette to be recorded on into the recording VCR. C Select input mode on recording VCR This VCR Select the correct external input on the recording VCR.
SR-V101US.fm Page 24 Friday, December 26, 2003 2:24 PM B Select input mode Insert Editing and AV Dubbing Insert Editing: You can replace a recorded scene with new scene recorded on another tape or with other material. Both the picture and the sound recorded on the Hi-Fi sound track are replaced at the same time. Source tape Select “F-1” —when connecting the other component to the audio/video input connectors on the front panel.
SR-V101US.fm Page 25 Friday, December 26, 2003 2:24 PM TUNER Specifications Tuning system Channel coverage VHF UHF CATV RF output GENERAL Power requirement Power consumption Power on Power off Temperature Operating Storage Operating position Dimensions (W x H x D) : AC 120 Vd, 60 Hz : 19 W : 1.6 W 5°C to 40°C (41°F to 104°F) –20°C to 60°C (–4°F to140°F) Horizontal only 435 mm x 94 mm x 242 mm (17-3/16" x 3-3/4" x 9-3/4") : 2.8 kg (6.
SR-V101US.fm Page 26 Monday, December 29, 2003 1:48 PM S Index List of Terms This guide serves as a quick way to locate frequently used terms and on-screen display names. A AUDIO MONITOR ................................................ 11, 19 Auto Channel Set ........................................................... 9 AUTO SP]EP TIMER ................................................... 18 AUTO TIMER ............................................................... 18 AV Connection .......................
SR-V101US.fm Page 27 Monday, December 29, 2003 2:04 PM Troubleshooting Before requesting service, use this chart and see if you can repair the trouble yourself. Small problems are often easily corrected, and this can save you from the trouble of sending your VCR off for repair. Power SYMPTOM The power will not come on. POSSIBLE CAUSE ● The AC power cord is disconnected. ● The Child Lock function is activated. CORRECTIVE ACTION ● Connect the AC power cord.
SR-V101US.fm Page 28 Friday, December 26, 2003 2:24 PM SR-V101US COPYRIGHT © 2004 VICTOR COMPANY OF JAPAN, LTD.