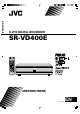
SR-VD400E D-VHS DIGITAL RECORDER SR-VD400E REMOTE CODE MTP NTSC POWER A/B/C/D TV/VCR VCR CABLE TV /DBS PROGRAM START .,? PROG.CHECK TIMER DATE TV/VCR CH STOP ABC DEF REC LINK SUBTITLE GHI JKL DBS DAILY PQRS TUV C. RESET MNO REC SPEED WEEKLY WXYZ ENTER AUX SKIP SEARCH CANCEL PLAY FF REW STOP REC PAUSE MENU TV VOL NAVI BACKK A .
EN Safety Precautions The rating plate and the safety caution are on the rear of the unit. WARNING: DANGEROUS VOLTAGE INSIDE WARNING: TO PREVENT FIRE OR SHOCK HAZARD, DO NOT EXPOSE THIS UNIT TO RAIN OR MOISTURE. Use only discs marked with the following. CAUTION: IMPORTANT 䡲 When you are not using the unit for a long period of time, it is recommended that you disconnect the power cord from the mains outlet. 䡲 Dangerous voltage inside. Refer internal servicing to qualified service personnel.
EN 3 When the equipment is installed in a cabinet or a shelf, make sure that it has sufficient space on all sides to allow for ventilation (10 cm or more on both sides, on top and at the rear). When discarding batteries, environmental problems must be considered and the local rules or laws governing the disposal of these batteries must be followed strictly. Failure to heed the following precautions may result in damage to the unit, remote control or video cassette. 1.
EN INSTALLING YOUR NEW VCR CONTENTS 5 Connections .................................................. 5 i.LINK Connections ........................................ 5 S-VIDEO/VIDEO Connections ......................... 6 INITIAL SETTINGS 7 Clock Setting ................................................. 7 Setting clock manually — Manual Clock Set ........................ 7 PLAYBACK 8 Basic Playback ............................................. 8 Basic Playback Features ...............................
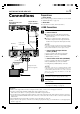
EN INSTALLING YOUR NEW VCR Connections Another D-VHS Digital Recorder (SR-VD400E) Y PB/CB Digital HD Video Camera (JY-HD10) VIDEO S VIDEO IN(L-1) R AUDIO L DIGITAL OUT OPTICAL PCM/DOLBY DIGITAL VIDEO IN(L-2) (for dubbing) [i.LINK IN/OUT] AC Outlet i.LINK cable (not supplied) Component Video Output AC Power Cord Make sure the package contains all of the accessories listed in ‘SPECIFICATIONS’ (墌 page 59). — Situate VCR Place the VCR on a stable, horizontal surface.
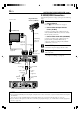
EN INSTALLING YOUR NEW VCR (cont.) S-VIDEO/VIDEO Connections Digital HD Video Camera (JY-HD10) Aerial or cable First follow Preparations on page 5, then go to the following steps. connections 1 Make — Connect VCR to TV Refer to 1 ‘Connect VCR to TV’ on page 5. — Connect VCR to the Digital HD Video Camera (JY-HD10) TV (HD Ready) To [S/AV] Connect an audio/S-video cable between the VCR’s [AUDIO/S VIDEO IN] connectors and JYHD10’s [S/AV] connectors.
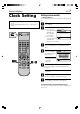
EN INITIAL SETTINGS Clock Setting ● Turn on the VCR and the TV, and select the AV mode on the TV. ● Set the [VCR/TV/CABLE/DBS] selector on the Remote to [VCR]. Setting clock manually — Manual Clock Set Access the Clock Set screen to perform the Manual Clock Set. 1 Access Main Menu screen 2 Access Clock Set screen Press [MENU]. 1 Press [@ #] to move the arrow to “INITIAL SET UP”, then press [fi] or [OK]. 2 Press [@ #] to move the arrow to EXIT “CLOCK SET”, then press [fi] or [OK].
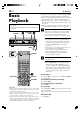
EN PLAYBACK Basic Playback ● Turn on the VCR and the TV, and select the AV mode on the TV. ● Set the [VCR/TV/CABLE/DBS] selector on the Remote to [VCR]. [POWER] 1 [STOP/EJECT (7/0)] 2 IN F-1 + [REW ( )] [FF ( )] [POWER] VCR CABLE TV /DBS This VCR can check the tape condition during playback (and recording), and realizes the best possible pictures. ● This VCR can play back tapes that have been recorded in D-VHS (MTP), S-VHS, S-VHS ET and VHS formats.
EN Basic Playback Features A Checking tape position The tape position indicator appears on the screen in the following cases: ● When you change the VCR operation mode from the stop mode to fast forward or rewind mode. ● When you perform an Index Search ( page 11). The position of “ ” in relation to “B” (Beginning) or “E” (End) shows you where you are on the tape. B ● Turn on the VCR and the TV, and select the AV mode on the TV. ● Set the [VCR/TV/CABLE/DBS] selector on the Remote to [VCR].
EN C Adjusting tracking condition — Tracking Adjustments Automatic tracking adjustment This VCR automatically adjusts the tracking condition. Whenever you insert a tape and start playback, automatic tracking starts working and continuously analyzes the signal to enable optimum picture quality during playback. Manual tracking adjustment If automatic tracking cannot eliminate noises well during playback, use the manual tracking following the procedures below.
EN E Automatic operations after rewinding — Next Function Memory The Next Function Memory tells the VCR what to do after rewinding is complete. ● Ensure that the VCR is in stop mode. a– For Automatic Playback Start Press [REW ( 1 )], then press [PLAY ( 3 )] within 2 seconds. b– For Automatic Power Off Press [REW ( 1 )], then press [POWER] within 2 seconds.
EN PLAYBACK (cont.) Some D-VHS tapes may contain the multiple programs, angles, sounds or subtitles. If a tape contains them, the icons appear on the top right corner of the TV screen when you press [OSD]. Program Selection Sound Selection PROG. 1 1. STEREO PROG. 2 2. Dolby D During normal playback, press [TV/VCR CH +/–] on the Remote to select the desired program. ● It is impossible to select the program if the tape does not contain the multiple programs. During normal playback, press [A.
EN Special Effect Playback ● Turn on the VCR and the TV, and select the AV mode on the TV. ● Set the [VCR/TV/CABLE/DBS] selector on the Remote to [VCR]. 13 With this VCR, you can enjoy special effect playback such as high-speed search, variable-speed search, and still playback and so on. A Locating particular scene rapidly — Picture Search 7 High-Speed Picture Search: Possible during normal playback or still picture playback. You can rapidly locate a particular scene on the tape. )].
EN PLAYBACK (cont.) B Viewing still picture — Still Picture Playback Press [PAUSE ( 8 )] during normal playback. Playback is freezed and a still picture appears. To resume normal playback, press [PLAY ( 3 )]. VCR CABLE TV /DBS NOTES: [TV/VCR CH +/–] ● To obtain a noiseless still picture, it may be necessary to adjust tracking in slow motion playback before starting still picture playback. ● Manual tracking is possible during still picture playback.
EN D 15 Viewing slow motion picture — Slow Motion Playback (S-VHS/VHS only) During normal playback: Press [4] to decrease the playback speed. Each time you press the button, the speed decreases (toward reverse slow motion playback, then reverse picture search). ● Holding [PAUSE ( 8 )] for more than 2 seconds also starts forward slow motion playback. If you press [PAUSE ( 8 )] again, still picture resumes.
EN PLAYBACK (cont.) PRO HD System Playback ● Turn on the VCR and the TV, and select the AV mode on the TV. ● Set the [VCR/TV/CABLE/DBS] selector on the Remote to [VCR]. [POWER] 1 [STOP/EJECT (7/0)] 2 IN F-1 + [REW ( )] [FF ( )] [POWER] VCR CABLE TV /DBS This PRO HD system can perform playback of the D-VHS tape recorded by the MPEG2-TS signal. This VCR can check the tape condition during playback (and recording), and realizes the best possible pictures.
EN ● Turn on the VCR and the TV, and select the AV mode on the TV. ● Set the [VCR/TV/CABLE/DBS] selector on the Remote to [VCR]. [POWER] 1 [STOP/EJECT (7/0)] 2 IN F-1 + [REW ( )] [FF ( )] [POWER] VCR CABLE TV /DBS 3 17 Please input a password number when you playback the tape on which the password was set up. This VCR can check the tape condition during playback (and recording), and realizes the best possible pictures.
EN EDITING Editing ● Turn on the VCR and the TV, and select the AV mode on the TV. ● Set the [VCR/TV/CABLE/DBS] selector on the Remote to [VCR]. 5 3 4 7 This VCR supports the copy protection technologies of DTLA (Digital Transmission Licensing Administrator). These technologies are admitted by DTLA. It is impossible to dub copy-limited signals between the devices which supports copy protection technologies of DTLA.
EN 5 Set recording speed Press [REC SPEED]/[SPEED] to set the recording speed. ● The recording speed changes each time [REC SPEED]/[SPEED] is pressed. 6 Start playback Press [PLAY ( 3 )] on the connected device. NOTE: If the connected device is equipped with a superimpose/OSD disable feature then set it to “OFF” before starting playback. “AUTO” : When recording in HS or STD mode is selected automatically according to the amount of data input (transfer rate) of the program.
EN EDITING (cont.) S-VHS/VHS Editing 1 2 Load a cassette Make connections Refer to ‘S-VIDEO/VIDEO Connections’ on page 6. Make sure the record safety tab is intact. If not, cover the hole with adhesive tape before inserting the cassette. 3 Select input location on this VCR “L-1” or “L-2” — when connecting the device to the [AUDIO/VIDEO] or [AUDIO/S VIDEO] input connectors on the rear panel.
EN To use a Master Edit Control-equipped JVC NTSC camcorder If you are using a JVC NTSC camcorder equipped with the Master Edit Control, you can control the VCR from the camcorder. 1 Access the “ADDITIONAL” screen ( page 39), then set “AV COMPU-LINK” to “OFF” after performing step 6 on page 20. ● The [REMOTE PAUSE/AV COMPULINK] connector works as a Remote Pause connector when “AV COMPU-LINK” is set to “OFF”. ● For details, refer to the camcorder’s instruction manual.
EN EDITING (cont.) Editing Features A Changing display information Press [DISPLAY] during recording or recording pause. Each time you press the button, the front display panel shows the auxiliary input, clock time, and the recording speed in sequence. Auxiliary Input ● Turn on the VCR and the TV, and select the AV mode on the TV. ● Set the [VCR/TV/CABLE/DBS] selector on the Remote to [VCR].
EN TIMER RECORDING 23 1 Set timer program on NTSC device Auto Recording ● For timer programming method, refer to the manual supplied with the NTSC device. ● Turn on the VCR and the TV, and select the AV mode on the TV. ● Set the [VCR/TV/CABLE/DBS] selector on the Remote to [VCR]. This function allows you to automatically record a program which is timer-programmed on your NTSC device.
EN VIDEO NAVIGATION Navigation Playback ● Turn on the VCR and the TV, and select the AV mode on the TV. ● Set the [VCR/TV/CABLE/DBS] selector on the Remote to [VCR]. VCR CABLE TV /DBS This function is useful when you want to quickly find programs you have recorded on a tape using this VCR. This function allows you to select a program to watch, and then automatically search for the beginning of the program. 1 Load a cassette Insert a tape recorded on this VCR. ● The VCR turns on automatically.
EN A How to read the Video Navigation screen 1 2 LIBRARY BLANK 0107 ALL SPORTS TAPE 3 1 NAVI. SET UP BLANK 2:00 (LS3) 1/3 4 2. FOOTBALL 2 3. EURO 96 ENGLAND 4. PROJECT XYZ PLAY EXIT NAVI STOP OK SELECT Access Video Navigation screen Press [NAVI]. 1. SYDNEY OLYMPIC SYDNEY OLYMPIC 12/21/02 SAT 6:30 AM – 5:53 PM Deactivating Video Navigation If you do not want to store program information, you can deactivate the Video Navigation function. Navigation SEARCH 25 i.
EN VIDEO NAVIGATION (cont.) Finding Tapes ● Turn on the VCR and the TV, and select the AV mode on the TV. ● Set the [VCR/TV/CABLE/DBS] selector on the Remote to [VCR]. You can find a tape you want using Video Navigation. You have four methods to find tapes; by tape number, by program title, by category, by recording date, and by tape remaining time. A Finding by tape number Use the Remote to do the following operations. 1 Access Video Navigation screen Press [NAVI].
EN B Finding by program title C Use the Remote to do the following operations. 1 2 Follow steps 1 to 2 on page 26, then go to the following steps Access title screen Press [@ #] to move the arrow to “TITLE”, then press [OK]. Navigation SEARCH TAPE NUMBER EXIT BLANK TITLE CATEGORY OK SELECT NAVI 3 LIBRARY NAVI. SET UP DATE Use the Remote to do the following operations. To find a program by category, be sure to select program category in advance (墌 page 33).
EN VIDEO NAVIGATION (cont.) D Finding by recording date Use the Remote to do the following operations. 1 VCR CABLE TV /DBS 2 Follow steps 1 to 2 on page 26, then go to the following steps Access date screen Press [@ #] to move the arrow to “DATE”, then press [OK]. The list screen appears, being sorted by the recording date. Navigation SEARCH TAPE NUMBER EXIT [ ] 3 BLANK TITLE CATEGORY OK SELECT NAVI [ ] LIBRARY NAVI.
EN E Finding blank space 4 Select tape number Press [%fi], then press [OK]. You can find a tape whose remaining time is enough for a program you want to record. Navigation SEARCH LIBRARY BLANK SPACE LIST ● To go to another page of the lists, press [<] or [>]. Use the Remote to do the following operations. 2 0001 17:00 BLANK 0004 23:00 BLANK TITLE 11/01/99 MON 11:34 AM SEARCH LIBRARY BLANK SPACE LIST BLANK NAVI.
EN VIDEO NAVIGATION (cont.) Editing Titles ● Turn on the VCR and the TV, and select the AV mode on the TV. ● Set the [VCR/TV/CABLE/DBS] selector on the Remote to [VCR]. When you record a TV program on this VCR, the VCR automatically records the recording start time, date, and channel in each program title. If the tape is recorded for the first time, the tape number and the date and time are recorded in the tape title. You can then edit the tape title and the program titles as you like.
EN 5 How to enter the characters and symbols with the number keys on the Remote Access edit screen Press [@ #] to move the arrow to “EDIT”, then press [OK]. 31 Navigation SEARCH LIBRARY BLANK NAVI. SET UP TAPE NUMBER LIST 1/3 0017* SOCCER 0017* 1. JAPAN VS KOREA 0017* 2. ENGLAND VS BRAZIL Press the ‘Number’ keys, then press [>] to enter each character. Refer to the example below. 0016 EURO 2000 SOCCER 12/21/02 SAT 6:30 AM – 5:53 PM SEARCH EXIT OK SELECT NAVI 6 RETURN i.
EN VIDEO NAVIGATION (cont.) B Entering or Editing program title When you want to edit the program title, follow the procedure below by using the Remote. VCR CABLE TV /DBS 1 Load a cassette Insert a tape on which there is a program you want to edit. 2 Access Video Navigation screen Press [NAVI]. 3 B -5 [ ] Select program Press [%fi] to select the program you want to edit, then press [OK]. [ ] Navigation SEARCH LIBRARY BLANK 0107 ALL SPORTS TAPE 3. EURO 96 ENGLAND 4.
EN C Editing program category D When you want to change the program category, follow the procedure below by using the Remote. 1 2 Load a cassette When you want to delete the entire tape information (information for all recorded programs on the tape), follow the procedure below by using the Remote. • Tape information for the Video Navigation function is deleted, but the recorded programs will not be erased.
EN E VIDEO NAVIGATION (cont.) Deleting program information When you want to delete the stored information for each recorded program, follow the procedure below by using the Remote. • Program information for the Video Navigation function is deleted, but the recorded program will not be erased. F Checking memory You can check the amount of recorded information in the VCR’s memory. 1 Access Video Navigation screen Press [NAVI].
EN OTHER USEFUL FUNCTIONS Useful Function Settings ● Turn on the VCR and the TV, and select the AV mode on the TV. ● Set the [VCR/TV/CABLE/DBS] selector on the Remote to [VCR]. 35 You can use the other useful function settings on the Function Set Up screens by following the procedure described below. The table below shows the structure of the menu system.
EN OTHER USEFUL FUNCTIONS (cont.) Video settings “VIDEO FUNCTION” “V. CALIBRATION” (S-VHS/VHS only) “ON” “OFF” * The default setting is bold in the table below. When this function is set to “ON”, this VCR checks the condition of the tape in use during playback and recording, and compensates to provide the highest-possible pictures. This takes place whenever you play back a tape or start recording after inserting a tape.
EN Audio settings “AUDIO FUNCTION” 37 * The default setting is bold in the table below. “STD AUDIO REC MODE” “STANDARD” “PCM&STANDARD” You can select the audio format when you record a program or analog signal from connected devices in STD mode. When this function is set to “PCM&STANDARD”, you can obtain high-quality audio sound. “STANDARD” : Select this when the picture quality is important and when you record in MP2 format. “PCM&STANDARD” : Select this when the sound quality is important.
EN OTHER USEFUL FUNCTIONS (cont.) Input/Output settings “IN/OUT FUNCTION” 䡵 “TV OUTPUT 1” “720to1080” “NO CONV.” “ALLto480i” * The default setting is bold in the table below. Select the appropriate mode when receiving signals via i.LINK connector or playing back a D-VHS tape containing a recording of an HD (High Definition) signal: “720to1080” “NO CONV.” “ALLto480i” : 720p is up-converted to 1080i and output to the TV.
EN Additional settings “ADDITIONAL” 䡵 “SUPERIMPOSE” “ON” “OFF” 39 * The default setting is bold in the table below. When this function is set to “ON”, various VCR status information (on-screen display) appears on the screen. NOTES: ● When you use this VCR as the playback VCR for editing a tape, be sure to set this function to “OFF”; otherwise, the VCR status information (on-screen display) will be recorded on the edited tape.
EN OTHER USEFUL FUNCTIONS (cont.) * The default setting is bold in the table below. 䡵 “S-VHS MODE” “ON” “OFF” You can determine which recording mode — either S-VHS mode or VHS mode — is used for recording on D-VHS and S-VHS tapes. When this function is set to “ON”, you can record on D-VHS and S-VHS tapes with S-VHS picture quality. When this function is set to “OFF”, you can record on D-VHS and S-VHS tapes with VHS picture quality.
– EN 41 * The default setting is bold in the table below. 䡵 “S-VHS ET” “ON” “OFF” This function allows you to record on VHS tapes with S-VHS picture quality. Tapes recorded using this function can be played back on a VCR equipped with the S-VHS ET function. The SVHS indicator lights up on the front display panel when “S-VHS ET” is set to “ON”. NOTES: ● Before recording, make sure that ”V. CALIBRATION” is set to “ON” (墌 page 36). ● You cannot activate the S-VHS ET function...
EN OTHER USEFUL FUNCTIONS (cont.) i.LINK Set Up ● Turn on the VCR and the TV, and select the AV mode on the TV. ● Set the [VCR/TV/CABLE/DBS] selector on the Remote to [VCR]. i.LINK set up for connected device When you connect i.LINK compatible devices to this VCR, an i.LINK device number is assigned to each device in the order of connection. If you want to change the number, follow the procedure below. 1 Access Main Menu screen 2 Access i.LINK Set Up screen Press [MENU].
EN 43 What is i.LINK? i.LINK Connection Examples i.LINK is a digital serial interface that allows devices equipped with an i.LINK connector to exchange digital video signals, digital audio signals, and device control signals bi-directionally over a single cable. Examples of good i.LINK connections and bad i.LINK connections are shown below. The digital signals flow to all connected devices. When connecting i.
EN OTHER USEFUL FUNCTIONS (cont.) JLIP ID Number Setting ● Turn on the VCR and the TV, and select the AV mode on the TV. ● Set the [VCR/TV/CABLE/DBS] selector on the Remote to [VCR]. The JLIP (Joint Level Interface Protocol) terminal is used to connect the VCR to a personal computer or similar device. By connecting through the JLIP terminals, you can control the VCR during editing and certain other operations, from the connected personal computer or similar device.
EN MULTI-BRAND REMOTE CONTROL TV Brand Setting 45 When programmed (set) with a manufacturer’s (brand’s) code, this Remote can perform some of the remote control functions of the listed TVs. You can control a JVC TV without setting a brand code. 1 Turn on the TV Turn on the TV using the [POWER] button on the TV or its Remote. 2 3 - 1,3 4 VCR CABLE TV /DBS [TV/VCR] 4 3 - 24 [ENTER] ‘Number’ keys Set the [VCR/TV/CABLE/DBS] selector to [TV]. Follow the example shown below.
EN MULTI-BRAND REMOTE CONTROL (cont.) Changing Remote Control Code [POWER] [PLAY (3)] The Remote is capable of controlling four JVC video recorders independently. Each of VCRs can respond to one of four codes (A, B, C or D). This Remote control is preset to send A code signals because your VCR is initially set to respond to A code signals. You can easily change your Remote and the VCR to send and respond to B, C or D code signals.
EN TROUBLESHOOTING 47 Troubleshooting Before requesting service, use this chart and see if you can repair the trouble yourself. Small problems are often easily corrected, and this can save you the trouble of sending your VCR off for repair. POWER SYMPTOM POSSIBLE CAUSE CORRECTIVE ACTION 1. The power will not come on. ● The AC power cord is disconnected. Connect the AC power cord. 2. The Remote will not function. ● The batteries are weak. Replace the dead batteries with new ones.
EN TROUBLESHOOTING (cont.) EDITNG SYMPTOM POSSIBLE CAUSE CORRECTIVE ACTION 1. Recording will not start, and [CASS] blinks on the front display panel for about 5 seconds. ● There is no cassette loaded. ● The loaded cassette has had its record safety tab removed. Insert a cassette. Remove the cassette and cover the hole with adhesive tape, or load a cassette on which the record safety tab is intact. 2. Tape-to-tape editing will not work.
EN 49 OTHER PROBLEMS SYMPTOM POSSIBLE CAUSE CORRECTIVE ACTION 1. The auxiliary input cannot be changed. ● Recording is in progress. Press [PAUSE ( 8 )] to pause the recording, change auxiliary inputs, then press [PLAY ( 3 )] to resume recording. 2. The Remote will not operate your TV. ● The brand codes are set incorrectly. Reset the correct brand codes (墌 page 45). 3. “PM” blinks on the front display panel. ● The VCR do not work properly. Unplug the AC power plug once, then plug it again. 4.
EN TROUBLESHOOTING (cont.) The following conditions are product features and do not indicate mechanical problems. Playback of tapes recorded in D-VHS mode • You may see a mosaic (block) noise, grayed images, or a still image in cases of excessive distortion caused when playing back a damaged tape or when the heads are momentarily dirty. • After you press [PLAY (3)], it takes a moment until you see the image and hear the sound.
EN 51 Error Codes and Messages Some error codes and messages may appear on the TV screen when operating the VCR. Refer to the chart below for the solution. CODE MESSAGE DESCRIPTION 102 “REC PROHIBITED” ● An attempt was made to make a D-VHS recording of a program for which only the analog information is copy protected. ● While making a D-VHS recording of a program, a signal in which only the analog information is copy protected was input to this VCR.
EN TROUBLESHOOTING (cont.) Questions and answers PLAYBACK RECORDING Q. What happens if the tape reaches its end during playback or search? A. The VCR automatically rewinds it to the beginning. ............................................ Q. Can the VCR indefinitely remain in still mode? A. No. It stops automatically after 5 minutes to protect the heads. ............................................ Q.
INDEX EN 53 Index Glossary D-VHS By utilizing the characteristic of the tape media, video and audio data compressed using MPEG2 method can be recorded at high-speed rate and in high volume. Bit stream recording*1 method is employed to record inputted MPEG2-TS signals (signals with additional information such as program assignment for service access other than MPEG2 video and audio data) directly.
EN INDEX (cont.) List of terms This guide serves as a quick way to locate frequently used terms and on-screen display names. A I S Accidental erasure prevention 21 Audio Monitor 10 Automatic tracking 10 Auxiliary input indication 22 AV COMPU-LINK 40 Index Front display panel 56 Front panel 55 Rear panel 56 Remote 58 On-screen display 57 Index Search 11 Instant Timer Recording (ITR) 22 i.
EN 55 Front panel 1 S-VIDEO 23 VIDEO POWER 4 5 6 7 8 SPEED D-THEATER IN F-1 STOP/ EJECT MENU (MONO) L–AUDIO–R – CHANNEL + REC PLAY PAUSE REW FF D-VHS + 9 0 !@#$ 1 [S-VIDEO/VIDEO/AUDIO] input connectors [IN F-1] : 墌 page 6 2 [POWER] button : 墌 page 8, 20 3 [SPEED] button : 墌 page 19 4 Cassette loading slot 5 Remote sensor 6 [STOP/EJECT ( 7/0 )] button : 墌 page 8, 20 7 Front display panel : 墌 page 56 8 [PLAY ( 3 )] button : 墌 page 8 9 [CHANNEL +] and [–] buttons : 墌 page 10, 18, 20 0 [RE
EN INDEX (cont.) Rear panel 1 2 4 3 Y PB/CB 5 PR/CR S VIDEO REMOTE PAUSE/ AV COMPULINK R AUDIO L VIDEO i.LINK IN/OUT DV IN S400 IN OUT S VIDEO IN(L-1) R AUDIO L DIGITAL OUT OPTICAL PCM/DOLBY DIGITAL VIDEO IN(L-2) 6 7 1 AC power cord : 墌 page 5 2 Cooling fan ● This prevents the temperature from rising inside the VCR. Do not remove it. ● Install the VCR so as not to block the area around the cooling fan.
EN 57 On-screen display D-VHS INDEX -9 B D-VHS E JVC LR D-VHS STD 12:59 AM HD I-1 STEREO VD400E OFF CC1 CC2 CC3 CC4 1 Cassette indication 2 Cassette type indication : 墌 page 18 3 Index no. indication : 墌 page 11 4 VCR operation mode indication 5 Audio monitor indications : 墌 page 10 6 Clock time Time counter* Tape remaining time (When “REMAIN” appears)** To reset the time counter, press [C. RESET] on the Remote. The counter reading becomes “0:00:00”. It is also reset when a tape is inserted.
EN INDEX (cont.) Remote 1 2 3 4 REMOTE CODE POWER VCR CABLE TV /DBS PROGRAM 5 6 7 8 9 0 ! @ # $ % ^ & * ( ) q TV/VCR A/B/C/D START .,? PROG.CHECK STOP TIMER DATE TV/VCR CH DEF REC LINK ABC SUBTITLE GHI JKL DBS DAILY PQRS C. RESET MNO REC SPEED WEEKLY TUV WXYZ ENTER AUX SKIP SEARCH CANCEL PLAY FF REW STOP REC PAUS E MENU TV VOL NAVI BACK A.
EN SPECIFICATIONS GENERAL Power requirement Power consumption Power on Power off Temperature Operating Storage Operating position Dimensions (W x H x D) TIMER : AC 220 V-240 V , 50/60 Hz : 42 W : 18 W Input/Output Head azimuth Drum rotation Tracking system Recording specification Main data input rate Interface : MPEG2 standard : Encode MPEG1 Layer2 Decode MPEG1 Layer2/ Dolby Digital / LINEAR PCM (HS/STD) : 33.4 mm/sec (HS mode) 16.67 mm/sec (STD mode) 5.55 mm/sec (LS3 mode) 3.
EN SR-VD400E COPYRIGHT © 2004 VICTOR COMPANY OF JAPAN, LTD.