Filename [SR-VS30E_Cov1-EN.fm] SR-VS30E_Cov1-EN.fm Page 1 Tuesday, February 19, 2002 4:08 PM ENGLISH CONTENTS SAFETY FIRST 2 Safety Precautions .....................................2 Mini DV/S-VHS VIDEO CASSETTE RECORDER INDEX INSTALLING YOUR NEW RECORDER 4 10 Basic Connections ...................................10 S-VIDEO Connection ...............................11 INITIAL SETTINGS 12 Auto Set Up .............................................12 Preset Download ....................................
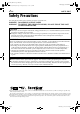
Filename [SR-VS30E_1-EN.fm] SR-VS30E_1-EN.book Page 2 Friday, February 1, 2002 3:35 PM 2 EN Masterpage:Left-FullColx2 SAFETY FIRST Safety Precautions The rating plate and the safety caution are on the rear of the unit. WARNING: DANGEROUS VOLTAGE INSIDE WARNING: TO PREVENT FIRE OR SHOCK HAZARD, DO NOT EXPOSE THIS UNIT TO RAIN OR MOISTURE. CAUTION 8 When you are not using the recorder for a long period of time, it is recommended that you disconnect the power cord from the mains outlet.
Filename [SR-VS30E_1-EN.fm] SR-VS30E_1-EN.book Page 3 Friday, February 1, 2002 3:35 PM Masterpage:Right-Full-NoTitle0 EN 3 For Italy: “It is declared that this product, brand JVC, conforms to the Ministry Decree n. 548 of 28 Aug.’95 published in the Official Gazette of the Italian Republic n. 301 of 28 Dec.’95” The STANDBY/ON 1 button does not completely shut off mains power from the unit, but switches operating current on and off. “`” shows electrical power standby and “!” shows ON.
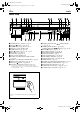
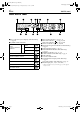
Filename [SR-VS30E_1-EN.fm] Masterpage:Left-index SR-VS30E_1-EN.book Page 4 Friday, February 1, 2002 3:35 PM 4 EN INDEX FRONT VIEW PR – / + PUSH / TURN DV DV IN/OUT ENTREE/SORTIE DV DV DUB VHS COPIE VHS * i.Link refers to the IEEE1394-1995 industry specification and extensions thereof. The logo is used for products compliant with the i.Link standard. 3 START IN /OUT INSERT 1 A STANDBY/ON 1 Button 墌 pg. 12 B DV Eject Button 墌 pg. 30, 31 C Stop 8 Button 墌 pg.
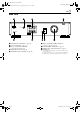
Filename [SR-VS30E_1-EN.fm] Masterpage:Right-index SR-VS30E_1-EN.book Page 5 Friday, February 1, 2002 3:35 PM EN 5 REAR VIEW IN/OUT AV1 (L-1) ENTREE/SORTIE ANTENNA ANTENNE IN ENTREE OUT S SORTIE AUDIO L OUT SORTIE OUT SORTIE AV2 (L-2) IN/DECODER ENTREE/DECODEUR A ANTENNA IN Connector 墌 pg. 10 B S OUT Connector 墌 pg. 11 C AV1 (L-1) IN/OUT Connector 墌 pg. 10, 50, 64, 65, 66 D Mains Power Cord 墌 pg. 10 E ANTENNA OUT Connector 墌 pg.
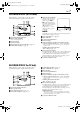
Filename [SR-VS30E_1-EN.fm] Masterpage:Left-index SR-VS30E_1-EN.book Page 6 Friday, February 1, 2002 3:35 PM 6 EN INDEX (cont.) FRONT DISPLAY PANEL A B.E.S.T. Picture System Display (VHS deck only) 墌 pg. 29 B Symbolic Mode Indicators PLAY: FF/REW VARIABLE SEARCH: STILL: SLOW: RECORD: RECORD PAUSE: AUDIO DUBBING: AUDIO DUBBING PAUSE: INSERT: INSERT PAUSE: AV INSERT: C Tape Speed Indicators 墌 pg. 21, 31 D Start Time Indicator ( ) 墌 pg. 38, 40 Stop Time Indicator ( ) 墌 pg.
Filename [SR-VS30E_1-EN.fm] Masterpage:Right-index SR-VS30E_1-EN.fm Page 7 Tuesday, February 19, 2002 4:04 PM EN 7 ON-SCREEN DISPLAY (for VHS deck) When “O.S.D.” is set to “ON” (墌 pg. 69), various operational indicators appear on the TV screen. G Tape Position Indicator The tape position indicator appears on the TV screen when you press 3 or 5 from the Stop mode or perform an Index Search (墌 pg. 23). The position of “q” in relation to “0” (beginning) or “+” (end) shows you where you are on the tape.
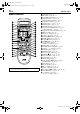
Filename [SR-VS30E_1-EN.fm] SR-VS30E_1-EN.book Page 8 Friday, February 1, 2002 3:35 PM 8 EN INDEX (cont.) REMOTE CONTROL TV CABLE/SAT DV VHS 1 LCD PROG AUDIO – –:– – TV/VCR 2 1 4 VPS/PDC 2 3 5 6 3 DAILY/QTDN. WEEKLY/HEBDO 7 8 0000 AUX 9 4 4 MENU 0 ENTER/ENTREE 1 PROG 30 SEC OK 3 2 START DEBUT STOP FIN DATE PR EXPRESS + TV PR + TV TV – T V PR – Buttons with a small dot on the left side of the name can also be used to operate your TV. (墌 pg.
Filename [SR-VS30E_1-EN.fm] SR-VS30E_1-EN.book Page 9 Friday, February 1, 2002 3:35 PM Masterpage:Right-Full-NoTitle0 EN 9 How To Use The remote control can operate most of your video recorder’s functions, as well as basic functions of TV sets and satellite receivers of JVC and other brands. (墌 pg. 61, 62) ● Point the remote control toward the receiving window. ● The maximum operating distance of the remote control is about 8 m.
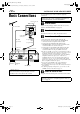
Filename [SR-VS30E_1-EN.fm] Masterpage:Left SR-VS30E_1-EN.fm Page 10 Tuesday, February 19, 2002 6:59 PM 10 EN INSTALLING YOUR NEW RECORDER Basic Connections Aerial connector Back of TV It’s essential that your video recorder be properly connected. THESE STEPS MUST BE COMPLETED BEFORE ANY VIDEO OPERATION CAN BE PERFORMED. A Check the contents. Make sure the package contains all of the accessories listed in “SPECIFICATIONS” on page 88. TV aerial cable B Situate the recorder.
Filename [SR-VS30E_1-EN.fm] Masterpage:Right-NoTitle0 SR-VS30E_1-EN.
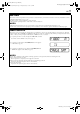
Filename [SR-VS30E_1a-EN.fm] Masterpage:Left SR-VS30E_1-EN.book Page 12 Friday, February 1, 2002 3:35 PM 12 EN INITIAL SETTINGS Auto Set Up Before starting, make sure of the following: Auto Channel Set/Auto Clock Set/ Auto Guide Program Number Set After the 1 button on the recorder or remote control is pressed for the first time to power on the recorder, by simply selecting your country*, the Auto Set Up function sets the tuner channels, clock** and Guide Program numbers automatically.
Filename [SR-VS30E_1a-EN.fm] Masterpage:Right-NoTitle0 SR-VS30E_1-EN.book Page 13 Friday, February 1, 2002 3:35 PM EN C Select the language. Press OK. The Language Set display appears on the front display panel and/or on the TV screen. On the front display panel Press rt to select your language code. Language Code ENGLISH DEUTSCH FRANCAIS ITALIANO CASTELLANO : : : : : 01 02 03 04 05 NEDERLANDS SVENSKA NORSK SUOMI DANSK : : : : : 06 07 08 09 10 (Example) DEUTSCH (02) is selected for SUISSE (41).
Filename [SR-VS30E_1a-EN.fm] Masterpage:Left SR-VS30E_1-EN.book Page 14 Friday, February 1, 2002 3:35 PM 14 EN INITIAL SETTINGS (cont.) Preset Download Auto Channel Set by Downloading from TV/Auto Clock Set/Auto Guide Program Number Set ATTENTION You can use this function only with a TV offering T-V Link, etc.* Be sure to use a fully-wired 21-pin SCART cable. * Compatible with TVs offering T-V Link, EasyLink, Megalogic, SMARTLINK, Q-Link, DATA LOGIC or NexTView Link via fullywired 21-pin SCART cable.
Filename [SR-VS30E_1a-EN.fm] Masterpage:Right-Full-NoTitle0 SR-VS30E_1-EN.book Page 15 Friday, February 1, 2002 3:35 PM EN 15 Results of Auto Set Up/Preset Download appear on the front display panel If both Auto Channel Set and Auto Clock Set have been performed successfully, the correct current time is displayed. Turn on the TV and select its AV mode, then make sure that all necessary stations have been stored in the recorder’s memory by using the PR button(s). ● If station names (ID – 墌 pg.
Filename [SR-VS30E_1a-EN.fm] Masterpage:Left SR-VS30E_1-EN.book Page 16 Friday, February 1, 2002 3:35 PM 16 EN INITIAL SETTINGS (cont.) This recorder offers you the choice to view on-screen messages in 10 different languages. Though Auto Set Up selects the language automatically (墌 pg. 15), you can change the language setting manually as required. Language Turn on the TV and select the AV mode. A Access the Main Menu screen. Press MENU. B Access the Country Set screen.
Filename [SR-VS30E_1a-EN.fm] Masterpage:Right SR-VS30E_1a-EN.fm Page 17 Tuesday, February 19, 2002 7:06 PM EN SAT CONTROL SET Satellite Receiver Control Setting Satellite receiver 17 The following procedure is required if you receive satellite channels through a satellite receiver. Approximately 20 seconds before the SHOWVIEW timer programming (墌 pg. 36) or Express timer programming (墌 pg.
Filename [SR-VS30E_1a-EN.fm] Masterpage:Left SR-VS30E_1-EN.book Page 18 Friday, February 1, 2002 3:35 PM 18 EN SAT CONTROL SET (cont.) C Access the Initial Set screen. Press rt to move the highlight bar (pointer) to “INITIAL SET”, then press OK or e. D Access the Sat Control Set screen. Press rt to move the highlight bar (pointer) to “SAT CONTROL SET”, then press OK or e. 1 2 1 2 3 4 5 6 3 7 8 9 4 4 0 1 3 2 E Enter the satellite receiver’s brand.
Filename [SR-VS30E_1a-EN.fm] Masterpage:Right-2lineTitle0 SR-VS30E_1-EN.book Page 19 Friday, February 1, 2002 3:35 PM SAT CONTROL SET (cont.) T-V LINK G Check the result of the test. If the satellite receiver’s channel number has been changed to the same one as you set in step 6 ... Press rt to move the highlight bar (pointer) to “CHANGED TO ...”, then press OK or e to finish the Sat Control Set mode. If the satellite receiver’s channel number has not been changed correctly ...
Filename [SR-VS30E_1a-EN.fm] Masterpage:Left SR-VS30E_1-EN.book Page 20 Friday, February 1, 2002 3:35 PM 20 EN PLAYBACK/RECORDING ON VHS DECK Basic Playback (VHS deck) Turn on the TV and select the AV mode. A Load a cassette. Make sure the window side is up, the rear label side is facing you and the arrow on the front of the cassette is pointed toward the recorder. ● Do not apply too much pressure when inserting. ● The recorder’s power comes on automatically.
Filename [SR-VS30E_1a-EN.fm] Masterpage:Right-NoTitle0 SR-VS30E_1-EN.book Page 21 Friday, February 1, 2002 3:35 PM EN Basic Recording A Load a cassette. (VHS deck) ● The recorder’s power comes on automatically. Turn on the TV and select the AV mode. 21 Insert a VHS (or S-VHS) cassette with the record safety tab intact. B Select the VHS deck. Press VHS. ● The VHS button lights on the recorder. C Choose a programme. Press PR +/– or the number keys.
Filename [SR-VS30E_1a-EN.fm] Masterpage:Left SR-VS30E_1-EN.book Page 22 Friday, February 1, 2002 3:35 PM 22 EN PLAYBACK/RECORDING ON VHS DECK (cont.) Playback Features (VHS deck) NOTE: Refer to the illustrations below as you read the following procedures. Reverse Forward Clean the video heads using a dry cleaning cassette — TCL-2 — when: ● Rough, poor picture appears while a tape is played back. ● The picture is unclear or no picture appears.
Filename [SR-VS30E_1a-EN.fm] Masterpage:Right-NoTitle0 SR-VS30E_1-EN.book Page 23 Friday, February 1, 2002 3:35 PM EN High-Speed (Turbo) Search Index Search During playback, turn the JOG dial quickly to the left or right. Your recorder automatically marks index codes at the beginning of each recording. This function gives you quick access to any one of 9 index codes in either direction. OR During playback or still, press 5 for forward highspeed search, or 3 for reverse high-speed search.
Filename [SR-VS30E_1a-EN.fm] Masterpage:Left SR-VS30E_1-EN.book Page 24 Friday, February 1, 2002 3:35 PM 24 EN PLAYBACK/RECORDING ON VHS DECK (cont.) Next Function Memory The Next Function Memory “tells” the recorder what to do after rewinding. Before continuing, make sure the recorder is in the Stop mode. a- For Automatic Start Of Playback Press 3, then press 4 within 2 seconds. b- For Automatic Power Off Press 3, then press 1 within 2 seconds.
Filename [SR-VS30E_1a-EN.fm] Masterpage:Right-NoTitle0 SR-VS30E_1-EN.book Page 25 Friday, February 1, 2002 3:35 PM EN 25 Manual Tracking Your recorder is equipped with automatic tracking control. During playback, you can override this and adjust the tracking manually by pressing the PR buttons. 1 1 Override automatic tracking. 2 Press p on the remote control. 1 2 3 4 5 6 3 7 8 9 4 4 2 Press PR + or –. ● Press p again to return to automatic tracking.
Filename [SR-VS30E_1a-EN.fm] Masterpage:Left SR-VS30E_1-EN.book Page 26 Friday, February 1, 2002 3:35 PM 26 EN PLAYBACK/RECORDING ON VHS DECK (cont.) Recording Features Record One Programme While Watching Another (VHS deck) Once recording is in progress, all you need to do is to set the channel controls on the TV for the station you wish to view.
Filename [SR-VS30E_1a-EN.fm] Masterpage:Right-NoTitle0 SR-VS30E_1-EN.book Page 27 Friday, February 1, 2002 3:35 PM EN 27 Elapsed Recording Time Indication 1 Set the counter display. Press – –:– – until a counter reading appears on the front display panel. 2 Reset the counter. Press 0000 before starting recording or playback. ● The counter is reset to “0:00:00” and shows the exact elapsed time as the tape runs. You can check the exact time of a recording or playback.
Filename [SR-VS30E_1a-EN.fm] Masterpage:Left SR-VS30E_1-EN.book Page 28 Friday, February 1, 2002 3:35 PM 28 EN PLAYBACK/RECORDING ON VHS DECK (cont.) Retake You can cut out unnecessary parts of a TV programme while you are recording it. End of programme Programme Unnecessary part Beginning of programme Unnecessary part Programme Recorded part Go back to end of programme to cut out unnecessary part 1 Engage the Record-Pause mode. Press 9 during recording. 2 Locate the start point.
Filename [SR-VS30E_1a-EN.fm] Masterpage:Right-NoTitle0 SR-VS30E_1-EN.book Page 29 Friday, February 1, 2002 3:35 PM EN B.E.S.T. Picture System 29 Recording The recorder assesses the quality of the tape once you initiate recording. DURING B.E.S.T. (VHS deck) The B.E.S.T. (Biconditional Equalised Signal Tracking) system checks the condition of the tape in use during playback and recording, and compensates to provide the highest-possible playback and recording pictures. You can set “B.E.S.T.
Filename [SR-VS30E_1a-EN.fm] Masterpage:Left SR-VS30E_1-EN.book Page 30 Friday, February 1, 2002 3:35 PM 30 EN PLAYBACK/RECORDING ON DV DECK Basic Playback (DV deck) Turn on the TV and select the AV mode. A Load a cassette. Make sure the window side is up, the rear label side is facing you and the arrow on the front of the cassette is pointed toward the recorder. ● Do not apply too much pressure when inserting. ● The recorder’s power comes on automatically.
Filename [SR-VS30E_1a-EN.fm] Masterpage:Right-NoTitle0 SR-VS30E_1-EN.book Page 31 Friday, February 1, 2002 3:35 PM EN Basic Recording A Load a cassette. (DV deck) ● The recorder’s power comes on automatically. Turn on the TV and select the AV mode. 31 Insert a Mini DV cassette with the erase protection switch set to “REC”. B Select the DV deck. Press DV. ● The DV button lights on the recorder. C Choose a programme. Press PR +/– or the number keys.
Filename [SR-VS30E_1a-EN.fm] Masterpage:Left SR-VS30E_1-EN.book Page 32 Friday, February 1, 2002 3:35 PM 32 EN PLAYBACK/RECORDING ON DV DECK (cont.) Playback Features (DV deck) NOTE: Refer to the illustrations below as you read the following procedures. Reverse Forward Clean the video heads using a dry cleaning cassette — M-DV12CL — when: ● No picture during playback. ● Blocks of noise appear during playback. ● “USE CLEANING CASSETTE” appears on the screen (only with “O.S.D.” set to “ON” (墌 pg. 69)).
Filename [SR-VS30E_1a-EN.fm] Masterpage:Right-NoTitle0 SR-VS30E_1-EN.book Page 33 Friday, February 1, 2002 3:35 PM EN 33 High-Speed (Turbo) Search Next Function Memory For forward high-speed search During playback, turn the JOG dial quickly to the right. For reverse high-speed search (refer to the JOG dial illustration) During playback, turn the JOG dial one or two click to the right (➀), and then turn it quickly to the left (➁).
Filename [SR-VS30E_1a-EN.fm] Masterpage:Left SR-VS30E_1-EN.book Page 34 Friday, February 1, 2002 3:35 PM 34 EN PLAYBACK/RECORDING ON DV DECK (cont.) Recording Features Record One Programme While Watching Another (DV deck) Once recording is in progress, all you need to do is to set the channel controls on the TV for the station you wish to view.
Filename [SR-VS30E_1a-EN.fm] Masterpage:Right-NoTitle0 SR-VS30E_1-EN.book Page 35 Friday, February 1, 2002 3:35 PM EN 35 Receiving Stereo and Bilingual Programmes Your recorder is equipped with a Sound-Multiplex decoder (A2) and a Digital stereo sound decoder (NICAM) making reception of stereo and bilingual broadcasts possible. When the channel is changed, the type of broadcast being received will be displayed on the TV screen for a few seconds.
Filename [SR-VS30E_2-EN.fm] Masterpage:Left SR-VS30E_1-EN.book Page 36 Friday, February 1, 2002 3:35 PM 36 EN TIMER RECORDING SHOWVIEW Timer Programming ® With the SHOWVIEW system, timer programming is greatly simplified because each TV programme has a corresponding code number which your recorder is able to recognize. You can use the remote control with LCD panel to enter the SHOWVIEW number.
Filename [SR-VS30E_2-EN.fm] Masterpage:Right-NoTitle0 SR-VS30E_1-EN.book Page 37 Friday, February 1, 2002 3:35 PM EN G Check the programme data. The SHOWVIEW number you entered and the matching timer-recording information are displayed on the TV screen. Check they are correct. The front display panel shows the programme start time. Pressing " changes the display to the programme stop time, then the date and channel position.
Filename [SR-VS30E_2-EN.fm] Masterpage:Left SR-VS30E_1-EN.book Page 38 Friday, February 1, 2002 3:35 PM 38 EN TIMER RECORDING (cont.) Express Timer Programming If you do not know the SHOWVIEW number for the programme you wish to record, use the following procedure to set your recorder to timer-record the programme. Before performing Express Timer Programming: ● Make sure that the recorder’s built-in clock is set properly. ● Turn on the TV and select the AV mode. A Turn on the recorder. Press 1.
Filename [SR-VS30E_2-EN.fm] Masterpage:Right-NoTitle0 SR-VS30E_1-EN.book Page 39 Friday, February 1, 2002 3:35 PM EN H Enter the programme date. Press DATE+/–. ● The current date appears on the TV screen. The date you enter appears in its place. I Enter the channel position. Press PR+/–. ● If you want to set a satellite programme, press the number key “0” to change “TV PROG” to “SAT”, then press PR+/–. 39 NOTES: ● You can programme each deck to timer-record as many as 6 programmes.
Filename [SR-VS30E_2-EN.fm] Masterpage:Left SR-VS30E_1-EN.book Page 40 Friday, February 1, 2002 3:35 PM 40 EN TIMER RECORDING (cont.) 24 Hour Express Timer Programming Before performing the 24 Hour Express Timer Programming: ● ● ● ● Make sure that the recorder’s built-in clock is set properly. Select the deck. Set the tape speed. For the VHS deck: Insert a VHS (or S-VHS) cassette with the record safety tab intact. For the DV deck: Insert a Mini DV cassette with the erase protection switch set to “REC”.
Filename [SR-VS30E_2-EN.fm] SR-VS30E_1-EN.book Page 41 Friday, February 1, 2002 3:35 PM Masterpage:Right-NoTitle0 EN 41 NOTES: ● You can programme each deck to timer-record as many as 6 programmes. If you try to programme the recorder to record a seventh, “PROGRAM FULL” appears on the TV screen and “FULL” appears on the front display panel. To record the extra programme, you must first cancel any unnecessary programmes (墌 pg. 42).
Filename [SR-VS30E_2-EN.fm] Masterpage:Left SR-VS30E_1-EN.book Page 42 Friday, February 1, 2002 3:35 PM 42 EN TIMER RECORDING (cont.) C Access the Programme screen/display. Press " again to check more information. Each time you press ", the next programme’s information appears. 1 2 1 2 3 4 5 6 3 7 8 9 4 4 The front display panel shows the programme start time. Pressing OK changes the display to the programme stop time, then the date and the channel position.
Filename [SR-VS30E_2-EN.fm] Masterpage:Right-NoTitle0 SR-VS30E_1-EN.book Page 43 Friday, February 1, 2002 3:35 PM EN 43 When programmes overlap each other If “PROGRAM OVERLAPPED” appears, you have another programme overlapping the programme you have just made. The Programme Check screen appears and conflicting programmes will start blinking. 1 2 1 2 3 4 5 6 3 7 8 9 4 4 0 1 2 3 Example: Programme 1 (you have just made) and Programme 4 overlap each other on the VHS deck.
Filename [SR-VS30E_3-EN.fm] Masterpage:Left SR-VS30E_1-EN.book Page 44 Friday, February 1, 2002 3:35 PM 44 EN EDITING Dubbing An Entire Cassette Tape Dubbing Because this recorder includes both VHS deck and DV deck, you can easily use it for dubbing without connecting any other equipment. (from DV to VHS) A Load cassettes. For the VHS deck Insert a VHS (or S-VHS) cassette with the record safety tab intact, or cover the hole using adhesive tape.
Filename [SR-VS30E_3-EN.fm] Masterpage:Right-NoTitle0 SR-VS30E_1-EN.book Page 45 Friday, February 1, 2002 3:35 PM EN 45 Dubbing An Entire Cassette Tape Dubbing Because this recorder includes both VHS deck and DV deck, you can easily use it for dubbing without connecting any other equipment. (from VHS to DV) A Load cassettes. For the VHS deck Insert a VHS (or S-VHS) cassette with the record safety tab removed.
Filename [SR-VS30E_3-EN.fm] Masterpage:Left SR-VS30E_1-EN.book Page 46 Friday, February 1, 2002 3:35 PM 46 EN EDITING (cont.) Normal Dubbing (from DV to VHS) You can dub selected scenes on a tape, starting and stopping wherever you wish. A Load cassettes. For the VHS deck Insert a VHS (or S-VHS) cassette with the record safety tab intact, or cover the hole using adhesive tape. For the DV deck Insert a Mini DV cassette with the erase protection switch set to “SAVE”. B Select the dubbing direction.
Filename [SR-VS30E_3-EN.fm] Masterpage:Right-NoTitle0 SR-VS30E_1-EN.book Page 47 Friday, February 1, 2002 3:35 PM EN Normal Dubbing (from VHS to DV) 47 You can dub selected scenes on a tape, starting and stopping wherever you wish. A Load cassettes. For the VHS deck Insert a VHS (or S-VHS) cassette with the record safety tab removed. For the DV deck Insert a Mini DV cassette with the erase protection switch set to “REC”. B Select the dubbing direction. 1 3 2 Press .
Filename [SR-VS30E_3-EN.fm] Masterpage:Left SR-VS30E_1-EN.book Page 48 Friday, February 1, 2002 3:35 PM 48 EN EDITING (cont.) You can use a camcorder as the source player and your recorder as the recording deck. You can perform digital dubbing if you connect a device such as a camcorder which has a DV IN/OUT connector. Because the signals are digital, there is no loss of video or audio quality as a result of editing. Edit From A Camcorder A Make connections.
Filename [SR-VS30E_3-EN.fm] Masterpage:Right-Full-NoTitle0 SR-VS30E_3-EN.fm Page 49 Friday, February 1, 2002 6:11 PM EN A If the camcorder has no S-VIDEO output connector ... VIDEO input Recorder 1 3 B If the camcorder has an S-VIDEO output connector ...
Filename [SR-VS30E_3-EN.fm] Masterpage:Left SR-VS30E_1-EN.book Page 50 Friday, February 1, 2002 3:35 PM 50 EN EDITING (cont.) Edit To Or From Another Video Recorder 1 2 1 2 3 4 5 6 3 7 8 9 4 4 0 1 3 2 You can use your recorder as the source player or as the recording deck. A Make connections. Connect the player’s 21-pin SCART connector to the recorder’s 21-pin SCART connector as illustrated on page 51. A When using your recorder as the source player ... ...
Filename [SR-VS30E_3-EN.fm] Masterpage:Right-Full-NoTitle0 SR-VS30E_3-EN.
Filename [SR-VS30E_3-EN.fm] Masterpage:Left SR-VS30E_1-EN.book Page 52 Friday, February 1, 2002 3:35 PM 52 EN EDITING (cont.) Output/Input Set Press rt to move the highlight bar (pointer) to “OUTPUT/INPUT SET”, then press OK or e. the output or input mode for the AV1 C Select (L-1) IN/OUT connector. 1 2 1 2 3 4 5 6 3 7 8 9 4 4 0 1 B Access the Output/Input Set screen. 3 2 Press rt to move the highlight bar (pointer) to “L-1 OUTPUT” or “L-1 INPUT”.
Filename [SR-VS30E_3-EN.fm] Masterpage:Right-NoTitle0 SR-VS30E_1-EN.book Page 53 Friday, February 1, 2002 3:35 PM EN 53 L-2 SELECT Setting VHS F-1 INPUT Setting Set “L-2 SELECT” to the appropriate mode depending on the type of appliance connected to the recorder’s AV2 (L-2) IN/ DECODER connector. Set “VHS F-1 INPUT” to the appropriate mode depending on the connector (VIDEO or S-VIDEO input connector) being used on the front panel.
Filename [SR-VS30E_3-EN.fm] Masterpage:Left SR-VS30E_1-EN.book Page 54 Friday, February 1, 2002 3:35 PM 54 EN EDITING (cont.) Audio Dubbing Your recorder VHS Audio Dubbing Audio Dubbing replaces the normal audio sound of a previously recorded tape with a new soundtrack. 1 Normal audio track 3 2 Pre-recorded tape Video/Hi-Fi audio track CD player, etc. Audio-dubbed tape CD player, etc.
Filename [SR-VS30E_3-EN.fm] Masterpage:Right-NoTitle0 SR-VS30E_1-EN.book Page 55 Friday, February 1, 2002 3:35 PM EN A Make connections. Connect an audio component to the AUDIO L + R input connectors on the recorder’s front panel. ● When connecting a monaural audio component, use only the recorder’s AUDIO L input connector. B Load a cassette. For the VHS deck Insert a VHS (or S-VHS) cassette with the record safety tab intact, or cover the hole using adhesive tape.
Filename [SR-VS30E_3-EN.fm] Masterpage:Left SR-VS30E_1-EN.book Page 56 Friday, February 1, 2002 3:35 PM 56 EN EDITING (cont.) Insert Editing Your recorder Recorder VHS Insert Editing Insert Editing replaces part of the recorded scene with new material. Both the picture and Hi-Fi audio soundtrack are replaced with new ones, while the normal audio soundtrack remains unchanged. If you wish to change the normal audio track as well, use the Audio Dubbing function simultaneously.
Filename [SR-VS30E_3-EN.fm] Masterpage:Right-NoTitle0 SR-VS30E_1-EN.book Page 57 Friday, February 1, 2002 3:35 PM EN A Make connections. Connect the player’s VIDEO OUT or S-VIDEO OUT and AUDIO OUT connectors to your recorder’s VIDEO or S-VIDEO and AUDIO input connectors on the front panel. B Set the recorder’s input mode. Press AUX (number key “0”) and/or PR to select “F-1”.
Filename [SR-VS30E_3-EN.fm] Masterpage:Left SR-VS30E_1-EN.book Page 58 Friday, February 1, 2002 3:35 PM 58 EN EDITING (cont.) Random Assemble Editing 64-programme Editing Memory (8 programmes x 8 scenes) By using the Random Assemble Editing function, you can select up to 8 scenes from a previously recorded Mini DV cassette and automatically dub them onto a VHS cassette. Random Assemble Editing is possible only when dubbing from the DV deck to the VHS deck. A Load cassettes.
Filename [SR-VS30E_3-EN.fm] Masterpage:Right-NoTitle0 SR-VS30E_1-EN.book Page 59 Friday, February 1, 2002 3:35 PM EN F Locate the end point. Press 4 to start playback. Find the edit-out point where you want the edited scene to end by pressing 9, then press IN/OUT. ● The edit-out point is registered in memory and appears on the screen. ● The total time of the edited scenes is displayed to the right of “TOTAL”. ● Repeat steps 5 and 6 for each additional scene. G Prepare the source tape.
Filename [SR-VS30E_3-EN.fm] Masterpage:Left SR-VS30E_1-EN.book Page 60 Friday, February 1, 2002 3:35 PM 60 EN REMOTE CONTROL Remote Control Functions Remote A/B/C/D Code Switching The remote control is capable of controlling four JVC video recorders independently. Each of recorders can respond to one of four codes (A, B, C or D). The remote control is preset to send A code signals because your video recorder is initially set to respond to A code signals.
Filename [SR-VS30E_3-EN.fm] Masterpage:Right-NoTitle0 SR-VS30E_1-EN.book Page 61 Friday, February 1, 2002 3:35 PM EN TV Multi-Brand Remote Control Your remote control can operate the basic functions of your TV set. In addition to JVC TVs, other manufacturer’s TVs can also be controlled. Before performing the following steps: Turn off the TV using its remote control. 61 A Set the TV brand code. Press TV/CABLE/SAT to switch the display to “TV” and keep pressing the button down until “TV-_ _” appears.
Filename [SR-VS30E_3-EN.fm] Masterpage:Left SR-VS30E_1-EN.book Page 62 Friday, February 1, 2002 3:35 PM 62 EN REMOTE CONTROL (cont.) Satellite Receiver Multi-Brand Remote Control Your remote control can operate the basic functions of your satellite receiver set. In addition to JVC satellite receivers, other manufacturer’s satellite receivers can also be controlled. Before performing the following steps: Turn off the satellite receiver using its remote control. A Set the satellite receiver brand code.
Filename [SR-VS30E_3-EN.fm] Masterpage:Right SR-VS30E_1-EN.book Page 63 Friday, February 1, 2002 3:35 PM EN SYSTEM CONNECTIONS Connecting To A Printer Your recorder 63 You can make printouts of video images by connecting the GV-DT1/GV-DT3 Digital Printer (sold separately) to the DV IN/OUT connector. A Make connections. Connect the printer’s DV IN connector to the recorder’s DV IN/OUT connector. B Select the deck. Press DV. ● When you use the VHS deck ... ... Press .
Filename [SR-VS30E_3-EN.fm] Masterpage:Left SR-VS30E_1-EN.book Page 64 Friday, February 1, 2002 3:35 PM 64 EN SYSTEM CONNECTIONS (cont.) Connecting To A Satellite Receiver Simple Connections NOTES: This is an example of simple connection if your TV has one 21-pin AV input (SCART) connector. Connect the satellite receiver to the AV2 (L-2) IN/ DECODER connector, then connect the AV1 (L-1) IN/ OUT connector to the TV’s connector. ● Set “L-2 SELECT” to “A/V” (墌 pg. 53).
Filename [SR-VS30E_3-EN.fm] Masterpage:Right-NoTitle0 SR-VS30E_1-EN.book Page 65 Friday, February 1, 2002 3:35 PM EN 65 Perfect Connections NOTES: This is an example of recommended connection if your TV has two 21-pin AV input (SCART) connectors. Connect the decoder to the satellite receiver’s connector if you have a decoder, AV1 (L-1) IN/OUT connector to TV’s connector, and AV2 (L-2) IN/DECODER connector to the satellite receiver’s connector. Then connect the satellite receiver and TV.
Filename [SR-VS30E_3-EN.fm] Masterpage:Left SR-VS30E_1-EN.book Page 66 Friday, February 1, 2002 3:35 PM 66 EN SYSTEM CONNECTIONS (cont.) Connecting/Using A Decoder The AV2 (L-2) IN/DECODER connector can be used as an input connector for an external decoder (descrambler). Simply connect a decoder and you can enjoy the variety of programming that is available through scrambled channels. A Select the input mode. Set “L-2 SELECT” to “DECODER”. (墌 pg.
Filename [SR-VS30E_3-EN.fm] Masterpage:Right-NoTitle0 SR-VS30E_1-EN.book Page 67 Friday, February 1, 2002 3:35 PM EN 67 Connecting/Using A Stereo System These instructions enable you to connect your video recorder to your Hi-Fi stereo system (if you have one) and listen to the soundtrack through the stereo.
Filename [SR-VS30E_4-EN.fm] Masterpage:Left SR-VS30E_1-EN.book Page 68 Friday, February 1, 2002 3:35 PM 68 EN SUBSIDIARY SETTINGS You can change various mode settings on TV screen by following the procedure described below. For each mode setting, see pages 69 to 73. Mode Set Turn on the TV and select the AV mode. MODE SET 墌 pg. 69 VHS MODE SET 墌 pg. 70 DV MODE SET 墌 pg. 73 ● The procedure shows how to set “O.S.D.” to “ON” on the “MODE SET” screen as an example. A Access the Main Menu screen.
Filename [SR-VS30E_4-EN.fm] SR-VS30E_1-EN.book Page 69 Friday, February 1, 2002 3:35 PM Masterpage:Right-Full-NoTitle0 EN MODE SET 8 O.S.D. ON OFF 69 * The default setting is bold in the table below. When this function is set to “ON”, various operational indicators appear on the TV screen. Messages appear in the selected language (墌 pg. 15, 16). NOTES: ● When you use this recorder as the source player for editing, be sure to set “O.S.D.” to “OFF” before starting.
Filename [SR-VS30E_4-EN.fm] Masterpage:Left-FullCol SR-VS30E_1-EN.book Page 70 Friday, February 1, 2002 3:35 PM 70 EN SUBSIDIARY SETTINGS (cont.) VHS MODE SET 8 B.E.S.T. ON OFF 8 PICTURE CONTROL AUTO EDIT SOFT SHARP * The default setting is bold in the table below. You can set the B.E.S.T. (Biconditional Equalised Signal Tracking) system to “ON” or “OFF” (墌 pg. 29). This feature helps you to adjust the playback picture quality according to your preference. Normally select “AUTO”.
Filename [SR-VS30E_4-EN.fm] Masterpage:Right-Full-NoTitle0 SR-VS30E_1-EN.book Page 71 Friday, February 1, 2002 3:35 PM EN VHS MODE SET (cont.) 8 DIGITAL 3R ON OFF 71 * The default setting is bold in the table below. When this function is set to “ON”, the Digital 3R picture system applies edge correction to the luminance signal to enhance detail. NOTES: ● Normally it is recommended to keep “DIGITAL 3R” set to “ON”.
Filename [SR-VS30E_4-EN.fm] Masterpage:Left-FullCol SR-VS30E_1-EN.book Page 72 Friday, February 1, 2002 3:35 PM 72 EN SUBSIDIARY SETTINGS (cont.) VHS MODE SET (cont.) 8 COLOUR SYSTEM PAL/NTSC MESECAM * The default setting is bold in the table below. You can play back PAL, NTSC and MESECAM tapes, or record PAL and SECAM* signals on this recorder. Select the appropriate colour system.
Filename [SR-VS30E_4-EN.fm] SR-VS30E_1-EN.book Page 73 Friday, February 1, 2002 3:35 PM Masterpage:Right-Full-NoTitle0 EN DV MODE SET 8 SOUND MODE 12BIT 16BIT 8 12BIT MODE SOUND1 SOUND2 FULL SOUND 73 * The default setting is bold in the table below. Select the appropriate mode before recording on a Mini DV tape. 12BIT: Enables Audio Dubbing later. Audio Dubbing is impossible but the recorded sound quality is 16BIT: higher than “12BIT”.
Filename [SR-VS30E_4-EN.fm] Masterpage:Left SR-VS30E_1-EN.book Page 74 Friday, February 1, 2002 3:35 PM 74 EN SUBSIDIARY SETTINGS (cont.) Tuner Set IMPORTANT Turn on the TV and select the AV mode. Perform the following steps only if — — Auto Channel Set has not been set correctly by Auto Set Up or by Preset Download (墌 pg. 12, 14). — you have moved to a different area or if a new station starts broadcasting in your area.
Filename [SR-VS30E_4-EN.fm] Masterpage:Right-NoTitle0 SR-VS30E_1-EN.book Page 75 Friday, February 1, 2002 3:35 PM EN 75 F Perform Auto Channel Set. Press OK twice. 1 2 1 2 3 4 5 6 3 7 8 9 4 4 0 1 3 2 IMPORTANT ● In certain reception conditions, station names may not be stored correctly, and Auto Guide Program Number Set may not work properly.
Filename [SR-VS30E_4-EN.fm] Masterpage:Left SR-VS30E_1-EN.book Page 76 Friday, February 1, 2002 3:35 PM 76 EN SUBSIDIARY SETTINGS (cont.) D Select the band. 1 Press rt to change the band between CH (regular) and CC (cable), then press e. 2 1 2 3 4 5 6 3 7 8 9 4 4 0 1 3 2 E Input the channel. Press the number keys to input the channel number you want to store. ● Input “0” before any single number entries. ● To input the registered station name (ID – 墌 pg.
Filename [SR-VS30E_4-EN.fm] Masterpage:Right-NoTitle0 SR-VS30E_1-EN.book Page 77 Friday, February 1, 2002 3:35 PM EN Delete A Channel Perform steps 1 and 2 of “Manual Channel Set” on page 76 to access the Confirmation screen before continuing. A Select the item. Press rt w e until the item you want to delete begins blinking. B Delete a channel. Press &. ● The item directly beneath the cancelled one moves up one line. ● Repeat steps 1 and 2 as necessary. C Close the Confirmation screen. Press MENU.
Filename [SR-VS30E_4-EN.fm] Masterpage:Left SR-VS30E_1-EN.book Page 78 Friday, February 1, 2002 3:35 PM 78 EN Set Stations (A) Set station names that are registered in your recorder. Perform steps 1 and 2 of “Manual Channel Set” on page 76 to access the Confirmation screen before continuing. A Select the item. Press rt w e until the item you want begins blinking. B Access the Manual Channel Set screen. Press OK twice. C Select the new station.
Filename [SR-VS30E_4-EN.fm] Masterpage:Right-NoTitle0 SR-VS30E_1-EN.
Filename [SR-VS30E_4-EN.fm] Masterpage:Left SR-VS30E_1-EN.book Page 80 Friday, February 1, 2002 3:35 PM 80 EN SUBSIDIARY SETTINGS (cont.) Clock Set IMPORTANT Turn on the TV and select the AV mode. A Turn on the recorder. 1 Press 1. 2 1 2 3 4 5 6 3 7 8 9 4 4 0 1 If you performed Auto Set Up (墌 pg. 12), Preset Download (墌 pg. 14) or Auto Channel Set (墌 pg. 74), without ever having set the clock previously, the recorder’s built-in clock is also set automatically.
Filename [SR-VS30E_4-EN.fm] Masterpage:Right-NoTitle0 SR-VS30E_1-EN.book Page 81 Friday, February 1, 2002 3:35 PM EN 81 E Set the date and time. Press rt to set the time, then press OK or e. The “DATE” display begins blinking. Repeat the same procedure to set the date and year. ● When you set the time, press and hold rt to change the time by 30 minutes. ● When you set the date, press and hold rt to change the date by 15 days. 1 F Set Just Clock.
Filename [SR-VS30E_4-EN.fm] Masterpage:Left SR-VS30E_1-EN.book Page 82 Friday, February 1, 2002 3:35 PM 82 EN SUBSIDIARY SETTINGS (cont.) SHOWVIEW System Setup ® IMPORTANT Normally, Auto Set Up (墌 pg. 12), Preset Download (墌 pg. 14) or Auto Channel Set (墌 pg. 74) sets the Guide Program numbers automatically. You need to set the Guide Program numbers manually only in the following cases.
Filename [SR-VS30E_4-EN.fm] Masterpage:Right-FullCol SR-VS30E_1-EN.book Page 83 Friday, February 1, 2002 3:35 PM EN TROUBLESHOOTING 83 Before requesting service for a problem, use this chart and see if you can repair the trouble yourself. Small problems are often easily corrected, and this can save you the trouble of sending your video recorder off for repair. POWER SYMPTOM POSSIBLE CAUSE CORRECTIVE ACTION 1. No power is supplied to the recorder. ● The mains power cord is disconnected. 2.
Filename [SR-VS30E_4-EN.fm] Masterpage:Left-FullCol SR-VS30E_1-EN.book Page 84 Friday, February 1, 2002 3:35 PM 84 EN TROUBLESHOOTING (cont.) RECORDING SYMPTOM 1. Recording cannot be started. POSSIBLE CAUSE CORRECTIVE ACTION ● For the VHS deck There is no cassette loaded, or the cassette loaded has had its record safety tab removed. Insert a VHS (or S-VHS) cassette, or using adhesive tape, cover the hole where the tab was removed.
Filename [SR-VS30E_4-EN.fm] Masterpage:Right-Full-NoTitle0 SR-VS30E_1-EN.book Page 85 Friday, February 1, 2002 3:35 PM EN 85 TIMER RECORDING SYMPTOM POSSIBLE CAUSE CORRECTIVE ACTION ● The clock and/or the timer have been set incorrectly. Re-perform the clock and/or timer settings. ● The timer is not engaged. Press # and confirm that “#” is displayed on the front display panel. ● Timer recording may not work when the recorder’s input mode is set to “F-1” for recording on the DV deck.
Filename [SR-VS30E_4-EN.fm] Masterpage:Left-FullColx2 SR-VS30E_1-EN.book Page 86 Friday, February 1, 2002 3:35 PM 86 EN TROUBLESHOOTING (cont.) OTHER PROBLEMS SYMPTOM POSSIBLE CAUSE CORRECTIVE ACTION ● The camcorder’s microphone is too close to the TV. Position the camcorder so its microphone is away from the TV. ● The TV’s volume is too high. Turn the TV’s volume down. 2. When scanning channels, some of them are skipped over. ● Those channels have been designated to be skipped.
Filename [SR-VS30E_4-EN.fm] Masterpage:Right SR-VS30E_1-EN.book Page 87 Friday, February 1, 2002 3:35 PM EN QUESTIONS AND ANSWERS 87 PLAYBACK TIMER RECORDING Q. What happens if the end of the tape is reached during playback or search? A. The tape is automatically rewound to the beginning. Q. “o” and “#” remain lit on the front display panel. Is there a problem? A. No. This is a normal condition for a timer recording in progress. Q. Can the video recorder indefinitely remain in the pause mode? A.
Filename [SR-VS30E_4-EN.fm] Masterpage:Left SR-VS30E_4-EN.fm Page 88 Tuesday, February 19, 2002 4:07 PM 88 EN SPECIFICATIONS GENERAL TUNER/TIMER Power requirement : AC 220 V – 240 Vd, 50 Hz/60 Hz Power consumption Power on : 31 W Power off : 6.5 W Temperature Operating : 5°C to 40°C Storage : –20°C to 60°C Operating position : Horizontal only Dimensions (WxHxD) : 435 mm x 106 mm x 380 mm Weight : 5.
Filename [SR-VS30E_1-ENIX.fm] Masterpage:Right SR-VS30E_1-EN.book Page 89 Friday, February 1, 2002 3:35 PM EN LIST OF TERMS 89 A O Audio Dubbing ...................................................... 54 AUDIO REC .......................................................... 73 Auto Channel Set .................................................... 74 Auto Set Up .......................................................... 12 AUTO SP]LP TIMER .............................................. 70 AUTO TIMER .....
Filename [SR-VS30E_1-ENIX.fm] SR-VS30E_1-EN.
Filename [SR-VS30E_1-ENIX.fm] SR-VS30E_1-EN.
Filename [SR-VS30E_Cov4-EN.fm] SR-VS30E_1-EN.book Page 92 Friday, February 1, 2002 3:35 PM EN Auto Set Up — referring to the front display panel The Auto Set Up function sets the tuner channels, clock and Guide Program numbers automatically. BEFORE YOU START PLEASE MAKE SURE THAT: 8 The TV aerial cable is connected to the ANTENNA IN connector on the rear panel of the video recorder. 8 The video recorder’s mains power cord is connected to a mains outlet. 8 The video recorder is turned off.