COMPACT DISC/TUNER CASSETTE DECK For Customer Use: Enter below the Model No. and Serial No. which are located either on the rear, bottom or side of the cabinet. Retain this information for future reference. Model No. Serial No.
Warnings, Cautions and Others CAUTION To reduce the risk of electrical shocks, fire, etc.: 1. Do not remove screws, covers or cabinet. 2. Do not expose this appliance to rain or moisture. Caution –– switch! Disconnect the mains plug to shut the power off completely (the STANDBY/ON lamp goes off). The switch in any position does not disconnect the mains line. • When the unit is on standby, the STANDBY/ON lamp lights red. • When the unit is turned on, the STANDBY/ON lamp lights green.
IMPORTANT FOR LASER PRODUCTS REPRODUCTION OF LABELS 1 CLASSIFICATION LABEL, PLACED ON EXTERIOR SURFACE CLASS LASER 1 PRODUCT 2 WARNING LABEL, PLACED INSIDE THE UNIT DANGER: Invisible laser radiation when open and interlock failed or defeated. AVOID DIRECT EXPOSURE TO BEAM. (e) VARNING: Osynlig laserstrålning när denna del är öppnad och spärren är urkopplad. Betrakta ej strålen. (s) ADVARSEL: Usynlig laserstråling ved åbning, når sikkerhedsafbrydere er ude af funktion.
Power sources • When unplugging from the wall outlet, always pull the plug, not the AC power cord. DO NOT handle the AC power cord with wet hands. Moisture condensation Moisture may condense on the lens inside the units in the following cases: • After starting heating in the room • In a damp room • If the units are brought directly from a cold to a warm place Should this occur, the system may malfunction.
Contents Introduction .......................................................... 1 Playing Back a Tape ........................................... 20 About This Manual ............................................................... 1 Precautions ........................................................................... 1 Playing Back a Tape — Basic Operation ........................... 20 Fast-Winding a Tape ...........................................................
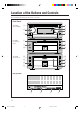
Location of the Buttons and Controls Become familiar with the buttons and controls on the units.
Continued Front Panels Buttons behind the sliding panel AX-UXG66 1 2 3 4 5 6 7 XT-UXG66 8 9 p q w e i o ; a 1 2 34 5 DISPLAY /CHARA.
Continued Become familiar with the buttons on the remote control. Remote Control Remote Control o ; REMOTE CONTROL RM-SUXG6E PANEL OPEN/CLOSE 1 3 5 7 2 ACTIVE BASS EX. CLOCK/TIMER 4 6 p q w e r t y u i SLEEP TREBLE BASS a FM MODE PLAY MODE REPEAT 8 9 DIMMER AUTO PRESET TITTLE/EDIT ENTER DISPLAY /CHARA.
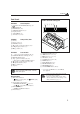
Getting Started Unpacking After unpacking, check to be sure that you have all the following items. The number in the parentheses indicates the quantity of the pieces supplied.
Continued Connecting MD Recorder XM-G6 Connecting Antennas You can also connect the MD recorder XM-G6 (not supplied), specifically designed for UX-G66. This unit will complete UX-G66 micro component system. When you connect and use this unit, refer to the Instructions supplied with it for details.
Continued Connecting Speakers AM antenna You can connect the speakers using the speaker cords. 1 2, 3 Vinyl-covered wire (not supplied) ANTENNA Red AM LOOP Speaker Cord Speaker Cord AM EXT FM 75 COAXIAL RIGHT LEFT SPEAKERS Black AM loop antenna (supplied) 1 2 Connect the AM loop antenna to the AM LOOP terminals as illustrated. Right speaker 1 2 Turn the AM loop antenna until you have the best reception.
Continued Connecting Other Equipments To connect audio equipment with an optical digital input terminal You can connect the following equipments to the system: By using both an optical digital cable (not supplied) and an audio cable (not supplied), connect: • Between the optical digital input terminal on the other equipment and the optical digital output terminal on XTUXG66. • Between the audio output jacks on the other equipment and the ANALOG IN jacks.
Basic Settings DIMMER REMOTE CONTROL RM-SUXG6E PANEL OPEN/CLOSE DIMMER OPEN/CLOSE STANDBY/ON M I C R O ACTIVE BASS EX. CLOCK/TIMER BASS TREBLE C O M P O N E N T S Y S T E M U X - G 6 6 CLOCK/TIMER MULTI JOG SLEEP FM MODE AUX FM/AM MULTI JOG PLAY MODE REPEAT TITTLE/EDIT CANCEL UP SET SET CANCEL AUX Before operating the system any further, set the clock built in this system first, then some other basic settings.
Common Operations PANEL OPEN/CLOSE REMOTE CONTROL RM-SUXG6E PANEL OPEN/CLOSE DIMMER ACTIVE BASS EX. CLOCK/TIMER BASS TREBLE (standby/on) ACTIVE BASS EX. SLEEP FM MODE BASS AUTO PRESET TREBLE STANDBY/ON OPEN/CLOSE OPEN/CLOSE STANDBY/ON M I C R O PLAY MODE REPEAT TITTLE/EDIT C O M P O N E N T S Y S T E M U X - G 6 6 ENTER BASS DISPLAY /CHARA.
Continued • When using the remote control, press VOLUME + button to increase the volume level or press VOLUME – button to decrease it. The volume level (from 0 to 50) appears in the display window as follows: Adjusting Bass and Treble Sounds You can adjust bass and treble sound effects with the remote control, conforming to your preference and acoustic surroundings. You can use this effect only while listening sources.
Continued Operating the Sliding Panel Listening to the External Equipment You can use the sliding panel to enable advanced operations features provided for UX-G66 micro component system. You can listen to an external equipment such as MD recorder, VCR, and other auxiliaries. First make sure that the external equipment is properly connected to the system (see page 7 and 9). For operation of the equipment, refer to its Instructions.
English Listening to FM and AM Broadcasts Buttons behind the sliding panel REMOTE CONTROL RM-SUXG6E PANEL OPEN/CLOSE ACTIVE BASS EX. CLOCK/TIMER BASS PANEL OPEN/CLOSE DIMMER TREBLE DISPLAY /CHARA. 4 ¢ SET CANCEL ENTER PLAY MODE REC MODE TITLE /EDIT CLOCK /TIMER SLEEP FM MODE FM MODE PLAY MODE REPEAT AUTO PRESET AUTO PRESET TITTLE/EDIT DISPLAY /CHARA.
English Continued Presetting Stations To preset stations automatically — Auto Preset You can preset up to 30 FM and 15 AM (MW/LW) stations into memory by following two methods: manual/automatic presettings. You can automatically preset 30 FM, 15 AM (MW/LW) stations. Preset numbers will be allocated as stations are found, starting from the lowest frequency and moving up to the higher frequency. • There is a time limit in doing the following steps.
English Playing Back a CD Buttons behind the sliding panel BASS TREBLE PLAY MODE REPEAT TITTLE/EDIT FM MODE AUTO PRESET CANCEL UP < SET 4 ¢ SET CANCEL ENTER PLAY MODE REC MODE TITLE /EDIT CLOCK /TIMER REPEAT ENTER DISPLAY /CHARA. DISPLAY /CHARA.
English Continued 4 Press 6 (play/pause) button on the CD unit. Each track of the CD starts playing one after another, and stops when the final track has finished playing. To go to another track Before or during playback, press 4 / ¢ button repeatedly: Press ¢ button: Skips to the beginning of the next and succeeding tracks. Press 4 button: Goes back to the beginning of the current and previous tracks. • To stop playing back for a moment, press 6 (play/pause) button on the CD unit.
4 Press SET button to program the track number. Track number Program number Here the track number 2 on the CD is stored into a program number 1, and shortly after that the total playback time of programed tracks appears in the display window as follows: English Continued To modify the program Before playing back the CD, you can erase the last programed track by pressing CANCEL button. Each time you press the button, the last programed track is erased from the end of program.
English Continued Playing at Random — Random Play Repeating Tracks — Repeat Play The tracks of the loaded CD will play in no special order (at random) when you select this mode. You can have the entire disc, the programed tracks, or the individual track repeat as many times as you like. 1 1 2 Place a CD. If the current playing source is not the CD, press 6 (play/pause) button on the CD unit, then 7 (stop) button before going to the next step.
Playing Back a Tape DISPLAY /CHARA. CANCEL Buttons behind the sliding panel UP < SET > DISPLAY /CHARA. 4 ¢ SET CANCEL ENTER PLAY MODE REC MODE TITLE /EDIT CLOCK /TIMER DOWN MD TAPE AUX FM/AM TAPE ` (playback) CD 4 ¢ π (auto reverse) 7 (stop) 0 (open/close) 4/¢ VOLUME DOLBY B NR REC PAUSE AUTO REVERSE REC ` (playback) DOLBY B NR 7 (stop) Tape operation indicators You can listen to Normal (Type I), High position (TypeII), and Metal (Type IV) type tapes without further settings.
Continued 5 Press 7 (stop) button to stop playback the tape. 6 Press 0 (open/close) button directly to stop and remove the tape. While the system is turned off (standby mode) Pressing ` (playback) or TAPE ` (playback) button automatically switches the system turned on and starts playback if a tape is already loaded. To skip forward to the next music Press the button same as the tape direction indicator as follows: 3 ] Press ¢ button. 2 ] Press 4 button.
Recording onto a Tape TITTLE/EDIT DISPLAY /CHARA. Buttons behind the sliding panel ENTER CANCEL DISPLAY /CHARA.
Continued REC indicator lights red to show the recording pause mode, and “TAPE REC” appears in the display window as follows, • Dolby B NR Press DOLBY B NR button before recording to reduce frequency response noise. When the tape is played back later, also press the button with its lamp lit. • BEAT CUT on AM (MW/LW) When recording AM broadcast, beats noise may be heard. Set the BEAT CUT selector to either position 1 or 2 on the rear panel of the cassette deck unit to reduce the noise.
Synchronized Recording from a CD When CD playback finished, the CD unit first, then the cassette deck stops recording automatically. CD application on UX-G66 system can be recorded with a simple, one-touch operation. 1 2 3 Place a recordable tape and a source CD into each tray. • To record using Dolby B NR, press the DOLBY B NR button before recording so that its lamp near the button lights orange. Press 6 (play/pause) button on the CD unit, then 7 (stop) button to set the system to CD operation mode.
Using the Timers Buttons behind the sliding panel DISPLAY /CHARA. 4 ¢ SET CANCEL ENTER PLAY MODE SET CANCEL REC MODE TITLE /EDIT CLOCK /TIMER CLOCK/TIMER • Each time you press the button, the timer mode changes as follows: On UX-G66 system, three timer features are available — Recording Timer, Daily Timer, and Sleep Timer. Before using these timers, you need to set the clock built in the system (see page 10).
Continued 5 Rotate MULTI JOG dial (< / > button on the remote control also available) to select the minute of the timer-off time, then press SET button. 2 6 Rotate MULTI JOG dial (< / > button on the remote control also available) to select either “TUNER FM” or “TUNER AM,” then press SET button. Using Daily Timer 7 Rotate MULTI JOG dial (< / > button on the remote control also available) to select a preset channel, then press SET button.
Continued 4 Rotate MULTI JOG dial (< / > button on the remote control also available) to select the hour of the timeroff time, then press SET button. 5 Rotate MULTI JOG dial (< / > button on the remote control also available) to select the minute of the timer-off time, then press SET button. 6 If you have selected CD as the source in the above step, select a track. 1) Rotate MULTI JOG dial (< / > button on the remote control also available) to select a track. 2) Press SET button.
Using Sleep Timer Timer Priority With Sleep Timer, you can fall asleep to your favorite music or radio program. Since each timer can be set separately, you may wonder what happens if the setting for these timers overlaps. Here are the priorities for each timer. How Sleep Timer actually works The system automatically turns off after the selected time length passes while playing any source. On the remote control only: 1 Press SLEEP button on the remote control repeatedly to select the sleep timer.
Maintenance and Additional Information General Notes In general, you will have the best performance by keeping your CDs, cassette tapes and the mechanism clean. • Store CDs and cassette tapes in their cases, and keep them in cabinets or on shelves. • Keep the CD disc tray, and the cassette tapes tray closed when not in use. Handling CDs • Only CDs bearing this mark can be used with this system. However, continued use of irregular shape CDs (e.g. heart shape, octagonal) can damage the system.
Handling Cassette Tapes Types of Cassette Tapes Cautions regarding handling This cassette deck unit incorporates an Automatic Tape Detection function. This mechanism uses the tape-type detection holes to distinguishes which type of tape was inserted, and sets the bias and equalizer to the optimum settings for that tape automatically. The following types of tapes may be used with this cassette deck unit. • Do not touch the surface of the tape or pull the tape out of the cassette.
Troubleshooting If you are having a problem with your system, check this list for a possible solution before calling for service. If you cannot solve the problem from the hints given here, or the units has been physically damaged, call a qualified person, such as your dealer, for service. Symptom No sound is heard. Poor radio reception. Unable to record onto a tape. Possible Cause • • • Connections are incorrect, or loose. Headphones are connected. • Volume level is set to “– –”.
Specifications Stereo Amplifier AX-UXG66 Output power: 48 W (24 W + 24 W) at 6 Ω (Max.) 42 W (21 W + 21 W) at 6 Ω (10% THD) Load impedance: 6 Ω (6 Ω to 16 Ω allowance) Audio output level/Impedance (at 1 kHz): Sub Woofer 800 mV/440 Ω Power requirement: AC 240 V , 50 Hz Power consumption: 63 W (at operation) 2.0 W (on standby: with Dimmer) Dimensions (approx.): 182 mm x 81 mm x 313 mm (W/H/D) (7 3/16 in. x 3 1/4 in. x 12 3/8 in.) Mass (approx.): 3.8 kg (8.
VICTOR COMPANY OF JAPAN, LIMITED EN cover[A]f 0201JTMMDWJSC 2 12/11/00, 11:36 AM