TH-D6D5D4[JC]EN.book Page 1 Friday, February 23, 2007 7:47 PM DVD DIGITAL THEATER SYSTEM TH-D60 Consists of XV-THD60, SP-THD6W, SP-THD6F, SP-THD6C and SP-THD6S TH-D50 Consists of XV-THD50, SP-THD5W, SP-THD5F, SP-THD5C and SP-THD5S TH-D5 Consists of XV-THD5, SP-THD5W, SP-THD5F, SP-THD5C and SP-THD5S TH-D4 Consists of XV-THD4, SP-THD5W, SP-THD5F, SP-THD5C and SP-THD5S (TH-D60 only) INSTRUCTIONS For Customer Use: Enter below the Model No. and Serial No.
TH-D6D5D4[JC]EN.book Page 1 Friday, February 23, 2007 7:47 PM Warnings, Cautions and Others Mises en garde, précautions et indications diverses CAUTION — button! Disconnect the mains plug to shut the power off completely (the STANDBY lamp goes off). When installing the apparatus, ensure that the plug is easily accessible. The button in any position does not disconnect the mains line. • When the system is on standby, the STANDBY lamp lights red. • When the system is turned on, the STANDBY lamp goes off.
TH-D6D5D4[JC]EN.book Page 2 Friday, February 23, 2007 7:47 PM For U.S.A. This equipment has been tested and found to comply with the limits for a Class B digital device, pursuant to part 15 of the FCC Rules. These limits are designed to provide reasonable protection against harmful interference in a residential installation.
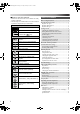
TH-D6D5D4[JC]EN.book Page 1 Friday, February 23, 2007 7:47 PM How to read this manual • Illustrations and button names of the TH-D60 are mainly used for explanation. • The following icons and illustrations are used to make the explanations simple and easy-to-understand. Icons for System operations Operations from the center unit Operations from the remote control The function can be operated from the on-screen bar ( 21).
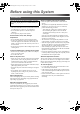
TH-D6D5D4[JC]EN.book Page 2 Friday, February 23, 2007 7:47 PM Before using this System Precautions There are no user-serviceable parts inside. If anything goes wrong, unplug the power cord and consult your dealer. Notes on installing the System • Select a location which is level, dry and neither too hot nor too cold between 5°C and 35°C (41°F and 95°F). • Do not install the System in a location subject to vibrations. • Do not put heavy objects on the System.
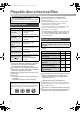
TH-D6D5D4[JC]EN.book Page 3 Friday, February 23, 2007 7:47 PM Playable discs/devices/files Some discs/files may require operations that differ from those explained in this manual. Some discs/devices/files may not be recognized or played back correctly due to their characteristics.
TH-D6D5D4[JC]EN.book Page 4 Friday, February 23, 2007 7:47 PM Playable file types The following files in a disc or a USB mass storage class device can be played back. Type of file Audio Picture Movie Playable files Extensions MP3 <.mp3> WMA <.wma> WAV <.wav> JPEG <.jpg>, <.jpeg> ASF <.asf> MPEG-1 <.mpg>, <.mpeg> MPEG-2 <.mpg>, <.mpeg>, <.mod> DivX (6.x, 5.x, 4.x and 3.11) <.divx>, <.div>, <.
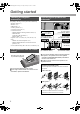
TH-D6D5D4[JC]EN.book Page 5 Friday, February 23, 2007 7:47 PM Getting started Checking the supplied accessories If anything is missing, contact your dealer immediately. • Remote control (x 1) • Batteries (x 2) • FM antenna (x 1) • AM loop antenna (x 1) • Composite video cord (x 1) • Connector for iPod – TH-D60/TH-D50: Docking station for iPod (x 1) – TH-D5/TH-D4: Connection cable for iPod (x 1) Stand for iPod (x 1) • Speaker cords: 3 m (10 ft) (x 4), 8 m (26.
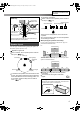
TH-D6D5D4[JC]EN.book Page 6 Friday, February 23, 2007 7:47 PM Do not connect the power cord until all other connections have been made. Attaching the base plates—required for the SPTHD6F only Connect the speaker cord. Speaker layout B Select “S.SPK F” as the speaker position mode for this layout. ( 12) Surround left (SL) Route the speaker cord. This side should face the front. Use the supplied screws (M5 x 85 mm/3-3/8 inches) to attach the base plate to the speaker.
TH-D6D5D4[JC]EN.
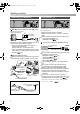
Body_TH-D456[JC].fm Page 8 Thursday, March 1, 2007 2:26 PM Do not connect the power cord until all other connections have been made. Connection using the component video jacks Green TV From component video input DBS (Direct Broadcasting Satellite) tuner, etc. Blue Component video cord (not supplied) Digital coaxial cable (not supplied) Digital optical cable (not supplied) A From digital coaxial output B From digital optical output Red For the BNC connection, use a plug adapter (not supplied).
Body_TH-D456[JC].fm Page 9 Thursday, March 1, 2007 2:26 PM Do not connect the power cord until all other connections have been made. Connection for “VIDEO2”—TH-D60 Connection for “VIDEO” —TH-D50/THD5/TH-D4 Select “VIDEO2” as the source ( 11) for playing a component connected as follows. Select “VIDEO” as the source ( 11) for playing a component connected as follows. Video connection Composite video cord* (not supplied) VCR, etc. Video connection Composite video cord* (not supplied) or VCR, etc.
TH-D6D5D4[JC]EN.book Page 10 Friday, February 23, 2007 7:47 PM Basic and common operations How to use the number buttons To select 3: Press 3. To select 10: Press 10. To select 14: Press h10, 1, then 4. To select 24: Press h10, 2, then 4. To select 40: Press h10, 4, then 0. To select 114: Press h10, h10, 1, 1, then 4. Set the remote control mode before operation.
TH-D6D5D4[JC]EN.book Page 11 Friday, February 23, 2007 7:47 PM See page 10 for button locations. Turning the power on or off Adjusting the volume To turn off the System by using the sleep timer – – (off) = 10 = 20 = 30 = 60 = 90 = 120 = 150 = 180 = (back to the beginning) (unit: minutes) To check the remaining time, press the button once.
TH-D6D5D4[JC]EN.book Page 12 Friday, February 23, 2007 7:47 PM Sound and monitor settings As the speaker position mode is changed, the following settings are also changed automatically: – The output level settings of the speakers and subwoofer (see below) are initialized. – The surround mode ( 13) is set to “AUTO SUR.” Set the remote control mode before operation.
TH-D6D5D4[JC]EN.book Page 13 Friday, February 23, 2007 7:47 PM Sound and monitor settings Adjusting the bass and treble sounds 1 TRE Adjusts the treble sound BASS Adjusts the bass sound 2 Adjust the level. Using the surround mode Select one of the available surround modes. The surround modes you can select depend on the playback source and the selected speaker position mode ( 12). For details on each surround mode, see “Available surround modes” on the right column.
Body_TH-D456[JC].fm Page 14 Thursday, March 1, 2007 6:00 PM See page 12 for button locations. Setting the audio input for external components Set the audio input of the external component for “VIDEO1/ VIDEO2” (TH-D60) or “VIDEO” (TH-D50/TH-D5/THD4). Scanning mode setting Select the scanning mode according to the type of TV and connection method. To use the progressive mode, connect the TV to the HDMI MONITOR OUT terminal or COMPONENT jacks*1.
TH-D6D5D4[JC]EN.book Page 15 Friday, February 23, 2007 7:47 PM Disc/file playback The following icons show the available disc/file types for the target function: Basic playback Playing back a disc Initial settings Make the following settings before playing back discs/ files. • Scanning mode ( 14) • MONITOR TYPE ( 23) • ON SCREEN LANGUAGE ( 23) 1 Select “DVD” as the source. ( 2 (On the center unit) 3 Place a disc on the tray.
TH-D6D5D4[JC]EN.book Page 16 Friday, February 23, 2007 7:47 PM DO NOT connect or disconnect the device when the System is turned on. You cannot connect a computer to the USB MEMORY terminal of the System. DO NOT connect the device through a USB hub. iPod does not play through the USB MEMORY terminal. When iPod is connected to the USB MEMORY terminal, “RESTRICT” appears on the display. This System may not playback some USB mass storage class devices and does not support DRM (Digital Rights Management).
TH-D6D5D4[JC]EN.book Page 17 Friday, February 23, 2007 7:47 PM Disc/file playback Using the disc menu Locating a desired scene or song For DVD Video/DVD Audio 1 For a DVD Video disc * or For a DVD Audio disc * 2 Select the desired item, then confirm the selection. Selecting the beginning of a desired scene or song To do Disc/file *1 Skip chapter/track/file *2 Select Confirm Select the chapter/ track/file number*3 *4 For some discs, you can also select items by using the number buttons.
TH-D6D5D4[JC]EN.book Page 18 Friday, February 23, 2007 7:47 PM See page 15 for button locations. Playing at random—random play Changing the playback mode Program play and random play cannot be used for a USB mass storage class device. Programing the playing order—program play 1 1 2 To return to normal playback Press the button repeatedly until both the program window and disappear from the TV. Program window 2 Select the desired chapters/ tracks.
Body_TH-D456[JC].fm Page 19 Friday, February 23, 2007 8:55 PM Disc/file playback Special picture playback Advanced operations Changing the language/sound/scene angle To do Disc/file Disc/file To do Play back frame by frame Select the subtitle language*1 *2 Play back in slowmotion*1 • To show/hide the subtitle, press SUBTITLE. «Hold Enlarge the picture*2 *3 • Change the scene magnification, then move the zoomed-in area.
TH-D6D5D4[JC]EN.book Page 20 Friday, February 23, 2007 7:47 PM See page 15 for button locations. Adjusting the picture quality (VFP) Special playback for DVD Audio Playing back a bonus group You can adjust the picture mode. 1 Some DVD Audio discs have a “bonus group.” To play back a bonus group, you have to enter the specific “key number” (a password). 1 Select a bonus group. 2 Select the desired preset, then finish the setting. The key number entry screen appears.
Body_TH-D456[JC].fm Page 21 Thursday, March 1, 2007 2:27 PM Disc/file playback Operation from the TV screen On-screen bar functions Selects the time information mode shown on the display and the status bar. TIME*3: Elapsed time of chapter/track REM*3: Remaining time of chapter/track TOTAL: Elapsed time of title (DVD Video)/ group (DVD Audio)/program (DVD VR)/disc (VCD/CD/SVCD) T.
TH-D6D5D4[JC]EN.book Page 22 Friday, February 23, 2007 7:47 PM See page 15 for button locations. Using the file control display Using the program list/ playlist (for DVD VR) The file control display appears in the following cases. – Audio files: Always appears. – Movie and picture files: When TOP MENU(/PG/DIRECT) or MENU(/PL) is pressed or playback is stopped. Program list File control display Ex.
TH-D6D5D4[JC]EN.book Page 23 Friday, February 23, 2007 7:47 PM Personal settings Set the remote control mode before operation. For disc playback For playback of a file on a USB mass storage class device You can change the settings of the System according to your preferences and playing environment. 1 2 Select the menu. 3 Select the item, then confirm. Select Confirm Repeat this procedure until all the options have been confirmed.
TH-D6D5D4[JC]EN.book Page 24 Friday, February 23, 2007 7:47 PM Underlined items are the initial settings. Audio menu (AUDIO) DOWN MIX This menu is available only when the speaker position mode is set to “S.SPK F” ( 12). Select the audio signal output to the TV connected to the HDMI MONITOR OUT terminal. DOLBY SURROUND: For the TV equipped with Dolby Pro Logic decoder STEREO: For ordinary TV D. RANGE COMPRESSION You can enjoy powerful audio even at low volume level while playing Dolby Digital software.
TH-D6D5D4[JC]EN.book Page 25 Friday, February 23, 2007 7:47 PM XM Satellite Radio operations XM Satellite Radio operations are available on TH-D60 only. Set the remote control mode before operation. • Select “XM” as the source. ( 11) How to subscribe Hardware and required monthly subscription sold separately. Other fees and taxes, including a one-time activation fee may apply. Subscription fee is consumer only. All fees and programming subject to change.
TH-D6D5D4[JC]EN.book Page 26 Friday, February 23, 2007 7:47 PM Manual tuning Preset tuning You can preset 30 XM Satellite Radio channels. To search a channel Storing the preset channels 1 Tune in to the channel you want to preset. “_ _” flashes on the display. Perform the next 2 While searching, the invalid and unsubscribed channels are skipped. TUNING 9/TUNING ( are not used to select a XM Satellite Radio channel. step while “_ _” is flashing.
TH-D6D5D4[JC]EN.book Page 27 Friday, February 23, 2007 7:47 PM FM/AM tuner operations Preset tuning Set the remote control mode before operation. You can preset 30 FM stations and 15 AM stations. * • Select the desired source (“FM” or “AM”) you want to listen to. ( 11) * TH-D50/TH-D5/TH-D4: The FM/ AM button is used instead of FM/ AM/XM. Storing the preset stations 1 Tune in to the station you want to preset. “_ _” flashes on the display. Perform the next 2 step while “_ _” is flashing.
TH-D6D5D4[JC]EN.book Page 28 Friday, February 23, 2007 7:47 PM iPod playback Set the remote control mode before operation. Play/pause/search/skip To do Start playback Pause playback Fast-forward/fast-reverse search * Operate on your iPod to skip to the next/previous item while playing back a video. • The iPod enters sleep mode when you turn off the System or select another source. • To show still pictures in the iPod, play back in slide-show mode on the iPod.
TH-D6D5D4[JC]EN.book Page 29 Friday, February 23, 2007 7:47 PM Operating external components Set the remote control mode before operation. For TV Operating external components Set the remote control mode before operating each external component (see the left column).
TH-D6D5D4[JC]EN.
TH-D6D5D4[JC]EN.book Page 31 Friday, February 23, 2007 7:47 PM References Messages and icons shown on the TV and display Messages and icons shown on the TV during disc/file playback OPEN/CLOSE Opening or closing the disc tray NOW READING Reading the disc/file information Messages shown on the display while listening to the XM Satellite Radio NO SIGNL No signal is received. CHECK XM TUNER The XM Mini-Tuner is not properly installed or the XM Mini-Tuner Home Dock is not properly connected.
TH-D6D5D4[JC]EN.book Page 32 Friday, February 23, 2007 7:47 PM No picture is displayed on the TV or no sound comes out through the HDMI connection. ZThe connected TV is not HDCP-compatible. (“HDCP ERR” appears on the display.) ZDisconnect the HDMI cable and connect it again, or use a shorter cable. Video and audio are distorted. ZThe disc is scratched or dirty. ZAudio/video files have not been properly copied on to the USB mass storage class device. ZA VCR is connected between the center unit and the TV.
Body_TH-D456[JC].fm Page 33 Friday, February 23, 2007 8:55 PM References Specifications Center unit (XV-THD60/XV-THD50/XVTHD5/XV-THD4) Output power Front/Surround: For XV-THD60/XV-THD50: 200 W per channel, RMS at 3 Ω at 1 kHz, with 10 % total harmonic distortion. For XV-THD5: 180 W per channel, RMS at 3 Ω at 1 kHz, with 10 % total harmonic distortion. For XV-THD4: 167 W per channel, RMS at 3 Ω at 1 kHz, with 10 % total harmonic distortion.
TH-D6D5D4[JC]EN.book Page 34 Friday, February 23, 2007 7:47 PM Satellite speakers (For TH-D60) Satellite speakers (For TH-D50/TH-D5/ TH-D4) Front speakers (SP-THD6F) Type: 2-Way Bass-Reflex Type (Magnetically Shielded Type) Speaker: 8 cm (3-3/16 inches) cone × 1 3 cm (1-3/16 inches) dome × 1 Power Handling Capacity: 200 W Impedance: 3Ω Frequency Range: 90 Hz to 20 000 Hz Sound Pressure Level: 78 dB/W•m Dimensions (W × H × D): 200 mm x 574 mm x 200 mm (7-7/8 inches × 22-5/8 inches × 7-7/8 inches) Mass: 2.
TH-D6D5D4[JC]EN.
TH-D6D5D4[JC]EN.
TH-D6D5D4[JC]EN.
TH_D60WM[J].book Page 1 Friday, February 23, 2007 3:19 PM DVD DIGITAL THEATER SYSTEM TH-D60WM Consists of XV-THD60WM, SP-THD60WMW, SP-THD6F, SP-THD6C and SP-THD6S INSTRUCTIONS For Customer Use: Enter below the Model No. and Serial No. which are located either on the rear, bottom or side of the cabinet. Retain this information for future reference. Model No. Serial No.
TH_D60WM[J].book Page 1 Friday, February 23, 2007 3:19 PM Warnings, Cautions and Others Mises en garde, précautions et indications diverses CAUTION — button! Disconnect the mains plug to shut the power off completely (the STANDBY lamp goes off). When installing the apparatus, ensure that the plug is easily accessible. The button in any position does not disconnect the mains line. • When the system is on standby, the STANDBY lamp lights red. • When the system is turned on, the STANDBY lamp goes off.
TH_D60WM[J].book Page 2 Friday, February 23, 2007 3:19 PM For U.S.A. This equipment has been tested and found to comply with the limits for a Class B digital device, pursuant to part 15 of the FCC Rules. These limits are designed to provide reasonable protection against harmful interference in a residential installation.
TH_D60WM[J].book Page 1 Friday, February 23, 2007 3:19 PM How to read this manual The following icons and illustrations are used to make the explanations simple and easy-to-understand. Icons for System operations Operations from the center unit Operations from the remote control The function can be operated from the on-screen bar ( 21).
TH_D60WM[J].book Page 2 Friday, February 23, 2007 3:19 PM Before using this System Precautions There are no user-serviceable parts inside. If anything goes wrong, unplug the power cord and consult your dealer. Notes on installing the System • Select a location which is level, dry and neither too hot nor too cold between 5°C and 35°C (41°F and 95°F). • Do not install the System in a location subject to vibrations. • Do not put heavy objects on the System.
TH_D60WM[J].book Page 3 Friday, February 23, 2007 3:19 PM Playable discs/devices/files Some discs/files may require operations that differ from those explained in this manual. Some discs/devices/files may not be recognized or played back correctly due to their characteristics.
TH_D60WM[J].book Page 4 Friday, February 23, 2007 3:19 PM Playable file types The following files in a disc or a USB mass storage class device can be played back. Type of file Audio Picture Movie Playable files Extensions MP3 <.mp3> WMA <.wma> WAV <.wav> JPEG <.jpg>, <.jpeg> ASF <.asf> MPEG-1 <.mpg>, <.mpeg> MPEG-2 <.mpg>, <.mpeg>, <.mod> DivX (6.x, 5.x, 4.x and 3.11) <.divx>, <.div>, <.
TH_D60WM[J].book Page 5 Friday, February 23, 2007 3:19 PM Getting started Checking the supplied accessories If anything is missing, contact your dealer immediately. • Remote control (x 1) • Batteries (x 2) • FM antenna (x 1) • AM loop antenna (x 1) • Composite video cord (x 1) • Docking station for iPod (x 1) • Speaker cords: 3 m (10 ft) (x 4), 8 m (26.
TH_D60WM[J].book Page 6 Friday, February 23, 2007 3:19 PM Do not connect the power cord until all other connections have been made. Attaching the base plates—required for the front speakers (SP-THD6F) only Connect the speaker cord. Speaker layout B Select “S.SPK F” as the speaker position mode for this layout. ( 12) Subwoofer (SW) Surround left (SL) Front left (L) Route the speaker cord. This side should face the front.
TH_D60WM[J].
TH_D60WM[J].book Page 8 Friday, February 23, 2007 3:19 PM Do not connect the power cord until all other connections have been made. Connection using the component video jacks Green TV From component video input DBS (Direct Broadcasting Satellite) tuner, etc.
TH_D60WM[J].book Page 9 Friday, February 23, 2007 3:19 PM Do not connect the power cord until all other connections have been made. Connecting an analog component Connection for “VIDEO2” Select “VIDEO2” as the source ( 11) for playing a component connected as follows. RCA pin plug cord (not supplied) VCR, etc. Video connection From audio output Composite video cord* (not supplied) VCR, etc. Select “2CH” as the audio input setting before playing back.
TH_D60WM[J].book Page 10 Friday, February 23, 2007 3:19 PM Basic and common operations How to use the number buttons To select 3: Press 3. To select 10: Press 10. To select 14: Press h10, 1, then 4. To select 24: Press h10, 2, then 4. To select 40: Press h10, 4, then 0. To select 114: Press h10, h10, 1, 1, then 4. Set the remote control mode before operation.
TH_D60WM[J].book Page 11 Friday, February 23, 2007 3:19 PM See page 10 for button locations. Turning the power on or off Adjusting the volume To turn off the System by using the sleep timer – – (off) = 10 = 20 = 30 = 60 = 90 = 120 = 150 = 180 = (back to the beginning) (unit: minutes) To check the remaining time, press the button once.
TH_D60WM[J].book Page 12 Friday, February 23, 2007 3:19 PM Sound and monitor settings As the speaker position mode is changed, the following settings are also changed automatically: – The output level settings of the speakers and subwoofer (see below) are initialized. – The surround mode ( 13) is set to “AUTO SUR.” Set the remote control mode before operation.
TH_D60WM[J].book Page 13 Friday, February 23, 2007 3:19 PM Sound and monitor settings Adjusting the bass and treble sounds 1 TRE Adjusts the treble sound BASS Adjusts the bass sound 2 Adjust the level. Using the surround mode Select one of the available surround modes. The surround modes you can select depend on the playback source and the selected speaker position mode ( 12). For details on each surround mode, see “Available surround modes” on the right column. • During 2-channel playback with “S.
TH_D60WM[J].book Page 14 Friday, February 23, 2007 3:19 PM See page 12 for button locations. Setting the audio input for external components Set the audio input of the external component for “VIDEO1” or “VIDEO2.” Scanning mode setting Select the scanning mode according to the type of TV and connection method. To use the progressive mode, connect the TV to the HDMI MONITOR OUT terminal or COMPONENT jacks*1. ( 7) 1 Item Current setting 2 Select a source you want to set the audio input for. AIN.
TH_D60WM[J].book Page 15 Friday, February 23, 2007 3:19 PM Disc/file playback The following icons show the available disc/file types for the target function: Basic playback Playing back a disc Initial settings Make the following settings before playing back discs/ files. • Scanning mode ( 14) • MONITOR TYPE ( 23) • ON SCREEN LANGUAGE ( 23) 1 Select “DVD” as the source. ( 2 (On the center unit) 3 Place a disc on the tray.
TH_D60WM[J].book Page 16 Friday, February 23, 2007 3:19 PM DO NOT connect or disconnect the device when the System is turned on. You cannot connect a computer to the USB MEMORY terminal of the System. DO NOT connect the device through a USB hub. iPod does not play through the USB MEMORY terminal. When iPod is connected to the USB MEMORY terminal, “RESTRICT” appears on the display. This System may not play back some USB mass storage class devices and does not support DRM (Digital Rights Management).
TH_D60WM[J].book Page 17 Friday, February 23, 2007 3:19 PM Disc/file playback Using the disc menu Locating a desired scene or song For DVD Video/DVD Audio 1 For a DVD Video disc For a DVD Audio disc Selecting the beginning of a desired scene or song To do or 2 Select the desired item, then confirm the selection. Disc/file *1 Skip chapter/track/file *2 Select Confirm Select the chapter/ track/file number*3 *4 For some discs, you can also select items by using the number buttons.
TH_D60WM[J].book Page 18 Friday, February 23, 2007 3:19 PM See page 15 for button locations. Playing at random—random play Changing the playback mode Program play and random play cannot be used for a USB mass storage class device. Programing the playing order—program play 1 1 2 To return to normal playback Press the button repeatedly until both the program window and disappear from the TV. Program window 2 Select the desired chapters/ tracks.
TH_D60WM[J].book Page 19 Friday, February 23, 2007 3:19 PM Disc/file playback Special picture playback Advanced operations Changing the language/sound/scene angle To do Disc/file Disc/file To do Play back frame by frame Select the subtitle language*1 *2 Play back in slowmotion*1 • To show/hide the subtitle, press SUBTITLE. «Hold Enlarge the picture*2 *3 • Change the scene magnification, then move the zoomed-in area.
TH_D60WM[J].book Page 20 Friday, February 23, 2007 3:19 PM See page 15 for button locations. Adjusting the picture quality (VFP) Special playback for DVD Audio Playing back a bonus group You can adjust the picture mode. 1 Some DVD Audio discs have a “bonus group.” To play back a bonus group, you have to enter the specific “key number” (a password). 1 Select a bonus group. 2 Select the desired preset, then finish the setting. The key number entry screen appears.
TH_D60WM[J].book Page 21 Friday, February 23, 2007 3:19 PM Disc/file playback Operation from the TV screen On-screen bar functions Selects the time information mode shown on the display and the status bar.
TH_D60WM[J].book Page 22 Friday, February 23, 2007 3:19 PM See page 15 for button locations. Using the file control display Using the program list/ playlist (for DVD VR) The file control display appears in the following cases. – Audio files: Always appears. – Movie and picture files: When TOP MENU(/PG/DIRECT) or MENU(/PL) is pressed or playback is stopped. Program list File control display Ex.
TH_D60WM[J].book Page 23 Friday, February 23, 2007 3:19 PM Personal settings Set the remote control mode before operation. For disc playback For playback of a file on a USB mass storage class device You can change the settings of the System according to your preferences and playing environment. 1 2 Select the menu. 3 Select the item, then confirm. Select Confirm Repeat this procedure until all the options have been confirmed.
TH_D60WM[J].book Page 24 Friday, February 23, 2007 3:19 PM Underlined items are the initial settings. Audio menu (AUDIO) DOWN MIX This menu is available only when the speaker position mode is set to “S.SPK F” ( 12). Select the audio signal output to the TV connected to the HDMI MONITOR OUT terminal. DOLBY SURROUND: For the TV equipped with Dolby Pro Logic decoder STEREO: For ordinary TV D. RANGE COMPRESSION You can enjoy powerful audio even at low volume level while playing Dolby Digital software.
TH_D60WM[J].book Page 25 Friday, February 23, 2007 3:19 PM XM Satellite Radio operations Set the remote control mode before operation. • Select “XM” as the source. ( 11) How to subscribe XM monthly service subscription sold separately. XM MiniTuner and Home Dock required (each sold separately) to receive XM service. Installation costs and other fees and taxes, including a one-time activation fee may apply. Subscription fee is consumer only. All fees and programming subject to change.
TH_D60WM[J].book Page 26 Friday, February 23, 2007 3:19 PM Manual tuning Preset tuning You can preset 30 XM Satellite Radio channels. To search a channel Storing the preset channels 1 Tune in to the channel you want to preset. “_ _” flashes on the display. Perform the next 2 While searching, the invalid and unsubscribed channels are skipped. TUNING 9/TUNING ( are not used to select a XM Satellite Radio channel. step while “_ _” is flashing.
TH_D60WM[J].book Page 27 Friday, February 23, 2007 3:19 PM FM/AM tuner operations Set the remote control mode before operation. Preset tuning You can preset 30 FM stations and 15 AM stations. Storing the preset stations • Select the desired source (“FM” or “AM”) you want to listen to. ( 11) 1 Tune in to the station you want to preset. “_ _” flashes on the display. Perform the next 2 step while “_ _” is flashing. 3 Select a preset number, then store the station to that number.
TH_D60WM[J].book Page 28 Friday, February 23, 2007 3:19 PM iPod playback Set the remote control mode before operation. Play/pause/search/skip To do Start playback Pause playback Fast-forward/fast-reverse search * Operate on your iPod to skip to the next/previous item while playing back a video. • The iPod enters sleep mode when you turn off the System or select another source. • To show still pictures in the iPod, play back in slide-show mode on the iPod.
TH_D60WM[J].book Page 29 Friday, February 23, 2007 3:19 PM Operating external components Set the remote control mode before operation. For TV Operating external components Set the remote control mode before operating each external component (see the left column).
TH_D60WM[J].
TH_D60WM[J].book Page 31 Friday, February 23, 2007 3:19 PM References Messages and icons shown on the TV and display Messages and icons shown on the TV during disc/file playback OPEN/CLOSE Opening or closing the disc tray NOW READING Reading the disc/file information Messages shown on the display while listening to the XM Satellite Radio NO SIGNL No signal is received. CHECK XM TUNER The XM Mini-Tuner is not properly installed or the XM Mini-Tuner Home Dock is not properly connected.
TH_D60WM[J].book Page 32 Friday, February 23, 2007 3:19 PM No picture is displayed on the TV or no sound comes out through the HDMI connection. ZThe connected TV is not HDCP-compatible. (“HDCP ERR” appears on the display.) ZDisconnect the HDMI cable and connect it again, or use a shorter cable. Video and audio are distorted. ZThe disc is scratched or dirty. ZAudio/video files have not been properly copied on to the USB mass storage class device. ZA VCR is connected between the center unit and the TV.
TH_D60WM[J].book Page 33 Friday, February 23, 2007 3:19 PM References Specifications Center unit (XV-THD60WM) Output power Front/Surround: 200 W per channel, RMS at 3 Ω at 1 kHz, with 10% total harmonic distortion. Center: 200 W, RMS at 3 Ω at 1 kHz, with 10% total harmonic distortion. Subwoofer: 200 W, RMS at 3 Ω at 100 Hz, with 10% total harmonic distortion. Audio section Digital Input* DIGITAL IN OPTICAL: COAXIAL: –21 dBm to –15 dBm (660 nm ±30 nm) 0.
TH_D60WM[J].book Page 34 Friday, February 23, 2007 3:19 PM Satellite speakers Front speakers (SP-THD6F) Type: 2-Way Bass-Reflex Type (Magnetically Shielded Type) Speaker: 8 cm (3-3/16 inches) cone × 1 3 cm (1-3/16 inches) dome × 1 Power Handling Capacity: 200 W Impedance: 3Ω Frequency Range: 90 Hz to 20 000 Hz Sound Pressure Level: 78 dB/W•m Dimensions (W × H × D): 200 mm x 574 mm x 200 mm (7-7/8 inches × 22-5/8 inches × 7-7/8 inches) Mass: 2.4 kg (5.
TH_D60WM[J].
TH_D60WM[J].
TH_D60WM[J].