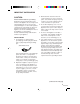
LCCS VIDEO MONITOR TM-L450TU INSTRUCTIONS Contents – + VOLUM E(CHAN NEL) TV VIDEO A VIDEO B MEN U BLUE CHECK SIZE SELECT POW ER For Customer Use: Enter below the Serial No. which is located on the bottom of the cabinet. Retain this information for future reference. Model No. : Serial No.
Thank you for purchasing this JVC LCCS video monitor. Before using, read and follow all instructions carefully to take full advantage of the monitor’s capabilities. Retain these instructions for future reference. * LCCS = Liquid Crystal Color Shutter IMPORTANT SAFETY PRECAUTIONS CAUTION RISK OF ELECTRIC SHOCK DO NOT OPEN CAUTION: To reduce the risk of electric shock. do not remove cover (or back). No user serviceable parts inside. Refer servicing to qualified service personnel.
IMPORTANT SAFEGUARDS CAUTION: Please read and retain for your safety. Electrical energy can perform many useful functions. This Appliance has been engineered and manufactured to assure your personal safety. But improper use can result in potential electrical shock or fire hazards. In order not to defeat the safeguards incorporated in this Appliance, observe the following basic rules for its installation, use and servicing. And also follow all warnings and instructions marked on your Appliance.
7 An outside antenna system should not be located in the vicinity of overhead power lines or other electric light or power circuits, or where it can fall into such power lines or circuits. When installing an outside antenna system, extreme care should be taken to keep from touching such power lines or circuits as contact with them might be fatal. EXAMPLE OF ANTENNA GROUNDING AS PER NATIONAL ELECTRICAL CODE 9 To avoid personal injury: – Do not place an Appliance on a sloping shelf unless properly secured.
14 An Appliance and cart combination should be moved with care. Quick stops, excessive force, and uneven surfaces may cause the Appliance and cart combination to overturn. 16 Do not attempt to service this Appliance yourself as opening or removing covers may expose you to dangerous voltage or other hazards. Refer all servicing to qualified service personnel.
CONTROLS AND FEATURES PRODUCT: FRONT & RIGHT VIEW FRONT VIEW – – VOLUME(CHANNEL) + VOLUME(CHANNEL) + TV VIDEO A VIDEO B MENU BLUE CHECK SIZE SELECT TV VIDEO A POWER RIGHT VIEW EAR PHONE 6 VIDEO B MENU BLUE CHECK SIZE SELECT POWER
FRONT VIEW 1 Carrying Handle Used to carry the monitor. Can be removed when the monitor is mounted in a rack. 2 Screen A removable shield protecting the liquid crystal shutter is provided. 3 Feet Can be removed when the monitor is mounted in a rack. 4 Stand The monitor will be tilted about 18° when the stand is pulled out. Can be removed when the monitor is mounted in a rack. * DO NOT push down on the monitor from above or place heavy objects on it when the stand is pulled out.
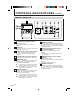
CONTROLS AND FEATURES (cont’d) PRODUCT: REAR VIEW AC IN 75 VHF/UHF DC IN 12V IN IN A 75 VHF/UHF DC IN 12V IN IN OUT OUT ANT. IN A ANT. IN VIDEO A VIDEO B DC IN 19V B OUT VIDEO A 1 AC IN (AC Power Input) Terminal Power input terminal. Connect the provided power cord to the terminal. 2 AC Adapter Can be removed when a commercial DC power supply (DC 12 V) is used. 3 DC IN 12 V (DC Power Input) Terminal Connect a commercial DC power supply. (Consult your dealer for usable DC power supplies.
BASIC CONNECTION EXAMPLES ● Before connecting your system, make sure that all units are turned off. ● If you are not connecting any equipment to one of the bridged video output (VIDEO OUT) terminals, be sure NOT to connect any cables to the terminal as this will cause the terminating resistance switch to open (auto terminate function). ● DO NOT connect a piece of equipment to the same pair of video input (VIDEO IN) and video output (VIDEO OUT) terminals.
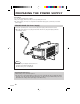
PREPARING THE POWER SUPPLY Precautions Use one of the following power supplies: ● AC power supply (120 V AC, 60 Hz): Use the provided power cord. ● DC power supply (12 V DC): Use any brand of external DC battery pack (commercial) or other DC power supply. INDOOR USAGE (AC Power Supply) Connect the provided power cord to the AC IN (AC power input) terminal and an AC outlet. ● When AC power supply is used, the power from the DC IN 12 V (DC power input) terminal is automatically cut off.
UPPLY OUTDOOR USAGE (DC Power Supply) Connect any commercial brand of external DC battery pack or other DC power supply to DC IN 12 V (DC power input) terminal with the exclusive power cord. Connection example: using an external DC battery pack Before performing the following, be sure to unplug the power cord. The DC battery pack fits into the attachment holes on the back of the monitor. ● The screw holes for fixing the DC battery are M4 size and have a depth of 12 mm.
BASIC OPERATIONS MONITORING THE PICTURE 3 – 2 1 + VOLUME(CHANNEL) TV VIDEO A VIDEO B MENU BLUE CHECK SIZE SELECT POWER Front operation panel Precautions ● Connect video components properly to the connection terminals on the rear of the monitor. (墌 pages 8 and 9) 1 The power indicator lights in green. ● To turn the power OFF, press the power button again. POWER 2 VIDEO A Press the power button to turn the power ON. VIDEO B Select a video input with the VIDEO A or VIDEO B button.
WATCHING TV 3, 4 – 2 1 + VOLUME(CHANNEL) TV VIDEO A VIDEO B MENU BLUE CHECK SIZE SELECT POWER Front operation panel Precautions ● Connect the TV antenna cable. (墌 page 9) ● Set TV channels. (墌 pages 14, 15 and 17) 1 The power indicator lights in green. ● To turn the power OFF, press the power button again. POWER 2 + 3 While the TV button is blinking in green, select the TV station (channel) you want to watch.
SETTINGS AND ADJUSTMENTS BASIC MENU OPERATION 2, 3 – 1, 3 + VOLUME(CHANNEL) TV VIDEO A VIDEO B MENU BLUE CHECK SIZE SELECT POWER Front operation panel 1 MENU Press the MENU button to select the desired item to adjust (set). The selected item changes each time the MENU button is pressed. The currently selected item is displayed on the monitor.
NTS MENU CONTENTS You can adjust (set) the following items on the menu screen. Each adjusted (set) value is automatically memorized. The values inside [ ] are the factory presets. 1 CONTRAST (Picture Contrast) Adjusts the picture contrast. Decreasing the value lowers the contrast, and increasing the value raises it. Adjustable range: –30 to +30 [0] 2 BRIGHTNESS (Picture Brightness) Adjusts the picture brightness. Decreasing the value makes the picture darker, and increasing the value makes it brighter.
SETTINGS AND ADJUSTMENTS BLUE CHECK + VIDEO B SCREEN SIZE ADJUSTMENTS Adjust the screen size to get the desired picture. Press the SIZE SELECT button. The screen size changes in the following order each time the SIZE SELECT button is pressed.
S (cont’d) 4 Adjust CHROMA (picture chroma) or PHASE (picture phase). When an NTSC color bar signal is input: 1 Adjust CHROMA (picture chroma) so that the blue bars on the left and right side of the screen have the same brightness. 2 Adjust PHASE so that the two blue bars at the center of the screen have the same brightness. 3 Repeat procedure 1 and 2 so that all four blue bars on the screen have the same brightness.
TROUBLESHOOTING Before requesting repair, check the following points. Problems No power supply. No picture with the power on. No sound. Points to be checked Measures (remedy) Is the power plug loosened or disconnected? Firmly insert the power plug. Is the battery charged properly? (when a DC power supply is used) Charge the battery or replace the charged battery (refer to the battery charger you are using). Is the signal output from the connected equipment? Set the connected equipment correctly.
Problems Points to be checked Measures (remedy) The screen size is small. Is the screen size set to UNDER? Set the screen size to OVER. There is no TV reception. Is an antenna connected to the monitor? Connect the TV antenna cable.
CHARACTERISTICS OF LCCS VIDEO MONITOR SYSTEM ■ PRINCIPLE BEHIND LCCS VIDEO MONITOR OPERATION The LCCS Video Monitor is a combination of a black-and-white cathode-ray tube and liquid crystal color shutter (LCCS), which are used together to reproduce color images. The video signal input to the monitor is demodulated into RGB primary color signals which are then stored in the field memory.
SPECIFICATIONS Type Color System RF Reception Channels Picture Tube : LCCS video monitor : NTSC/PAL : U.S.A. VHF: 2 – 13, UHF: 14 – 69 : 4.5" measured diagonally, black and white Effective Screen Size : Width : 3-3/4" (94.2 mm) Height : 2-13/16" (70.7 mm) Diagonal : 4-1/2" (114.3 mm) Video Inputs : 2 line inputs, composite video, BNC connector x 4, 1 V(p-p), 75 Ω Bridge connection possible, 75 Ω auto termination Audio Inputs : 2 line inputs, monaural, RCA-pin connector x 2, 0.
SPECIFICATIONS (cont’d) 䡵 Dimensions Unit : inch (mm) 11-1/2 (291.8) 9-7/8 (250) – + TV VIDEO A VIDEO B MENU BLUE CHECK SIZE SELECT POWER 3/8 (9.3) VOLUME(CHANNEL) 22 5-1/4 (132) 3-1/16 (77) 7-3/16 (181.
TM-L450TU LCCS VIDEO MONITOR JVC PROFESSIONAL PRODUCTS COMPANY DIVISION OF US JVC CORP. 1700 Vallery Road Wayne, NJ07470 JVC CANADA INC.