Cover-5500(E).fm Page 1 Monday, May 11, 1998 4:23 PM ULTRA MICRO COMPONENT SYSTEM ULTRA-MIKRO-KOMPONENTEN-SYSTEM SYSTEME DE COMPOSANTS ULTRA MICRO ULTRA MIKRO KOMPONENTENSYSTEEM SISTEMAS DE COMPONENTES ULTRA MICRO SISTEMA AD ULTRA MICROCOMPONENTI UX-5500R PTY/EON REMOTE CONTROL RM-RXU5500R DIMMER DISPLAY MODE DOWN MULTI CONTROL UP CLOCK SLEEP OPEN/CLOSE MD/TAPE AUX TUNER BAND CD SLEEP TIMER/SNOOZE DISPLAY FM MODE AHB.
:DUQLQJðèèííõ(ôïIPýý3DJHýìýý:HGQHVGD\ñý-XQHýëéñýìääåýýçãèäý30 Warnings, Cautions and Others / Warnung, Achtung und sonstige Hinweise /Mises en garde, précautions et indications diverses /Waarschuwingen, voorzorgen en andere mededelingen/Avisos, precauciones y otras notas / Avvertenze e precauzioni da osservare Caution –– switch! Disconnect the mains plug to shut the power off completely. The switch in any position does not disconnect the mains line. The power can be remote controlled.
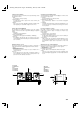
:DUQLQJðèèííõ(ôïIPýý3DJHýëýý:HGQHVGD\ñý-XQHýëéñýìääåýýçãèäý30 Caution: Proper Ventilation To avoid risk of electric shock and fire, and to prevent damage, locate the apparatus as follows: 1 Front: No obstructions and open spacing. 2 Sides/ Top/ Back: No obstructions should be placed in the areas shown by the dimensions below. 3 Bottom: Place on the level surface. Maintain an adequate air path for ventilation by placing on a stand with a height of 10 cm or more.
Ux-M9000 Warning.
Ux5500(E)-e.
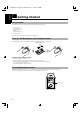
English Ux5500(E)-e.fm Page 2 Monday, May 11, 1998 4:26 PM ■ ■ Getting Started Accessories &KHFN#WKDW#\RX#KDYH#DOO#RI#WKH#IROORZLQJ#LWHPV/#ZKLFK#DUH#VXSSOLHG#ZLWK#WKH#6\VWHP1 3RZHU#&RUG#+4, $0#/RRS#$QWHQQD#+4, 5HPRWH#&RQWURO#+4, %DWWHULHV#+5, )0#:LUH#$QWHQQD#+4, 6SHDNHU#&RUGV#+5, ,I#DQ\#RI#WKHVH#LWHPV#DUH#PLVVLQJ/#FRQWDFW#\RXU#GHDOHU#LPPHGLDWHO\1# How To Put Batteries In the Remote Control 0DWFK#WKH#SRODULW\#+.#DQG#±,#RQ#WKH#EDWWHULHV#ZLWK#WKH#.
Ux5500(E)-e.fm Page 3 Monday, May 11, 1998 4:26 PM English CAUTION: Make all connections before plugging the System into an AC power outlet.
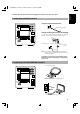
English Ux5500(E)-e.fm Page 4 Monday, May 11, 1998 4:26 PM CAUTION: Make all connections before plugging the System into an AC power outlet. Connecting the Speakers 1. Open the Speaker terminals on the rear of the Unit, and on the Speakers themselves. 2. Connect the speaker cords between the terminals as shown below. Connect the cords with a black line to the (–) terminals and cords without a black line to the (+) terminals.
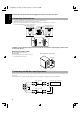
Ux5500(E)-e.fm Page 5 Monday, May 11, 1998 4:26 PM English CAUTION: Make all connections before plugging the System into an AC power outlet. Connecting Auxiliary Equipment Connect an (optional) signal cord between the AUX terminals on the System and the output terminals of your auxiliary equipment, (e.g. turntable).
COMPU PLAY -9&¶V#&2038#3/$<#IHDWXUH#OHWV#\RX#FRQWURO#WKH#PRVW#IUHTXHQWO\#XVHG#6\VWHP#IXQFWLRQV#ZLWK#D#VLQJOH#WRXFK1 :LWK#2QH#7RXFK#2SHUDWLRQ#\RX#FDQ#SOD\#D#&'/#WXUQ#RQ#WKH#UDGLR/#RU#OLVWHQ#WR#DQ#H[WHUQDO#HTXLSPHQW#ZLWK#D#VLQJOH#SUHVV#RI#WKH#SOD\#EXWWRQ#IRU WKDW#IXQFWLRQ1#2QH#7RXFK#2SHUDWLRQ#WXUQV#WKH#SRZHU#RQ#IRU#\RX/#WKHQ#VWDUWV#WKH#IXQFWLRQ#\RX#KDYH#VSHFLILHG1#,I#WKH#6\VWHP#LV#QRW#UHDG\#+QR#&' LQ#SODFH,/#WKH#6\VWHP#VWLOO#SRZHUV#RQ#VR#\RX#FDQ#LQVHUW#D#&'1 +RZ#2QH#7RXFK#2SHUDWLRQ#ZRUNV#LQ#HDFK#FDVH#LV#H[SOD
Adjusting the Volume 7XUQ#WKH#92/80(#FRQWURO#RI#WKH#8QLW#FORFNZLVH#WR#LQFUHDVH#WKH YROXPH#RU#FRXQWHUFORFNZLVH#WR#GHFUHDVH#LW1 25 :LWK#WKH#6\VWHP#WXUQHG#RQ/#SUHVV#WKH#92/80(#.#EXWWRQ#RQ#WKH#5H0 PRWH#&RWURO#WR#LQFUHDVH#WKH#YROXPH#RU#SUHVV#WKH#92/80(#±#EXWWRQ WR#GHFUHDVH#LW1 CAUTION: DO NOT turn on the System and/or start playing any source without first setting the VOLUME control to minimum, as a sudden blast of sound could damage your hearing, speakers and/ or headphones.
■ ■ Using the Tuner REMOTE CONTROL RM-RXU5500R DIMMER SLEEP DISPLAY FM MODE AUX FM MODE AHB. AUTO SUPER PRO PRESET CD AUTO PRESET TREBLE CANCEL UP SET > PTY/EON MD /TAPE DISPLAY MODE TUNER BAND Band display, Frequency display, Preset channel A M Y S IC U RO X-55 00 R E NT CO M P O N DISPLAY MODE DOWN PTY/EON R UP < LT U SET M BASS REPEAT T E PROGRAM RANDOM S English Ux5500(E)-e.
4. Press the UP, DOWN, >, or < button to ■ select the preset number. 83#EXWWRQ= ,QFUHDVHV#WKH#SUHVHW#QXPEHU#E\#41 '2:1#EXWWRQ= 'HFUHDVHV#WKH#SUHVHW#QXPEHU#E\#41 !#EXWWRQ= ,QFUHDVHV#WKH#WHQWK#GLJLW#IRU#SUHVHW#QXPEHU1 ?#EXWWRQ= 'HFUHDVHV#WKH#WHQWK#GLJLW#IRU#SUHVHW#QXPEHU1 5. Press the SET button. ■ $IWHU#4#VHFRQG/#WKH#GLVSOD\#UHWXUQV#WR#WKH#EURDGFDVW#IUHTXHQF\# GLVSOD\1 6. Repeat above steps 1 to 5 for each station ■ you want to store in memory with a preset number.
English Ux5500(E)-e.fm Page 10 Monday, May 11, 1998 4:26 PM To search for a programme by PTY codes ———————————————— 2QH#RI#WKH#DGYDQWDJHV#RI#WKH#5'6#VHUYLFH#LV#WKDW#\RX#FDQ#ORFDWH#D SDUWLFXODU#NLQG#RI#SURJUDPPH#E\#VSHFLI\LQJ#WKH#37<#FRGHV1 To search for a programme using PTY or TA codes: PTY/EON DOWN MULTI CONTROL UP PTY/EON 1. Press the PTY button once while listening ■ to an FM station. 7KH#GLVSOD\#DOWHUQDWHV#EHWZHHQ#³37<´#DQG#³6(/(&7´1 2.
To select a programme type———— PTY/EON DOWN MULTI CONTROL Case 2: If there is a station broadcasting the type of programme you have selected 7KLV#XQLW#WXQHV#WR#WKH#VWDWLRQ#EURDGFDVWLQJ#WKH#SURJUDPPH1#7KH#SUR0 JUDPPH#W\SH#+7$/#1(:6#RU#,1)2,#LQGLFDWRU#VWDUWV#EOLQNLQJ1 PTY/EON UP « :KHQ#WKH#SURJUDPPH#LV#RYHU/#WKLV#XQLW#JRHV#EDFN#WR#WKH#FXUUHQWO\#VH0 OHFWHG#VWDWLRQ/#EXW#VWLOO#UHPDLQV#LQ#(21#6WDQGE\#PRGH1 1.Press the EON button twice while listening ■ to an FM station.
English Ux5500(E)-e.fm Page 12 Monday, May 11, 1998 4:26 PM The Quickest Way To Start a CD Is With the One Touch Operation ■ 3UHVV#WKH#&'#38#EXWWRQ1 ‡ 7KH#SRZHU#LV#DXWRPDWLFDOO\#WXUQHG#RQ1#,I#D#&'#LV#DOUHDG\#LQ0 VHUWHG/#LW#ZLOO#VWDUW#SOD\LQJ#IURP#WKH#ILUVW#WUDFN1# ‡ ,I#QR#&'#LV#LQVHUWHG/#³12#',6&´#DSSHDUV#RQ#WKH#GLVSOD\#DQG# WKH#&'#3OD\HU#UHPDLQV#LQ#6WRS#PRGH1# To Insert a CD 1. Press the OPEN/CLOSE 0 button (or the CD ■ 0 button on the Remote Control). 7KH#&'#KROGHU#RSHQV1 2.
To cancel the programming before playing,#SUHVV#WKH#&$10 &(/#EXWWRQ#LQ#DERYH#VWHS#7/#8#RU#91 To confirm the programmed tracks,# SUHVV# WKH# 352*5$0 EXWWRQ>#WKH#WUDFNV#PDNLQJ#XS#WKH#SURJUDP#ZLOO#VXFFHVVLYHO\#EH#GLV0 SOD\HG#LQ#WKH#SURJUDPPHG#RUGHU1# To skip a track during playback,#SUHVV#WKH#¢#EXWWRQ#WR#MXPS WR#WKH#QH[W#WUDFN#LQ#WKH#UDQGRP#VHTXHQFH1#3UHVV#WKH# 4#EXWWRQ#WR MXPS#EDFN#WR#WKH#VWDUW#RI#D#WUDFN#EHLQJ#SOD\HG1 To cancel random play,#SUHVV#WKH#5$1'20#EXWWRQ#DJDLQ1#7KH ³5$'0´#LQGLFDWRU#JRHV#RXW#DQG#1R
3. Start playing the auxiliary equipment. ■ 4. Adjust the VOLUME control to the desired ■ Listening to Auxiliary Equipment listening level. You can listen to a turntable or other auxiliary equipment1 ■ )LUVW#PDNH#VXUH#WKDW#WKH#H[WHUQDO#HTXLSPHQW#LV#SURSHUO\#FRQQHFW0 HG#WR#WKH#6\VWHP1#+6HH#SDJH#81, 1. Set the VOLUME to minimum position. ■ 2. Press the AUX button. ■ :KHQ#WKH#6\VWHP#LV#LQ#6WDQGE\#PRGH/#WKH#6\VWHP#LV#DXWRPDWL0 FDOO\#WXUQHG#RQ1# #³$8;´#DSSHDUV#RQ#WKH#GLVSOD\1 5.
Ux5500(E)-e.fm Page 15 Monday, May 11, 1998 4:26 PM 41 Press the TIMER/SNOOZE button on the Unit. The Timer indicator lights up and the current ON time blinks on the display1 7. Before turning off the Unit, prepare the ■ music source selected in step 4. 7XQHU= 7XQH#LQ#WR#WKH#GHVLUHG#VWDWLRQ1 &'= ,QVHUW#D#&'1 8.
English Ux5500(E)-e.
■ ■ Troubleshooting ‡ ‡ ,I#\RX#DUH#KDYLQJ#D#SUREOHP#ZLWK#\RXU#6\VWHP/#FKHFN#WKLV#OLVW#IRU#D#SRVVLEOH#VROXWLRQ#EHIRUH#FDOOLQJ#IRU#VHUYLFH1 ,I#\RX#FDQQRW#VROYH#WKH#SUREOHP#IURP#WKH#KLQWV#JLYHQ#KHUH/#RU#WKH#6\VWHP#KDV#EHHQ#SK\VLFDOO\#GDPDJHG/#FDOO#D#TXDOLILHG#SHUVRQ/#VXFK#DV# \RXU#GHDOHU/#IRU#VHUYLFH1 Symptom 1R#VRXQG#LV#KHDUG1 3RRU#UDGLR#UHFHSWLRQ Possible Cause Action ‡ &RQQHFWLRQV#DUH#LQFRUUHFW/#RU#ORRVH1 ‡ ‡ +HDGSKRQHV#DUH#FRQQHFWHG1 ‡ ‡ ‡ 7KH#DQWHQQD#LV#GLVFRQQHFWHG1 7KH#$0#/RRS#$QWHQQD#LV#WR
English Ux5500(E)-e.fm Page 18 Monday, May 11, 1998 4:26 PM ■ ■ Specifications Amplifier 2XWSXW#3RZHU 63#:#+48#:#.#48#:,#DW#7#RKPV#+0D[1, 53#:#+43#:#.
Back cover-5500(E).