MICRO COMPONENT MD SYSTEM SISTEMA MD DE MICROCOMPONENTES SISTEMA MD DE MICROCOMPONENTE UX-A70MD 1 MARK 2 ABC 3 DEF 4 GHI 5 JKL 6 MNO 7 PQRS 8 TUV 9 WXYZ 10 0 +10 COMPACT DIGITAL AUDIO INSTRUCTIONS MANUAL DE INSTRUCCIONES INSTRUÇÕES For Customer Use: Enter below the Model No. and Serial No. which are located either on the rear, bottom or side of the cabinet. Retain this information for future reference. Model No. Serial No.
Warnings, Cautions and Others Avisos, precauciones y otras notas Advertências, precauções e outras notas Caution –– switch! Disconnect the mains plug to shut the power off completely (the STANDBY/ON lamp goes off). The switch in any position does not disconnect the mains line. • When the unit is on standby, the STANDBY/ON lamp lights red. • When the unit is turned on, the STANDBY/ON lamp lights green. The power can be remote controlled.
English PRECAUÇÃO Para reduzir riscos de choques elétricos, incêndio, etc.: 1. Não remova parafusos e tampas ou desmonte a caixa. 2. Não exponha este aparelho à chuva nem à umidade. Português PRECAUCIÓN Para reducir riesgos de choques eléctricos, incendio, etc.: 1. No extraiga los tornillos, los cubiertas ni la caja. 2. No exponga este aparato a la lluvia o a la humedad. – G-2 – UX-A70MD[US,UB,UJ]safety_f 2 Español CAUTION To reduce the risk of electrical shocks, fire, etc.: 1.
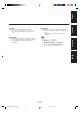
Caution: Proper Ventilation To avoid risk of electric shock and fire, and to prevent damage, locate the apparatus as follows: 1 Front: No obstructions and open spacing. 2 Sides/ Top/ Back: No obstructions should be placed in the areas shown by the dimensions below. 3 Bottom: Place on the level surface. Maintain an adequate air path for ventilation by placing on a stand with a height of 10 cm or more.
English IMPORTANT FOR LASER PRODUCTS / IMPORTANTE PARA PRODUCTOS LÁSER / IMPOTANTE PARA PRODUTOS LASER / 2 WARNING LABEL, PLACED INSIDE THE UNIT 1 ETIQUETA DE CLASIFICACIÓN, PEGADA EN LA PARTE POSTERIOR DE LA CAJA 2 ETIQUETA DE ADVERTENCIA, PEGADA EN EL INTERIOR DE LA UNIDAD 1 ETIQUETA DE CLASSIFICAÇÃO LOCALIZADA NA PARTE POSTERIOR DA CAIXA DO APARELHO. 2 ETIQUETA DE ADVERTÊNCIA LOCALIZADA NA PARTE INTERNA DA UNIDADE.
English Introduction We would like to thank you for purchasing one of our JVC products. Before operating this unit, read this manual carefully and thoroughly to obtain the best possible performance from your unit, and retain this manual for future reference. About This Manual Power sources • When unplugging the unit from the wall outlet, always pull the plug, not the AC power cord.
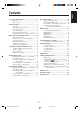
Location of the Buttons .................................. 3 Recording on MD ......................................... 25 Main Unit ............................................................... 4 Remote Control ...................................................... 5 Before You Start Recording ................................. 26 Recording FM/AM Broadcasts ............................ 28 Recording CD — CD Synchronized Recording .... 28 Recording the External Equipment — Sound Synchronized Recording ...
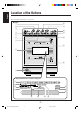
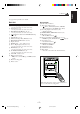
English Location of the Buttons Become familiar with the buttons on your unit. Main unit 1 2 p q 3 w e 4 5 r 6 7 t 8 y 9 Display window on the electronic swing panel u TRACK 1 i DAILY MD o SP LP2 LP4 ; 2 3 4 5 REC SLEEP 6 NORMAL SPEED REC 8 9 10 11 12 13 14 15 MONO STEREO CD MD HIGH 7 ALL RANDOMPRGM BASS g SOUND h j a s d f –3– EN01-09.UX-A70MD[USUBUJ]_f 3 00.12.
See pages in the parentheses for details. Main Unit Display window 1 MD # ¥ 8 (play/pause) button (11, 22) • Pressing this button also turns on the unit. 2 AUX button (11, 29) • Pressing this button also turns on the unit. 3 MD OPEN/CLOSE 0 button (22, 37) • Pressing this button also turns on the unit.
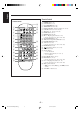
English Remote Control Remote Control r 1 t 2 y 3 u 4 5 i 6 7 8 o 9 ; p a q s w d e 1 2 3 4 5 6 7 8 9 p q w e r t y u i o ; a s d DIMMER button (13) COLOR button (9, 13) CLOCK/TIMER button (39) TITLE/EDIT button (32, 36) DISPLAY/CHARA (character) button (23, 27, 36) CANCEL button (19, 24, 32, 36, 39) SET button (13, 15, 26, 32, 36, 39) ENTER button (32, 37) REPEAT button (20, 24) MD # ¥ 8 (play/pause) button (11, 22) • Pressing this button also turns on the unit.
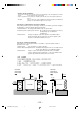
Continued Unpacking Connecting Antennas After unpacking, check to be sure that you have all the following items. The number in the parenthesis indicates the quantity of the pieces supplied. FM antenna • • • • • • • FM antenna (supplied) FM antenna (1) AM loop antenna (1) AC power cord (1) Remote control (1) Batteries (2) Spacers (2) AC Plug Adaptor (1) — except for Hong Kong If any is missing, consult your dealer immediately. 1 Attach the FM antenna to the FM (75 Ω) COAXIAL terminal.
English Connecting Speakers AM antenna To attach spacers 1 If you want to put the speakers on the side of the main unit, you need to make a space between the main unit and the right speaker for ventilation. In this case, attach spacers (supplied) to the right speaker as the illustration below: The main unit The right speaker Vinyl-covered wire (not supplied) 2 3 The openings for ventilation Spacers (supplied) By peeling the cover seal from spacers, you can attach them to the right speaker.
Connecting Other Equipment To connect speakers You can connect the speakers using the speaker cords. You can connect the following equipment which can be used as a playback and recording device. By using the cassette deck, for example, you can record any source played back on this unit. 1 When you connect and use the equipment, refer also to its manual supplied. 2 Speaker terminals • DO NOT connect other equipment while the power is on.
English Putting the Batteries into the Remote Control NOW, you can plug in the unit and other connected equipment FINALLY! Insert the batteries — R6P(SUM-3)/AA(15F) — into the remote control, by matching the polarity (+ and –) on the batteries with the + and – marking on the battery compartment. When the remote control can no longer operate the unit, replace both batteries at the same time.
The buttons enlarged clearly in the illustration below are used and explained in this section (pages 11 to 13.) Remote control Main unit – 10 – EN10-13.UX-A70MD[USUBUJ]_f 10 00.12.
English Turning On the Power Selecting the Sources and Starting Play When you press the play button (CD # / 8, MD # / 8) for a particular source or the source selecting buttons such as FM/AM and AUX, the unit automatically turns on (and starts playback if the source is ready). To select the tuner as the source, press FM/AM. The unit automatically turns on (when the unit is in standby), and “FM” or “AM” appears in the main display for a while. The unit starts to tune in the last received station.
English Adjusting the Volume Reinforcing the Bass Sound You can adjust the volume level only while the unit is turned on. The richness and fullness of the bass sound is clearly maintained regardless of how low you set the volume — Active Hyper Bass PRO. • You can use this effect only for playback. To decrease the volume, press VOLUME – . To increase the volume, press VOLUME + . To get the effect, press AHB PRO. “BASS ON” appears in the main display and the BASS indicator lights on the display.
English Setting the Display Illumination To create your favorite colors You can change the illumination color and brightness of the electronic swing panel and display window. To set the illumination color You can select the illumination color by your preference. 1 Press to turn on the unit. 2 Press COLOR repeatedly until the color you want You can create two favorite colors and store them in memory as “M1” and “M2.” On the remote control ONLY: 1 Press to turn on the unit.
The buttons enlarged clearly in the illustration below are used and explained in this section (pages 15 and 16.) Remote control Main unit – 14 – EN14-16.UX-A70MD[USUBUJ]_f 14 00.12.
English Setting the AM Tuner Interval Spacing To change the FM reception mode Some countries space AM stations 9 kHz apart, and some countries use 10 kHz spacing. When shipped, the built-in AM tuner is set to 9 kHz spacing. On the main unit ONLY: To set the AM tuner to the 10 kHz spacing, be sure that the unit is turned off, but is plugged into a wall outlet. . While holding ¢, press When an FM stereo broadcast is noisy or hard to receive, you can change the FM reception mode to improve the reception.
English 3 Press the number buttons to select a preset number. Ex. For preset number 5, press 5. For preset number 15, press +10, then 5. For preset number 20, press +10, then 10. For preset number 30, press +10, +10, then 10. • You can also select the preset number by pressing ¢ or 4. 4 Press SET again. “STORED” appears in the main display for a while. The tuned station in step 1 is stored in the preset number selected in step 3. • Storing a new station on a used number erases the previously stored one.
English Playing Back a CD The buttons enlarged clearly in the illustration below are used and explained in this section (pages 18 to 20.) Remote control Main unit – 17 – EN17-20.UX-A70MD[USUBUJ]_f 17 00.12.
English Playing Back the Entire CD — Normal Play To stop during play, press 7. All the tracks on the CD You can play a CD. TRACK 1 Press CD OPEN/CLOSE 0. 1 2 3 MD The unit automatically turns on, the electronic swing panel slides upward, then the disc tray comes out. 4 5 6 7 8 10 11 12 CD Total track number Electronic swing panel 9 Total playing time Ex. The CD playback stops. The CD has 12 tracks. To remove the disc, press CD OPEN/CLOSE 0.
English Programing the Playing Order of the Tracks — Program Play To exit from Program play mode, press PLAY MODE once or twice so that the unit enters another playback mode (Normal play or Random play mode) before or after play. You can arrange the order in which the tracks play before you start playing. You can program up to 32 tracks. To check the program contents On the remote control ONLY: 1 Load a CD. 2 Press CD # / 8, then 7. To modify the program The source is changed to “CD.
Repeating Tracks — Repeat Play The tracks of a loaded CD will play at random. You can have all the tracks, the program or the individual track currently playing repeat as many times as you like. On the remote control ONLY: On the remote control ONLY: To repeat play, press REPEAT during or before play. • Each time you press REPEAT, Repeat play mode changes as follows: 1 Load a CD. 2 Press CD # / 8, then 7. The source is changed to “CD.
English Playing Back an MD The buttons enlarged clearly in the illustration below are used and explained in this section (pages 22 to 24.) Remote control Main unit – 21 – EN21-24.UX-A70MD[USUBUJ]_f 21 00.12.
English Playing Back the Entire MD — Normal Play Track number indicator TRACK You can play an MD. 1 2 3 SP MD 4 5 6 7 8 9 10 11 CD 12 Flashing On the main unit ONLY: 1 Press MD OPEN/CLOSE 0. The current track Elapsed playing time Recording length mode indicator The unit automatically turns on, the electronic swing panel slides downward, then the MD loading slot appears. • If an MD is already in the MD loading slot, it will eject. Ex.
English Basic MD Operations While playing an MD, you can do the following operations. Programing the Playing Order of the Tracks — Program Play You can arrange the order in which the tracks play before you start playing. You can program up to 32 tracks. To stop playback for a moment Press MD # / 8. The MD indicators lights on the display and the elapsed playing time starts flashing in the main display. To resume playback, press MD # / 8 again. On the remote control ONLY: 1 Load an MD.
Before playing, you can erase the last programed track by pressing CANCEL. Each time you press the button, the last programed track is erased from the program. English To modify the program 4 Press MD # / 8. The tracks are played at random. The track numbers which will be played back from now on. To add tracks in the program before you start play, simply select track numbers you want to add. 5 TRACK SP MD To erase the entire program, press MD OPEN/CLOSE 0 to eject the MD.
English Recording on MDs The buttons enlarged clearly in the illustration below are used and explained in this section (pages 26 to 29.) For recording operations, you mainly use the buttons on the main unit. Main unit Remote control – 25 – EN25-29.UX-A70MD[USUBUJ]_f 25 00.12.
Before You Start Recording • It may be unlawful to record or play back copyrighted material without the consent of the copyright owner. • When you record onto partially recorded MD, its contents are not erased or overwritten. The recording starts from the point following the last recorded track of the MD. If you want to record on such an MD from the beginning, you have to erase its contents first (see “ALL ERASE Function” on page 34.) • When an MD is fully recorded, recording will stops automatically.
English Stereo Long-Hour Recording (MDLP) To check the remaining recording time 1 Load an MD to record on. 2 Press MD # ¥ 8, then press 7 to select MD as the source. 3 Press DISPLAY/CHARA repeatedly until “REM.” and the remaining time appears in the main display. On conventional MD recorders, 2 times long-hour recording on MDs has been possible only in monaural sound, but this unit allows for 2 times or 4 times longhour recording without losing stereo sound.
Recording FM/AM Broadcasts You have three methods (MODE 1 – 3) to record from an FM/AM broadcast onto an MD. Recording length mode* Recording Speed MODE 1 SP NORMAL SPEED REC MODE 2 LP2 NORMAL SPEED REC MODE 3 LP4 NORMAL SPEED REC Recording mode Recording CD — CD Synchronized Recording You have six methods (MODE 1 – 6) to record from a CD onto an MD. Using these synchronized recording methods, you can start and stop CD play and MD recording at the same time.
English Recording the External Equipment — Sound Synchronized Recording 4 Press REC. The recording starts. The track number on the MD is flashing while recording. TRACK 1 SP LP2 LP4 MD NORMAL SPEED Flashing CD REC Elapsed playing time The now recorded track number Recording length and speed With this recording method, you can start recording automatically when the source sound comes into this unit through the LINE IN jacks.
The buttons enlarged clearly in the illustration below are used and explained in this section (pages 31 to 34.) Remote control Main unit – 30 – EN30-34.UX-A70MD[USUBUJ]_f 30 00.12.
English Introducing MD Editing Functions A recorded MD can be edited in many ways. The MD editing functions include dividing, joining, moving, erasing tracks, erasing the entire disc, and more than one of them can be combined as required. Dividing a track (DIVIDE) : Page 32 This function divides a track by adding a track marking(s) in the desired point(s) in the middle or where you want to search later.
DIVIDE Function 6 Press Ø or ø to adjust the dividing point precisely. When you stop pressing the buttons, the unit repeats the newly selected dividing point. • You can shift the dividing point up to ±128. This range (±128) corresponds to approximately ±8 seconds* from the original point (Position 0). This function allows you to divide one track into two separate tracks. It is useful, for example, when you want to add track marks at a certain point within a track or if you want to separate a recording.
English 1 Insert an MD you want to edit into the MD loading 3 Press SET. “– – – + 1 slot. ?” appears in the main display. 2 Press TITLE/EDIT repeatedly until “MOVE ?” appears in the main display. The source is changed to “MD.” 4 Press ¢ or 4 to select the two adjacent tracks you want to join. • You can also press the number button(s) to directly select the track you want to join. • Each time you press TITLE/EDIT, the edit mode changes as follows: DISC TITLE? Playback mode (canceled) Ex.
English ERASE Function ALL ERASE Function This function allows you to erase unwanted tracks. • To stop any time during editing process, press TITLE/EDIT. This function allows you to erase all the tracks on an MD. • To stop any time during editing process, press TITLE/EDIT. 1 Insert an MD you want to edit into the MD loading 1 Insert an MD you want to edit into the MD loading slot. slot.
English Assigning Titles to an MD The buttons enlarged clearly in the illustration below are used and explained in this section (pages 36 and 37.) Remote control Main unit – 35 – EN35-37.UX-A70MD[USUBUJ]_f 35 00.12.
3 Press Ø or ø to change the title entry mode. Assigning the Disc Title and Track Title You can assign a name to each MD and to each track using alphabetic characters (uppercase and lowercase), symbols and numerals. Once a title is assigned, it is displayed for your confirmation. • You cannot edit titles composed of more than 64 characters. Ex. Track 8 is selected.
English 3) Repeat steps 5 – 1) and 5 – 2) to input other characters. • If the character you want to input next is assigned to the same button you have just pressed in step 5 – 2), press Ø first to move the character entry position to the right. Available Symbols are as follows: (Blank) • The main display can only show 9 characters at a time. If you enter the 10th character, the first character disappears, and so on. Changing the Title 6 Press ENTER to finish the current title entry.
The buttons enlarged clearly in the illustration below are used and explained in this section (pages 39 to 42.) Remote control Main unit – 38 – EN38-42.UX-A70MD[USUBUJ]_f 38 00.12.
English There are three timers available — Recording Timer, Daily Timer, and Sleep Timer. Using Recording Timer Before using these timers, you need to set the built-in clock. With Recording Timer, you can make an unattended recording. • You can set Recording Timer whether the unit is turned on or in the standby mode. • To correct a mis-entry any time during the setting process, press CANCEL. Setting the Clock You can set the clock whether the unit is turned on or in standby mode.
3 Set the timer-off time. 1) Press ¢ or 4 repeatedly to adjust the hour. 2) Press SET. The minute digit starts flashing. To turn off the Recording Timer after its setting is done 1 Press CLOCK/TIMER repeatedly until “REC” appears in the main display. 2 Press CANCEL. “REC off” appears in the main display, and the timer ( ) and MD REC indicators go off from the display. To turn on the Recording Timer, press SET. The timer ( ) and MD REC indicators light on the display.
English 2 Set the timer-on time. 1) Press ¢ or 4 repeatedly to adjust the hour. 5 Adjust the volume level. 1) Press ¢ or 4 repeatedly to adjust the volume level. • You can adjust the volume level within the range of 0 (silent) to 40 (maximum.) • When you select “VOLUME – –,” the volume is set to the current volume level. 2) Press SET. The minute digit starts flashing. 3) Press ¢ or 4 repeatedly to adjust the minute. 4) Press SET. The hour digit of the timer-off time starts flashing.
To sleep with the Sleep Timer and wake up with the Daily Timer With Sleep Timer, you can fall asleep to your favorite music. You can set Sleep Timer when the unit is turned on. The unit turns off when the shut-off time comes (set by the Sleep Timer), and turns on when the timer-on time (set by the Daily Timer) comes. How Sleep Timer actually works 1 2 The unit automatically turns off after the specified time length passes. 3 Set the Daily Timer as explained on pages 40 and 41.
English Maintenance To get the best performance of the unit, keep your discs and mechanism clean. Handling MDs General Notes In general, you will have the best performance by keeping your CDs, MDs and the mechanism clean. • Store CDs and MDs in their cases, and keep them in cabinets or on shelves. • Keep the CD trays, and the MD loading slot cover closed when not in use. • Do not open the shutter. - The shutter is locked so that it will not open. Trying to force it open will break the MD.
English Additional Information MD Disc Types There are two types of MDs: Premastered (prerecorded) and Recordable (blank). Premastered MDs Premastered MDs, which have been recorded at music studio, can be played back like regular CDs. On an MD of this type, data is recorded as the presence or absence of tiny pits. A laser beam focuses on the pits on the surface of the MD and reflects the detection back to the lens in the MD recorder. The MD recorder then decodes the signals and plays them back as music.
English SCMS (Serial Copy Management System) The MD recorder integrated to this unit uses the Serial Copy Management System which allows only first-generation digital copies to be made of premastered software (like CDs or prerecorded MDs). 1st Generation OK 2nd Generation NO DIGITAL DIGITAL ABCDEFG HCMS (High-speed Copy Management System) Now onto recordable MDs (minidiscs), you can record (copy) sound at a recording speed exceeding the normal speed.
Message English MD Messages Signification Solution BLANK DISC The disc is blank. Change the MD with another if you want to enjoy playback. CANNOT JOIN You are trying to join tracks which cannot be joined. This is not a malfunction. (See “MD limitations” on page 45.) CAN NOT LISTEN You are trying to listen to the sound during high-speed recording. This is not a malfunction. You cannot listen to the sound during high-speed recording. There is a problem with the MD. Change the MD.
English Troubleshooting If you are having a problem with your unit, check this list for a possible solution before calling for service. If you cannot solve the problem from the hints given here, or the unit has been physically damaged, call a qualified person, such as your dealer, for service. Symptom No sound is heard. Possible Cause Connections are incorrect or loose. Unable to record on an MD. Poor radio reception. Unable to operate the remote control. Loaded CD and MD can not be ejected.
English Specifications Amplifier Speaker Section Output Power (IEC 268-3/DIN): 44 W (22 W + 22 W) at 4 Ω (MAX.) 40 W (20 W + 20 W) at 4 Ω (10 % THD) Speakers: Woofer 10 cm, Tweeter 4 cm Impedance: 4Ω Dimensions (approx.): 130 mm x 215 mm x 231.5 mm (W/H/D) (51/8 in. x 81/2 in. x 91/8 in.) Mass (approx.): 2.0 kg (4.5 lbs) Audio input sensitivity/Impedance (at 1 kHz) LINE IN: 400 mV/48 kΩ Audio output level/Impedance (at 1 kHz) LINE OUT: 260 mV/5.
Mains (AC) Line Instruction (not applicable for Europe, U.S.A., Canada, Australia, and U.K.) Instrucción sobre la línea de la red (CA) (no aplicable para Europa, EE.UU., Canadá, Australia, ni el Grã-Bretanha) Instrução sobre a tensão da rede eléctrica (CA) (não aplicável para a Europa, os E.U.A.