UX-DM8_Cover[U].
UX-DM8[U]_Safety.fm Page 1 Tuesday, May 29, 2007 3:17 PM Warnings, Cautions and others CAUTION To reduce the risk of electrical shocks, fire, etc.: 1. Do not remove screws, covers or cabinet. 2. Do not expose this appliance to rain or moisture. CAUTION — button! Disconnect the mains plug to shut the power off completely (the STANDBY lamp goes off). When installing the apparatus, ensure that the plug is easily accessible. The button in any position does not disconnect the mains line.
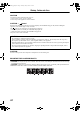
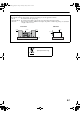
UX-DM8[U]_Safety.fm Page 2 Tuesday, May 29, 2007 3:17 PM Caution: Proper Ventilation To avoid risk of electric shock and fire, and to prevent damage, locate the apparatus as follows: 1. Front: No obstructions and open spacing. 2. Sides/Top/Back: No obstructions should be placed in the areas shown by the dimensions below. 3. Bottom: Place on the level surface. Maintain an adequate air path for ventilation by placing on a stand with a height of 10 cm or more.
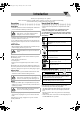
UX-DM8[U].book Page 1 Monday, June 4, 2007 8:20 PM Introduction Thank you for purchasing a JVC product. Please read all instructions carefully before operation, to ensure your complete understanding and to obtain the best possible performance from the unit. Precautions How to Read This Manual Installation • Button and control operations are explained in the table below.
UX-DM8[U].book Page 2 Monday, June 4, 2007 8:20 PM Contents Getting Started......................................................... 3 Recording operations ............................................ 20 Connections......................................................................... 3 Preparing the remote control ............................................... 5 About Display Indicators .................................................... 5 Before You Start Recording................................
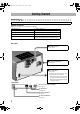
UX-DM8[U].book Page 3 Monday, June 4, 2007 8:20 PM Getting Started Connections Do not connect the AC power cord until all other connections have been made. Supplied accessories Check to be sure that you have all the following items.
UX-DM8[U].book Page 4 Monday, June 4, 2007 8:20 PM ~ AM/FM antenna Ÿ Speakers To assemble the AM loop antenna • When connecting the speaker cords, match the polarity of the speaker terminals: transparent to (+) and transparent with black stripe to (–).
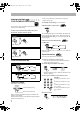
UX-DM8[U].book Page 5 Monday, June 4, 2007 8:20 PM How to attach the core filter Attach the provided core filter to the power cord, then the core filter reduces interference. 1 2 Preparing the remote control 3 10 cm stopper 1 Release the stopper of the core filter. R6(SUM-3)/AA(15F) 2 Run the power cord through the core filter, and place the core filter at about 10 cm away from the rear of the unit.
UX-DM8[U].book Page 6 Monday, June 4, 2007 8:20 PM Daily Operations—Playback In this manual, operations using the remote control are mainly explained; however, you can use the buttons and controls on the main unit if they have the same (or similar) name and marks. Remote control Number buttons 1 SET ENTER TITLE/EDIT 7 GROUP SKIP 2 4,¢ REPEAT GROUP SELECT FM/PLAY MODE QP LINK 1 2 3 1 Turn on the power. The STANDBY lamp on the main unit turns off.
UX-DM8[U].book Page 7 Monday, June 4, 2007 8:20 PM Listening to the Radio • When you repeatedly press the button, the frequency changes step by step. INFO To select the AM tuner interval spacing To manually stop searching, press either button. Main Unit ONLY Some countries space AM sations 9 kHz apart, and other countries use 10 kHz spacing. 1 Select “AM,” then turn off (standby) the System. 2 Select the AM tuner interval spacing.
UX-DM8[U].book Page 8 Monday, June 4, 2007 8:20 PM Remote ONLY To tune in to a preset station 1 Select the band (FM or AM). FM AM AUX 2 Select the preset number for the station you stored. Examples: To select preset number 5, press 5. To select preset number 10, press 10. To select preset number 15, press 10, 1, then 5. To select preset number 30, press 10, 3, then 0. To enter the station name Remote ONLY You can enter the station name (8 characters or less) to the preset stations.
UX-DM8[U].book Page 9 Monday, June 4, 2007 8:20 PM • You can connect a USB device such as a USB flash memory, Digital Audio Player*, Portable HDD, etc. to this System. See page 37 for details. • You cannot connect a computer to the (USB memory) terminal of the System. • You cannot connect a memory device through a USB hub or a multimedia card reader. Connect the USB device directly. • You cannot connect an iPod to the (USB memory) terminal of the System.
UX-DM8[U].book Page 10 Monday, June 4, 2007 8:20 PM Playing Back an iPod INFO Compatible iPod types iPod nano 1GB/2GB/4GB iPod nano (2nd Generation) 2GB/4GB/8GB iPod mini 4GB/6GB iPod (4th Generation) 20GB/40GB iPod photo (4th Generation) 20GB/30GB/40GB/60GB iPod video (5th Generation) 30GB/60GB/80GB • iPod is a trademark of Apple Inc., registered in the U.S. and other countries. • If the iPod does not play correctly, update your iPod software to the latest version.
UX-DM8[U].book Page 11 Monday, June 4, 2007 8:20 PM To locate a particular portion Remote ONLY While playing an iPod... Playing Back an other equipment Remote ONLY INFO By using QP Link (Quick Portable Link), you can easily start playing back a external equipment connected to the AUX jack. Stereo mini plug (not supplied) On the front panel To turn ON/OFF the charge mode While “iPod” is selected as the source... 1 Display the current charge mode. 2 sec. 2 Select the charge mode you want.
UX-DM8[U].book Page 12 Monday, June 4, 2007 8:20 PM Daily Operations—Sound & Other Adjustments Adjusting the Sound Remote control INFO To reinforce the bass sound DISP/CHARA CANCEL Remote ONLY While Active Hyper Bass Pro (AHB PRO) is turned on, the richness and fullness of the bass sound is clearly maintained regardless of how you set the volume. ON SET OFF 4,¢ CLOCK/TIMER REPEAT DIMMER FADE MUTING A.
UX-DM8[U].book Page 13 Monday, June 4, 2007 8:20 PM Changing the Display Brightness Remote ONLY You can dim the display window and illumination lamps. While the System is turned on... DIMMER OFF (Canceled) DIMMER 2 DIMMER 1 Adjusting the Audio Input Level Remote ONLY If the sound from the component connected to the AUX jack is too loud or is too small when changing from another source to “AUX,” you can change the audio input level through the AUX jack (without changing the volume level).
UX-DM8[U].book Page 14 Monday, June 4, 2007 8:20 PM Setting the Clock Remote ONLY INFO Without setting the built-in clock, you cannot use Recording or Playback Timer (see pages 34 and 36). • To exit from setting the clock, press CLOCK/TIMER as required. • To correct a mis-entry during the process, press CANCEL or CLOCK/TIMER. You can return to the previous step. Turning Off the Power Automatically Remote ONLY Auto Standby This function only available for CD, built-in memory, USB, iPod and AUX.
UX-DM8[U].book Page 15 Monday, June 4, 2007 8:20 PM Advanced Playback Operations 1 Start and stop playback of the disc. Remote control Number buttons 2 Activate Program Play. GROUP SKIP 7 RANDOM Canceled 4,¢ TITLE SEARCH MEMORY 6 CD 6 PROGRAM CANCEL SET ENTER USB 6 REPEAT PLAY/ FM MODE REPEAT 3 Select tracks you want for Program Play. • For MP3/WMA/WAV: 1 Select a group number. 2 Select a track number. 3 Repeat steps 1 and 2 above. • For CD: 1 Select tracks.
UX-DM8[U].book Page 16 Monday, June 4, 2007 8:20 PM To program the playing order of tracks on the built-in memory and USB device You can arrange the playing order of the tracks in the built-in memory and USB device (up to 999) before you start playback. 6 Start playback. Built-in memory USB device Playback starts in the order you have programmed. 1 Start and stop playback.
UX-DM8[U].book Page 17 Monday, June 4, 2007 8:20 PM Playing at Random—Random Play Remote ONLY Playing a Selected Group only INFO —Group Play Remote ONLY INFO You can play all tracks on the disc, built-in memory or USB device at random. 1 Before starting playback, activate Random Play. You can play a selected group on the built-in memory or USB device. • You cannot use this function for “CD.” 1 Before starting playback, activate Group Play.
UX-DM8[U].book Page 18 Monday, June 4, 2007 8:20 PM Playing at Random in a Selected Group INFO —Group Random Play Playing Repeatedly—Repeat Play You can play all tracks of the selected group on the built-in memory or USB device at random. • You cannot use this function for “CD.” You can repeat playback. Remote ONLY Remote ONLY INFO While playing or before playback... 1 Before starting playback, activate Group Random Play. PROGRAM Canceled RANDOM GROUP RANDOM GROUP 2 Start playback.
UX-DM8[U].book Page 19 Monday, June 4, 2007 8:20 PM Search for a Track or Group by Title INFO —Title Search Prohibiting Disc Ejection—Child Lock Remote ONLY You can search for a track or group in a built-in memory or USB device by title and start playback. • You cannot use this function for “CD.” 1 Before starting playback, select Title Search. Main Unit ONLY You can lock the disc tray so that no one can eject the loaded disc. • This is possible only while the System is on standby.
UX-DM8[U].book Page 20 Monday, June 4, 2007 8:20 PM Recording operations Before You Start Recording Remote control SET ENTER 7 GROUP SKIP CD 6 HQ/SP/EP REC SPEED REPEAT USB 6 MEMORY 6 MARKING MODE Main unit CD #/8 MEMORY #/8 USB #/8 7 USB REC ¶ MEMORY REC ¶ • It may be unlawful to record or play back copyrighted material without the consent of the copyright owner. • The recording level is not affected by the volume.
UX-DM8[U].book Page 21 Monday, June 4, 2007 8:20 PM About SCMS (Serial Copy Management System) The System uses the Serial Copy Management System which allows only first-generation digital copies to be made of premastered software such as regular CDs. If you try to record from a duplicated CD-R or CD-RW into the built-in memory or USB device, “SCMS CANNOT COPY” appears on the display (see step 4 on page 22).
UX-DM8[U].book Page 22 Monday, June 4, 2007 8:20 PM 3 Select the Recording Speed. 5 Select the group to record tracks into. REC SPEED NORMAL • When you make a new group for the tracks: 1 Select “FORM GR ?” mode. REC SPEED HIGH REC SPEED Record at same speed as usual playback. NORMAL 2 Make a new group. REC SPEED Record at a speed of 8 times* normal HIGH speed. * Sometimes record at a speed of 4 to 5 times normal speed according to the condition of the disc.
UX-DM8[U].book Page 23 Monday, June 4, 2007 8:20 PM To stop recording manually Recording from the Radio, iPod or the other equipment You can record from the radio, iPod or the other equipment to the built-in memory or a USB device. • You cannot record tracks from an iPod to a USB device. To record the playing track 1 Prepare the sound source. While playing back... 1 Select a recording device.
UX-DM8[U].book Page 24 Monday, June 4, 2007 8:20 PM 5 Select a group to record tracks into. • When you make a new group: 1 Select “FORM GR ?” mode. 2 Make a new group. • When you want to record into the root group (G1 MUSIC): To record onto built-in To record onto USB memory: device: (on the main unit) (on the main unit) 6 Start playing the source. (Only for the iPod or Ex.
UX-DM8[U].book Page 25 Monday, June 4, 2007 8:20 PM Moving Tracks Between the Built-in Memory and USB Device You can move tracks between the built-in memory and a USB device. • You cannot copy tracks to the built-in memory or USB device. After moving the tracks onto the target device, the original tracks are deleted from the original device. • While in Random Play (see page 17) or Group Random Play (see page 18), you cannot move the tracks.
UX-DM8[U].book Page 26 Monday, June 4, 2007 8:20 PM • When you select an existing group: 1 Select a desired group. • How to select an existing group, see “To select a group” on page 9. 2 Start moving the track. When moving the track When moving the track onto built-in memory: onto USB device: To move a group • After moving a group onto the target device, the original group is deleted from the original device, and the following groups in the original device are re-numbered automatically.
UX-DM8[U].book Page 27 Monday, June 4, 2007 8:20 PM To move the tracks in the programmed order • Even if a track is programmed twice or more, the track is transferred only once. • After moving the tracks onto the target device, the original tracks are deleted from the original device, and the following tracks in the original device are re-numbered automatically. 1 Program desired tracks. (See page 16.) 2 Start Program Play. (See page 16.) 3 Select a target device to move tracks onto.
UX-DM8[U].book Page 28 Monday, June 4, 2007 8:20 PM Editing operations INFO • When you want to edit a group title: 1 Enter the group title editing mode. Remote control Number buttons DISP/CHARA CANCEL SET TITLE/EDIT GROUP TITLE/EDIT 2 Select a group. ENTER 4,¢ • You cannot edit the title for the root group (G1 MUSIC). GROUP SKIP REPEAT MEMORY 3/8 USB 3/8 3 Display the title editing screen.
UX-DM8[U].book Page 29 Monday, June 4, 2007 8:20 PM To enter a space Entering Titles Example: To enter “C” 1 Select the character type [A]. Track number or group number Select the space from “Symbols.” (See “Available Characters” below.) • You can also enter a space at the end of a title by pressing 10. To quit title entry Character entry position Available character types: [ ] indicates the selected character type.
UX-DM8[U].book Page 30 Monday, June 4, 2007 8:20 PM 4 Enter a title of a new group. Forming a Group (FORM GR) • For entering a title, see “Entering Titles” on page 29. You can make a group into the built-in memory. • You can create only an empty group by this function. An empty group can be used only for recording or editing. After recording or moving the tracks into the empty group, you can select that group to play. • You can make up to 999 groups in the built-in memory or USB device.
UX-DM8[U].book Page 31 Monday, June 4, 2007 8:20 PM 3 Select track. Erasing the Tracks (ERASE) You can erase tracks on the built-in memory or USB device. • Once the tracks are erased, you cannot resume them. Example: Erasing the track “B.” 4 Select a destination group. Group title 5 Select the new track number in the destination group for the target track. 1 Select a desired source. Built-in memory USB device Track title 2 Select “ERASE.” 6 Start moving.
UX-DM8[U].book Page 32 Monday, June 4, 2007 8:20 PM 6 Start erasing. 2 Select “ERASE GR.” TITLE “EDITING” appears on the display. The message goes off as the editing result is stored. To go back to previous step: FORM GR ERASE GR Canceled FORMAT 3 Confirm your selection. To quit editing: or Erasing a Group (ERASE GR) 4 Select an unwanted group. INFO You can erase groups in the built-in memory or USB device. • Once the groups are erased, you cannot resume them.
UX-DM8[U].book Page 33 Monday, June 4, 2007 8:20 PM Erasing All Tracks and Groups (FORMAT) You can erase all tracks and groups in the built-in memory or USB device. • When you erase all tracks in the USB device, other files than music-files will also be erased. • Once all tracks and groups are erased, you cannot resume them. 5 Confirm the erasing. 6 Start erasing. Example: Erasing all tracks. “EDITING” appears on the display. The message goes off as the editing result is stored.
UX-DM8[U].book Page 34 Monday, June 4, 2007 8:20 PM Timer Operations INFO Setting Recording Timer Remote control STANDBY/ON Number buttons CANCEL SET Remote ONLY INFO You can use Recording Timer to record FM/AM broadcasts or sounds from a portable audio device to the built-in memory. • You can store three timer settings in total of Recording Timer and Playback Timer (see page 36). • To exit from the timer setting, press CLOCK/TIMER as required.
UX-DM8[U].book Page 35 Monday, June 4, 2007 8:20 PM 4 Set the start time and end time of the selected timer. 9 Select a source to record. • Adjust the start hour, the start minute, the end hour, then the end minute. • When you want to record the radio broadcast (FM or AM): Select the preset number of the desired station. 5 Select “ONCE” or “WEEKLY.” ONCE Recording Timer works once. WEEKLY Recording Timer works weekly or every day. 6 Display the week setting screen.
UX-DM8[U].book Page 36 Monday, June 4, 2007 8:20 PM Setting Playback Timer Remote ONLY INFO 4 Select the source to play. You can use Playback Timer for all the sources. • You can store three timer settings in total of Recording Timer (see page 34) and Playback Timer. • To exit from the timer setting, press CLOCK/TIMER as required. • To correct a mis-entry during process, press CANCEL. You can go back to the previous step.
UX-DM8[U].book Page 37 Monday, June 4, 2007 8:20 PM Additional Information Learning More about This System Getting Started (see pages 3 to 5) Connections: • Make sure the antenna conductors do not touch any other terminals, connecting cords or the power cord. Also, keep the antennas away from metallic parts of the System, connecting cords, and the AC power cord. This could cause poor reception.
UX-DM8[U].book Page 38 Monday, June 4, 2007 8:20 PM Daily Operations—Sound & Other Adjustments (see pages 12 to 14) Adjusting the Sound: • This function also affects the sound through the headphones. Setting the Clock: • “0:00 Sun” will flash on the display until you set the clock. • The clock may gain or lose 1 to 2 minutes per month. If this happens, set the clock again. Advanced Playback Operations (see pages 15 to 19) Programming the Playing Order—Program Play: • While programming steps...
UX-DM8[U].book Page 39 Monday, June 4, 2007 8:20 PM Editing operations (see pages 28 to 33) • Do not vibrate the System while recording/editing tracks. Take care especially while “WRITING” is shown on the display. It may damage the recorded tracks in the System. Giving (Editing) Titles to Tracks or Groups: • When a track is recorded, the track title is given to the track automatically. When you give a title to the track, delete that title first, then enter your desired title.
UX-DM8[U].book Page 40 Monday, June 4, 2007 8:20 PM Display messages for Recording/Editing operations Display messages Possible cause and Solutions CANNOT EDIT CHANGE MSC • Change the USB connection mode to “MSC” (see page 9). CANNOT EDIT MTP DEVICE • You cannot edit to the connected USB device. CANNOT ERASE • You cannot erase a track (The data may be corrupted.). Turn off, then turn on the power of the system. • The USB device is write-protected.
UX-DM8[U].book Page 41 Monday, June 4, 2007 8:20 PM Display messages Possible cause and Solutions DRM ERROR • The playing back track is restricted by WMA-DRM. DRM FILE • You cannot playback the track with DRM while the USB connection mode is “MSC” (see page 9) DRM FILE EXIST • You cannot delete the track with DRM. • You cannot move the track with DRM to the built-in memory. FORMAT ERROR • You cannot initialize the built-in memory or the USB device (The data may be corrupted.).
UX-DM8[U].book Page 42 Monday, June 4, 2007 8:20 PM Troubleshooting General: Adjustments or settings are suddenly canceled before you finish. sThere is a time limit. Repeat procedure again. Operations are disabled. sThe built-in microprocessor may malfunction due to external electrical interference. Unplug the AC power cord, then plug it back in. Unable to operate the System from the remote control. sThe path between the remote control and the remote sensor on the System is blocked.
UX-DM8[U].book Page 43 Monday, June 4, 2007 8:20 PM General Specifications Power requirement: Amplifier section—CA-UXDM8 Output power: 40 W Audio input AUX: Speaker impedance: (20 W + 20 W) at 4 Ω (10% THD) 500 mV/47 kΩ (at “LEVEL1”) 250 mV/47 kΩ (at “LEVEL2”) 125 mV/47 kΩ (at “LEVEL3”) 4 Ω – 16 Ω Tuner section FM tuning range: AM tuning range: 87.50 MHz – 108.
UX-DM8[U].book Page 44 Monday, June 4, 2007 8:20 PM Parts Index Remote control Button 7 x 4 AHB PRO AUX/FM/AM A.
UX-DM8_Cover[U].