MICRO COMPONENT SYSTEM COMPACT COMPONENT SYSTEM UX-EP25 — Consists of CA-UXEP25 and SP-UXEP25 INSTRUCTIONS For Customer Use: Enter below the Model No. and Serial No. which are located either on the rear, bottom or side of the cabinet. Retain this information for future reference. Model No. Serial No.
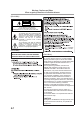
Warnings, Cautions and Others Mises en garde, précautions et indications diverses (For U.S.A.) CAUTION RISK OF ELECTRIC SHOCK DO NOT OPEN CAUTION: TO REDUCE THE RISK OF ELECTRIC SHOCK, DO NOT REMOVE COVER (OR BACK). NO USER SERVICEABLE PARTS INSIDE. REFER SERVICING TO QUALIFIED SERVICE PERSONNEL.
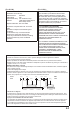
(For U.S.A.) (For U.S.A.) For the main unit: Note to CATV system installer: Declaration of Conformity This reminder is provided to call the CATV system installer’s attention to section 82040 of the NEC which provides guidelines for proper grounding and, in particular, specifies that the cable ground shall be connected to the grounding system of the building, as close to the point of cable entry as practical. Model Number: Trade Name: Responsible Party: Address: UX-EP25 JVC JVC Americas Corp.
IMPORTANT FOR LASER PRODUCTS / IMPORTANT POUR PRODUITS LASER 1. CLASS 1 LASER PRODUCT 2. CAUTION: Do not open the top cover. There are no user serviceable parts inside the unit; leave all servicing to qualified service personnel. 3. CAUTION: (For U.S.A.) Visible and/or invisible class II laser radiation when open. Do not stare into beam. (For Canada) Visible and/or invisible class 1M laser radiation when open. Do not view directly with optical instruments. 4.
Contents Introduction ...............................................................................................................................2 Precautions............................................................................................................................................................2 How to Read This Manual ...................................................................................................................................3 Getting Started ..................
Introduction Thank you for purchasing the JVC Micro Component System. We hope it will be a valued addition to your home, giving you years of enjoyment. Be sure to read this instruction manual carefully before operating your new stereo system. In it you will find all the information you need to set up and use the system. If you have a query that is not answered by the manual, please contact your dealer.
Others Indicates that you press the button briefly. • Should any metallic object or liquid fall into the System, unplug the AC power cord and consult your dealer before operating any further. Indicates that you press the button briefly and repeatedly until an option you want is selected. Indicates that you press one of the buttons. DO NOT disassemble the System since there are no user serviceable parts inside.
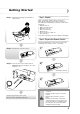
Getting Started Step 1: Unpack the package and check the accessories. Step 1: Unpack After unpacking, check to be sure that you have all the following items. The number in parentheses indicates the quantity of each piece supplied. • FM antenna (1) • AM loop antenna (1) • Speaker cords (2) • Remote control (1) • Batteries (2) • iPod connection cable (1) • iPod stand (1) If any item is missing, consult your dealer immediately.
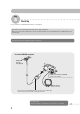
Step 3 Hook Up If you need more detailed information, see page 7. Illustrations of the input/output terminals below are typical examples. When you connect other components, refer also to their manuals since the terminal names actually printed on the rear may vary. Turn the power off to all components before connections. For better FM/AM reception Outdoor FM antenna (not supplied) Vynil-covered wire (not supplied) Extend it horizontally. AM loop antenna Keep it connected.
FM antenna (supplied) Extend it so that you can obtain the best reception. AM loop antenna (supplied) Turn it until the best reception is obtained. Speaker cord (supplied) Connect the black cord to the black (−) terminal. Speaker cord (supplied) Connect the white cord to the red (+) terminal.
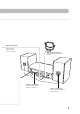
To assemble and connect the AM loop antenna To connect the AM loop antenna Make sure to connect the wire correctly. To assemble the AM loop antenna • If the AM loop antenna wire or speaker cords are covered with vinyl, remove the vinyl to expose the tip of the antenna by twisting the vinyl. • Make sure the antenna conductors do not touch any other terminals, connecting cords and power cord. Also, keep the antennas away from metallic parts of the System, connecting cords, and the AC power cord.
Before Operating the System The indications on the display teach you a lot of things while you are operating the System. Before operating the System, be familiar with when and how the indicator illuminates on the display. 1 Main display 2 FM reception indicators 1 2 3 4 5 • ST (stereo): Lights while an FM stereo station with sufficient signal strength is tuned in. • MONO: Lights while the FM monaural mode is activated.
Daily Operations — Playback — 1 Remote control The STANDBY lamp on the main unit turns off. 1 Numeric buttons • Without pressing STANDBY/ON , the System turns on by pressing one of the source selecting buttons in the next step. SET/RESUME DISPLAY PRESET UP, PRESET DOWN 4,1,7, 33, ¢ 2 Select the source. Playback automatically starts if the selected source is ready to start. 2 • If you press USB MEMORY, iPod or USB/AUX/FM/AM, start playback source on the external component.
To display the clock indication Remote ONLY If the received FM station is hard to listen Remote ONLY While the System is turned on... MONO STEREO • Press the button again, to return to the source information. Listening to the Radio To select the band (FM or AM) MONO : Reception will improve though stereo effect is lost. MONO indicator lights up. STEREO : Normally select this. Stereo effect will be resumed. To restore the stereo effect, press the button again (the MONO indicator goes off).
To tune in to a preset station 1 Remote ONLY Playing Back a Disc This System can playback the following discs— regular CD and CD-R/CD-RW (recorded either in the audio CD, MP3, or WMA format). Select a band (FM or AM). To set a disc You can set a disc while playing another source. Press the OPEN/CLOSE button. FM USB AUDIO 2 AM AUX Remote control: Main unit: Select a preset number for the station you store. • You can also use the PRESET 5/ . 5 Gently press the disc until it snaps into place.
To locate a particular portion While playing a disc, press and hold until the portion you want is reached. Fast-reverses the track. Fast-forwards the track. To locate a track directly and start play Remote ONLY Examples: To select track number 5, press 5. To select track number 15, press > =10 J 1 J 5. To select track number 20, press > =10 J 2 J 0. To select track number 125 (for MP3/WMA only), press > =10 J 1 J 2 J 5.
When disconnecting the iPod, make sure that the System is turned off. To remove the connector from your iPod, squeeze the buttons on the sides and pull. To playback sounds on the iPod To start: To pause: ✎ IMPORTANT • Always set volume to “VOLUME MIN” when connecting or disconnecting the other equipment. • Connect the USB mass stotrage class device directly to the system. Using a USB hub may result in malfunction. • Coded or encrypted tracks in a special method cannot be played on the unit.
To select a track/group* Decrease the track/group* numbers. Increase the track/group* numbers. For MP3/WMA playback According to the MP3/WMA playback mode, 4 / ¢ or number buttons work for the group selection or the track selection. Examples: When the MP3 play back mode is “GROUP.” Total group number * For details about the group selection, see “For MP3/WMA playback” on this page. GROUP mode Total track number You can change the MP3/WMA playback mode by pressing MP3/ WMA PLAY MODE.
Resume Play for MP3/WMA If you press 7 while playing MP3/WMA, the number of the track where you have stopped playback will be memorized by the unit. By pressing CD 6 or USB MEMORY 6, you can start playback again from the beginning of the same track. To activate/cancel resume play 2 FM USB AUDIO Remote ONLY 3 Playing Back from the PC This System is equipped with a USB terminal on the rear panel. You can connect your PC to this terminal and enjoy the sound out of your PC.
Playing Back from Other Equipment To connect other equipment 2 Adjust the input level. 2 sec. By using a stereo mini plug cord (not supplied), you can connect other equipment with analog audio output jacks, such as Digital Audio Player, a TV, etc. Stereo mini plug cord (not supplied) Portable audio device, Game machine, etc.
Daily Operations — Sound & Other Adjustments — Adjusting the Volume Remote control You can adjust the volume level from level 0 (VOLUME-MIN) to level 30 (VOLUME-MAX). Remote control: Main unit: CANCEL SET/RESUME CLOCK/TIMER DISPLAY 4/¢ SLEEP To drop the volume in a moment Remote ONLY To restore the volume, press again, or adjust the volume level. FADE MUTING DIMMER A.
To adjust the treble Setting the Clock Remote ONLY Without setting the built-in clock, you cannot use the Daily Timer and sleep Timer (see page 23). • To exit from the clock setting, press CLOCK/ TIMER as required. • To go back to the previous step, press CANCEL. BASS TREBLE Canceled 1 Activate the clock setting mode. Changing the Display Brightness — DIMMER Remote ONLY You can dim the display window.
Turning Off the Power Automatically To turn off the System after a certain period of time — Sleep Timer Remote ONLY To turn off the System after playback is over — Auto Standby 1 Specify the time (in minutes). This function works only when the source is CD. A.STANDBY Canceled When Auto Standby is in use, the A.STANDBY indicator lights on the display. 10 20 OFF 2 30 120 60 90 Wait until the set time goes off.
Advanced Disc/USB mass storage class device Operations 2 Remote control Select tracks you want for Program Play. For CD Track number CANCEL Numeric buttons Program step For MP3/WMA Select the group first, then the track. 4, 7, ¢ USB MEMORY CD 6 Track number 6 PROGRAM REPEAT RANDOM Program step Group number Examples: To select track number 5, press 5. To select track number 15, press > =10 J 1 J 5. To select track number 20, press > =10 J 2 J 0.
To check the programmed contents While the PRGM indicator is shown on the display and before play back... Playing at Random — Random Play Remote ONLY You can play back all the tracks on the disc and the USB mass storage class device at random. In the reverse order. In the programmed order. To modify the program While the PRGM indicator is shown on the display and before play back... Playback starts in random order. Random Play ends when all tracks are played.
Playing Repeatedly — Repeat Play Remote ONLY You can repeat playback. ALL Canceld (No indication) ALL CD MP3/WMA (Track mode) Repeats the current track. MP3/WMA (Group mode) Repeats all the tracks in the current group (for MP3/WMA playback mode in “GROUP” only). CD MP3/WMA Repeats all the tracks.
Timer Operations When the on-time comes Remote control STANDBY/ON CANCEL SET/RESUME CLOCK/ TIMER 4/¢ The System turns on, tunes in to the selected source, and sets the volume level to the preset level. • When selecting “FM (AM) – –,” the last tuned station will be selected for Daily Timer. • While Daily Timer is working, the timer indicator flashes on the display. • The timer setting remains in memory until you change it.
To turn off the Timer after its setting is done 4 Set the volume. Since Daily Timer is activated at the same time everyday, you may need to cancel it on some particular days. 1 Select the Timer setting. • “SET OK” appears on the display followed by the timer settings you have entered. 3 Turn off the System (on standby) if you have set the timer with the System turned on. STANDBY/ON Current timer settings Canceled (normal display) 2 Timer Setting Clock setting (see page 18) Turn off the Timer.
Additional Information Learning More about This System Daily Operations—Playback (see pages 9 to 16) Listening to the Radio: • If you store a new station into an occupied preset number, the previously stored station in that number will be erased. • When you unplug the AC power cord or if a power failure occurs, the preset stations will be erased in a few days. If this happens, preset the stations again. Playing Back a Disc/USB mass storage class device: • This System cannot play “packet write” discs.
To remove the speaker grilles No sound is heard from the speakers. @ Speaker connections are incorrect or loose (see page 7). @ Headphones are connected (see page 9). Sound from PC connected with a USB cable has some noise. (See page 15) @ PC is subjected to excessive load due to using other applications. Close the applications you do not use. @ PC is connected via USB Hub. Connect the PC directly to the main unit with a USB cable.
Maintenance To get the best performance of the System, keep your discs, and mechanism clean. Handling discs • When removing the disc from its case, hold it at the edge while pressing the center hole lightly. • Do not touch the shiny surface of the disc, or bend the disc. • Put the disc back in its case after use to prevent warping. • Be careful not to scratch the surface of the disc. • Avoid exposure to direct sunlight, temperature extremes, and moisture.
Parts Index Refer to the pages to see how to use the buttons and controls.
TO OUR VALUED CUSTOMER THANK YOU FOR PURCHASING THIS JVC PRODUCT. WE WANT TO HELP YOU ACHIEVE A PERFECT EXPERIENCE. NEED HELP ON HOW TO HOOK UP? NEED ASSISTANCE ON HOW TO OPERATE? NEED TO LOCATE A JVC SERVICE CENTER? LIKE TO PURCHASE ACCESSORIES? IS HERE TO HELP! TOLL FREE: 1(800)252-5722 http://www.jvc.com Remember to retain your Bill of Sale for Warranty Service. Do not attempt to service the product yourself Caution To prevent electrical shock, do not open the cabinet.
LIMITED WARRANTY 1-1 USA ONLY ONLY FOR PRODUCT PURCHASED IN U.S.A. JVC Americas Corp. (JVC) warrants this product and all parts thereof, except as set forth below ONLY TO THE ORIGINAL RETAIL PURCHASER to be FREE FROM DEFECTIVE MATERIALS AND WORKMANSHIP from the date of original purchase for the period shown below. ("The Warranty Period") PARTS 1 LABOR YR 1 YR THIS LIMITED WARRANTY IS VALID ONLY IN THE FIFTY (50) UNITED STATES, THE DISTRICT OF COLUMBIA AND IN THE COMMONWEALTH OF PUERTO RICO.
UX-EP25 MICRO COMPONENT SYSTEM EN © 2006 Victor Company of Japan, Limited 0706NYMCREBET