English COVER.
SAFETY.FM Page 1 Thursday, April 19, 2007 10:29 AM Warnings, Cautions and Others CAUTION To reduce the risk of electrical shocks, fire, etc.: 1 Do not remove screws, covers or cabinet. 2 Do not expose this appliance to rain or moisture. CAUTION • Do not block the ventilation openings or holes. (If the ventilation openings or holes are blocked by a newspaper or cloth, etc., the heat may not be able to get out.) • Do not place any naked flame sources, such as lighted candles, on the apparatus.
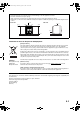
SAFETY.FM Page 2 Thursday, April 19, 2007 10:29 AM Caution: Proper Ventilation To avoid risk of electric shock and fire, and to prevent damage, locate the apparatus as follows: 1. Front: No obstructions and open spacing. 2. Sides/ Top/ Back: No obstructions should be placed in the areas shown by the dimensions below. 3. Bottom: Place on the level surface. Maintain an adequate air path for ventilation by placing on a stand with a height of 10 cm or more.
SAFETY.FM Page 3 Thursday, April 19, 2007 10:29 AM IMPORTANT for the U.K. DO NOT cut off the mains plug from this equipment. If the plug fitted is not suitable for the power points in your home or the cable is too short to reach a power point, then obtain an appropriate safety approved extension lead or consult your dealer. BE SURE to replace the fuse only with an identical approved type, as originally fitted.
SAFETY.FM Page 4 Thursday, April 19, 2007 10:29 AM SAFETY INSTRUCTIONS “SOME DOS AND DON’TS ON THE SAFE USE OF EQUIPMENT” This equipment has been designed and manufactured to meet international safety standards but, like any electrical equipment, care must be taken if you are to obtain the best results and safety is to be assured. ✮✮✮✮✮✮✮✮✮✮✮✮✮✮✮✮✮✮✮✮✮✮✮✮✮✮✮✮✮✮✮✮✮✮✮✮✮✮✮✮✮✮✮✮✮✮✮ Do read the operating instructions before you attempt to use the equipment.
UX-G28[B].BOOK Page 1 Monday, May 14, 2007 9:53 AM Contents Introduction ........................................................2 Precautions ......................................................................... 2 How to Read This Manual ................................................. 3 Getting Started ...................................................4 Step 1: Unpack ................................................................... 4 Step 2: Prepare the Remote Control ..........................
Body.fm Page 2 Monday, May 21, 2007 11:45 AM Introduction Thank you for purchasing a JVC product. Please read all instructions carefully before operation, to ensure your complete understanding and to obtain the best possible performance from the unit. Precautions Installation • Install in a place which is level, dry and neither too hot nor too cold—between 5°C and 35°C. • Install the System in a location with adequate ventilation to prevent internal heat buildup inside the System.
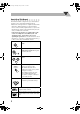
Body.fm Page 3 Monday, May 21, 2007 11:45 AM How to Read This Manual To make this manual as simple and easy-to-understand as possible, we have adapted the following methods: • Button and control operations are explained as listed in the table below. In this manual, the operations using the remote control is mainly explained; however, you can use the buttons and controls on the main unit if they have the same (or similar) name and marks.
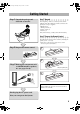
Body.fm Page 4 Monday, May 21, 2007 11:45 AM Getting Started Step 1: Unpack Step 1:Unpack the package and check the accessories. After unpacking, check to be sure that you have all the following items. The number in parentheses indicates the quantity of each piece supplied. • FM antenna (1) • AM loop antenna (1) • Remote control (1) • Batteries (2) If any item is missing, consult your dealer immediately.
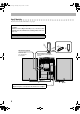
Body.fm Page 5 Monday, May 21, 2007 11:45 AM Step 3: Hook Up If you need more detailed information, see page 6 Illustrations of the input/output terminals below are typical examples. When you connect Digital Audio Player, etc., refer also to their manuals since the terminal names actually printed on the rear may vary. Turn the power off to all components before connections. FM antenna (supplied) Extend it so that you can obtain the best reception.
Body.fm Page 6 Monday, May 21, 2007 11:45 AM To connect the AM loop antenna To connect the speaker cords Make sure to connect the wire correctly. Make sure the both speakers are connected correctly and firmly. 1 Hold 1 Unlock 2 Insert 3 Release 3 Lock 2 Insert For better FM/AM reception Outdoor FM antenna (not supplied) Disconnect the supplied FM antenna, and connect to an outdoor FM antenna using a 75 Ω wire with coaxial type connector (IEC or DIN45325).
Body.fm Page 7 Monday, May 21, 2007 11:45 AM Before Operating the System The indications on the display teach you a lot of things while you are operating the System. Before operating the System, be familiar with when and how the indicator illuminates on the display. 1 2 3 4 5 6 7 8 9 REPEAT1 GROUP RANDOM PROG.
Body.fm Page 8 Monday, May 21, 2007 11:45 AM Daily Operations—Playback 1 Turn on the power. 1 The STANDBY lamp on the main unit turns off. 2 Select the source. Playback automatically starts if the selected source is ready to start. • If you press AUX, start playback source on the external component. Numeric buttons DISPLAY/ PROGRAM 4/1/ Á/¢ PRESET 2 3 Adjust the volume. 4 Operate the target source as explained later.
Body.fm Page 9 Monday, May 21, 2007 11:45 AM Listening to the Radio To preset the stations To select the band (FM or AM) 1 2 FM/AM/AUX FM You can preset 20 FM and 10 AM stations. FM MONO AM Tune in to a station you want to preset. Activate the preset number entry mode. DISPLAY/ PROGRAM AUX PROG. kHz You can also carry out the same operation using the FM/ AM/AUX on the System. To tune in to a station While FM or AM is selected...
Body.fm Page 10 Monday, May 21, 2007 11:45 AM Playing Back from the USB mass storage class device Playable media and files This system can playback following types of media and files. Media File format Audio CD, CD-R/RW, USB mass storage class device MP3, WMA Audio CD CD-R CD-RW This System is equipped with a USB MEMORY terminal on the front panel. You can connect a USB mass storage class device such as a USB flash memory device, Digital Audio Player (DAP) to this System.
Body.fm Page 11 Monday, May 21, 2007 11:45 AM To select a track/group Playing Back Other Equipment To select a track: Increases the track numbers. Decreases the track numbers. To select a group (MP3/WMA disc, USB device only): To connect other equipment By using a stereo mini plug cord (not supplied), you can connect equipment with analog audio output jacks such as a Digital Audio Player, or a TV, etc. Stereo mini plug cord (not supplied) AUX Increases the group numbers. Decreases the group numbers.
Body.fm Page 12 Monday, May 21, 2007 11:45 AM Daily Operations—Sound & Other Adjustments Adjusting the Volume Remote control You can adjust the volume level from level 0 (VOL MIN) to level 31 (VOL MAX). Remote control: Main unit: CLOCK/ SLEEP VOLUME Remote ONLY To drop the volume in a moment FADE MUTING 4/¢ To restore the volume, press again, or adjust the volume level.
Body.fm Page 13 Thursday, July 5, 2007 5:49 PM Setting the Clock Turning Off the Power Automatically Without setting the built-in clock, you cannot use the Daily Timer (see page 19). To turn off the System after a certain period of time—Sleep Timer 1 1 Turn off (standby) Activate the sleep timer mode. 2 sec. CLOCK/ SLEEP 2 Activate the clock setting mode. 5 sec. CLOCK/ SLEEP REPEAT1 GROUP TRACK WMA 2 Specify the time (in minutes).
Body.fm Page 14 Monday, May 21, 2007 11:45 AM Advanced Radio Operations To show the Radio Data System information While listening to an FM station... Remote control DISPLAY MODE PS PTY RT Station Frequency TUNING/ GROUP/PTY PS Station names is displayed. “NO PS” will appear if no signal is sent. PTY The broadcast program type is displayed. “NO PTY” will appear if no signal is sent. RT Text messages the station sends is displayed. “NO RT” will appear if no signal is sent.
Body.fm Page 15 Monday, May 21, 2007 11:45 AM 3 Start searching. 26; 5-)4+0 How the Enhanced Other Networks function actually works: CD CASE 1 The receiver searches 20 preset FM stations, stops when it finds the one you have selected, and tunes in to that station. • If no program is found, “NO FOUND” appear on the display. • To stop searching any time during search, press PTY SEARCH.
Body.fm Page 16 Thursday, July 5, 2007 5:40 PM Advanced Disc/USB mass strage class device Operations Programming the Playing Order— Remote control Program Play You can arrange the playing order of the tracks (up to 32) before you start playback. • You can repeat one programmed track or all the programmed tracks by pressing REPEAT. 1 Numeric buttons CD 6 4/¢ TUNING/ GROUP/PTY Before starting playback, press DISPLAY/ PROGRAM. For CD DISPLAY/ PROGRAM DISPLAY/ PROGRAM USB MEMORY 6 STOP 7 PROG.
Body.fm Page 17 Monday, May 21, 2007 11:45 AM To check the programmed contents Then select a track. While the PROG. indicator is shown on the display and before playback... PROG. MP3 CD DISPLAY/ PROGRAM Track number DISPLAY/ PROGRAM To modify the program Next program step will be indicated when you program tracks. For CD While the PROG. indicator is shown on the display and before playback... Edit: 1 Press DISPLAY/PROGRAM repeatedly until displaying the programmed number you want to edit.
Body.fm Page 18 Thursday, July 5, 2007 5:40 PM Playing at Random—Random Play Remote ONLY You can play back all the tracks on the disc, USB mass storage class device at random. You can play back all the tracks on the disc at random. 1 Playing Repeatedly—Repeat Play You can repeat playback. For CD: REPEAT Press RANDOM. Remote ONLY REPEAT1 REPEAT Canceled RANDOM (No indication) For MP3/WMA disc, USB mass storage class device (DAP): 2 REPEAT Start play back.
Body.fm Page 19 Monday, May 21, 2007 11:45 AM Timer Operations Setting the Timer Remote control Using Timer, you can wake up with music, etc. • You can set the Timer when the System turns on. • To exit from the timer setting, press 7 as required. TIMER How Timer actually works Once the Timer has been set, the timer ( ) indicator lights on the display. Lights TIMER lamp on the main unit. Timer is activated at the same time everyday until the timer is turned off manually.
Body.fm Page 20 Monday, May 21, 2007 11:45 AM 3 To inactivate the TIMER. Set Off Time 1 Set Off Time setting. When the System turns on. TIMER TIMER 2 Set time. See the step 2 1, 2 You can not set On time and Off time on the same time setting. 4 Select the playback source. 1 Select the source. The timer ( ) indicator on the display and the TIMER lamp of the main unit go out. • When setting both SLEEP TIMER and DAILY TIMER, the timer which turns the unit off earlier takes precedence.
Body.fm Page 21 Monday, May 21, 2007 11:45 AM Additional Information Daily Operations—Sound & Other Adjustments Learning More about This System Daily Operations—Playback (see pages 8) Listening to the Radio: • If you store a new station into an occupied preset number, the previously stored station in that number will be erased. • When you unplug the AC power cord or if a power failure occurs, the preset stations will be erased in a few days. If this happens, preset the stations again.
Body.fm Page 22 Monday, May 21, 2007 11:45 AM TEST: ALARM: NONE: Broadcasts for testing emergency broadcast equipment or unit Emergency announcement No program type, undefi ned program, or difficult to categorize into particular types Advanced Disc/USB mass storage class device (see pages 16 to 18) Programming the Playing Order—Program Play: • If you try to program a 33rd track, “FULL” appears on the display. • While programming steps...
Body.fm Page 23 Monday, May 21, 2007 11:45 AM Cleaning the System • Stains should be wiped off with a soft cloth. If the System is heavily stained, wipe it with a cloth soaked in water-diluted neutral detergent and wrung well, then wipe clean with a dry cloth. • Since the System may deteriorate in quality, it become damaged or get its paint peeled off, be careful about the following: – DO NOT wipe it with a hard cloth. – DO NOT wipe it strongly. – DO NOT wipe it with thinner or benzine.
Body.fm Page 24 Monday, May 21, 2007 11:45 AM Parts Index Refer to the pages to see how to use the buttons and controls.
Body.
Body.
COVER.