UX-G30[US_UB_UW_A].
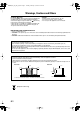
UX-G30[US_UB_UW_A].book Page 1 Tuesday, February 14, 2006 10:27 AM Warnings, Cautions and Others button! CAUTION— Disconnect the mains plug to shut the power off completely (the STANDBY lamp goes off). When installing the apparatus, ensure that the plug is easily accessible. The button in any position does not disconnect the mains line. • When the unit is on standby, the STANDBY lamp lights red. • When the unit is turned on, the STANDBY lamp goes off. The power can be remote controlled.
UX-G30[US_UB_UW_A].book Page 1 Tuesday, February 14, 2006 10:27 AM Contents Introduction ............................................................... 2 Connections ................................................................ 3 Before Operating the System.................................... 6 Daily Operations—Playback .................................... 7 Listening to the Radio .................................................................. 8 Playing Back a Disc ..................................
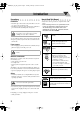
UX-G30[US_UB_UW_A].book Page 2 Tuesday, February 14, 2006 10:27 AM Introduction Precautions How to Read This Manual Installation • Button and control operations are explained in the table below. • Some related tips and notes are explained later in the sections “Learning More about This System” and “Troubleshooting,” but not in the same section explaining the operations ( indicates that the content has some information).
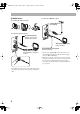
UX-G30[US_UB_UW_A].book Page 3 Tuesday, February 14, 2006 10:27 AM Connections Supplied accessories After unpacking, check to be sure that you have all the following items: • FM antenna (1) • Remote control (1) • AM loop antenna (1) • Batteries (2) • AC plug adapter (1) (not supplied for Hong Kong region and Australia) If any item is missing, consult your dealer immediately. Do not connect the AC power cord until all other connections have been made. Rear view 1 From AM/FM antenna See page 4.
UX-G30[US_UB_UW_A].book Page 4 Tuesday, February 14, 2006 10:27 AM 1 AM/FM antenna For the better AM/FM reception To assemble the AM loop antenna Outdoor FM antenna (not supplied) To connect the AM loop antenna FM antenna (supplied) Extend it so that you can obtain the best reception. AM loop antenna (supplied) Keep it connected. Vinyl-covered wire (not supplied) Extend it horizontally. AM loop antenna (supplied) Turn it until the best reception is obtained.
UX-G30[US_UB_UW_A].book Page 5 Tuesday, February 14, 2006 10:27 AM 2 Speakers To connect a portable audio device To connect the speaker cords Make sure that both speakers are connected correctly and firmly. 1 Hold 2 Insert 3 Release AUX jack DOWN PHONES UP AUX Stereo mini plug cord (not supplied) Portable audio device Red From left speaker Black From right speaker Red • When connecting the speaker cords, match the polarity of the speaker terminals: red cord to (+) and black cord to (–).
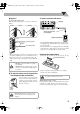
UX-G30[US_UB_UW_A].book Page 6 Tuesday, February 14, 2006 10:27 AM Before Operating the System The indications on the display tell you a lot of things while you are operating the System. Before operating the System, be familiar with when and how the indicator illuminates on the display. 1 2 3 5 PRGM RND 4 FM AM ST MONO SLEEP 1 MP 3 S.TURBO AHB PRO A.STBY QP Link REC 123 REC 9 6 7 8 pq Indications on the main display • While listening to radio: • While selecting TAPE or AUX: FM S.TURBO S.
UX-G30[US_UB_UW_A].book Page 7 Tuesday, February 14, 2006 10:27 AM Daily Operations—Playback In this manual, the operations using the remote control are explained mainly; however, you can use the buttons and controls on the main unit if they have the same (or similar) name and symbol. 1 SET CANCEL QP LINK DIMMER 2 4,¢ 7 PRESET/GROUP DOWN,UP NUMBER SELECT FM MODE/ PLAY MODE 3 1 Turn on the power. The STANDBY lamp on the main unit turns off. Without pressing STANDBY/ON ...
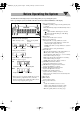
UX-G30[US_UB_UW_A].book Page 8 Tuesday, February 14, 2006 10:27 AM Listening to the Radio FM MODE/ PLAY MODE To select the band (FM or AM) Remote control: Main unit: FM FM FM/AM /AUX AM Remote ONLY If the FM station has poor reception AM The MONO indicator lights on the display. Reception will improve though stereo effect is lost—Monaural reception mode. To restore the stereo effect, press the button again (the MONO indicator disappears).
UX-G30[US_UB_UW_A].book Page 9 Tuesday, February 14, 2006 10:27 AM To locate a particular portion Playing Back a Disc This System can play back the following discs—regular CD and CD-R/CD-RW (recorded either in the audio CD or MP3 format). Remote ONLY While playing a disc, press and hold until the portion you want is reached. PRESET/GROUP UP DOWN To insert a disc Fast-forwards the track. You can insert a disc while playing another source. Fast-reverses the track.
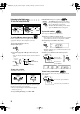
UX-G30[US_UB_UW_A].book Page 10 Tuesday, February 14, 2006 10:27 AM Playing Back a Tape Playing Back a Portable Audio Device Remote ONLY To insert a tape You can play back type I tapes only. Push Insert Close By using QP Link (Quick Portable Link), you can easily start playing back a portable audio device connected to the AUX jack. • Make sure to set the volume of your portable audio device loud enough so that the System can detect the sound signal.
UX-G30[US_UB_UW_A].book Page 11 Tuesday, February 14, 2006 10:27 AM Daily Operations—Sound&Other Adjustments To drop the volume in a moment Remote control SLEEP A. STANDBY CLOCK/ TIMER DIMMER FADE MUTING Remote ONLY To restore the volume, press again, or adjust the volume level. SET Adjusting the Sound CANCEL To emphasize the sound—Sound Turbo This function emphasizes the sound.
UX-G30[US_UB_UW_A].book Page 12 Tuesday, February 14, 2006 10:27 AM Changing the Display Brightness Remote ONLY DIM 1 Adjust the hour, then the minute. PRESET/GROUP UP DOWN You can dim the display window. DIMMER 2 SET DIM 2 DIM OFF (Initial setting) Now the built-in clock starts working. DIM 1 DIM 2 Dims the display and the illumination on the main unit. Dims the display more than DIM 1 and turns off the illumination on the main unit. Adjusting the Audio Input Level 2 sec.
UX-G30[US_UB_UW_A].book Page 13 Tuesday, February 14, 2006 10:27 AM Advanced Disc Operations 2 Remote control Select track numbers you want for Program Play. PRESET/GROUP UP DOWN SET Increases the track numbers. SET Decreases the track numbers. CANCEL • For regular CDs CD 6 4,¢ PRESET/GROUP DOWN,UP Main unit CD ‹/8 DOWN 4 7 ¢ UP 0 S.TURBO PRGM MP 3 S.TURBO QP Link QP Link To select track numbers on an MP3 disc, enter the number in two digits.
UX-G30[US_UB_UW_A].book Page 14 Tuesday, February 14, 2006 10:27 AM To exit from Program Play Playing Repeatedly—Repeat Play Before playback or while playback is stopped... Remote ONLY You can repeat playback. FM MODE/ PLAY MODE PROGRAM RANDOM Canceled While a regular CD is loaded... REPEAT REP TRK REP ALL REP OFF • Exiting from Program Play erases the stored program. (Canceled) While an MP3 disc is loaded...
UX-G30[US_UB_UW_A].book Page 15 Tuesday, February 14, 2006 10:27 AM Recording Operations Synchronized Disc Recording Main unit Main Unit ONLY You can start and stop both disc play and tape recording at the same time. 1 REC 2 TAPE FM/AM /AUX CD ‹/8 7 IMPORTANT It may be unlawful to record or play back copyrighted material without the consent of the copyright owner. Recording on a Tape Main Unit ONLY You can use type I tapes for recording. • To play a tape, see page 10.
UX-G30[US_UB_UW_A].book Page 16 Tuesday, February 14, 2006 10:27 AM Timer Operations 2 Remote control STANDBY/ON Make the timer setting as you want. For Daily Timers: 1 Set the hour then the minute for on-time. PRESET/GROUP UP DOWN SET SET CLOCK/ TIMER CANCEL 2 Select the playback source—“TUNER,” “CD,” or “TAPE.” 4,¢ PRESET/GROUP UP DOWN SET PRESET/GROUP DOWN,UP Setting the Timer Remote ONLY S.TURBO Using Daily Timer, you can wake up with your favorite music.
UX-G30[US_UB_UW_A].book Page 17 Tuesday, February 14, 2006 10:27 AM 3 Select the volume level. PRESET/GROUP UP DOWN To turn off the Timer after its setting is done SET Since Daily Timer is activated at the same time everyday, you may need to cancel it on some particular days. 1 Select the Timer you want to cancel. 3 • You can select the volume level (“VOLUME 1” to “VOLUME 40” and “VOLUME – –”). If you select “VOLUME – –,” the volume is set to the last level when the unit has been turned off.
UX-G30[US_UB_UW_A].book Page 18 Tuesday, February 14, 2006 10:27 AM Additional Information Learning More about This System Daily Operations—Playback (see pages 7 to 10) Listening to the Radio: • If you store a new station into an occupied preset number, the previously stored station in that number will be erased. • When you unplug the AC power cord or if a power failure occurs, the preset stations will be erased in a few days. If this happens, preset the stations again.
UX-G30[US_UB_UW_A].book Page 19 Tuesday, February 14, 2006 10:27 AM Advanced Disc Operations (see pages 13 and 14) Programming the Playing Order—Program Play: • You cannot specify a group number of an MP3 disc for Program Play. • If you try to program the 100th track, “FULL” appears on the display. Recording Operations (see page 15) Recording on a Tape: • The recording level is automatically set correctly. Thus, you can adjust the sound without affecting the recording level.
UX-G30[US_UB_UW_A].book Page 20 Tuesday, February 14, 2006 10:27 AM Disc Operations: Handling cassette tapes The disc does not play. ] The disc is placed upside down. Place the disc with the label side up. ID3 Tag on an MP3 disc cannot be shown. ] There are two types of ID3 Tag—Version 1 and Version 2. This System can only show ID3 Tag Version 1. MP3 groups and tracks are not played back as you expect. ] The playing order is determined when the disc was recorded. It depends on the writing application.
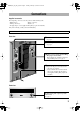
UX-G30[US_UB_UW_A].book Page 21 Tuesday, February 14, 2006 10:27 AM Specifications Amplifier section Output Power: 60 W (30 W + 30 W) at 6 Ω (10% THD) Speakers/Impedance: 6 Ω – 16 Ω Audio Input AUX: 500 mV/50 kΩ (at “AUX LVL 1”) 250 mV/50 kΩ (at “AUX LVL 2”) 125 mV/50 kΩ (at “AUX LVL 3”) Tuner section Dimensions (approx.): 165 mm x 231 mm x 328 mm (W/H/D) Mass (approx.): 4.5 kg Parts Index Refer to the pages to see how to use the buttons and controls. Remote control FM tuning range: 87.50 MHz – 108.
UX-G30[US_UB_UW_A].book Page 1 Tuesday, February 14, 2006 10:27 AM Mains (AC) Line Instruction (not applicable for Europe, U.S.A., Canada, Australia, U.K.