English English UX-G45(UW)_Cover.fm Page 1 Wednesday, June 7, 2006 7:52 PM SISTEMAS DE MICROCOMPONENTES SISTEMA DE MICRO COMPONENTES UX-G45 —Consists of CA-UXG45 and SP-UXG45 —Consta de CA-UXG45 y SP-UXG45 —Consiste em CA-UXG45 e SP-UXG45 Português Español MICRO COMPONENT SYSTEM ¡ATENCION! Antes de operar su equipo, lea cuidadosamente este instructivo.
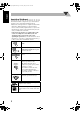
UX-G45_Safty[UW].fm Page 1 Sunday, June 4, 2006 6:47 PM Warnings, Cautions and Others Avisos, precauciones y otras notas Advertências, precauções e outras notas CAUTION— (standby/on) button! Disconnect the mains plug to shut the power off completely (all lamps and indications go off). When installing the product ensure that the plug is easily accessible. The button in any position does not disconnect the mains line. • When the unit is on standby, the STANDBY/ON lamp lights in red.
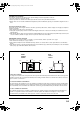
UX-G45_Safty[UW].fm Page 2 Sunday, June 4, 2006 6:47 PM CAUTION: Proper Ventilation To avoid risk of electric shock and fire, and to prevent damage, locate the apparatus as follows: 1. Front: No obstructions and open spacing. 2. Sides/ Top/ Back: No obstructions should be placed in the areas shown by the dimensions below. 3. Bottom: Place on a level surface. Maintain an adequate air path for ventilation by placing on a stand with a height of 10 cm or more.
UX-G45_Safty[UW].fm Page 3 Sunday, June 4, 2006 6:47 PM IMPORTANT FOR LASER PRODUCTS 1. CLASS 1 LASER PRODUCT 2. CAUTION: Do not open the top cover. There are no user serviceable parts inside the unit; leave all servicing to qualified service personnel. 3. CAUTION: Visible and invisible laser radiation when open and interlock failed or defeated. Avoid direct exposure to beam. 4. REPRODUCTION OF LABEL: CAUTION LABEL, PLACED INSIDE UNIT. IMPORTANTE PARA PRODUCTOS LÁSER 1. PRODUCTO LÁSER CLASE 1 2.
UX-G45[UW].BOOK Page 1 Tuesday, May 30, 2006 2:07 AM English English Contents Introduction .................................................... 2 Precautions...................................................................... 2 How to Read This Manual.............................................. 3 Getting Started ............................................... 4 Step 1: Unpack................................................................ 4 Step 2: Prepare the Remote Control .........................
UX-G45[UW].BOOK Page 2 Tuesday, May 30, 2006 2:07 AM Thank you for purchasing the JVC Micro Component System. We hope it will be a valued addition to your home, giving you years of enjoyment. Be sure to read this instruction manual carefully before operating your new stereo system. In it you will find all the information you need to set up and use the system. If you have a query that is not answered by the manual, please contact your dealer.
English UX-G45[UW].BOOK Page 3 Tuesday, May 30, 2006 2:07 AM How to Read This Manual To make this manual as simple and easy-to-understand as possible, we have adapted the following methods: • Button and control operations are explained as listed in the table below. In this manual, the operations using the remote control is mainly explained; however, you can use the buttons and controls on the main unit if they have the same (or similar) name and marks.
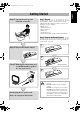
UX-G45[UW].BOOK Page 4 Tuesday, May 30, 2006 2:07 AM Step 1:Unpack the package and check the accessories. English Getting Started Step 1: Unpack After unpacking, check to be sure that you have all the following items. The number in parentheses indicates the quantity of each piece supplied. • FM antenna (1) • AM loop antenna (1) • Remote control (1) • Batteries (2) • AC plug adapter (1) If any item is missing, consult your dealer immediately.
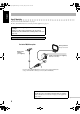
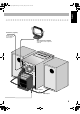
English UX-G45[UW].BOOK Page 5 Tuesday, May 30, 2006 2:07 AM Step 3: Hook Up If you need more detailed information, see page 7. For more detailed information on connecting external equipment, see page 13. Illustrations of the input/output terminals below are typical examples. When you connect other components, refer also to their manuals since the terminal names actually printed on the rear may vary. Turn the power off to all components before connections.
English UX-G45[UW].BOOK Page 6 Tuesday, May 30, 2006 2:07 AM FM antenna (supplied) Extend it so that you can obtain the best reception. AM loop antenna (supplied) Turn it until the best reception is obtained.
English UX-G45[UW].BOOK Page 7 Tuesday, May 30, 2006 2:07 AM To assemble and connect the AM loop antenna To connect the speaker cords To assemble the AM loop antenna Make sure the both speakers are connected correctly and firmly. 3 Release 1 Hold To connect the AM loop antenna Make sure to connect the wire correctly: The white end to AM EXT, the black end to GND.
UX-G45[UW].BOOK Page 8 Tuesday, May 30, 2006 2:07 AM English Before Operating the System The indications on the display teach you a lot of things while you are operating the System. Before operating the System, be familiar with when and how the indicator illuminates on the display.
UX-G45[UW].BOOK Page 9 Tuesday, May 30, 2006 2:07 AM English Daily Operations—Playback 1 Turn on the power. 1 Numeric buttons SET/ RESUME DISPLAY MP3 MODE PRESET UP, PRESET DOWN 4/1, 7,¡/¢ 2 QP LINK FM MODE DIMMER 3 The STANDBY lamp on the main unit turns off. • Without pressing STANDBY/ON , the System turns on by pressing one of the source selecting buttons in the next step. 2 Select the source. Playback automatically starts if the selected source is ready to start.
English UX-G45[UW].BOOK Page 10 Tuesday, May 30, 2006 2:07 AM Listening to the Radio To select the AM tuner interval spacing Remote ONLY If the received FM station is hard to listen Some countries space AM stations 9 kHz spacing, and other countries use 10 kHz spacing. FM MODE Remote ONLY MONO STEREO You can change the AM tuner intervals while the System is on stand by. 1 2 sec. 2 • Current interval setting appears on the display.
English UX-G45[UW].BOOK Page 11 Tuesday, May 30, 2006 2:07 AM To tune in to a preset station Remote ONLY To start: To pause: To stop: 1 Select a band (FM or AM). FM AM To release, press again. 2 Select a preset number for the station you store. 1 2 3 4 5 6 7 8 9 0 10 To select a track/group* • You can also use the PRESET UP or PRESET DOWN. Increases the track/group* numbers. Decreases the track/group* numbers. * For details about the group selection, see “For MP3 playback” on page 12.
English UX-G45[UW].BOOK Page 12 Tuesday, May 30, 2006 2:07 AM IMPORTANT • Always set volume to “VOL MIN” when connecting or disconnecting the other equipment. • Connect the USB Memory or DAP directly to the front panel of the unit. Connecting via a USB hub may result in malfunction. • USB Memory and DAPs compatible with the USB mass storage class specifications are connectable. • Some DAPs are not compatible with the unit. • Coded or encrypted tracks in a special method cannot be played on the unit.
English UX-G45[UW].BOOK Page 13 Tuesday, May 30, 2006 2:07 AM To adjust the sound input level from other equipment Playing Back a Tape To insert a tape You can adjust the sound input level from the connected equipment, if the incoming signal is too small or too large. You can play back type I tapes. Push Insert Close 1 Select AUX for the source. 2 Adjust the input level. 2 sec.
Quick Portable Link (QP Link) English UX-G45[UW].BOOK Page 14 Tuesday, May 30, 2006 2:07 AM Remote ONLY If you connect other equipment such as a digital audio player to the AUX terminal and play it back, the source automatically changes to AUX. QP LINK QP Link Canceled (No indication) The QP Link indicator is lit while QP Link is activated. When QP Link is activated... • If an audio input is received at AUX when the System is turned on, the source automatically switches to AUX.
UX-G45[UW].BOOK Page 15 Tuesday, May 30, 2006 2:07 AM English Daily Operations—Sound & Other Adjustments Adjusting the Volume Remote control You can adjust the volume level from level 0 (VOL-MIN) to level 31 (VOL-MAX). Remote control: Main unit: VOLUME SET/RESUME CANCEL CLOCK/ TIMER VOLUME DISPLAY PRESET UP, PRESET DOWN To drop the volume in a moment Remote ONLY To restore the volume, press again, or adjust the volume level. FADE MUTING DIMMER A.
Changing the Display Brightness—DIMMER English UX-G45[UW].BOOK Page 16 Tuesday, May 30, 2006 2:07 AM 3 Adjust the minute. PRESET UP SET/RESUME Remote ONLY You can dim the display window. DIMMER PRESET DOWN DIM ON DIM OFF (Canceled) “CLOCK OK” appears and the built-in clock starts working. To check the current time during play Setting the Clock Remote ONLY DISPLAY Without setting the built-in clock, you cannot use the Daily Timer and Recording Timer (see page 23).
English UX-G45[UW].BOOK Page 17 Tuesday, May 30, 2006 2:07 AM Turning Off the Power Automatically Remote ONLY To turn off the System after playback is over— Auto Standby This function works only when the source is CD or tape. A.STANDBY A.STBY Canceled (No indication) When Auto Standby is in use, the A.STBY indicator lights on the display. When the disc and tape playback stops, the A.STBY indicator starts flashing.
UX-G45[UW].BOOK Page 18 Tuesday, May 30, 2006 2:07 AM English Advanced Disc/USB Memory/DAP Operations Programming the Playing Order— Remote control Remote ONLY Program Play You can arrange the playing order of the tracks (up to 32) before you start playback. • Program play can be used only in MP3 TRACK mode. • You can repeat all the programmed tracks by pressing REPEAT. Numeric buttons 1 Before starting playback, press PROGRAM.
English UX-G45[UW].BOOK Page 19 Tuesday, May 30, 2006 2:07 AM To check the programmed contents While the PRGM indicator is shown on the display and before playback... In the programmed order. In the reverse order. Playing at Random—Random Play Remote ONLY You can play back all the tracks on the selected disc, USB Memory or DAP at random. • You can repeat All tracks (PALL) by pressing REPEAT. Press RANDOM.
Playing Repeatedly—Repeat Play Remote ONLY You can repeat playback. Main Unit ONLY You can lock the disc trays so that no one can eject the loaded discs. • This is possible while the System is on standby. For CD/MP3(TRACK mode): REPEAT Prohibiting Disc Ejection—Child Lock 1 ALL While the disc trays are closed... Canceled (No indication) For MP3 (GROUP mode): REPEAT 1 Canceled ALL (at the same time) (No indication) To cancel the prohibition, repeat the same procedure.
UX-G45[UW].BOOK Page 21 Tuesday, May 30, 2006 2:07 AM English Advanced Tape Operations IMPORTANT It may be unlawful to record or play back copyrighted material without the consent of the copyright owner. Remote control Recording on a Tape You can use type I tapes for recording. • To play a tape, see page 13. 1 Insert a recordable cassette.
Synchronized Disc Recording You can start and stop both disc, USB memory and DAP playback and tape recording at the same time. To record the entire disc Set “RESUME” on (see page 12). 1 2 If the beat is heard while recoding an AM broadcast FM MODE English UX-G45[UW].BOOK Page 22 Tuesday, May 30, 2006 2:07 AM Remote ONLY BEAT 1 BEAT 2 • Select “BEAT 1” or “BEAT 2” to reduce the beat. Load a disc and insert a recordable cassette.
UX-G45[UW].BOOK Page 23 Tuesday, May 30, 2006 2:07 AM English Timer Operations Setting the Timer Remote control STANDBY/ON SET/RESUME CLOCK/ TIMER CANCEL PRESET UP, PRESET DOWN Remote ONLY Using Daily Timer, you can wake up with music, etc. On the other hand, with Recording Timer, you can make a tape of a radio broadcast automatically. • You can store three Daily Timer settings and one Recording Timer setting; however, you can activate only one of the four settings above at the same time.
1 Select one of the timer setting modes you want to set— Daily 1 Timer, Daily 2 Timer, Daily 3 Timer, or Recording Timer. CLOCK /TIMER Daily 1 Timer Canceled Daily 2 Timer Clock setting English UX-G45[UW].BOOK Page 24 Tuesday, May 30, 2006 2:07 AM For Recording Timer: 1 Set the hour then the minute for on-time. PRESET UP SET/RESUME Daily 3 Timer Recording Timer PRESET DOWN (see page 16) 2 Set the hour then minute for off-time in the same manner. 3 Select “TUNER FM” or “TUNER AM.” PRESET UP Ex.
English UX-G45[UW].BOOK Page 25 Tuesday, May 30, 2006 2:07 AM To turn off the Timer after its setting is done Since Daily Timer is activated at the same time everyday, you may need to cancel it on some particular days. 1 Select the Timer you want to cancel. CLOCK /TIMER Daily 1 Timer Canceled Daily 2 Timer Clock setting Daily 3 Timer Recording Timer (see page 16) 2 Turn off the selected Timer. CANCEL The indicator corresponding to the Timer is turned off.
Additional Information Learning More about This System Daily Operations—Playback (see pages 9 to 14) Listening to the Radio: • If you store a new station into an occupied preset number, the previously stored station in that number will be erased. • When you unplug the AC power cord or if a power failure occurs, the preset stations will be erased in a few days. If this happens, preset the stations again.
English UX-G45[UW].BOOK Page 27 Tuesday, May 30, 2006 2:07 AM ] The batteries are exhausted. Timer Operations (see pages 23 to 25) • When you unplug the AC power cord or if a power failure occurs, the timer will be canceled. You need to set the clock first, then the timer again. • Without Stopping the recording, you cannot change the source after Recording Timer starts recording. • You cannot use the SLEEP timer while activating the Recording timer.
Maintenance Specifications To get the best performance of the System, keep your discs, and mechanism clean. Amplifier section Output Power: Handling discs • When removing the disc from its case, hold it at the edge while pressing the center hole lightly. • Do not touch the shiny surface of the disc, or bend the disc. • Put the disc back in its case after use to prevent warping. • Be careful not to scratch the surface of the disc. • Avoid exposure to direct sunlight, temperature extremes, and moisture.
Parts Index Refer to the pages to see how to use the buttons and controls. Remote control 9, 24 10, 12, 13, 16, 24 STANDBY/ON 19, 23, 25 10, 11, 18 1 2 3 4 5 6 SET/RESUME 16 CANCEL 7 8 0 10 9 16, 23, 25 DISPLAY 12 MP3 MODE CLOCK /TIMER IIV English UX-G45[UW].
English UX-G45[UW].
UX-G45[UW]_SP.BOOK Page 1 Sunday, June 4, 2006 5:52 PM Contenido Introducción ................................................... 2 Precauciones ................................................................... 2 Cómo leer este manual.................................................... 3 Procedimientos iniciales ................................ 4 Español Paso 1: Desembalaje ....................................................... 4 Paso 2: Prepare el control remoto...................................
UX-G45[UW]_SP.BOOK Page 2 Sunday, June 4, 2006 5:52 PM Introducción Calor interior • Hay un ventilador de enfriamiento montado en el panel trasero para evitar que se genere calor dentro de la unidad principal (consulte la página G-2). Para fines de seguridad, observe atentamente lo siguiente: • Asegúrese de que haya una buena ventilación alrededor de la unidad principal. Una ventilación defectuosa podría recalentar y dañar el sistema.
UX-G45[UW]_SP.BOOK Page 3 Sunday, June 4, 2006 5:52 PM Español Cómo leer este manual Para que las explicaciones de este manual sean simples y fáciles de entender, hemos adoptado los siguientes métodos: • Las operaciones de los botones y de los controles se explican tal como se indican en la tabla de abajo.
UX-G45[UW]_SP.BOOK Page 4 Sunday, June 4, 2006 5:52 PM Procedimientos iniciales accesorios. Paso 1: Desembalaje Después de efectuar el desembalaje, asegúrese de que dispone de todos los elementos siguientes. El número entre paréntesis indica la cantidad de piezas suministradas para cada elemento. • Antena FM (1) • Antena de cuadro AM (1) • Control remoto (1) • Pilas (2) • Adaptador para conector de CA (1) Si hay algún elemento faltante, consulte inmediatamente con su distribuidor.
UX-G45[UW]_SP.BOOK Page 5 Sunday, June 4, 2006 5:52 PM Paso 3: Conexión Si necesita una información más detallada, consulte la página 7. Para obtener información más detallada sobre la conexión de un equipo externo, consulte la página 13. Español Las ilustraciones de abajo son ejemplos típicos de los terminales de entrada/salida. Cuando conecte otros componentes, consulte también sus respectivos manuales debido a que los nombres de los terminales impresos al dorso pueden variar entre los mismos.
Español UX-G45[UW]_SP.BOOK Page 6 Sunday, June 4, 2006 5:52 PM Antena FM (suministrada) Extiéndala de manera que se obtenga la mejor recepción. Antena de cuadro AM (suministrada) Gírela hasta que se obtenga la mejor recepción.
UX-G45[UW]_SP.BOOK Page 7 Sunday, June 4, 2006 5:52 PM Cómo armar y conectar la antena de cuadro AM Cómo conectar los cables de los altavoces Cómo armar la antena de cuadro AM Asegúrese de que ambos altavoces se encuentren conectados correcta y firmemente. Español 3 Suelte 1 Sostenga Cómo conectar la antena de cuadro AM Asegúrese de conectar correctamente el cable: El extremo blanco a AM EXT, el extremo negro a GND.
UX-G45[UW]_SP.
UX-G45[UW]_SP.BOOK Page 9 Sunday, June 4, 2006 5:52 PM Operaciones diarias—Reproducción 1 Encienda el sistema. 1 Español Botones numéricos SET/ RESUME DISPLAY MP3 MODE PRESET UP, PRESET DOWN 4/1, 7,¡/¢ 2 QP LINK FM MODE DIMMER 3 La lámpara STANDBY de la unidad principal se apaga. • Sin pulsar STANDBY/ON , el sistema se enciende cuando se pulsa uno de los botones de selección de fuente en el siguiente paso. 2 Seleccione la fuente.
UX-G45[UW]_SP.BOOK Page 10 Sunday, June 4, 2006 5:52 PM Para escuchar la radio Si la emisora FM recibida es muy ruidosa Para seleccionar el intervalo de frecuencias del sintonizador de AM Remote ONLY Remote ONLY FM MODE Los intervalos del sintonizador de AM se pueden cambiar mientras el sistema está en espera. 1 MONO: La recepción mejorará, pero se perderá el efecto estéreo. El indicador MONO se enciende. STEREO: Normalmente seleccione esto. El efecto estereofónico se reanuda. 2 seg.
UX-G45[UW]_SP.BOOK Page 11 Sunday, June 4, 2006 5:52 PM Para sintonizar una emisora presintonizada Remote ONLY Para iniciar: Para poner en pausa: Para detener: Español 1 Seleccione la banda (FM o AM). FM AM 2 Seleccione el número de preajuste para la emisora que Para cancelar, pulse otra vez. Para seleccionar una pista/grupo* se va almacenar. 1 2 3 4 5 6 7 8 9 0 10 Los números de las pistas/grupos* aumentan. • También puede usar el control PRESET UP o PRESET DOWN.
UX-G45[UW]_SP.BOOK Page 12 Sunday, June 4, 2006 5:52 PM • Siempre ajuste el volumen a “VOL MIN” cuando conecte o desconecte el otro equipo. • Conecte la memoria USB o DAP directamente al panel frontal de la unidad. La conexión a través de un hub USB puede provocar errores de funcionamiento. • Pueden conectarse memorias USB y DAP compatibles con las especificaciones del tipo de almacenamiento masivo USB. • Algunos DAP no son compatibles con la unidad.
UX-G45[UW]_SP.BOOK Page 13 Sunday, June 4, 2006 5:52 PM Cómo ajustar el nivel de entrada de sonido desde otro equipo Para reproducir una cinta Cómo insertar una cinta Puede reproducir cintas tipo I. Presione Inserte Cierre Puede ajustar el nivel de entrada de sonido desde el equipo conectado, si la señal de entrada es demasiado pequeña o demasiado grande. Español 1 Seleccione AUX como fuente. 2 Ajuste el nivel de entrada 2 seg.
UX-G45[UW]_SP.BOOK Page 14 Sunday, June 4, 2006 5:52 PM Quick Portable Link (QP Link) Remote ONLY Si conecta otro equipo como un reproductor de audio digital al terminal AUX y lo reproduce, la fuente cambia automáticamente a AUX. QP Link Español QP LINK Cancelado (Sin indicación) El indicador de QP está encendido mientras QP Link esté activado. Cuando QP Link está activado... • Si se recibe una entrada de audio en AUX cuando el sistema está encendido, la fuente cambia automáticamente a AUX.
UX-G45[UW]_SP.BOOK Page 15 Sunday, June 4, 2006 5:52 PM Operaciones diarias—Ajustes del sonido y otros ajustes Ajuste del volumen Control remoto Podrá ajustar el nivel de volumen entre nivel 0 (VOL-MIN) y nivel 31 (VOL-MAX). Control remoto: Unidad principal: Español VOLUME SET/RESUME CANCEL CLOCK/ TIMER VOLUME DISPLAY PRESET UP, PRESET DOWN Remote ONLY Para bajar el volumen instantáneamente Para restablecer el volumen, pulse de nuevo o ajuste el nivel de volumen. FADE MUTING DIMMER A.
UX-G45[UW]_SP.BOOK Page 16 Sunday, June 4, 2006 5:52 PM Cambio de la luminosidad de la pantalla— PRESET UP SET/RESUME Remote ONLY Podrá oscurecer la ventana de visualización. DIMMER DIM ON DIM OFF (Cancelado) Ajuste del reloj PRESET DOWN Aparece “CLOCK OK” y el reloj incorporado comienza a funcionar. Para verificar la hora actual durante la reproducción Remote ONLY Sin ajustar el reloj incorporado, no podrá utilizar el temporizador diario y el temporizador de grabación (consulte la página 23).
UX-G45[UW]_SP.BOOK Page 17 Sunday, June 4, 2006 5:52 PM Apagado automático del sistema Remote ONLY Para que el sistema se apague después de finalizar la reproducción—Auto Standby Esta función funciona sólo cuando la fuente es el CD o cinta. Español A.STANDBY A.STBY Cancelado (Sin indicación) Cuando se está usando Auto Standby, el indicador A.STBY se enciende en la pantalla. Cuando se detiene la reproducción del disco y de la cinta, el indicador A.STBY comienza a parpadear.
UX-G45[UW]_SP.BOOK Page 18 Sunday, June 4, 2006 5:52 PM Operaciones avanzadas de disco/memoria USB/DAP Programando el orden de reproducción— Reproducción programada Remote ONLY Antes de iniciar la reproducción, podrá programar el orden de reproducción de las pistas (hasta 32). • La reproducción programada sólo puede utilizarse en el modo MP3 TRACK. • Pulse REPEAT si desea repetir todas las pistas programadas.
UX-G45[UW]_SP.BOOK Page 19 Sunday, June 4, 2006 5:52 PM Para verificar una secuencia programada Mientras el indicador PRGM se encuentra visualizado en la pantalla, y antes de la reproducción... Español En el orden programado. En el orden inverso. Reproduciendo en orden aleatorio— Remote ONLY Reproducción aleatoria Puede reproducir todas las pistas del disco, memoria USB o DAP seleccionado de forma aleatoria. • Puede repetir todas las pistas (PALL) si pulsa REPEAT. Pulse RANDOM.
UX-G45[UW]_SP.BOOK Page 20 Sunday, June 4, 2006 5:52 PM Reproducción repetida Podrá repetir la reproducción. —Bloqueo para niños Podrá bloquear las bandejas de los discos para que nadie pueda sacar los discos cargados. • Esto es posible mientras el sistema está en espera. Para CD/MP3 (modo TRACK): REPEAT Prohibición de la expulsión del disco Main Unit ONLY Remote ONLY 1 ALL Con las bandejas de los discos cerradas...
UX-G45[UW]_SP.BOOK Page 21 Sunday, June 4, 2006 5:52 PM Operaciones avanzadas de la cinta IMPORTANTE Podría ser ilegal grabar o reproducir material protegido por los derechos de autor sin el consentimiento del titular de los derechos de autor. Español Control remoto Grabando en una cinta Podrá usar cintas tipo I para la grabación. • Para reproducir una cinta, consulte la página 13. 7 FM/AM CD 6 TAPE 1 Inserte un cassette grabable.
UX-G45[UW]_SP.BOOK Page 22 Sunday, June 4, 2006 5:52 PM Grabación sincronizada del disco Puede iniciar y detener el disco, la memoria USB y la reproducción DAP y grabar en cinta al mismo tiempo. Si se escuchan batidos mientras se está grabando una radiodifusión en AM FM MODE Remote ONLY BEAT 1 BEAT 2 Active “RESUME” (consulte la página 12) 1 2 • Seleccione “BEAT 1” o “BEAT 2” para reducir el batido. Cargue un disco e inserte un cassette grabable.
UX-G45[UW]_SP.BOOK Page 23 Sunday, June 4, 2006 5:52 PM Operaciones de los temporizadores Programando el temporizador Español Control remoto STANDBY/ON SET/RESUME CLOCK/ TIMER CANCEL PRESET UP, PRESET DOWN Remote ONLY Usando el temporizador diario, podrá despertarse con canción, etc. Por otra parte, con el temporizador de grabación, podrá grabar automáticamente una cinta con un programa de la radio.
UX-G45[UW]_SP.BOOK Page 24 Sunday, June 4, 2006 5:52 PM Para el temporizador de grabación: 1 Ajuste la hora y seguidamente, los minutos de la hora de activación. Seleccione uno de los modos de ajuste del temporizador que desea definir—temporizador diario 1, temporizador diario 2, temporizador diario 3 o temporizador de grabación.
UX-G45[UW]_SP.BOOK Page 25 Sunday, June 4, 2006 5:52 PM Para desactivar el temporizador después de programarlo Español Como el temporizador diario se activa todos los días a la misma hora, es posible que quiera cancelarlo para algunos días específicos. 1 Seleccione el temporizador que desea cancelar. CLOCK /TIMER Temporizador diario 1 Temporizador diario 2 Cancelado Ajuste del reloj Temporizador diario 3 Temporizador de grabacion (Consulte la página 16) 2 Desactive el temporizador seleccionado.
UX-G45[UW]_SP.BOOK Page 26 Sunday, June 4, 2006 5:52 PM Aprendiendo más acerca de este sistema Operaciones diarias—Reproducción (consulte las páginas 9 a 14) Para escuchar la radio: • Almacenando una emisora nueva en un número de preajuste usado se borrará la emisora almacenada previamente en ese número. • Cuando se desenchufa el cable de alimentación de CA o se produce una falla de alimentación eléctrica, las emisoras preajustadas se borrarán en unos días. En tal caso, preajuste las emisoras otra vez.
UX-G45[UW]_SP.BOOK Page 27 Sunday, June 4, 2006 5:52 PM Grabación sincronizada del disco: • No es posible abrir la bandeja de discos mientras se graba. Operaciones de los temporizadores (consulte las Español páginas 23 a 25) • Cuando se desenchufa el cable de alimentación de CA o se produce una falla de alimentación eléctrica, el temporizador se cancela. Primero deberá volver a ajustar el reloj, y luego el temporizador.
UX-G45[UW]_SP.BOOK Page 28 Sunday, June 4, 2006 5:52 PM Operaciones de los temporizadores: Especificaciones El temporizador diario no funciona. Sección del amplificador Potencia de salida: Mantenimiento Para obtener el máximo rendimiento del sistema, mantenga limpios sus discos y mecanismo. Altavoces/Impedancia: Entrada de audio Manejo de los discos • Saque el disco de su estuche sujetándolo por los bordes, mientras presiona ligeramente el orificio central.
UX-G45[UW]_SP.BOOK Page 29 Sunday, June 4, 2006 5:52 PM Índice de las piezas Español Consulte las páginas indicadas para saber cómo usar los botones y controles.
UX-G45[UW]_SP.
UX-G45[UW]_PT.BOOK Page 1 Sunday, June 4, 2006 6:08 PM Índice Geral Introdução ...................................................... 2 Precauções ...................................................................... 2 Como Consultar este Manual ......................................... 3 Começar a Utilizar ......................................... 4 Ponto 1: Efectue a desembalagem .................................. 4 Ponto 2: Prepare o comando à distância .........................
UX-G45[UW]_PT.BOOK Page 2 Sunday, June 4, 2006 6:08 PM Introdução Calor interno • Para evitar a acumulação de calor no interior da unidade principal, está instalada um ventoinha de arrefecimento no painel posterior (consulte a página G-2). Por questões de segurança, tenha em atenção as indicações que se seguem. • Certifique-se de que existe uma ventilação adequada em redor da unidade principal. Caso contrário, o sistema pode sobreaquecer e sofrer danos.
UX-G45[UW]_PT.BOOK Page 3 Sunday, June 4, 2006 6:08 PM Português Como Consultar este Manual Para simplificar e facilitar ao máximo a compreensão deste manual, adaptámos os métodos que se seguem. • Os botões e as operações de controlo encontram-se descritos na tabela apresentada em seguida.
UX-G45[UW]_PT.BOOK Page 4 Sunday, June 4, 2006 6:08 PM Começar a Utilizar Ponto 1:Retire o sistema da embalagem e verifique os acessórios. Ponto 1: Efectue a desembalagem Depois de efectuar a desembalagem, certifique-se de que possui os itens indicados em seguida. O número que se encontra entre parêntesis indica a quantidade fornecida.
UX-G45[UW]_PT.BOOK Page 5 Sunday, June 4, 2006 6:08 PM Ponto 3: Efectue as ligações Para mais informações, consulte a página 7. Para mais informações sobre como ligar equipamento externo, consulte a página 13. As imagens dos terminais de entrada/saída apresentadas em seguida são os exemplos mais comuns. Quando ligar outros componentes, consulte também os respectivos manuais, pois os nomes dos terminais impressos na parte posterior podem ser diferentes.
UX-G45[UW]_PT.BOOK Page 6 Sunday, June 4, 2006 6:08 PM Antena de FM (fornecida) Estique-a para poder obter a melhor recepção. AM LOOP Português Antena circular de AM (fornecida) Rode-a até obter a melhor recepção.
UX-G45[UW]_PT.BOOK Page 7 Sunday, June 4, 2006 6:08 PM Para montar e conectar a antena AM de quadro Para conectar os cabos de alto-falante Para montar a antena AM de quadro Certifique-se de ambas as caixas acústicas estejam conectadas correta e firmemente. 3 Solte 1 Segure Português Para conectar a antena AM de quadro Certifique-se de conectar o fio corretamente: A extremidade branca a AM EXT, e a extremidade preta a GND.
UX-G45[UW]_PT.BOOK Page 8 Sunday, June 4, 2006 6:08 PM Antes de Utilizar o Sistema Durante a utilização do sistema, as indicações do visor fornecem muitas informações. Antes de utilizar o sistema, familiarize-se com as situações em que os indicadores acendem no visor.
UX-G45[UW]_PT.BOOK Page 9 Sunday, June 4, 2006 6:08 PM Operações Frequentes—Reprodução 1 Ligue o dispositivo. 1 Botões numéricos SET/ RESUME DISPLAY MP3 MODE PRESET UP, PRESET DOWN 4/1, 7,¡/¢ 2 QP LINK Português FM MODE DIMMER 3 O indicador luminoso STANDBY da unidade principal apaga. • Se não pressionar STANDBY/ON , o sistema liga se pressionar um dos botões de selecção de fonte no ponto seguinte. 2 Seleccione a fonte. A reprodução inicia automaticamente se a fonte seleccionada estiver pronta.
UX-G45[UW]_PT.BOOK Page 10 Sunday, June 4, 2006 6:08 PM Se for difícil ouvir a estação de FM sintonizada Ouvir Rádio Para selecionar o espaçamento do intervalo do sintonizador AM Remote ONLY FM MODE Você pode alterar os intervalos do sintonizador AM enquanto o sistema estiver no modo de prontidão. 1 MONO: A qualidade da recepção melhora, embora deixe de ouvir o som em estéreo. O indicador MONO acende. STEREO: Normalmente, deve seleccionar esta opção. É reposto o som estéreo. 2 seg.
UX-G45[UW]_PT.BOOK Page 11 Sunday, June 4, 2006 6:08 PM Para sintonizar uma estação predefinida Remote ONLY Para iniciar: Para efectuar uma pausa: Para parar: 1 Seleccione uma banda (FM ou AM). FM AM Para libertar, pressione novamente. 2 Seleccione um número de predefinição para a estação Português que pretende gravar. 1 2 3 4 5 6 7 8 9 0 10 Para seleccionar uma faixa/um grupo* • Pode também utilizar PRESET UP ou PRESET DOWN. Aumenta os números de faixa/grupo*.
UX-G45[UW]_PT.BOOK Page 12 Sunday, June 4, 2006 6:08 PM • Defina sempre o volume para “VOL MIN” quando ligar ou desligar outros equipamentos. • Ligue a memória USB ou o leitor de áudio digital directamente ao painel frontal da unidade. Se efectuar a ligação através de um concentrador (hub) USB, o dispositivo poderá não funcionar correctamente. • Pode ligar memórias USB e leitores de áudio digitais compatíveis com as especificações da classe de armazenamento em massa USB.
UX-G45[UW]_PT.BOOK Page 13 Sunday, June 4, 2006 6:08 PM Para ajustar o nível de entrada do som do outro equipamento Reprodução de uma fita Para colocar uma fita Pode ajustar o nível de entrada do som do equipamento ligado se o sinal de entrada for demasiado fraco ou forte. Você pode reproduzir fitas do tipo I. Empurre Coloque Feche 1 Seleccione AUX como fonte. 2 Ajuste o nível de entrada. 2 seg.
UX-G45[UW]_PT.BOOK Page 14 Sunday, June 4, 2006 6:08 PM Quick Portable Link (QP Link) Remote ONLY Se ligar outro equipamento ao terminal AUX, como, por exemplo, um leitor de áudio digital, e efectuar a reprodução, a fonte muda automaticamente para AUX. QP LINK QP Link Cancelado (Sem indicação) Português O indicador QP Link mantém-se aceso enquanto QP Link estiver activado. Quando QP Link estiver activado...
UX-G45[UW]_PT.BOOK Page 15 Sunday, June 4, 2006 6:08 PM Operações Frequentes—Som e Outros Ajustes Ajustar o Volume Comando à distância Pode ajustar o nível de volume de 0 (VOL-MIN) a 31 (VOL-MAX). Comando à distância: Unidade principal: VOLUME SET/RESUME CANCEL CLOCK/ TIMER Para baixar momentaneamente o volume PRESET UP, PRESET DOWN Português VOLUME DISPLAY Remote ONLY Para repor o volume, volte a pressionar ou ajuste o nível do volume. FADE MUTING DIMMER A.
UX-G45[UW]_PT.BOOK Page 16 Sunday, June 4, 2006 6:08 PM Alterar a Luminosidade do Visor—DIMMER Remote ONLY 3 Acerte os minutos. PRESET UP Pode escurecer a janela do visor. DIMMER SET/RESUME DIM ON PRESET DOWN DIM OFF (Cancelado) Aparece a indicação “CLOCK OK” e o relógio integrado começa a funcionar. Acertar o Relógio Remote ONLY Para ver as horas durante a reprodução 1 Active o modo de definição do relógio.
UX-G45[UW]_PT.BOOK Page 17 Sunday, June 4, 2006 6:08 PM Desligar o Dispositivo Automaticamente Remote ONLY Para desligar o sistema após o fim da reprodução—Modo de espera automático Esta função só é activada quando a fonte for CD ou fita. A.STANDBY A.STBY Cancelado (Sem indicação) Português Quando o modo de espera automático estiver activado, o indicador A.STBY fica aceso no visor. Quando parar a reprodução do disco ou da fita, o indicador A.STBY fica intermitente.
UX-G45[UW]_PT.BOOK Page 18 Sunday, June 4, 2006 6:08 PM Operações de Disco/Memória USB/Leitor de Áudio Digital Avançadas Programar a Ordem de Reprodução— Comando à distância Remote ONLY Reprodução Programada É possível organizar a ordem de reprodução das faixas (até 32) antes de iniciar a reprodução. • A reprodução programada só pode ser efectuada no modo MP3 TRACK. • Pode repetir todas as faixas programadas pressionando REPEAT.
UX-G45[UW]_PT.BOOK Page 19 Sunday, June 4, 2006 6:08 PM Para verificar o conteúdo programado Quando o indicador PRGM aparece no visor e antes da reprodução... Pela ordem programada. Pela ordem inversa. Para alterar o programa Português Reprodução Aleatória Remote ONLY Pode reproduzir todas as faixas do disco seleccionado, da memória USB ou do leitor de áudio digital de modo aleatório. • Pode repetir todas as faixas (PALL) pressionando REPEAT. Pressione RANDOM.
UX-G45[UW]_PT.BOOK Page 20 Sunday, June 4, 2006 6:08 PM Reproduzir de Modo Repetido— Evitar a Ejecção do Disco— Remote ONLY Reprodução Repetida Bloqueio para Crianças Pode repetir a reprodução. Para CD/MP3 (modo TRACK): REPEAT 1 ALL Cancelado Main Unit ONLY Pode bloquear os suportes para discos de forma a que ninguém possa ejectar os discos inseridos. • Pode efectuar esta operação quando o sistema está em modo de espera. Quando os suportes para discos estiverem fechados...
UX-G45[UW]_PT.BOOK Page 21 Sunday, June 4, 2006 6:08 PM Operações de fita avançadas IMPORTANTE Pode ser ilegal gravar ou reproduzir material protegido por direitos autorais sem o consentimento do proprietário dos direitos autorais. Controle remoto Gravação em uma fita Você pode utilizar fitas do tipo I para gravação. • Para reproduzir uma fita, consulte a página 13. 1 Coloque uma fita que pode ser gravada.
UX-G45[UW]_PT.BOOK Page 22 Sunday, June 4, 2006 6:08 PM Gravação de disco sincronizada Pode iniciar e parar o disco, a memória USB e a reprodução DAP e a gravação de cassetes simultaneamente. Se você ouvir ruídos de batimento durante a gravação de uma emissora AM FM MODE Remote ONLY BEAT 1 BEAT 2 Para gravar o disco inteiro Ative “RESUME” (consulte a página 12). 1 Coloque um disco e uma fita que pode ser gravada. • Se a fonte de reprodução atual não for o CD player, pressione CD 6 e, em seguida, 7.
UX-G45[UW]_PT.BOOK Page 23 Sunday, June 4, 2006 6:08 PM Operações de Temporização Definição do timer Comando à distância STANDBY/ON SET/RESUME CLOCK/ TIMER CANCEL PRESET UP, PRESET DOWN Remote ONLY Com o timer diário, você pode acordar com música, etc. Por outro lado, com o timer de gravação, você pode criar uma fita de um programa de rádio automaticamente.
UX-G45[UW]_PT.BOOK Page 24 Sunday, June 4, 2006 6:08 PM 1 Selecione um dos modos de definição do timer que deseja definir—timer diário 1, timer diário 2, timer diário 3, ou timer de gravação. CLOCK /TIMER Timer diario 1 Cancelado Timer diario 2 Ajuste do relógio Para o timer de gravação: 1 Defina a hora e, em seguida, os minutos para a hora de ligar.
UX-G45[UW]_PT.BOOK Page 25 Sunday, June 4, 2006 6:08 PM Desactivar o temporizador depois de definido Uma vez que o temporizador diário é activado todos os dias à mesma hora, poderá ter de o cancelar em dias específicos. 1 Seleccione o temporizador que pretende cancelar. CLOCK /TIMER Timer diario 1 Timer diario 2 Cancelado Timer diario 3 Ajuste do relógio (consulte a página 16) 2 Desactive o temporizador seleccionado.
UX-G45[UW]_PT.BOOK Page 26 Sunday, June 4, 2006 6:08 PM Informações Adicionais Operações Frequentes—Reprodução (consulte as páginas 9 a 14) Ouvir Rádio: • Se gravar uma nova estação num número de predefinição já utilizado, a estação previamente gravada nesse número será eliminada. • Quando desliga o cabo de corrente alterna ou quando ocorre uma falha de energia, as estações predefinidas serão eliminadas após alguns dias. Se isso acontecer, volte a predefinir as estações.
UX-G45[UW]_PT.BOOK Page 27 Sunday, June 4, 2006 6:08 PM Operações de Temporização (consulte as páginas 23 a 25) • Quando desliga o cabo de corrente alterna ou quando ocorre uma falha de energia, o temporizador será cancelado. Em primeiro lugar, tem de voltar a acertar o relógio e, em seguida, definir o temporizador. • Sem parar a gravação, você não poderá mudar a fonte depois que o timer de gravação começar a gravar. • Não é possível utilizar o timer SLEEP enquanto o timer de gravação está ativado.
8_ADDITONALINFO.fm Page 28 Wednesday, June 7, 2006 6:46 PM Manutenção Especificações Para obter o melhor desempenho do sistema, mantenha os discos e o mecanismo limpos. Amplificador • Quando retirar o disco da caixa, segure-o pelas extremidades e exerça uma ligeira pressão no orifício central. • Não toque na superfície brilhante do disco nem dobre o disco. • Depois de utilizar o disco, guarde-o na respectiva caixa para evitar deformações. • Tenha cuidado para não riscar a superfície do disco.
UX-G45[UW]_PT.BOOK Page 29 Sunday, June 4, 2006 6:08 PM Índice Remissivo dos Componentes Consulte as páginas indicadas para obter informações sobre como utilizar os botões e os controlos.
UX-G45[UW]_PT.
UX-G45(UW)_Cover.fm Page 2 Sunday, June 4, 2006 6:18 PM Mains (AC) Line Instruction (not applicable for Europe, U.S.A., Canada, Australia, and U.K.) Instrucción sobre la línea de la red (CA) (no aplicable para Europa, EE.UU., Canadá, Australia, ni el Grã-Bretanha) Instrução sobre a tensão da rede eléctrica (CA) (não aplicável para a Europa, os E.U.A.