English Cover[UJ].
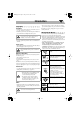
Safty[UJ].fm Page 1 Monday, June 6, 2005 3:32 PM Warnings, Cautions and Others CAUTION— (standby/on) button! Disconnect the mains plug to shut the power off completely (all lamps and indications go off). The button in any position does not disconnect the mains line. • When the unit is on standby, the STANDBY lamp lights in red. • When the unit is turned on, the STANDBY lamp goes off. The power can be remote controlled. CAUTION To reduce the risk of electrical shocks, fire, etc.: 1.
UX-G5[UJ].book Page 1 Friday, June 10, 2005 1:07 PM Contents Introduction .....................................................2 Precautions......................................................................2 How to Read This Manual..............................................2 Getting Started ................................................3 Step 1: Unpack................................................................3 Step 2: Prepare the Remote Control ...............................
UX-G5[UJ].book Page 2 Friday, June 10, 2005 1:07 PM Introduction Precautions Installation • Install in a place which is level, dry and neither too hot nor too cold—between 5°C and 35°C. • Install the System in a location with adequate ventilation to prevent internal heat buildup inside the System. DO NOT install the System in a location near heat sources, or in a place subject to direct sunlight, excessive dust or vibration. • Leave sufficient distance between the System and the TV.
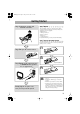
UX-G5[UJ].book Page 3 Friday, June 10, 2005 1:07 PM Getting Started Step 1: Unpack Step 1:Unpack the package and check the accessories. After unpacking, check to be sure that you have all the following items. The number in parentheses indicates the quantity of each piece supplied. • FM antenna (1) • AM loop antenna (1) • Remote control (1) • Batteries (2) • AC plug adapter (1) If any item is missing, consult your dealer immediately.
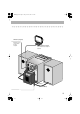
UX-G5[UJ].book Page 4 Friday, June 10, 2005 1:07 PM Step 3: Hook Up If you need more detailed information, see page 6. Illustrations of the input/output terminals below are typical examples. When you connect other components, refer also to their manuals since the terminal names actually printed on the rear may vary. Turn the power off to all components before connections. For better FM/AM reception AM loop antenna Keep it connected.
UX-G5[UJ].book Page 5 Friday, June 10, 2005 1:07 PM FM antenna (supplied) Extend it so that you can obtain the best reception. AM loop antenna (supplied) Turn it until the best reception is obtained.
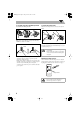
UX-G5[UJ].book Page 6 Friday, June 10, 2005 1:07 PM To assemble and connect the AM loop antenna To connect the speaker cords To assemble the AM loop antenna Make sure the both speakers are connected correctly and firmly. 3 Release 1 Hold To connect the AM loop antenna Make sure to connect the wire correctly: The white end to AM EXT, the black end to GND. When connecting the speaker cords, match the polarity of the speaker terminals: The cord with black stripe to (–), the cord without stripe to (+).
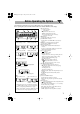
UX-G5[UJ].book Page 7 Friday, June 10, 2005 1:07 PM Before Operating the System The indications on the display teach you a lot of things while you are operating the System. Before operating the System, be familiar with when and how the indicator illuminates on the display. 12 MP3 GR. 3 4 5 SOUND TURBO AHB PRO MONO ST 1CD ALL PRGM RANDOM 6 REC REC A.
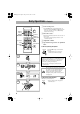
UX-G5[UJ].book Page 8 Friday, June 10, 2005 1:07 PM Daily Operations—Playback 1 Turn on the power. The STANDBY lamp on the main unit turns off. • Without pressing STANDBY/ON , the System turns on by pressing one of the source selecting buttons in the next step. 1 Numeric buttons SET 4/1, 7,¡/¢ DISPLAY PRESET UP, PRESET DOWN 2 Disc selection buttons REV.MODE FM MODE/ MP3 3 2 Select the source. Playback automatically starts if the selected source is ready to start.
UX-G5[UJ].book Page 9 Friday, June 10, 2005 1:07 PM Listening to the Radio If the received FM station is hard to listen To select the AM tuner interval spacing FM MODE/ MP3 Some countries space AM stations 9 kHz spacing, and other countries use 10 kHz spacing. MONO STEREO You can change the AM tuner intervals while the System is on stand by. 1 2 sec. 2 MONO: Reception will improve though stereo effect is lost. MONO indicator lights up. STEREO: Normally select this. Stereo effect will be resumed.
UX-G5[UJ].book Page 10 Friday, June 10, 2005 1:07 PM To tune in to a preset station Remote ONLY To select a disc to be played back 1 Select a band (FM or AM). FM 2 3 4 5 6 7 8 9 10 10 CD 2 CD 4 CD 5 CD 3 AM 2 Select a preset number for the station you store. 1 CD 1 To start: To pause: To stop: • You can also use the PRESET UP or PRESET DOWN. To release, press again. To select a track/group* Increases the track/group* numbers. Decreases the track/group* numbers.
UX-G5[UJ].book Page 11 Friday, June 10, 2005 1:07 PM For MP3 playback According to the MP3 playback mode, 4/1, ¡/¢ or numeric buttons work for the group selection or the track selection. Examples: When the MP3 play back mode is “GROUP.” MP3 groups/tracks configuration This System plays back MP3 tracks as follows. Hierarchy Level 1 Level 3 Level 4 A C D ROOT 3 B GR. (Group) indicator MP3 GR.
UX-G5[UJ].book Page 12 Friday, June 10, 2005 1:07 PM Playing Back a Tape Playing Back Other Equipment To insert a tape To connect other equipment You can play back type I tapes. Push Insert Close By using a stereo mini plug cord (not supplied), you can connect equipment with analog audio output jacks such as an MD player, or a TV, etc. Stereo mini plug cord (not supplied) Portable audio device, Game machine, etc.
UX-G5[UJ].book Page 13 Friday, June 10, 2005 1:07 PM Daily Operations—Sound & Other Adjustments Adjusting the Volume Remote control You can adjust the volume level from level 0 (VOL-MIN) to level 31 (VOL-MAX). Remote control: Main unit: VOLUME CLOCK/ TIMER 4/1, 7,¡/¢ DIMMER A.
UX-G5[UJ].book Page 14 Friday, June 10, 2005 1:07 PM Changing the Display Brightness Remote ONLY —DIMMER You can dim the display window. DIMMER DIMMER-1 Turning Off the Power DIMMER-2 DIM OFF DIMMER-1 Dims the display illumination. DIMMER-2 Erases the display illumination. Remote ONLY Without setting the built-in clock, you cannot use the Daily Timer (see page 20). • To exit from the clock setting, press CLOCK/TIMER as required. • To go back to the previous step, press CANCEL. Remote ONLY A.
UX-G5[UJ].book Page 15 Friday, June 10, 2005 1:07 PM Advanced Disc Operations Programming the Playing Order— Remote control Remote ONLY Program Play You can arrange the playing order of the tracks (up to 32) before you start playback. • You cannot enjoy MP3 discs for program play. • You can repeat all the programmed tracks by pressing REPEAT. Numeric buttons CANCEL 1 Before starting playback, press PROGRAM.
UX-G5[UJ].book Page 16 Friday, June 10, 2005 1:07 PM To check the programmed contents While the PRGM indicator is shown on the display and before playback... In the programmed order. In the reverse order. Playing at Random—Random Play Remote ONLY You can play back all the tracks on the selected disc at random. • You can repeat the current disc by pressing REPEAT. 1 2 Select a disc by pressing CD 1 – CD 5. Press RANDOM.
UX-G5[UJ].book Page 17 Friday, June 10, 2005 1:07 PM Remote ONLY Playing Repeatedly—Repeat Play You can repeat playback. 1 CD Canceled While the disc trays are closed... ALL (No indication) REC 0 1 CD Canceled ALL (No indication) GR. (at the same time) • Only CD 1 0 can work for this function. To cancel the prohibition, repeat the same procedure. “UNLOCKED” appears on the display.
UX-G5[UJ].book Page 18 Friday, June 10, 2005 1:07 PM Advanced Tape Operations IMPORTANT It may be unlawful to record or play back copyrighted material without the consent of the copyright owner. Remote control Recording on a Tape You can use type I tapes for recording. • To play a tape, see page 12. 1 Push 7 TAPE23 CD 6 Insert a recordable cassette. Insert Close FM/AM AUX Disc selection buttons REV.
UX-G5[UJ].book Page 19 Friday, June 10, 2005 1:07 PM 3 Select and start playing the source—“FM,” “AM,” “CD,” or “AUX IN.” • When recording a disc, you can also use “Synchronized Disc Recording” (see below). 4 Start recording. To record Program Play or Random Play 1 Select Program Play (and make a program) or Random Play. 2 Press REC to start recording. To protect your recording Cassettes have two small tabs on the back to protect from unexpected erasure or re-recording.
UX-G5[UJ].book Page 20 Friday, June 10, 2005 1:07 PM Timer Operations Setting the Timer Remote control STANDBY/ON SET CANCEL PRESET UP, PRESET DOWN CLOCK/ TIMER Remote ONLY Using Daily Timer, you can wake up with music, etc. On the other hand, with Recording Timer, you can make a tape of a radio broadcast automatically. • You can store three Daily Timer settings and one Recording Timer setting; however, you can activate only one of the four settings above at the same time.
UX-G5[UJ].book Page 21 Friday, June 10, 2005 1:07 PM 1 2 Select “TUNER FM” or “TUNER AM.” Select one of the timer setting modes you want to set— Daily 1 Timer, Daily 2 Timer, Daily 3 Timer, or Recording Timer. CLOCK /TIMER Daily 1 Timer Canceled Daily 2 Timer Clock setting PRESET UP SET Daily 3 Timer PRESET DOWN Recording Timer (see page 14) 3 Select preset station number. PRESET UP REC SET 1 PRESET DOWN Ex.
UX-G5[UJ].book Page 22 Friday, June 10, 2005 1:07 PM Additional Information Learning More about This System Daily Operations—Playback (see pages 8 to 12) Listening to the Radio: • If you store a new station into an occupied preset number, the previously stored station in that number will be erased. • When you unplug the AC power cord or if a power failure occurs, the preset stations will be erased in a few days. If this happens, preset the stations again.
UX-G5[UJ].book Page 23 Friday, June 10, 2005 1:07 PM Timer Operations (see pages 20 and 21) • When you unplug the AC power cord or if a power failure occurs, the timer will be canceled. You need to set the clock first, then the timer again. • Without stopping the recording, you cannot change the source after Recording Timer starts recording. • You cannot use the SLEEP timer while activating the Recording timer.
UX-G5[UJ].book Page 24 Friday, June 10, 2005 1:07 PM Troubleshooting If you are having a problem with your System, check this list for a possible solution before calling for service. General: Adjustments or settings are suddenly canceled before you finish. ] There is a time limit. Repeat the procedure again. Operations are disabled. ] The built-in microprocessor may malfunction due to external electrical interference. Unplug the AC power cord and then plug it back in.
UX-G5[UJ].book Page 25 Friday, June 10, 2005 1:07 PM Maintenance Specifications To get the best performance of the System, keep your discs, and mechanism clean. Amplifier section Handling discs • When removing the disc from its case, hold it at the edge while pressing the center hole lightly. • Do not touch the shiny surface of the disc, or bend the disc. • Put the disc back in its case after use to prevent warping. • Be careful not to scratch the surface of the disc.
UX-G5[UJ].book Page 26 Friday, June 10, 2005 1:07 PM Parts Index Refer to the pages to see how to use the buttons and controls.
Cover[UJ].fm Page 2 Thursday, June 9, 2005 11:15 AM Mains (AC) Line Instruction (not applicable for Europe, U.S.A., Canada, Australia, and U.K.