Français English English COVERC.
UX-G50[C].BOOK Page 1 Friday, February 10, 2006 3:04 PM Warnings, Cautions and Others Mises en garde, précautions et indications diverses CAUTION RISK OF ELECTRIC SHOCK DO NOT OPEN CAUTION: TO REDUCE THE RISK OF ELECTRIC SHOCK, DO NOT REMOVE COVER (OR BACK). NO USER SERVICEABLE PARTS INSIDE. REFER SERVICING TO QUALIFIED SERVICE PERSONNEL.
UX-G50[C].BOOK Page 2 Friday, February 10, 2006 3:04 PM For the main unit: Note to CATV system installer: Declaration of Conformity This reminder is provided to call the CATV system installer’s attention to section 820-40 of the NEC which provides guidelines for proper grounding and, in particular, specifies that the cable ground shall be connected to the grounding system of the building, as close to the point of cable entry as practical.
UX-G50[C].BOOK Page 3 Friday, February 10, 2006 3:04 PM IMPORTANT FOR LASER PRODUCTS / IMPORTANT POUR PRODUITS LASER 1. CLASS 1 LASER PRODUCT 2. CAUTION: Do not open the top cover. There are no user serviceable parts inside the unit; leave all servicing to qualified service personnel. 3. CAUTION: VISIBLE AND / OR INVISIBLE CLASS 1M LASER RADIATION WHEN OPEN. DO NOT STARE INTO BEAM OR VIEW DIRECTLY WITH OPTICAL INSTRUMENTS. 4. REPRODUCTION OF LABEL: CAUTION LABEL, PLACED INSIDE THE UNIT. 1.
UX-G50[C].BOOK Page 1 Tuesday, March 7, 2006 11:17 PM English Contents Introduction .....................................................2 Precautions ......................................................................2 How to Read This Manual ..............................................3 Getting Started ................................................ 4 Step 1: Unpack ................................................................4 Step 2: Prepare the Remote Control ...............................
UX-G50[C].BOOK Page 2 Tuesday, March 7, 2006 11:17 PM Thank you for purchasing the JVC Micro Component System. We hope it will be a valued addition to your home, giving you years of enjoyment. Be sure to read this instruction manual carefully before operating your new stereo system. In it you will find all the information you need to set up and use the system. If you have a query that is not answered by the manual, please contact your dealer.
English UX-G50[C].BOOK Page 3 Tuesday, March 7, 2006 11:17 PM How to Read This Manual To make this manual as simple and easy-to-understand as possible, we have adapted the following methods: • Button and control operations are explained as listed in the table below. In this manual, the operations using the remote control is mainly explained; however, you can use the buttons and controls on the main unit if they have the same (or similar) name and marks.
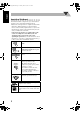
UX-G50[C].BOOK Page 4 Tuesday, March 7, 2006 11:17 PM Step 1:Unpack the package and check the accessories. English Getting Started Step 1: Unpack After unpacking, check to be sure that you have all the following items. The number in parentheses indicates the quantity of each piece supplied. • FM antenna (1) • AM loop antenna (1) • Remote control (1) • Batteries (2) If any item is missing, consult your dealer immediately.
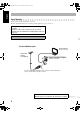
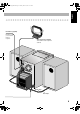
English UX-G50[C].BOOK Page 5 Tuesday, March 7, 2006 11:17 PM Step 3: Hook Up If you need more detailed information, see page 7. For more detailed information on connecting external equipment, see pages 13 and 14. Illustrations of the input/output terminals below are typical examples. When you connect other components, refer also to their manuals since the terminal names actually printed on the rear may vary. Turn the power off to all components before connections.
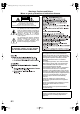
English UX-G50[C].BOOK Page 6 Tuesday, March 7, 2006 11:17 PM FM antenna (supplied) Extend it so that you can obtain the best reception. AM loop antenna (supplied) Turn it until the best reception is obtained.
English UX-G50[C].BOOK Page 7 Tuesday, March 7, 2006 11:17 PM To assemble and connect the AM loop antenna To assemble the AM loop antenna To connect the AM loop antenna Make sure to connect the wire correctly. 1 Hold 2 Insert 3 Release • If the AM loop antenna wire or speaker cords are covered with vinyl, remove the vinyl to expose the tip of the antenna by twisting the vinyl. • Make sure the antenna conductors do not touch any other terminals, connecting cords and power cord.
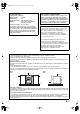
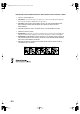
UX-G50[C].BOOK Page 8 Tuesday, March 7, 2006 11:17 PM English Before Operating the System The indications on the display teach you a lot of things while you are operating the System. Before operating the System, be familiar with when and how the indicator illuminates on the display.
UX-G50[C].BOOK Page 9 Tuesday, March 7, 2006 11:17 PM English Daily Operations—Playback 1 Turn on the power. 1 Numeric buttons SET/ RESUME MP3 MODE PRESET UP, PRESET DOWN 4/1, 7,¡/¢ 2 Disc selection buttons QP LINK FM MODE DIMMER 3 The STANDBY lamp on the main unit turns off. • Without pressing STANDBY/ON , the System turns on by pressing one of the source selecting buttons in the next step. 2 Select the source. Playback automatically starts if the selected source is ready to start.
Listening to the Radio To preset the stations To select the band (FM or AM) You can preset 30 FM and 15 AM stations. FM English UX-G50[C].BOOK Page 10 Tuesday, March 7, 2006 11:17 PM Remote ONLY 1 Tune in to a station you want to preset. 2 Activate the preset number entry mode. AM SET/RESUME To tune in to a station While FM or AM is selected... Remote control: Main unit: 3 1 sec. 1 sec. DOWN UP Frequency starts changing on the display.
English UX-G50[C].BOOK Page 11 Tuesday, March 7, 2006 11:17 PM To tune in to a preset station Remote ONLY 1 Select a band (FM or AM). FM AM 2 Select a preset number for the station you store. 1 2 3 4 5 6 7 8 9 0 10 To select a disc to be played back CD 1 CD 2 CD 4 CD 5 To start: CD 3 To pause: To release, press again. To select a track/group* Increases the track/group* numbers.
English UX-G50[C].BOOK Page 12 Tuesday, March 7, 2006 11:17 PM Resume Play for Audio CD/MP3 For MP3 playback If you press 7 during playback, the position of the track where you stopped playback will be memorized by the unit. By pressing CD 6, you can start playback again from the point where you stoppped it. According to the MP3 playback mode, 4/1 / ¡/¢ or number buttons work for the group selection or the track selection.
English UX-G50[C].BOOK Page 13 Sunday, April 23, 2006 6:20 PM To play back sounds on the PC Playing Back from the PC This System is equipped with a USB terminal on the front panel of the main unit. You can connect your PC to this terminal and enjoy sound reproduced through your PC. When you connect your PC for the first time, follow the procedure below. • Remember you cannot send any signal or data to your PC from this System. Press USB, then start playback from PC.
English UX-G50[C].BOOK Page 14 Tuesday, March 7, 2006 11:17 PM Playing Back from other equipment Quick Portable Link (QP Link) To connect other equipment If you connect other equipment such as a digital audio player to the AUX terminal and play it back, the source automatically changes to AUX. By using an stereo mini plug cord (not supplied), you can connect equipment with analog audio output jacks such as a Digital Audio Player, or a TV, etc.
UX-G50[C].BOOK Page 15 Tuesday, March 7, 2006 11:17 PM English Daily Operations—Sound & Other Adjustments Adjusting the Volume Remote control You can adjust the volume level from level 0 (VOL-MIN) to level 31 (VOL-MAX). Remote control: Main unit: VOLUME SET/RESUME CANCEL CLOCK/ TIMER 4/1, 7,¡/¢ VOLUME DISPLAY PRESET UP, PRESET DOWN To drop the volume in a moment Remote ONLY To restore the volume, press again, or adjust the volume level. FADE MUTING DIMMER A.
English UX-G50[C].BOOK Page 16 Tuesday, March 7, 2006 11:17 PM Changing the Display Brightness —DIMMER Remote ONLY You can dim the display window. DIMMER DIM ON DIM OFF (Canceled) Setting the Clock Remote ONLY Without setting the built-in clock, you cannot use the Daily Timer (see page 21). • To exit from the clock setting, press CLOCK/TIMER as required. • To go back to the previous step, press CANCEL. 1 Activate the clock setting mode.
English UX-G50[C].BOOK Page 17 Tuesday, March 7, 2006 11:17 PM Turning Off the Power Automatically Remote ONLY To turn off the System after playback is over— Auto Standby This function works only when the source is CD. A.STANDBY A.STBY Canceled (No indication) When Auto Standby is in use, the A.STBY indicator lights on the display. When the disc playback stops, the A.STBY indicator starts flashing.
UX-G50[C].BOOK Page 18 Tuesday, March 7, 2006 11:17 PM English Advanced Disc Operations Programming the Playing Order— Remote control Remote ONLY Program Play You can arrange the playing order of the tracks (up to 32) before you start playback. • You cannot enjoy MP3 discs for program play. • You can repeat all the programmed tracks by pressing REPEAT. Numeric buttons CANCEL 1 Before starting playback, press PROGRAM.
English UX-G50[C].BOOK Page 19 Tuesday, March 7, 2006 11:17 PM To check the programmed contents While the PRGM indicator is shown on the display and before playback... In the programmed order. In the reverse order. Playing at Random—Random Play Remote ONLY You can play back all the tracks on the selected disc at random. • You can repeat the current disc by pressing REPEAT. 1 2 Select a disc by pressing CD 1 – CD 5. Press RANDOM.
Remote ONLY Playing Repeatedly—Repeat Play You can repeat playback. Main Unit ONLY You can lock the disc trays so that no one can eject the loaded discs. • This is possible while the System is on standby. For CD/MP3 (TRACK mode): REPEAT Prohibiting Disc Ejection—Child Lock 1 CD Canceled While the disc trays are closed... ALL (No indication) CD1 For MP3 (GROUP mode): REPEAT GR 1 Canceled CD ALL (No indication) (at the same time) • Only CD 1 0 can work for this function.
UX-G50[C].BOOK Page 21 Tuesday, March 7, 2006 11:17 PM English Timer Operations Setting the Timer Remote control STANDBY/ON CLOCK/ TIMER SET/RESUME CANCEL Remote ONLY Using Daily Timer, you can wake up with music, etc. • You can store three Daily Timer settings; however, you can activate only one of Daily Timers at the same time. • To exit from the timer setting, press CLOCK/TIMER as required. • To correct a misentry during the process, press CANCEL. You can return to the previous step.
2 Make the timer setting as you want. 1 Set the hour then the minute for on-time. PRESET UP English UX-G50[C].BOOK Page 22 Tuesday, March 7, 2006 11:17 PM To turn off the Timer after its setting is done Since Daily Timer is activated at the same time everyday, you may need to cancel it on some particular days. SET/RESUME 1 Select the Timer you want to cancel. PRESET DOWN CLOCK /TIMER 2 Set the hour then the minute for off-time in the same manner.
English UX-G50[C].BOOK Page 23 Tuesday, March 7, 2006 11:17 PM Additional Information Learning More about This System Daily Operations—Playback (see pages 9 to 14) Listening to the Radio: • If you store a new station into an occupied preset number, the previously stored station in that number will be erased. • When you unplug the AC power cord or if a power failure occurs, the preset stations will be erased in a few days. If this happens, preset the stations again.
Troubleshooting If you are having a problem with your System, check this list for a possible solution before calling for service. Disc Operations: The disc does not play. ] The disc is placed upside down. Place the disc with the label side up. General: The disc sound is discontinuous. Adjustments or settings are suddenly canceled before you finish. ] There is a time limit. Repeat the procedure again. Operations are disabled. The disc tray does not open or close.
Specifications Parts Index Amplifier section Refer to the pages to see how to use the buttons and controls. Output Power: 120 W per channel, min. RMS, driven into 6 Ω at 1 kHz with no more than 10% total harmonic distortion. Speakers Impedance: 6 Ω – 16 Ω Audio Input AUX Input sensitivity/Impedance: LEVEL1: 150 mV/47 kΩ LEVEL2: 500 mV/47 kΩ USB: USB Ver. 1.1 Remote control Tuner section FM tuning range: AM tuning range: 87.5 MHz – 108.
English UX-G50[C].
UX-G50[C].BOOK Page 1 Wednesday, March 8, 2006 12:24 AM Table des matières Introduction .....................................................2 Précautions ......................................................................2 Comment lire ce manuel .................................................3 Pour démarrer .................................................4 Français Étape 1: Déballage ..........................................................4 Étape 2: Préparation de la télécommande ..............
UX-G50[C].BOOK Page 2 Wednesday, March 8, 2006 12:24 AM Introduction Échauffement interne • Un ventilateur de refroidissement est monté sur le panneau arrière pour éviter tout échauffement interne de l’appareil principal (voir page G-2). Pour votre sécurité, respectez les points suivants attentivement: • Assurez-vous qu’il y a une ventilation suffisante autour de l’appareil principal. Une mauvaise ventilation peut entraîner un échauffement et endommager la chaîne.
UX-G50[C].BOOK Page 3 Wednesday, March 8, 2006 12:24 AM Français Comment lire ce manuel Pour rendre ce manuel aussi simple et facile à comprendre que possible, nous avons adopté les méthodes suivantes: • Les opérations des touches et des commandes sont expliquées dans le tableau ci-dessous.
UX-G50[C].BOOK Page 4 Wednesday, March 8, 2006 12:24 AM Pour démarrer accessoires. Étape 1: Déballage Après le déballage, vérifiez que tous les éléments suivants sont présents. Le nombre entre parenthèse indique la quantité de chaque pièce fournie. • Antenne FM (1) • Antenne cadre AM (1) • Télécommande (1) • Piles (2) Si quelque chose manquait, consultez votre revendeur immédiatement. Étape 2: Préparation de la télécommande Insérez les piles dans la télécommande en respectant les polarités (+ et –).
UX-G50[C].BOOK Page 5 Wednesday, March 8, 2006 12:24 AM Étape 3: Connexions Si vous avez besoin d’informations plus détaillées, voir page 7. Pour des informations plus détaillées sur la connexion de l’appareil externe, voir les pages 13 et 14. Français Les illustrations des prises d’entrée/sortie ci-dessous sont des exemples typiques. Quand vous connectez d’autres appareils, référez-vous aussi à leurs modes d’emploi car le nom des prises imprimé au dos de l’appareil peut varier.
Français UX-G50[C].BOOK Page 6 Wednesday, March 8, 2006 12:24 AM Antenne FM (fournie) Étendez-la de façon à obtenir la meilleure réception possible. Antenne cadre AM (fournie) Tournez-la jusqu’a que vous obteniez la meilleure réception possible.
UX-G50[C].BOOK Page 7 Wednesday, March 8, 2006 12:24 AM Pour assembler et connecter l’antenne cadre AM Pour assembler l’antenne cadre AM Pour connecter l’antenne cadre AM Assurez-vous de connecter le fil correctement. Français 1 Maintenez 2 Insérez 3 Relâchez • Si les fils de l’antenne cadre AM ou des cordons d’enceinte sont recouverts de vinyle, retirez-le pour mettre à nu l’âme de l’antenne en torsadant la partie en vinyle.
UX-G50[C].
UX-G50[C].BOOK Page 9 Wednesday, March 8, 2006 12:24 AM Opérations quotidiennes—Lecture 1 Mise sous tension de l’appareil. 1 Français Touches numériques SET/ RESUME MP3 MODE PRESET UP, PRESET DOWN 4/1, 7,¡/¢ 2 Touches de sélection de disque QP LINK FM MODE DIMMER 3 Le témoin STANDBY s’éteint sur l’appareil. • Sans appuyer sur STANDBY/ON , la chaîne se met sous tension quand vous appuyez sur une des touches de sélection de source à l’étape suivante. 2 Sélection de la source.
UX-G50[C].BOOK Page 10 Wednesday, March 8, 2006 12:24 AM Écoute de la radio Pour prérégler les stations Pour choisir la bande (FM ou AM) Vous pouvez préréglez 30 stations FM et 15 stations AM. 1 Accordez la station que vous souhaitez prérégler. 2 Mettez en service le mode d’entrée de numéro de AM Français FM Remote ONLY préréglage. SET/RESUME Pour accorder une station Quand FM ou AM est choisi... Télécommande: Appareil: 1 sec. 3 1 sec. DOWN UP La fréquence change sur l’affichage.
UX-G50[C].BOOK Page 11 Wednesday, March 8, 2006 12:24 AM Pour accorder une station préréglée Remote ONLY 1 Choisissez une bande (FM ou AM). Français FM AM 2 Choisissez un numéro de préréglage pour la station à Pour choisir le disque à reproduire CD 1 CD 2 CD 4 CD 5 CD 3 • La même opération peut être effectuée à l’aide des touches CD1 à CD5 sur la chaîne. Pour démarrer: Pour faire une pause: Pour arrêter: mémoriser.
UX-G50[C].BOOK Page 12 Wednesday, March 8, 2006 12:24 AM Reprendre la lecture d’un CD audio/MP3 Pour la lecture MP3... Si vous appuyez sur 7 pendant la lecture, l’endroit de la plage où vous avez arrêté la lecture est mémorisé par la chaîne. En appuyant sur CD 6, vous pouvez redémarrer la lecture à l’endroit où vous l’avez arrêtée. Selon le mode de lecture MP3, 4/1 / ¡/¢ ou les touches numériques fonctionnent pour la sélection de groupe ou de plage.
BASIC.FM Page 13 Thursday, April 27, 2006 1:05 AM Français Lecture à partir de l’ordinateur Cette chaîne est munie d’une prise USB sur le panneau avant de l’appareil principal. Vous pouvez connecter votre ordinateur à cette prise et écouter les sons reproduits par votre ordinateur. Pour connecter votre ordinateur pour la première fois, suivez la procédure ci-dessous. • Notez que vous ne pouvez envoyer aucun signal ou donnée sur votre ordinateur à partir de cette chaîne.
UX-G50[C].BOOK Page 14 Wednesday, March 8, 2006 12:24 AM Lecture à partir d’un autre appareil Quick Portable Link (QP Link) Connexion d’un autre appareil Si vous connectez un autre équipement tel qu’un lecteur audio numérique à la prise AUX et que vous commencez la lecture, la source passe automatiquement en AUX.
UX-G50[C].BOOK Page 15 Wednesday, March 8, 2006 12:24 AM Opérations quotidiennes—Ajustement du son et autres ajustements Ajustement du volume Télécommande Vous pouvez ajuster le niveau de volume du niveau 0 (VOLMIN) au niveau 31 (VOL-MAX). Télécommande: Appareil: Français VOLUME SET/RESUME CANCEL CLOCK/ TIMER 4/1, 7,¡/¢ VOLUME DISPLAY PRESET UP, PRESET DOWN Remote ONLY Pour couper le volume momentanément Pour rétablir le volume, appuyez de nouveau sur la touche ou ajuster le niveau de volume.
UX-G50[C].BOOK Page 16 Wednesday, March 8, 2006 12:24 AM Modification de la luminosité de l’affichage —DIMMER Remote ONLY Vous pouvez réduire la luminosité de la fenêtre d’affichage. DIMMER Français DIM ON DIM OFF (Annulé) Réglage de l’horloge Remote ONLY Sans régler l’horloge intégrée, vous ne pouvez pas utiliser la minuterie quotidienne (voir page 21). • Pour quitter le réglage de l’horloge, appuyez sur CLOCK/ TIMER autant de fois que nécessaire.
UX-G50[C].BOOK Page 17 Wednesday, March 8, 2006 12:24 AM Mise hors tension de l’appareil Français automatiquement Remote ONLY Pour mettre la chaîne hors tension une fois que la lecture est terminée—Mise en attente automatique Cette fonction ne marche que quand la source est CD. A.STANDBY A.STBY Annulé (Pas d’indication) Quand la mise en attente automatique est en service, l’indicateur A.STBY s’allume sur l’affichage. Quand la lecture du disque s’arrête, l’indicateur A.STBY clignote.
UX-G50[C].BOOK Page 18 Wednesday, March 8, 2006 12:24 AM Opérations avancées des disques Programmation de l’ordre de lecture— Lecture programmée Remote ONLY Vous pouvez arranger l’ordre de lecture des plages (32 maximum) avant de démarrer la lecture. • Vous ne pouvez pas utiliser la lecture programmée pour les disques MP3. • Vous pouvez répéter toutes les plages programmées en appuyant sur REPEAT. Touches numériques CANCEL 1 Avant de démarrer la lecture, appuyez sur PROGRAM.
UX-G50[C].BOOK Page 19 Wednesday, March 8, 2006 12:24 AM Pour vérifier le contenu programmé Pendant que l’indicateur PRGM apparaît sur l’affichage et avant la lecture... Français Dans l’ordre programmé. Dans l’ordre inverse. Pour modifier le programme Pendant que l’indicateur PRGM apparaît sur l’affichage et avant la lecture... Pour effacer la dernière étape: Lecture dans un ordre aléatoire— Lecture aléatoire Remote ONLY Vous pouvez reproduire toutes les plages sur disque choisi de façon aléatoire.
UX-G50[C].BOOK Page 20 Wednesday, March 8, 2006 12:24 AM Répétition de la lecture — Verrou parental Vous pouvez répéter la lecture. Vous pouvez verrouiller les plateaux à disque de façon que personne ne puisse éjecter le disque en place. • C’est possible quand la chaîne est en attente. Pour les CD/MP3 (Mode TRACK): REPEAT Main Unit ONLY 1 CD Annulé Quand les plateaux à disque sont fermés...
UX-G50[C].BOOK Page 21 Wednesday, March 8, 2006 12:24 AM Utilisation de la minuterie Réglage de la minuterie Français Télécommande STANDBY/ON CLOCK/ TIMER SET/RESUME CANCEL PRESET UP, PRESET DOWN Remote ONLY En utilisant la minuterie quotidienne, vous pouvez vous réveiller au son de musique, etc. • Vous pouvez mémoriser trois réglages de minuterie quotidienne; cependant, vous ne pouvez mettre en service qu’une seule de ces minuteries quotidiennes en même temps.
UX-G50[C].BOOK Page 22 Wednesday, March 8, 2006 12:24 AM Effectuez le réglage de la minuterie comme vous le souhaitez. 1 Réglez les heures puis les minutes de l’heure de mise en service. PRESET UP SET/RESUME Pour mettre la minuterie hors service une fois le réglage effectué Puisque la minuterie quotidienne se met en service à la même heure tous les jours, vous avez peut-être besoin de l’annuler certains jours. 1 Choisissez la minuterie que vous souhaitez annuler.
UX-G50[C].BOOK Page 23 Wednesday, March 8, 2006 12:24 AM Informations additionnelles Français Pour en savoir plus sur cette chaîne Opérations quotidiennes—Ajustement du son et autres ajustements (voir pages 15 à 17) Opérations quotidiennes—Lecture (voir pages 9 Ajustement du volume: à 14) • Assurez-vous de réduire le volume avant de connecter un casque ou de vous le mettre sur les oreilles.
ADDITONALINFO.fm Page 24 Thursday, April 27, 2006 1:10 AM Si vous des problèmes avec votre chaîne, cherchez d’abord une solution dans cette liste avant d’appeler un réparateur. Général: Les ajustements ou les réglages sont annulés soudainement avant la fin. ] Il y a un temps limite. Recommencez la procédure. L’appareil ne fonctionne pas. Radio: Trop de bruit pendant les émissions de radio (voir pages 4 à 7). ] Les connexions des antennes sont incorrectes ou lâches.
Spécifications Nomenclature Section de l’amplificateur Référez-vous aux pages indiquées pour savoir comment utiliser les touches et les commandes. Puissance de sortie: 120 W par canal, min. RMS, entraîné sur 6 Ω à 1 kHz avec moins de 10% de distorsion harmonique totale. Enceintes impédance: 6 Ω – 16 Ω Entrée audio AUX Sensibilité entrée/impédance: NIVEAU1:150 mV/47 kΩ NIVEAU2:500 mV/47 kΩ USB: USB Ver. 1.
UX-G50[C].
UX-G50[C].