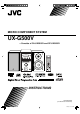
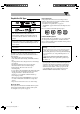
MICRO COMPONENT SYSTEM UX-G500V —Consists of CA-UXG500V and SP-UXG500V SUPER VIDEO INSTRUCTIONS GVT0249-006A [US/UB/UN/UG/UX/A/UH/UW] Cover_UX-G500V[U]f.
Warnings, Cautions and Others CAUTION The button in any position does not disconnect the mains line. Disconnect the mains plug to shut the power off completely (the STANDBY lamp goes off). The MAINS plug or an appliance coupler is used as the disconnect device, the disconnect device shall remain readily operable. • When the System is on standby, the STANDBY lamp lights red. • When the System is turned on, the STANDBY lamp goes off. The power can be remote controlled.
Caution: Proper Ventilation To avoid risk of electric shock and fire, and to prevent damage, locate the apparatus as follows: 1. Front: No obstructions and open spacing. 2. Sides/Top/ Back: No obstructions should be placed in the areas shown by the dimensions below. 3. Bottom: Place on the level surface. Maintain an adequate air path for ventilation by placing on a stand with a height of 10 cm or more. Front view Side view [European Union only] G-2 Safety_UX-G500V[U]3.
Introduction Thank you for purchasing a JVC product. Please read all instructions carefully before operation, to ensure your complete understanding and to obtain the best possible performance from the System. Precautions How to Read This Manual Installation • Button and control operations are explained in the table below.
Contents Connections ............................................................ 4 Display Indicators .................................................... 7 Daily Operations—Playback .................................... 8 Listening to the Radio ......................................................... 9 Playing Back a Disc/USB Mass Storage Class Device..... 10 Playing Back a Digital Audio Player ................................. 12 Daily Operations—Sound & Other Adjustments.........
Note on Region Code Playable Disc/File Types COMPACT DIGITAL VIDEO SUPER VIDEO DVD players and DVDs have their own Region Code numbers. This System can play back only DVDs with an appropriate Region Code number. • For details, see “Specifications” on page 45. • “RG ERROR” appears if DVD with other Region Code is loaded. Ex.: For Southeast Asia and Hong Kong region DIGITAL AUDIO • CD-R/-RW: Recorded in the Audio CD, Video CD, and SVCD formats.
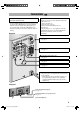
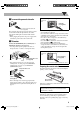
Connections Do not connect the power cord until all other connections have been made. Supplied accessories • Connect VIDEO OUT directly to the video input of your TV. Connecting VIDEO OUT to a TV via a VCR may interfere with your viewing when playing back copyprotected discs/files. Connecting VIDEO OUT to an integrated TV/VCR system may also interfere with your viewing. Rear panel INFO Check to be sure that you have all the following items.
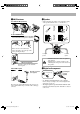
~ AM/FM antenna Ÿ Speakers To assemble the AM loop antenna • When connecting the speaker cords, match the polarity of the speaker terminals: red to (+) and black to (–) Press and hold To connect AM/FM antenna AM loop antenna (supplied) Turn it until the best reception is obtained. Insert Release Red If the cords are covered with vinyl, remove the vinyl to expose the tip of the cord by twisting the vinyl.
⁄ To connect the powered subwoofer When connecting a USB mass storage class device On the front panel USB cable (not supplied) From the powered subwoofer (not supplied) The connected subwoofer can reproduce the bass sounds recorded in front left and right channels, but cannot reproduce the LFE signals encoded in multi-channel software. • Before plugging the System to the power supply, make sure that the powered subwoofer is turned off.
Display Indicators The indications on the display tell you a lot of things while you are operating the System. Before operating the System, be familiar with when and how the indicators illuminate on the display. 1 USB indicator • Lights when “USB MEM” is selected as the source. 2 REC (recording) indicator • Lights when recording started. 3 Disc format indicators • SVCD: lights when playing back an SVCD. • VCD: lights when playing back a VCD. • CD: lights when playing back a CD.
Daily Operations—Playback In this manual, operations using the remote control are mainly explained; however, you can use the buttons and controls on the main unit if they have the same (or similar) name and marks. Remote control 1 Turn on the power. The STANDBY lamp on the main unit turns off. AUDIO/TV, the System is • Instead of pressing turned on by pressing one of the source buttons. 2 Select the source. • Playback automatically starts if the selected source is ready.
To select the band (FM or AM) How to select a number Examples: To select number 5, press 5. To select number 10, press 10. To select number 15, press 10, 1, then 5. To select number 30, press 10, 3, then 0. To select number 125, press 10, 10, 1, 2, then 5. To tune in to a station While FM or AM is selected... Listening to the Radio INFO To select the AM tuner interval spacing Main Unit ONLY Some countries space AM stations 9 kHz apart, and other countries use 10 kHz spacing.
3 4 Select a preset number for the station you store. • To select a number, see “How to select a number” on page 9. • You can also use the ¡ or 1 button. Playing Back a Disc/USB Mass Storage Class Device INFO Store the station. • When using an 8 cm disc, place it on the inner circle of the disc tray. To tune in to a preset station Remote ONLY 1 Select the band (FM or AM). 2 Select the preset number for the station you stored. • To select a number, see “How to select a number” on page 9.
If different types of playable files (audio/still picture/moving picture) are recorded • Select a file type to play (see the following and “FILE TYPE” in “PICTURE” menu on page 37). • You can use the control screen appears on the TV. (For still/moving picture files, it appears while playback is stopped.) For details, see page 32.
To locate an item directly Remote ONLY You can select a title/chapter/track/file directly and start playback. • For DVD Video, you can select a title before starting playback, while you can select a chapter after starting playback. • To select a number, see “How to select a number” on page 9. To move to the next or previous page of the current menu: Moves to the next page. Moves to the previous page. To return to the previous menu: (while holding...
Daily Operations—Sound & Other Adjustments To drop the volume in a moment Remote control Remote ONLY To restore the volume, press again, or adjust the volume level. Adjusting the Sound INFO To activate EALA surround mode (Canceled) As the number of the surround mode increases, the surround effect becomes stronger. To reinforce the heavy sound This boosts the low and high frequency sound—Sound Turbo II.
To adjust the tone Remote ONLY MY SOUND You can adjust the bass and treble level from –3 to +3. To adjust the bass SELECT START AND PRESS THE ENTER KEY TO START MEASUREMENT START Canceled EXIT To adjust the treble MY SOUND MEASURING... DATA 1 2 3 4 5 PRESS THE ENTER KEY IMMEDIATELY AFTER YOU HEAR THE TEST TONE. Canceled ENTER Creating a Soothing Tone for your Ear —MY SOUND EXIT Remote ONLY Each individual response to audio frequency differently.
To exit MY SOUND setup Presetting Automatic DVD Sound Increase Level To select the preset MY SOUND Remote ONLY DVD sound is sometimes recorded at a lower level than other discs and sources. You can set the increase level for the currently loaded DVD, so you do not have to adjust the volume when you change the source. • This only functions for DVD Video and DVD-VR. Remote ONLY • This does not function for DivX files. While “DVD/CD” is selected as the source...
Setting the ECO (ecology) Mode Changing the Picture Tone Setting the ECO mode allows you to reduce power consumption by turning the display off while on standby. While showing a playback picture on the TV, you can select a preset picture tone, or adjust it and store your own preference. Remote ONLY While the System is on standby... To select a preset picture tone 1 Changing the Color System and Scanning Mode INFO While playing, display VFP setting screen.
To adjust the picture tone 1 Select “USER1” or “USER2.” • Follow steps 1 and 2 explained in “To select a preset picture tone.” 2 Select a parameter you want to adjust. Setting the Clock INFO Without setting the built-in clock, you cannot use Daily Timers (see page 34). • To exit the clock settings, press CLOCK/TIMER as required. • To correct a mis-entry during the process, press CANCEL (while holding SHIFT). You can return to the previous step.
Turning Off the Power Automatically Sleep Timer Remote ONLY Auto Standby You can set the shut-off time so that you can go to bed without turning off the System yourself. 1 Specify the time (in minutes). • This only functions while playing a disc or USB mass storage class device. A.STBY indicator lights on the display. Canceled When the playback stops, the A.STBY indicator starts flashing.
Unique Video Disc/File Operations Remote control For DivX files/DVD Video: While playing back a chapter/ file containing several audio languages, you can select the language to listen to. For DVD-VR/SVCD/VCD: While playing back a track, you can select the audio channel to listen to. • For DVD Video/DVD-VR/SVCD/VCD: You can also select the audio track using the on-screen bar (see page 29). USB 6 DVD/CD 6 SLOW Remote ONLY Selecting the Audio Track INFO , ZOOM (while holding...
Selecting the Subtitle Language Remote ONLY For DivX files/DVD Video: While playing back a chapter/ file containing subtitles in different languages, you can select the subtitle language to display on the TV. For DVD-VR: While playing, you can turn the subtitles on or off. For SVCD: While playing, you can select the subtitles even if no subtitles are recorded on the disc. • For DVD Video/DVD-VR/SVCD: You can also select the subtitle language using the on-screen bar (see page 29). While playing a DVD-VR..
To replay the previous scenes (One-Touch Replay) Special Effect Playback INFO Still picture playback • This function is only used while playing DVD Video/ DVD-VR. To display the still picture: While playing... Disc Remote ONLY USB mass storage class device While playing.... The playback position moves back about 10 seconds before the current position (only within the same title for DVD Video). To resume normal playback, press either button again.
Advanced Playback Operations Remote control Programming the Playing Order —Program Play INFO Remote ONLY You can arrange the playing order of the chapters/tracks/ files (up to 99) before you start playback. • Program play cannot be used for the USB mass storage class device, DVD-VR and JPEG/MPEG-1/MPEG-2/ DivX files on a disc. • Resume does not work for Program Play. Number buttons 1 Before starting playback, activate Program Play.
To check the programmed contents Before or after playback... Playing at Random —Random Play Remote ONLY In the reverse order. You can play all chapters or tracks at random. • Random Play cannot be used for the USB mass storage class device, DVD-VR and JPEG/MPEG-1/MPEG-2/ DivX files on a disc. In the programmed order. 1 Before starting playback, activate Random Play. • You can also use 4 or ¢ to check the programmed contents. Canceled To modify the program Before or after playback...
Playing Repeatedly INFO Remote ONLY • For DVD Video/DVD-VR/SVCD/VCD/CD: You can also select the repeat mode using the on-screen bar (see pages 30 and 31). For DVD Video: While playing... (Canceled) For CD/SVCD/VCD: While playing (without PBC for SVCD/VCD) or before playback... REP CHAP * Repeats the current chapter. REP TTL Repeats the current title. REP TRK * Repeats the current track/file. REP GRP Repeats the current group. REP PG Repeats the current program.
Recording and Editing Operations INFO Before You Start Recording Remote control Number buttons • It may be unlawful to record or play back copyrighted material without the consent of the copyright owner. • The recording level is not affected by the volume. • Active Hyper Bass Pro, tone adjustment and/or sound mode effect (see page 13) does not affect recordings. • Random Play and Repeat Mode are canceled during recording mode. • You can record up to 999 tracks per group to the USB device.
• To give title directly to the new group, press TITLE/DEL (while holding SHIFT) when the cursor is pointing at “NEW GROUP.” • To change title for the existing groups (eg. “GROUP01,” “GROUP02,” etc.), see “Giving (Editing) Titles to Tracks or Groups” on the following. Both recording and playback start at the same time. When playback ends, recording also stop. • You cannot change the source while recording.
3 Select the track/group title editing mode. Remote ONLY Entering Titles 1 Select the character type. or (while holding...) (Canceled) 4 Upper case Confirm the selection. Numeric 2 Enter a character. • Several characters are assigned to one button. Press the button repeatedly until the desired character is displayed. • For available characters, refer to “Available Characters” below.
2 To move the character entry position Select a track/group you want to erase. To select a track: Move the entry position to the right. Move the entry position to the left. To select a group: To erase a character When the character entry position is on the character you want to erase... (while holding...) 3 Select the track/group title erase mode. (while holding...) To enter a space Select the space from “Symbols.” (See “Available Characters” on page 27.
On-Screen Operations VCD Remote control 1 2 VCD TIME TIME USB 6 DVD/CD 6 PROGRAM 1/3 1/3 ST OFF OFF 3 TIME 1:25:58 0:00:58 TRACK 233 TOTAL TITLE 14 CHAP 1/3 4 CD 1 2 RANDOM CD Number buttons TIME TIME OFF OFF 3 TIME 1:25:58 0:00:58 TRACK 233 TOTAL TITLE 14 CHAP 1/3 1/3 1/3 4 MPEG-1/MPEG-2/DivX files on a disc 1 2 FILE ON SCREEN MPEG-1/MPEG-2/DivX files in a USB mass storage class device 1 On-screen Bar Operations On-screen Bar Information DVD Video 2 Dolby D DVD-VIDEO 3/2.
To operate using the On-screen Bar To change the time information Ex.: Selecting a subtitle (French) for DVD Video You can change the time information on the on-screen bar and the display on the main unit. While “DVD/CD” is selected as the source... 1 1 Display the entire on-screen bar. While playing, display the entire on-screen bar. Dolby D DVD-VIDEO 3/2.1ch TIME OFF TIME OFF 2 3 Make sure TIME TIME 1:25:58 0:00:58 CHAP233 TOTAL TITLE TITLE 14 2CHAP 1/3 1/3 CHAP.
4 6 Select the repeat mode you want. A-B Repeats a desired portion (see below). TITLE* Repeats the current title. ALL Repeats the disc (not applicable for DVD) or programmed track. CHAPTER** Repeats the current chapter. TRACK** Repeats the current track. OFF Cancels Repeat Play. Finish the setting. A-B Repeat You can repeat playback of a desired portion by specifying the beginning (point A) and the ending (point B).
Ex.: When Original Program is selected. Chapter Search For DVD Video/DVD-VR: You can search for the chapter number to play. • This function is not available during Program Play and Random Play. 1 2 3 Select CHAP. . Date 03/12/08 09/12/08 18/12/08 20/12/08 25/12/08 28/12/08 Ch L L L L L L Time 12:15 23:05 08:17 07:47 19:38 14:20 3 4 Title La fleur The last struggle free flyer BOOM! Mr. Lawrence Satisfy U Display the pop-up window. TIME TIME Dolby D 3/2.
Control screen for MP3/WMA/WAV/JPEG/MPEG-1/ MPEG-2/DivX files The control screen appears on the TV when the System detects MP3/WMA/WAV/JPEG/MPEG-1/MPEG-2/DivX files on the loaded disc or connected USB mass storage class device. • For JPEG/MPEG-1/MPEG-2/DivX, it appears when playback is stopped. To move the highlight bar between group list and file list Moves the bar to the file list. Moves the bar to the group list. To select an item in the list Move the highlight bar to the desired item.
Daily Timer Operations Remote ONLY Setting the Daily Timer INFO Remote control Using Daily Timer, you can wake up with your favorite music. AUDIO You can store three Daily Timer settings; however, you can activate only one of the timers at any one time. • To exit the timer settings, press CLOCK/TIMER as required. • To correct a mis-entry during process, press CANCEL (while holding SHIFT). You can go back to the previous step.
1 Set the hour then the minute for on-time. 2 Set the hour then the minute for off-time. 3 Select the playback source—“TUNER-FM,” “TUNER-AM,” “DISC,” “AUDIO IN,” or “USB.” To turn on or off the Daily Timer Since Daily Timer is activated at the same time everyday, you may need to cancel it on some particular days. To cancel the Daily Timer 1 4 For “TUNER-FM” or “TUNER-AM”: Select a preset channel. For “DISC”: Select the title/group number, then the chapter/track/file number.
Setup Menu Operations INFO Remote ONLY Initial Settings Remote control You can change the settings of the System. • The Setup Menu can be used only when “DVD/CD” or “USB MEM’ is selected as the source. 1 Press SET UP while playback is stopped. LANGUAGE SET UP 2 3 4 5 MENU LANGUAGE ENGLISH AUDIO LANGUAGE ENGLISH SUBTITLE OFF ON SCREEN LANGUAGE ENGLISH Press 3 (or 2)to select the menu. Press ∞ (or 5) to move to select the item. Press ENTER/SET.
AUDIO PICTURE Menu Item Contents PICTURE SOURCE You can obtain optimal picture quality by selecting the source type of the video source. AUTO: Normally, select this option. The System recognizes the picture type (film or video source) of the current picture according to its information. FILM: For a film source picture. VIDEO: For a video source picture. SCREEN SAVER You can set the screen saver function (ON or OFF). If no operation is done for about 5 minutes, the TV screen dims.
Additional Information Learning More about This System Connections (see pages 4 to 6) • Make sure the antenna conductors do not touch any other terminals, connecting cords or the power cord. Also, keep the antennas away from metallic parts of the System, connecting cords, and the power cord. These could cause poor reception. • Use only speakers with the same speaker impedance as indicated by the speaker terminals on the rear of the System.
• For JPEG files playback... – It is recommended that you record a file at 640 x 480 resolution. (If a file has been recorded at a resolution of more than 640 x 480, it will take a long time to be shown.) – This System can play back JPEG files with the extension code <.jpg> or <.jpeg> (regardless of the letter case— upper/lower). – This System may not play back JPEG files properly if they are recorded from a device other than a digital camera. • For MPEG-1/MPEG-2 playback...
Recording and Editing Operations (see pages 25 to 28) • Do not vibrate the System while recording/editing tracks. Take care especially while “WAIT” is shown on the display. It may damage the recorded tracks in the System. Giving (Editing) Titles to Tracks or Groups: • When a track is recorded, the track title is given to the track automatically. When you give a title to the track, delete that title first, then enter your desired title.
Troubleshooting General Adjustments or settings are suddenly canceled before you finish. ] There is a time limit. Repeat procedure again. Operations are disabled. ] The built-in microprocessor may malfunction due to external electrical interference. Unplug the power cord and then plug it back in. Disc/USB mass storage class device Playback Operations The disc does not play. ] You have inserted a disc whose Region Code is not “2.” (“RG ERROR” appears on the display.) ] The disc is placed upside down.
Recording and Editing Operations Unable to record into the USB device. ] The capacity of the USB device is full. Erase some tracks. ] There have been 999 tracks or groups on the USB device you want to record into. Erase unwanted tracks. ] The USB device is write-protected. ] The USB device you connected is incompatible to this System. Display Messages for Recording or Editing Operations NODEVICE • No USB device is connected or the connected USB device is not compatible with this System.
Language Code List AA AB AF AM AR AS AY AZ BA BE BG BH BI BN BO BR CA CO CY DA DZ EL EO ET EU FA FI FJ FO FY GA Afar Abkhazian Afrikaans Ameharic Arabic Assamese Aymara Azerbaijani Bashkir Byelorussian Bulgarian Bihari Bislama Bengali, Bangla Tibetan Breton Catalan Corsican Welsh Danish Bhutani Greek Esperanto Estonian Basque Persian Finnish Fiji Faroese Frisian Irish GD GL GN GU HA HI HR HY IA IE IK IN IS IW JI JW KA KK KL KM KN KO KS KU KY LA LN LO LT LV MG Scots Gaelic Galician Guarani Gujarati Hausa
Optical Digital Out Signals DIGITAL AUDIO OUTPUT Playback disc/file DVD Video STREAM/PCM DOLBY DIGITAL/PCM PCM ONLY with 48 kHz, 16/20/24 bit Linear PCM 48 kHz, 16 bit Linear PCM* with 96 kHz, Linear PCM 48 kHz, 16 bit Linear PCM with Dolby Digital with DTS DVD-R/-RW in DVD-VR format Output Signals DTS bitstream with 48 kHz, 16/20/24 bit Linear PCM with Dolby Digital 48 kHz, 16 bit Linear PCM Dolby Digital bitstream 48 kHz, 16 bit Linear PCM 48 kHz, 16 bit Linear PCM* 48 kHz, 16 bit Linear PC
USB section Specifications Amplifier section—CA-UXG500V Output power: Audio input: Audio output: Digital output: 60 W (30 W + 30 W) at 4 Ω (10% THD) AUDIO IN: Stereo min. (∅ 3.
Parts Index Remote control Name AUDIO/TV 7 1, ¡ 4, ¢ 5, ∞, 2, 3, ENTER/SET (One Touch Replay) 3D P/HPS AHB PRO AUDIO IN AUDIO/MPX AUDIO/TV VOL +, – BASS/TREBLE C.VOICE CANCEL CLOCK/TIMER DISP/CHARA DVD/CD 6 DVD/AUDIO IN LEVEL ECO, DIMMER FADE MUTING FILE TYPE GROUP/TITLE SKIP MARK MENU/PL MY SOUND Number buttons, Character entry buttons ON SCREEN REPEAT RETURN SCAN MODE SET UP SHIFT SLEEP/A.STBY SLOW 9, ( S.
UX-G500V MICRO COMPONENT SYSTEM EN © 2008 Victor Company of Japan, Limited Rear_UX-G500V[U]1.