Cover[U].
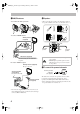
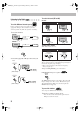
Safty[U].fm Page 1 Tuesday, February 7, 2006 1:40 PM Warnings, Cautions and Others CAUTION— (Standby/on) button! Disconnect the mains plug to shut the power off completely (the STANDBY lamp goes off). When installing the apparatus, ensure that the plug is easily accessible. The (Standby/on) button in any position does not disconnect the mains line. • When the System is on standby, the STANDBY lamp lights red. • When the System is turned on, the STANDBY lamp goes off. The power can be remote controlled.
UX-G60_TOC.fm Page 1 Wednesday, February 15, 2006 8:52 AM Introduction Precautions Contents Installation Introduction..............................................................1 • Install the System in a location with adequate ventilation to prevent internal heat build-up in the System. Playable Disc/File Types .................................................... 2 How to Read This Manual ..................................................
UX-G60[U]_2.book Page 2 Tuesday, February 7, 2006 5:16 PM Playable Disc/File Types * * * * * When playing a multi-channel encoded DVDs, the System properly converts these multi-channel signals into 2 channels, and emits the downmixed sound from the speakers. • To enjoy the powerful sound of these multi-channel encoded DVDs, connect a proper decoder or an amplifier with a proper built-in decoder to the OPTICAL DIGITAL OUT terminal on the rear.
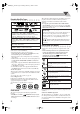
UX-G60[U]_2.book Page 3 Friday, February 10, 2006 9:53 AM Connections Do not connect the AC power cord until all other connections have been made. • Connect VIDEO OUT directly to the video input of your TV. Connecting VIDEO OUT to a TV via a VCR may interfere with your viewing when playing back a copyprotected disc. Connecting VIDEO OUT to an integrated TV/VCR system may also interfere with your viewing. Rear panel Supplied accessories Check to be sure that you have all the following items.
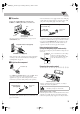
UX-G60[U]_2.book Page 4 Tuesday, February 7, 2006 5:16 PM ~ AM/FM antenna Ÿ Speakers To assemble the AM loop antenna • When connecting the speaker cords, match the polarity of the speaker terminals: red color to (+) and black color to (–). Press and hold To connect AM/FM antenna AM loop antenna (supplied) Insert Release Red From right speaker CAUTION: Black From left speaker FM antenna (supplied) Extend it so that you can obtain the best reception.
UX-G60[U]_2.book Page 5 Tuesday, February 7, 2006 5:16 PM ⁄ TV/monitor Connect the COMPONENT (for UX-G60 only), S-VIDEO, or VIDEO jacks which you want to use. When connecting a USB mass storage class device (for UX-G60 only) Red Blue Green • If an external device is not equipped with a stereo mini plug audio output, use a plug adaptor to convert the stereo mini plug to the corresponding plug of the audio output.
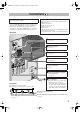
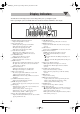
UX-G60[U]_2.book Page 6 Friday, February 10, 2006 9:52 AM Display Indicators The indications on the display tell you a lot of things while you are operating the System. Before operating the System, be familiar with when and how the indicator illuminates on the display. 1 2 3 4 5 6 7 8 QPLink S V C D V D MP3 WMA 3DPHONIC L-BANDIII AM FM S.TURBO AHB PRO USB MIC V.MASK C.VOICE PG PL ST MONO 12 3 PRGR. B.S.P. BONUS PRGM RND 1 TA NEWS INFO REC SLEEP A.
UX-G60[U]_2.book Page 7 Tuesday, February 7, 2006 6:02 PM Daily Operations—Playback In this manual, operations using the remote control are mainly explained; however, you can use the buttons and controls on the main unit if they have the same (or similar) name and marks. Remote control 1 Number buttons RETURN ENTER/SET TOP MENU/PG MENU/PL , , , 2 GROUP/TITLE 7 GROUP/TITLE SKIP 4,¢ FM/PLAY MODE 8 1,¡ QP LINK 3 SHIFT 1 Turn on the power. The STANDBY lamp on the main unit turns off.
UX-G60[U]_2.book Page 8 Tuesday, February 7, 2006 5:16 PM Listening to the Radio To select the band (FM or AM) INFO UX-G60 Remote control: To set the AM tuner interval spacing Main unit: Main Unit ONLY FM/AM /AUX Before operating the tuner, it is required to select the appropriate AM space interval used for your area. • This is possible only while the System is on standby. 1 Select the AM band.
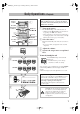
UX-G60[U]_2.book Page 9 Tuesday, February 14, 2006 10:38 AM 2 Activate the preset number entry mode. ENTER/SET Playing Back a Tape QP Link S V C D V D MP3 WMA 3DPHONIC L-BANDIII AM FM S.TURBO AHB PRO USB MIC V.MASK C.VOICE PG PL ST MONO 12 3 PRGR. B.S.P. BONUS PRGM RND 1 TA NEWS INFO REC SLEEP A.STBY REC 3 To insert a tape You can playback type I tapes. Push Insert Close • Finish the following process while the indication on the display is flashing. Select a preset number for the station you store.
UX-G60[U]_2.book Page 10 Tuesday, February 7, 2006 5:16 PM Playing Back a Disc/File On-screen guide icons INFO Before operating a disc/file, be familiar how a disc/file is recorded. • DVD Video comprises of “Titles” which includes “Chapters,” DVD Audio*/MP3/WMA*/MPEG-1/ MPEG-2/ASF*/DivX comprises of “Groups” which includes “Tracks,” JPEG comprises of “Groups” which includes “Files,” and CD/SVCD/VCD comprises of only “Tracks.
UX-G60[U]_2.book Page 11 Tuesday, February 7, 2006 5:16 PM • For DivX, each time you press the > or < button, you can skip to a scene for 30 seconds or 5 minutes depending on the DivX file. To move to the next or previous page of the current menu: GROUP/TITLE SKIP Moves to the next page. Moves to the previous page. To locate an item directly Remote ONLY To return to the previous menu: You can select a title/chapter/track directly and start playback.
UX-G60[U]_2.book Page 12 Friday, February 10, 2006 9:53 AM Daily Operations—Sound & Other Adjustments Adjusting the Volume Remote control DIMMER 3D PHONIC SCAN MODE (UX-G60) NTSC/PAL (UX-G55) CANCEL ENTER/SET You can adjust the volume level from VOL MIN to level 40 (VOL MAX). SLEEP Main unit: Remote control: A.STANDBY CLOCK/TIMER VFP DISPLAY VOLUME TV VOL AUDIO VOL , , , To drop the volume in a moment FADE MUTING Remote ONLY To restore the volume, press again, or adjust the volume level.
UX-G60[U]_2.book Page 13 Friday, February 17, 2006 6:15 PM To adjust the tone Presetting Automatic DVD Video Sound Remote ONLY Remote ONLY You can adjust the bass and treble level from –3 to +3. Increase Level To adjust the bass DVD Video sound is sometimes recorded at a lower level than other discs and sources. You can set the increase level for the currently loaded DVD Video, so you do not have to adjust the volume when you change the source.
UX-G60[U]_2.book Page 14 Tuesday, February 7, 2006 5:16 PM Remote ONLY Changing the Display Brightness Changing the Picture Tone You can dim the display window. DIMMER 1 DIM OFF DIM ON (Canceled) • While showing a playback picture on the TV, you can select a preset picture tone, or adjust it and store your own taste. To select a preset picture tone 1 While playing, display VFP setting screen. AUTO DIM NORMAL (while holding...) DIM ON AUTO DIM*1 Remote ONLY VFP Dims the display.
UX-G60[U]_2.book Page 15 Tuesday, February 7, 2006 5:16 PM 3 Adjust the parameter. Turning Off the Power Automatically TV CH ENTER/SET Remote ONLY Auto Standby TV CH A.STANDBY 4 Repeat steps 2 to 3 to adjust other parameters. To erase the screen, press VFP again while holding SHIFT. Setting the Clock Remote ONLY INFO Without setting the built-in clock, you cannot use Daily Timers (see page 33) and Sleep Timer.
UX-G60[U]_2.book Page 16 Tuesday, February 14, 2006 11:56 AM Unique DVD/VCD Operations The following discs/files can be played back only with UX-G60: • DVD Audio, WMA, ASF, DivX Ultra • Files in a USB mass storage class device Remote control Number buttons For DVD Video/DivX: While playing back a chapter containing audio languages, you can select the language to listen to. For DVD Audio*: While playing back a track containing audio channels, you can select the audio channel to listen to.
UX-G60[U]_2.book Page 17 Tuesday, February 7, 2006 5:16 PM Remote ONLY Selecting the Subtitle Language For DVD Video/DivX: While playing back a chapter containing subtitles in different languages, you can select the subtitle language to display on the TV. For DVD-VR: While playing, you can turn the subtitles on or off. For SVCD: While playing, you can select the subtitles even if no subtitles are recorded on the disc. • You can also select the subtitle language using the on-screen bar (see page 22).
UX-G60[U]_2.book Page 18 Tuesday, February 7, 2006 6:03 PM 2 Enter the key number. 1 2 3 4 5 6 7 8 9 Slow-motion playback • This does not function for MPEG-1/MPEG-2/ASF*1/DivX discs. ENTER/SET 1 While playing... Still picture playback starts. 0 3 Follow the interactive instructions shown on the screen. 2 Select slow motion speed. – SLOW + To cancel the key number entry, press 7. Forward slow motion starts. 1/32 Making Dialogues Clear—Clear Voice 1/32 C.VOICE C.
UX-G60[U]_2.book Page 19 Friday, February 10, 2006 9:53 AM Advanced Playback Operations The following discs/files can be played back only with UX-G60: • DVD Audio, WMA, ASF, DivX Ultra • Files in a USB mass storage class device Remote control Number buttons ZOOM TOP MENU/PG *USB MEMORY 3 DVD/CD 3 8 1 FM/PLAY MODE Programming the Playing Order Remote ONLY —Program Play INFO You can arrange the playing order of the chapters or tracks (up to 99) before you start playback.
UX-G60[U]_2.book Page 20 Friday, February 10, 2006 9:53 AM 3 Start playback. DVD/CD To skip a step: Playback starts in the order you have programmed. To pause: To stop: GROUP/TITLE SKIP Playing at Random—Random Play Remote ONLY You can play all chapters or tracks at random. • Random Play cannot be used for DVD-VR/JPEG/ MPEG-1/MPEG-2/ASF*1/DivX, some DVDs and files in the USB mass storage class device*1. 1 Before starting playback, activate Random Play.
UX-G60[U]_2.book Page 21 Monday, February 20, 2006 4:38 PM Playing Repeatedly Remote ONLY INFO • You can also select the repeat mode using the on-screen bar (see pages 23 and 24). • For MP3/WMA*1/JPEG/MPEG-1/MPEG-2/ASF*1/DivX, see page 27. Repeat Play • For DVD Video: While playing... REP CHAP * 2 REP TTL REP OFF (Canceled) REP ALL REP OFF (Canceled) REP TRK * You can repeat playback of a desired portion by specifying the beginning (point A) and the ending (point B).
UX-G60[U]_2.book Page 22 Tuesday, February 7, 2006 5:16 PM On-screen Disc Operations Remote ONLY INFO You can check the disc information and use some functions through the on-screen bar. On-screen bars DVD Video 1 2 Dolby D DVD-VIDEO 3/2.1ch TIME TIME OFF OFF 3 TIME 1:25:58 0:00:58 CHAP233 TOTAL TITLE TITLE 14 2CHAP 1/3 1/3 CHAP. 1/1/3 3 1/3 1/1 4 DVD Audio*1 1 2 DVD-AUDIO LPCM 2/0.0ch TIME OFF 3 GROUP 14 TRACK 23 TIME 1 Disc type 2 Playback information Indication Dolby D, LPCM 3/2.
UX-G60[U]_2.book Page 23 Tuesday, February 7, 2006 5:16 PM To operate using the On-screen Bar For detailed operations of the following functions, see also “To operate using the On-screen Bar” on the left. Ex.: Selecting a subtitle (French) for DVD Video While a disc is selected as the source... To change the time information 1 Display the entire on-screen bar. You can change the time information in the on-screen bar and the display window on the main unit.
UX-G60[U]_2.book Page 24 Tuesday, February 7, 2006 5:16 PM 4 Select the repeat mode you want. Time Search A-B Repeats a desired portion (see below). TITLE*1 Repeats the current title. GROUP Repeats the current group. ALL Repeats the disc (except for DVD) or program. 1 While playing (without PBC for SVCD/VCD), display CHAPTER*2 Repeats the current chapter. TRACK*2 Repeats the current track. OFF Cancels Repeat Play.
UX-G60[U]_2.book Page 25 Tuesday, February 7, 2006 5:16 PM 4 Enter the desired chapter/track number. 1 2 3 4 5 6 7 8 9 Control screen for DVD-R/-RW in DVD-VR format Examples: To select chapter/track 5, press 5. To select chapter/track 10, press 1, then 0. To select chapter/track 15, press 1, then 5. To select chapter/track 30, press 3, then 0. 0 • To correct a mis-entry, press the number buttons until the desired number shown in the pop-up window. 5 Finish the setting.
UX-G60[U]_2.book Page 26 Monday, February 20, 2006 5:16 PM Audio/Video File Operations The following discs/files can be played back only with UX-G60: • DVD Audio, WMA, ASF, DivX Ultra • Files in a USB mass storage class device Ex.: When the MP3 disc is loaded. REPEAT TRACK TIME : 00:00:14 1 Remote control 2 3 ZOOM 4 Group : 2 / 3 Spring Summer Fall Winter Track : 6 / 14 (Total 41) Cloudy.mp3 Fair.mp3 Fog.mp3 Hail.mp3 Indian summer.mp3 Rain.mp3 Shower.mp3 Snow.mp3 Thunder.mp3 Typhoon.mp3 Wind.
UX-G60[U]_2.book Page 27 Monday, February 20, 2006 5:16 PM To repeat MP3 or WMA*1 playback While playing or before playback... To start playback For JPEG: The selected track (still picture) is displayed until you change it. ENTER/SET REPEAT A-B REPEAT REP TRK*2 REP GRP REP OFF REP ALL (Canceled) DVD/CD USB DVD/CD USB * MEMORY 1 Press one of the buttons depending on the current source. Slide-show playback starts.
UX-G60[U]_2.book Page 28 Wednesday, February 8, 2006 7:59 AM Advanced Tape Operations IMPORTANT It may be unlawful to record or playback copyrighted material without the consent of the copyright owner. Remote control Recording on a Tape INFO You can use type I tapes for recording. • To play a tape, see page 9. 1 Insert a recordable cassette.
UX-G60[U]_2.book Page 29 Monday, February 20, 2006 2:21 PM Synchronized Recording INFO To record only your favorite track You can start and stop both playback and tape recording at the same time. You can specify tracks to be recorded on the tape while listening from a disc (except for DVD Video/DVD-VR) or USB mass storage class device*1. To record the entire tracks 1 Start playing a disc/file.
UX-G60[U]_2.book Page 30 Wednesday, February 8, 2006 7:59 AM Enjoying Karaoke NOTE This function is not available for UX-G55. Remote control IMPORTANT Always set MIC VOLUME to MIN when connecting or disconnecting the microphone. DO NOT keep the microphone connected while they are not in use.
UX-G60[U]_2.book Page 31 Tuesday, February 7, 2006 6:03 PM To adjust the Key (disc/file playback only) 4 Activate Vocal Masking. 1 Activate Key Control. ON SCREEN KARAOKE ON SCREEN KEYCON OFF KEYCON V-CANCEL KARAOKE OFF (Canceled) (while holding...) (Canceled) (while holding...) 5 Sing into the microphone. 6 Adjust the MIC VOLUME and VOLUME. 2 Adjust the Key VOLUME VOLUME KEY KEY To raise the key. To lower the key. (while holding...
UX-G60[U]_2.book Page 32 Tuesday, February 7, 2006 5:16 PM Reserving Karaoke Songs Remote ONLY 4 Start playback. DVD/CD —Karaoke Program Play Playback starts in the order you have programmed. You can determine the playback order of the titles or tracks on the disc player. You can program up to 12 steps. 1 Change the source to “DVD/CD.” To check the programmed contents During Karaoke Program Play... DVD/CD The Karaoke reserve screen appears. 2 Activate Karaoke Program Play.
UX-G60[U]_2.book Page 33 Tuesday, February 7, 2006 5:16 PM Timer Operations 1 Select one of the timer setting modes you want to set— DAILY 1 ON time, DAILY 2 ON time, DAILY 3 ON time, or REC TMR(Recording Timer) ON time. Remote control CLOCK/TIMER 6 AUDIO CLOCK/TIMER (while holding...
UX-G60[U]_2.book Page 34 Tuesday, February 7, 2006 5:16 PM 3 5 Select the volume level. • You can adjust the volume level (“1” to “40” and “VOL – –”). If you select “VOL – –,” the volume is set to the last level when the unit has been turned off. Once settings are completed, the Timer setting information appears in sequence. • This function is not available for VCD with PBC activated. For Recording Timer: 1 Set the hour then the minute for on-time. 2 Set the hour then the minute for off-time.
UX-G60[U]_2.book Page 35 Tuesday, February 7, 2006 5:16 PM Setup Menu Operations Initial settings Remote Control INFO Remote ONLY The Setup Menu cannot be activated during playback. 1 Press SET UP. LANGUAGE , , , SET UP MENU LANGUAGE ENGLISH AUDIO LANGUAGE ENGLISH SUBTITLE ENGLISH ON SCREEN LANGUAGE ENGLISH ENTER/SET 2 3 4 5 Press (or )to select the menu. Press (or ) to move to select the item. Press ENTER/SET. Press (or ) to select the options, then press ENTER/SET.
UX-G60[U]_2.book Page 36 Tuesday, February 7, 2006 5:16 PM AUDIO menu Item DIGITAL AUDIO OUTPUT DOWN MIX D. RANGE COMPRESSION Contents Set this item correctly when using the OPTICAL DIGITAL OUT terminal on the rear. PCM ONLY: When connecting to audio equipment which can decode only linear PCM signals. DOLBY DIGITAL/PCM: When connecting to a Dolby Digital decoder or an amplifier with a builtin Dolby Digital decoder. STREAM/PCM: When connecting to a DTS decoder or an amplifier with a built-in DTS decoder.
UX-G60[U]_2.book Page 37 Tuesday, February 7, 2006 5:16 PM Additional Information Learning More about This System Connections (see pages 3 to 5) • Make sure the antenna conductors do not touch any other terminals, connecting cords or the power cord. Also, keep the antennas away from metallic parts of the System, connecting cords and the AC power cord. This could cause poor reception. • Use only speakers with the same speaker impedance as indicated by the speaker terminals on the rear of the System.
UX-G60[U]_2.book Page 38 Tuesday, February 7, 2006 5:16 PM – This System can playback DivX files with the extension code <.divx> <.div> <.avi> (regardless of the letter case—upper/lower). – The System does not support GMC (Global Motion Compression). – The file encoded in the interlaced scanning mode may not be played back correctly. – You cannot use the following functions—One Touch Replay, Slow motion, A-B Repeat, Program Play, Random Play and on-screen operations.
UX-G60[U]_2.book Page 39 Monday, February 20, 2006 5:48 PM Daily Operations—Sound & Other Adjustments (see pages 12 to 15) Adjusting the Sound: • This function also affects the sound through the headphones. Changing the Scanning Mode (for UX-G60 only): • You cannot change the scanning mode to progressive in the following cases: – When your TV does not support the progressive video input. – When you have not connected your TV to the system using a component video cord.
UX-G60[U]_2.book Page 40 Tuesday, February 7, 2006 5:16 PM Setup Menu Operations (see pages 35 and 36) Cleaning the System General: • If the upper and lower parts of the menu are cut off, adjust the picture size control of the TV. LANGUAGE menu: • When the language you have selected for MENU LANGUAGE, AUDIO LANGUAGE, or SUBTITLE is not recorded on a disc, the original language is used as the initial language.
UX-G60[U]_2.book Page 41 Monday, February 20, 2006 5:49 PM Troubleshooting General: Adjustments or settings are suddenly canceled before you finish. ] There is a time limit. Repeat procedure again. Operations are disabled. ] The built-in microprocessor may malfunction due to external electrical interference. Unplug the AC power cord and then plug it back in. Unable to operate the System from the remote control. ] The path between the remote control and the remote sensor on the System is blocked.
UX-G60[U]_2.
UX-G60[U]_2.book Page 43 Tuesday, February 7, 2006 6:04 PM OPTICAL DIGITAL OUT Signals DIGITAL AUDIO OUTPUT Playback disc/file DVD Video Output Signals STREAM/PCM with 96 kHz, Linear PCM 48 kHz, 16 bit Linear PCM with Dolby Digital Dolby Digital bitstream DTS bitstream DVD Audio*1 with 48/96/192 kHz, 16/20/24 bit Linear PCM with 44.1/88.2/176.4 kHz, 16/20/24 bit Linear PCM 48 kHz, 16 bit Linear PCM 48 kHz, 16 bit Linear PCM 48 kHz, 16 bit Linear PCM 44.
UX-G60[U]_2.
UX-G60[U]_2.book Page 45 Tuesday, February 7, 2006 5:16 PM Parts Index Remote control Button AUDIO TV 7 ¡,1 ¢,4 8 g h t u , y , , , , ENTER/SET q (One-Touch Replay) n 3D PHONIC 5 AHB PRO ; ANGLE 7 AUDIO/MPX o AUDIO VOL + , – Q AUX (UX-G55) b A.STANDBY f BASS/TREBLE E C.VOICE 4 CANCEL 9 CLOCK/TIMER j DIMMER 3 DISPLAY / DVD/AUX LEVEL a DVD/CD 3 r ECHO (UX-G60)* x FADE MUTING W FM/PLAY MODE .
Cover[U].fm Page 2 Tuesday, February 7, 2006 1:40 PM Mains (AC) Line Instruction (not applicable for Europe, U.S.A., Canada, Australia, and U.K.) UX-G60/UX-G55 MICRO COMPONENT SYSTEM VOLTAGE SELECTOR E VOLTAGOR SELECT 110V 220V 110V 127V 220V 230V V -240 127V 230V -240V The illustration above is UX-G60 (except for Hong Kong region and Australia).