MICRO COMPONENT SYSTEM UX-H350 –Consists of CA-UXH350 and SP-UXH350 INSTRUCTIONS LVT1193-012A [UJ] UX-H350[UJ]cover2.
Warnings, Cautions and Others CAUTION— (STANDBY/ON) button! Disconnect the mains plug to shut the power off completely (all lamps and indications go off). The (STANDBY/ON) button in any position does not disconnect the mains line. • When the unit is on standby, the STANDBY lamp lights red. • When the unit is turned on, the STANDBY lamp goes off. The power can be remote controlled. CAUTION To reduce the risk of electrical shocks, fire, etc.: 1. Do not remove screws, covers or cabinet. 2.
IMPORTANT FOR LASER PRODUCTS 1. CLASS 1 LASER PRODUCT 2. CAUTION: Do not open the top cover. There are no user serviceable parts inside the unit; leave all servicing to qualified service personnel. 3. CAUTION: Visible and invisible laser radiation when open and interlock failed or defeated. Avoid direct exposure to beam. 4. REPRODUCTION OF LABEL: CAUTION LABEL, PLACED INSIDE THE UNIT. CAUTION - INVISIBLE LASER RADIATION WHEN OPEN AND INTERLOCKS DEFEATED. AVOID EXPOSURE TO BEAM.
Introduction We would like to thank you for purchasing one of our JVC products. Before operating this unit, read this manual carefully and thoroughly to obtain the best possible performance from your unit, and retain this manual for future reference. About This Manual This manual is organized as follows: • This manual mainly explains operations using the buttons on the remote control.
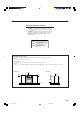
Contents Location of the Buttons and Controls ............................. 3 Main Unit .................................................................................. 3 Remote Control ......................................................................... 5 Getting Started .................................................................. 6 Unpacking ................................................................................. Connecting AM and FM Antennas ........................................
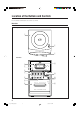
Location of the Buttons and Controls Become familiar with the buttons and controls on your unit. Main Unit Top view 1 COMPACT DIGITAL AUDIO OPEN 2 D A I L Y T I M E R / S N O O Z E 3 Front view q 4 COMPACT DIGITAL AUDIO 5 STANDBY VOLUME 6 — CD 7 TAPE FM/AM + AUX w #/8 PHONES DOWN 4 UP ¢ 7 AUX REC 8 e r 9 p PUSH OPEN A U T O R E V E R S E t MICRO COMPONENT SYSTEM 3 01-05_UX-H350[UJ]2.
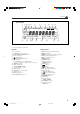
Continued Display window 1 234 5 6 7 8 9 REC SLEEP SNOOZE MONO ST p q MP3 SOUND BASS REC ON OFF DAILY 123 MHz kHz ALL GR. PRGM RANDOM e r w ty u i TOTAL REMAIN A.STANDBY o ; a See pages in parentheses for details.
Remote Control See pages in parentheses for details. w STANDBY/ON DISPLAY FM MODE A.
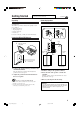
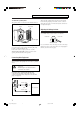
Getting Started Do not connect the AC power cord until all other connections have been made. Continued Unpacking Connecting Speakers After unpacking, check to be sure that you have all the following items. The number in parentheses indicates the quantity of each piece supplied. • AM loop antenna (1) • AC plug adaptor (1) • Remote control (1) • Batteries (2) If any item is missing, consult your dealer immediately. You can connect the speakers using the speaker cords.
Do not connect the AC power cord until all other connections have been made. To remove the speaker grilles The speaker grilles are removable as the illustration below. When the audio equipment has pin jacks for audio output: Be sure that the pin plugs of the audio cords are colored— white plugs and jacks are for left audio signals, and red ones for right audio signals.
Putting the Batteries into the Remote Control Insert the batteries—AAA/UM-4/R03—into the remote control by matching the polarity (+ and –) on the batteries with the + and – marking on the battery compartment. When the remote control can no longer operate the unit, replace both batteries at the same time. • DO NOT use an old battery together with a new one. • DO NOT use different types of batteries together. • DO NOT expose batteries to heat or flame.
Common Operations Setting the Clock To adjust the clock Before operating the unit any further, first set the unit’s clock. When you plug in the power cord, “0:00” starts flashing on the display. You can set the clock when the unit is either turned on or in standby mode. On the remote control ONLY: 1 Press CLOCK/TIMER repeatedly CLOCK /TIMER to show the current time indication. The hour indication starts flashing. 2 Repeat steps 2 and 3 on the left column.
Selecting the Source Selecting the Sound Modes To select the source, press CD 6, TAPE 2 3, FM/AM, or AUX. • When you select CD as the source, playback starts automatically. To operate the CD player, see pages 11 to 14. To operate the tape deck, see page 15. To operate the tuner (FM or AM), see pages 16 and 17. To record on a tape, see pages 18 and 19. To use an external equipment, see page 17. You can select one of the 4 sound modes. • This function also affects the sound from headphones.
Playing Back Discs This unit has been designed to play back the following discs—CD, CD-R, and CD-RW. You can play back the discs containing the tracks in music CD format or MP3 files in ISO 9660 format. • In this instruction, we call a disc recorded MP3 files “MP3 disc,” and “file” is also referred to as “track.” When playing CD-Rs or CD-RWs • Before playing CD-Rs or CD-RWs, read their instructions or cautions carefully.
Continued To remove the disc, press ) OPEN on the unit, then take out the disc by holding it at the edges while pressing the unit’s pivot lightly. • If the disc cannot be read correctly (because it is scratched, for example) or an unreadable CD-R or CD-RW is inserted Playback will not start. • If no disc is inserted “NO DISC” appears on the display. DO NOT open the disc cover by hand as it will be damaged. Basic Disc Operations While playing a disc, you can do the following operations.
4 Repeat step 3 to program other tracks you want. 5 Press CD 3/8. CD The tracks are played in the order you have programed. Repeating Tracks—Repeat Play You can have all the tracks, the program or individual track currently playing, repeat as many times as you like. 3/8 On the remote control ONLY: Press REPEAT repeatedly before or during playback.
Playing at Random—Random Play Displaying the Remaining Time during Playback You can play the tracks at random. You can display the remaining time of the current track/disc and the elapsed time of the current track/disc during playing. On the remote control ONLY: RANDOM Press RANDOM. The RANDOM indicator lights up on the display. On the remote control ONLY: Press REMAIN repeatedly. REMAIN When playing back audio CD: RANDOM To exit from Random Play, press 7 or RANDOM. The RANDOM indicator goes off.
Playing Back Tapes Playing Back a Tape You can play back type I tapes only. If no cassette is inserted when you press TAPE ¤ ‹ “NO TAPE” appears on the display. 1 Press PUSH OPEN. To stop playing, press 7. The cassette holder opens. UP PUSH OPEN PRESET GROUP DOWN PRESET GROUP DOWN 4 2 Put a cassette in with the exposed part of the tape down. To fast-wind to the left or to the right, press ¢ or 4 (or UP ¢ or DOWN 4 on the unit).
Listening to FM and AM Broadcasts Continued To stop during searching, press ¢ or 4 (or UP ¢ or DOWN 4 on the unit). Setting the Tuner Interval Spacing You can only change the FM or AM tuner interval spacing while tuning in to a FM or AM station. When you repeatedly press ¢ or 4 (or UP ¢ or DOWN 4 on the unit) The frequency changes step by step. On the unit ONLY: 1 Press FM/AM to select either “FM” FM/AM or “AM.
3 Press PRESET GROUP Tuning in to a Preset Station UP or PRESET GROUP to select a preset number, then press SET. PRESET GROUP On the remote control ONLY: DOWN PRESET GROUP 1 Press FM/AM to select either “FM” The preset station is stored in memory. • Even if you do not press SET, the station will automatically be stored on the selected preset number 5 seconds later. or “AM.” The unit automatically turns on and tunes in to the previously received station—either FM or AM.
Recording Continued IMPORTANT: • It may be unlawful to record or play back copyrighted material without the consent of the copyright owner. • The recording level is automatically set correctly, so it is not affected by the other sound settings. Thus, during recording you can adjust the sound you are actually listening to without affecting the recording level. • If recordings you have made have excessive noise or static, the unit may be too close to a TV. Increase the distance between the TV and the unit.
Recording Discs —Disc Synchronized Recording To stop recording for a moment, press REC. Both the CD playback and tape recording are paused. To resume recording, press TAPE ¤ ‹. REC You can start disc play and recording at the same time. On the unit ONLY: 1 Put a recordable cassette in with the exposed To stop recording, press 7. The recording stops and the CD playback is paused. DOWN 4 7 UP ¢ part of the tape down. • See also page 15.
Using the Timers There are four timers available—Daily Timer, Recording Timer, Snooze Timer, and Sleep Timer. • Before using these timers, make sure the built-in clock is set correctly (see page 9). Using Daily Timer and Recording Timer You can set the timer whether the unit is on or off. How the Timer actually works When the on-time comes, the unit automatically turns on (the [timer] indicator flashes and continues flashing while the timer is operating).
3 For the Recording Timer ONLY: Set the off-time you want the unit to turn off. REC OFF To deactivate the timer, press and hold DAILY TIMER/SNOOZE. • Each time you press and hold the button, the timer setting changes as follows: DAILY 1 DAILY 2 Canceled (1) Press UP or DOWN to set the hour, then press SET. (2) Press UP or DOWN to set the minute, then press SET. If you want to change the time setting, press CANCEL. • The Recording Timer is activated. The (timer) and REC indicators light up.
Using Sleep Timer With Sleep Timer, you can fall asleep to your favorite music or radio program. • You can set Sleep Timer only when the unit is turned on. • You can also turn off the unit automatically by using Auto Standby. (See page 9.) How the Sleep Timer actually works When you set the Sleep Timer after the Daily Timer starts playing the selected source The unit turns off with either timer having an earlier shut-off time.
Maintenance To get the best performance of the unit, keep your discs, tapes and mechanism clean. General Notes Handling cassette tapes In general, you will have the best performance by keeping your discs, tapes and the mechanism clean. • Store discs and tapes in their cases, and keep them in cabinets or on shelves. • If the tape is loose in its cassette, take up the slack by inserting a pencil in one of the reels and rotating. • If the tape is loose, it may get stretched, cut, or caught in the cassette.
Troubleshooting If you are having a problem with your unit, check this list for a possible solution before calling for service. If you cannot solve the problem from the hints given here, or the unit has been physically damaged, call a qualified person, such as your dealer for service. Symptom Possible Cause Power does not come on. Action The power cord is not connected to an AC outlet. • Connections are incorrect or loose. No sound is heard. • A pair of headphones is connected.
Mains (AC) Line Instruction (not applicable for Europe, U.S.A., Canada, Australia, and U.K.) UX-H350 AC 220-240V AC 110-127V MICRO COMPONENT SYSTEM VOLTAGE SELECTOR IMPORTANT for mains (AC) line BEFORE PLUGGING IN, do check that your mains (AC) line voltage corresponds with the position of the voltage selector switch provided on the outside of this equipment and, if different, reset the voltage selector switch, to prevent from a damage or risk of fire/ electric shock.