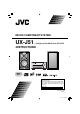
MICRO COMPONENT SYSTEM UX-J51 — Consists of CA-UXJ51 and SP-UXJ51 INSTRUCTIONS TM For customer use: Enter below the Model No. and Serial No. which are located either on the rear, bottom or side of the cabinet. Retain this information for future reference. Model No. Serial No. GVT0294-006B [UN/J] UX-J51_EN.indb 1 10.8.
Warnings, Cautions and Others For U.S.A. and Canada, please refer to the attached sheet “Warnings, Cautions, and Others” and “Important Safety Instructions” before using the System. CAUTION The button in any position does not disconnect the mains line. Disconnect the mains plug to shut the power off completely (the STANDBY lamp goes off ). The MAINS plug or an appliance coupler is used as the disconnect device, the disconnect device shall remain readily operable.
[European Union Only] Caution: Proper Ventilation To avoid risk of electric shock and fire, and to prevent damage, locate the apparatus as follows: 1. Front: No obstructions and open spacing. 2. Sides/Top/ Back: No obstructions should be placed in the areas indicated by the dimensions in the illustration. 3. Bottom: Place on the level surface. Maintain an adequate air path for ventilation by placing on a stand with a height of 10 cm (3-15/16 in.) or more.
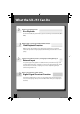
What the UX-J51 Can Do Various recording formats Disc Playback As well as music CDs, the system will also play discs containing recorded audio files (MP3/ WMA). High-quality sound reproduction of iPod music iPod Playback Function With this system, the amplifier receives digital signals of iPod music as input. This realizes the reproduction of high-quality sound minimizing the deterioration of sound quality.
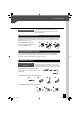
Contents Before Using the System Be sure to read these precautions. Warnings, Cautions and Others ………… 2 Accessories ……………………………… 6 Installing the System …………………… 7 Connecting the System ………………… 8 Component Names and Functions … 12 How to Use This Manual ……………… 16 Basic Operation ……………………… 18 Important Information ……………… 20 To ensure safety, read the items by this mark carefully. Procedures by Input Source P.23 This chapter explains how to connect and use the system with the different input sources.
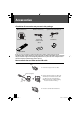
Accessories Check that all accessories are present in the package AM loop antenna (1) FM indoor antenna (1) Remote control (1) Batteries for Remote control (R03: 2) Speaker cords (2 m [6.56 ft.]: 2) Core filter (1) RM-SUXJ51U If any accessories are missing, or if the unit is damaged or fails to operate, notify your dealer immediately. If the unit was shipped to you directly, notify your shipper immediately.
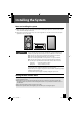
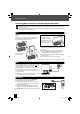
Installing the System Notes on installing the system l Always install the system on a flat, stable surface. When installing the system on a stand of some sort, be sure to check the strength of the stand. l The magnets used in the speakers may cause color irregularities on TV or PC screens. Do not set up the speakers too close to a TV or PC. Left speaker CAUTION Main unit Right speaker Observe the following cautions when installing the system.
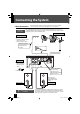
Connecting the System Main Connections Caution for Connection Ensure that all the cords are securely connected. Loose or incomplete connections may result in noise interference or no sound at all. Do not plug the AC power cord into an AC wall outlet until all the connections are completed. Before disconnecting any cords or cables, always turn the system off and unplug the power cord from AC wall outlet. AM loop antenna FM indoor antenna Push into the slot. 1Connect to [FM75Ω].
Connecting the System Microcomputer malfunctions If the system is connected correctly and still does not operate normally or shows display errors, reset the microcomputer. (P.67) Connecting the AM loop antenna The antenna supplied with the system is for indoor use. Place it as far as possible away from the main unit, your TV set, the speaker cords and the power cord and point it in the direction that gives the best reception.
Connecting the System Connecting Other Accessories (Commercially Available Units) l When connecting a related system component, read the instruction manual that comes with the component too. l Ensure that all the cords are securely connected. Loose or incomplete connections may result in noise interference or no sound at all. iPod Attach the Dock adapter supplied with iPod to the system.
Connecting the System AUX IN Connect the audio OUT terminals on components such as cassette decks to the [AUX PLAY IN] terminal on the rear panel of the main unit. l [AUX PLAY IN] inputs an analog audio signal. Cassette deck, etc. R R L SUB WOOFER PRE OUT L REC OUT SPEAKERS R D.AUDIO IN DIGITAL IN PLAY IN L DIGITAL OUT PLAY IN Audio OUT AUX REC OUT Connect the audio IN terminals on components such as cassette decks to the [AUX REC OUT] terminal on the rear panel of the main unit.
Component Names and Functions Main unit Cover Open the cover before attaching iPod or USB device. USB USB iPod connector (P.10, 34) USB port (P.10, 36) Power (P.19) Turns the system on or off (Standby). STANDBY/TIMER indicator Red: Lights in normal Standby mode. Orange: Lights in Timer Standby mode. LCD tray open/close (P.19, 24) E/BAND (P.19) F/TUNING MODE (P.31) INPUT SELECTOR (P.19) G/I, J/H (P.31, 35, 37) CD tray (P.19, 24) Dial lighting (P.59) VOLUME (P.18 ) Display (P.13) PHONES jack (P.
Component Names and Functions Displays shown in this manual may differ from the actual displays. Display AUTO Lights during auto tuning. Turns off during manual tuning. (P.31) TUNED Lights when you are tuned to the radio station. (P.31) ST. Lights when you are receiving the stereo broadcast. (P.31) Lights in folder playback mode. (P.37) Lights in program playback mode. (P.28) Displayed while the sleep timer is set. (P.54) Lights in random playback mode. (P.
Component Names and Functions Remote control Sets the timer. (P.54-58) Remote control keys with the same names as keys on the main unit have the same functions as the main unit keys. Turns the unit on or off (Standby). (P.19, 58) Turns the main unit on when the [STANDBY/TIMER] indicator on the main unit is lit. CD tray open/close (P.19, 24) Selects input source. (P.38, 39) Selects folders or albums. (P.35, 37) Display settings. (P.59) Numbers Selects tracks or radio stations. (P.
Component Names and Functions Using the remote control After plugging the main unit into an AC wall outlet, press the power [ ] key on the remote control unit to turn the system on. After the system powers up, press the key for the function you want to use. Point the remote control at the remote sensor when using it. Approx. 6m (19.68 ft.
How to Use This Manual Operation procedure While this system can be controlled from either the remote control or the main unit, the explanations in this manual primarily describe operation procedures using the remote control. Remote control keys used in the procedure Display shown during or after an operation l The displays shown in this instruction manual may differ from the actual displays. 16 UX-J51_EN.indb 16 10.8.
How to Use This Manual Explanations of main unit procedures Explanations of remote control procedures Operation icons Explains the procedure for CDs. Explains the procedure for the radio. Related functions that may also be helpful Explains the procedures for iPods. Explains the procedures for USB devices. Explains the procedures for external components. Explains the procedure for digital audio players. Explains how to set the sound quality. Explains how to set up component units.
Basic Operation This section describes some basic procedures for using the system, such as tuning the radio and playing audio from a CD, iPod, USB device, a digital audio player. Preparations Check the connections. (P.8-11) Have the remote control ready. (P.15) 2 2 1 1 3 3 n Adjusting the volume level Lowers the volume Increases the volume Increases the volume Lowers the volume n Mute l Press this key again to unmute the sound. 18 UX-J51_EN.indb 18 10.8.
Basic Operation 1 Turn the system on (off ). l On remote control [D.AUDIO], [TUNER/BAND], [CDE], [iPodE], [USBE], [D-IN], [AUX] key also turn on the power. ] key when the l Pressing the power [ system is on turns it off (Standby mode). 2 Insert a disc (when listening to a CD). To use other components for playback, proceed to step 3. Open the tray. Insert a CD. Close the tray. Insert a CD with the label side upwards. Press the [L] key. 3 Start playback.
Important Information Supported Media Media USB flash memory USB USB mass storage class compliant digital audio player Commercially available music CDs CD CD-R/CD-RW discs recorded in CD-DA format MP3/WMA files recorded on CD-R/CDRW discs Icon in this manual Explanation l You cannot connect a computer and JVC Everio camcorder to the USB terminals of the System. l Electrostatic shock at connecting a USB device may cause abnormal playback of the device.
Important Information Supported Audio Files On this system, you can play the audio file types listed below (MP3, WMA and AAC). MP3 files (CD/USB) File format: MPEG 1 Audio Layer 3 MPEG 2 Audio Layer 3 MPEG 2.5 (MPEG 2 Audio Layer 3 Lower sampling rate) Extension: .mp3 Sampling frequency MPEG 1 Audio Layer 3: 32 / 44.1 / 48 kHz MPEG 2 Audio Layer 3: 16 / 22.05 / 24 kHz MPEG 2.5: 8 / 11.025 / 12 kHz Bit rate MPEG 1 Audio Layer 3: 32 – 320 kbps MPEG 2 Audio Layer 3: 8 – 160 kbps MPEG 2.
Important Information l “Made for iPod” means that an electronic accessory has been designed to connect specifically to iPod and has been certified by the developer to meet Apple performance standards. l Apple is not responsible for the operation of this device or its compliance with safety and regulatory standards. l iPod is a trademark of Apple Inc., registered in the U.S. and other countries. l Windows Media is a trademark of Microsoft Corporation registered in the U.S. and other countries.
Procedures by Input Source This chapter explains the operation procedures for each input source. For information on the sound quality settings and component settings regardless of the input source, see “Audio Settings” (P.43) and “Component Settings” (P.53). If an error is displayed or a problem arises, see “Maintenance” (P.63).
CD This section explains how to play a CD. As well as normal playback, you can use folder playback, random playback, repeat playback and program playback. Playing Back from a CD Insert and play the CD. l If a disc is already inserted, simply press the [CDE] key to turn the system on and begin playback. 1 Press the [L] key to open the CD tray and then insert the CD. l Insert the disc that the labeled side faces upwards and the disc sits snugly in the tray. 2 Press the [L] key to close the CD tray.
Related Information CD l Audio Settings R P.43 onwards n Operations during CD playback Specifying a track number To play the 3rd track, press the [3] key. To play the 17th track, press the [ 10], [1], and then [7] key. To play the 123rd track, press the [ 10], [ 10], [1], [2], and then [3] key. Switching display contents Press the [DISPLAY] key. The mode changes as shown below each time you press the key.
CD n Playback sequence for folders and track files MP3/WMA When you play a disc containing recorded audio files, the track files on the disc are played sequentially beginning with the files in the ROOT folder, as shown in the figure. Sample folder configuration Folder name ROOT Track file name F0_1.mp3 F0_2.mp3 F0_3.mp3 Folder name Folder 2 Track file name F1_1.mp3 F1_2.mp3 Folder name Track file name Folder 3 F2_1.mp3 Folder name Track file name Folder 4 F3_1.mp3 F3_2.
CD RPage •l Supported XX Audio Files R P.21 Related Related RPage AudioXX Settings R P.43 onwards Information • l Information CD Random Playback Mode This mode plays the tracks in the CD or in a folder in a random sequence. l If the CD is already playing, press the [F] key to stop playback. 1 Press the [P.MODE] key to select the random playback mode. l The mode changes as shown below each time you press the key.
CD CD Program Playback Mode You can select up to 50 tracks and play them in the order you like. l Press the [CDE] key to switch the input source to CD. Playback begins when you switch the input source, so press the [F] key to stop playback. l If the CD is already playing, press the [F] key to stop playback. 1 Press the [P.MODE] key to select program playback mode. l The mode changes as shown below each time you press the key.
CD RPage •l CD Repeat XX Playback ModeR P.27 Related Related Information • RPage XX Information 3 Use the number keys to select the track or file you want to listen to. CD When Track 10 selected as program track 1. 4 MP3/WMA When file number 5 is selected. To select two or more tracks, repeat steps 3 (or steps 2 and 3 in case of MP3/WMA). l You can select up to 50 tracks for playback. If you attempt to select more tracks, the message “PGM FULL” appears on the display.
Receiving Radio Broadcasts This section explains how to listen to the FM/AM radio and set radio stations. Listening to FM/AM Radio l Simply pressing the [TUNER/BAND] key turns on the system and allows you to listen to the radio. 1 Press the [TUNER/BAND] key to select “FM” or “AM”. 2 Select a station. Each time you press the key, the band switches between “FM” and “AM”. Choosing from preset stations (Preset Call) Select a preset station. l See P.32 and P.33 for more information on presets.
Receiving Radio Broadcasts Related Information l Presetting Stations Automatically (AUTO MEMORY) R P.32 l Presetting Stations Manually (Manual Preset) R P.33 l Audio Settings R P.43 onwards Choosing from stations that are not preset (Auto/ Manual Tuning) 1 Select Auto tuning or Manual tuning. [AUTO/MONO] key. Press the [TUNING MODE] The mode changes as shown below each time you press the key. AUTO lit AUTO unlit Auto tuning (Select this mode when reception is good.
Receiving Radio Broadcasts Presetting Stations Automatically (AUTO MEMORY) l Up to 40 stations can be preset in the system. 1 Press the [MODE] key. 2 Select “AUTO MEMORY”. Press the [G] or [H] key. Press the [ENTER] key. l “AUTO MEMORY” flashes on the display and the receivable radio stations are preset automatically. l A preset frequency can be rewritten later. l A broadcast station that cannot be preset with AUTO MEMORY should be set with Manual preset. (P. 33) 32 UX-J51_EN.indb 32 10.8.
Receiving Radio Broadcasts Presetting Stations Manually (Manual Preset) Use this procedure to make the station you are currently listening to a preset number. If the selected preset number is already assigned a station, the existing station is overwritten by the new station. l You can preset up to 40 FM and AM stations. 1 Tune in the station you want to preset, and then press the [ENTER] key. Use Auto Tuning or Manual Tuning to tune in the desired station. (P.31) The preset number flashes.
iPod This section explains how to connect and play from Apple iPod. Playing Back from iPod Use this procedure to connect iPod to the system for playback. l Also refer to the instruction manual that comes with iPod. l Update the software for iPod to the latest version. l For details about updating iPod, check on the apple web site . l JVC does not assure the compatibility of iPod released after April 2009 with this unit.
iPod l Supported Audio Files R P.21 Related Information l Audio Settings R P.43 onwards n Operations during iPod playback You can also perform these operation on iPod. Playing the tracks in the previous/next album Press the [PREV.] key to go to the previous album, while press the [NEXT] key to go to the next album. Setting the shuffle Press the [SHUFFLE] key. Each time you press the key, the shuffle setting is changed. Setting the repeat playback Press the [REPEAT] key.
USB This section explains how to connect a USB flash memory or USB mass storage class compliant digital audio player (“USB device”) and play back audio files from it. Playing Back from a USB Device Connect a USB flash memory or USB mass storage class compliant digital audio player to the USB port and play back audio files from it. l Also refer to the instruction manual that comes with the USB device you are connecting. l Supported Files AAC MP3 WMA See “Supported Audio Files” for details. (P.
USB l Supported Audio Files R P.21 Related Audio Settings R P.43 onwards Information l n Operations during USB device playback Playing the tracks in the previous/next folder To go to the previous folder, l These functions may press the [PREV.] key. not work with some USB To go to the next folder, press devices. the [NEXT] key. Repeat playback mode Press the [REPEAT] key to shift the selection.
External Components This section explains how to connect external components to the system and play back tracks. Playing Back from External Components Connect the external component to the system as described in (P.11). l When connecting external components, always turn this system and the external components off beforehand. l Also refer to the instruction manual that comes with the external component being connected.
External Components l Connecting Other Accessories (Commercially Available Units) R P.11 Related Information l Audio Settings R P.43 onwards Adjusting the External Component Input Level Use the procedure below to adjust the input level for the external component connected to the [AUX IN] terminal. Use this adjustment when the volume from an external component is noticeably higher or lower than other input sources at the same volume setting. 1 Press the [AUX] key. 2 Press the [MODE] key.
D.AUDIO You can connect a digital audio player to the system and use it to play tracks. Playing Back from a Digital Audio Player Use this procedure to connect a digital audio player to the system and play tracks. l Always turn this system and the digital audio player off before connecting the digital audio player. l Also refer to the instruction manual that comes with the digital audio player you are connecting. 1 Connect the digital audio player to the [D.
Related Information l Adjusting the Digital Audio Player Input Level R P.42 l Audio Settings R P. 43 onwards 3 D.AUDIO Begin playback on the connected external component. l Perform the required operation on the connected external component to start playback. l When you have finished using the digital audio player, disconnect the player’s connection cable from the [D.AUDIO IN] terminal. 41 UX-J51_EN.indb 41 10.8.
D.AUDIO Adjusting the Digital Audio Player Input Level Use the procedure below to adjust the input level for the external component connected to the [D.AUDIO IN] terminal. Use this adjustment when the volume from an external component is noticeably higher or lower than other input sources at the same volume setting. 1 Press the [D.AUDIO] key. 2 Press the [MODE] key. 3 Select "INPUT LEVEL". Press the [C] or [D] key. Press the [ENTER] key. 4 Adjust the Input Level. Press the [A] or [B] key.
Audio Settings Use the procedures in this chapter to specify the sound quality settings for your stereo system. You can use the system's sound quality function to customize the sound to your own preferences.
CONEQ (Acoustic Equalizer) With the digital sound correction technology of Convolution Equalizer (CONEQ), you can select an Acoustic Effect suitable for your listening environment. Matching the Acoustic Effect to the Environment of the Room 1 Press the [MODE] key. 2 Select "CONEQ SET". Press the [C] or [D] key. Press the [ENTER] key. 44 UX-J51_EN.indb 44 10.8.
CONEQ (Acoustic Equalizer) 3 Select a CONEQ number. Press the [A] or [B] key. The display changes as shown below. Suitable for a room where sound is echoed easily (a room with a lot of hard materials, for example, cement and floor board) Suitable for a room where sound is not echoed easily (a room with a lot of sound-absorbing materials, for example, curtain) Suitable for a room with the average acoustic environment Press the [ENTER] key. 45 UX-J51_EN.indb 45 10.8.
Digital Signal Processor The system has a digital signal processor (DSP), which allows you to adjust the impact of super-bass tones and the levels of low-, mid-, and high-range tones. This provides more detailed settings that allow you to adjust the sound to your own preferences. Adjusting Super-Bass Tones (D-BASS) This feature lets you tailor the impact of super-bass tones to your own preferences. 1 Press the [D-BASS] key. 2 Press the [A] or [B] key to adjust the level.
Digital Signal Processor Adjusting the Range Levels (TONE) You can adjust the low-, mid- and high-range tones to match your preferences (TONE). Variable frequencies LEVEL (dB) Frequency Variability Frequency Variability Frequency Variability Frequency Adjusted level LEVEL (dB) Variability Frequency Continued to next page 47 UX-J51_EN.indb 47 10.8.
Digital Signal Processor 1 Press the [TONE] key, and then select [BASS] from the range levels (BASS: low-range tones, MID: mid-range tones, TREBLE: high-range tones). 2 Press the [C] or [D] key to select the frequency (Low: 100Hz, Mid: 150Hz, or High: 200Hz) of the low-range tones (BASS). 3 Press the [A] or [B] key to adjust the low tones (BASS) level. l The “TONE” flashes while setting is in progress. While the “TONE” is flashing, you can adjust the level in a range from -8 to +8. 48 UX-J51_EN.
Digital Signal Processor 4 Press the [TONE] key. 5 Press the [C] or [D] key to select the frequency (Low: 1kHz, Mid: 2kHz, or High: 3kHz) of the mid-range tones (MID). 6 Press the [A] or [B] key to adjust the mid tones (MID) level. l The “TONE” flashes while setting is in progress. While the “TONE” is flashing, you can adjust the level in a range from -8 to +8. Continued to next page 49 UX-J51_EN.indb 49 10.8.
Digital Signal Processor 7 Press the [TONE] key. 8 Press the [C] or [D] key to select the frequency (Low: 5kHz, Mid: 7kHz, or High: 10kHz) of the high-range tones (TREBLE). 9 Press the [A] or [B] key to adjust the high tones (TREBLE) level. l The “TONE” flashes while setting is in progress. While the “TONE” is flashing, you can adjust the level in a range from -8 to +8. 10 Press the [ENTER] key. l If you set a level other than 0, the “TONE” is displayed.
Related Information Digital Signal Sound Processor Presets • RPage XX • RPage XX Disabling D-BASS, TONE effects (FLAT) 1 Press the [FLAT] key. l The “D-BASS” and “TONE” levels are set to 0. 51 UX-J51_EN.indb 51 10.8.
BALANCE Use this procedure to adjust the volume balance for the left and right speakers. Adjusting the Speaker Volume Balance 1 Press the [MODE] key. 2 Select “BALANCE”. Press the [C] or [D] key. Press the [ENTER] key. 3 Adjust the balance. Press the [A] or [B] key. Press the [ENTER] key. 52 UX-J51_EN.indb 52 10.8.
Component Settings This chapter explains basic timekeeping settings, as well as settings for the timer, display, and other functions which provide more extensive usage of this product. Setting the Timer • Setting the Sleep Timer (SLEEP) …………………………… 54 • Setting the Program Timer (TIMER SET) …………………… 55 Display Settings • Setting the Display Brightness (DIMMER) ………………… 59 • Turning the Display Saver ON/OFF ………………………… 59 Setting the System Clock……………………………………60 Auto Power Save (A.P.S.
Setting the Timer A Sleep Timer automatically turns the system off after a set interval, while a Program Timer starts playback at a specified time. Setting the Sleep Timer (SLEEP) This function automatically turns the system off after a set interval. You can set an interval from 10 to 90 minutes, in 10-minute increments. 1 Press the [SLEEP] key. The interval increases by 10 minutes each time you press the key. The next setting after 90 minutes is timer off.
Related Information Setting the Timer l Setting the System Clock R P.60 Setting the Program Timer (TIMER SET) This function allows you to use the timer to start playback automatically at a specified time. You can set two timers (PROG. 1 and PROG. 2) at the same time. You can play back from a radio, CD, iPod, USB device, or external component (Digital In and Aux In). l Set the system clock to the correct time before performing this procedure. (P.60) l Make sure the times for PROG. 1 and PROG.
Setting the Timer 5 Select the day (or days) on which the Program Timer will run. Press the [A] or [B] key. The mode changes as shown below each time you press the key. EVERYDAY SUNDAY SAT-SUN MONDAY TUE-SAT TUESDAY MON-FRI WEDNESDAY SATURDAY THURSDAY FRIDAY Press the [ENTER] key. l If you selected “EVERYDAY”, “MON-FRI”, “TUE-SAT” or “SAT-SUN”, proceed to step 7. 6 Select “EVERY WEEK” or “ONETIME”. Press the [A] or [B] key. l The timer runs every week. l The specified timer runs once only.
l Related Information l Setting the Timer RP.XX RP.XX 9 Select “PLAY” or “AI PLAY”. Press the [A] or [B] key. l Playback is at the volume set in step 10. l Playback begins at the specified time and the volume gradually increases to the level set in step 10. Press the [ENTER] key. 10 Set the volume. Press the [A] or [B] key. Press the [ENTER] key. l You cannot use the [VOLUME] key to set the volume. 11 Select the input source. Press the [A] or [B] key.
Setting the Timer 12 Press the power [ ] key to turn the power OFF. l The [STANDBY/TIMER] indicator on the main unit lights orange. l If the indicator lights red, set the clock to the correct time. n To turn a timer off or on l When the system is turned on, press the [TIMER] key. The setting changes each time you press the [TIMER] key. 1 lit 2 lit PROG. 1 on PROG. 2 on 1 2 unlit 1 2 lit Timer off PROG.
Display Settings Related Information Use these settings to adjust the brightness of the display and to specify the settings for the main unit dial lighting. Setting the Display Brightness (DIMMER) Use this procedure to adjust the display brightness. Adjust the brightness according to your preferences and the conditions in the room. 1 Press the [DIMMER] key. The mode changes as shown below each time you press the key. “DIMMER OFF”: Normal brightness “DIMMER 1”: Reduces the display brightness.
Setting the System Clock Set the system clock to the correct time. If the system clock time setting is not correct, the Program Timer will not start playback at the correct time. 1 Press the [MODE] key. 2 Select “TIME ADJUST”. Press the [C] or [D] key. Press the [ENTER] key. *3 Set the day of the week. Press the [A] or [B] key. Press the [ENTER] key. *4 Set the time. Use the [A] or [B] key to set the “hour”. Press the [ENTER] key. Use the [A] or [B] key to set the “minute”. Press the [ENTER] key.
Auto Power Save (A.P.S.) Related Information Auto Power Save (A.P.S.) is automatically turns the system off if no operation is performed for 30 minutes after a CD or a USB connected device stops playing. 1 Press the [MODE] key. 2 Select “A.P.S. SET”. Press the [C] or [D] key. l “A.P.S.” lights up on the display. Press the [ENTER] key. 3 Select “ON” or “OFF”. Press the [A] or [B] key. l “A.P.S.” flashes on the display. l “A.P.S.” turns off. Press the [ENTER] key.
Setting the Power Supply Specify whether power is supplied to iPod or USB device, even when iPod or USB device is connected but not selected as an input source. (Power is always supplied to a device selected as an input source, regardless of this setting.) 1 Press the [MODE] key. 2 Select “P.SUPPLY”. Press the [C] or [D] key. Press the [ENTER] key. 3 Select “ON” or “OFF”. Press the [A] or [B] key. l Power is always supplied when the system is turned on.
Maintenance This chapter explains what to do when error messages appear on the display or when problems arise. It also describes how to store and maintain the system so it continues to give pleasure for many years to come. Messages ……………………………………………………64 Troubleshooting ……………………………………………65 Glossary of Terms ……………………………………………68 Care and Storage ……………………………………………69 Specifications ………………………………………………70 63 UX-J51_EN.indb 63 10.8.
Messages Displayed Message Meaning NO DISC There is no CD inserted. RInsert a CD. NO PGM No tracks are programmed. RProgram the tracks you want to listen to. (P.28) RCancel program mode and use normal playback. (P.29) PGM FULL An attempt was made to program a 51st CD track. RYou can program only up to 50 tracks. (P.29) NOT SUPPORT iPod that is not supported with this device is connected. (P.
Troubleshooting Whenever the system is not operating as expected, check the following tables to see if you can resolve the problem yourself before requesting service. Amplifier/ Speakers Symptoms Solution Ref. page l Check all connections as described in . l Increase the volume. l Cancel the MUTE setting. l Unplug any headphones plugged into the main unit. 8-11 [STANDBY/TIMER] indicator is flashing red and there is no sound. l One of the speaker cords is short-circuited.
Troubleshooting CD Symptoms Solution Ref. page l Load the disc correctly with the label side facing upward. l Clean the disc. (See .) l Allow any condensation to evaporate. (See .) 24 No sound output l Press the [CDE] key. l Clean the disc. (See .) 24 69 Playback skips. l Clean the disc. (See .) 69 Some audio files can't play back.
Troubleshooting Remote control Symptoms The remote control does not work. Solution Ref. page l Load new batteries. l Use the remote control within its effective range. 15 15 Resetting the microcomputer Symptoms Microcomputer malfunction (the system does not work, the display is faulty, etc.). Solution l Malfunctions may occur due to an external cause or because a connection cord was unplugged while the system was turned on. Use the procedure below to reset the microcomputer.
Glossary of Terms Term Meaning Page AAC An abbreviation for “Advanced Audio Coding”. This is a compression standard that applies only to the audio component in image compression methods used for digital broadcasting, etc. 21 Bit rate A value indicating the amount of information processed per second. The higher the bit rate, the better the sound quality. 21 CD-DA Refers to music CDs. Almost all discs normally referred to as “CDs” are actually CD-DA discs.
Care and Storage Care and storage of main unit n Keep the system out of the following locations l Areas exposed to direct sunlight. l Areas subjected to excessive humidity or dust. l Areas exposed to direct heat from heating equipment. n Be careful against condensation Extreme differences between system temperature and air temperature can cause water droplets (condensation) to form on the system. The system will not operate properly while condensation is present.
Specifications Main unit [Amplifier] Effective output power during STEREO operation .... 40 W+40 W RMS (1kHz, 10%T.H.D., 4 Ω) Total harmonic distortion ...... 0.03% (1 kHz, 1 W, 4 Ω) Tone control characteristics BASS (TURN OVER 100 Hz) ..................±4.0 dB (at 100 Hz) (TURN OVER 150 Hz) ................. ±6.6 dB (at 100 Hz) (TURN OVER 200 Hz) ................. ±7.5 dB (at 100 Hz) MID (TURN OVER 1 kHz) ....................... ±8.0 dB (at 1 kHz) (TURN OVER 2 kHz) ....................... ±8.
[Power supply, etc.] Power requirement (for other countries/areas )......... AC 110 V − 240V , 50Hz/60Hz Power requirement (for U.S.A. and Canada) ................ AC 120 V , 60Hz Standby power consumption ................ 1.00 W or less Power consumption ................................................... 35 W Dimensions Width ....................................................................200 mm Height ..................................................................... 95 mm Depth ..................
UX-J51 MICRO COMPONENT SYSTEM EN © 2010 Victor Company of Japan, Limited UX-J51_EN.indb Sec1:72 0410WMKMDWJMM 10.8.