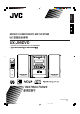
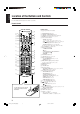
English MICRO COMPONENT MD SYSTEM UX-J99DVD —Consists of CA-UXJ99DVD and SP-UXJ99DVD — CA-UXJ99DVD SP-UXJ99DVD INSTRUCTIONS GVT0123-002A [UB] Cover_UX-J99DVD[UB].p65 3 03.11.
Warnings, Cautions and Others CAUTION— button! Disconnect the mains plug to shut the power off completely (the STANDBY/ON lamp goes off). The button in any position does not disconnect the mains line. • When the unit is on standby, the STANDBY/ON lamp lights red. • When the unit is turned on, the STANDBY/ON lamp lights green. The power can be remote controlled. CAUTION To reduce the risk of electrical shocks, fire, etc.: 1. Do not remove screws, covers or cabinet. 2.
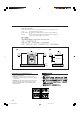
Caution: Proper Ventilation To avoid risk of electric shock and fire, and to prevent damage, locate the apparatus as follows: 1 Front: No obstructions and open spacing. 2 Sides/ Top/ Back: No obstructions should be placed in the areas shown by the dimensions below. 3 Bottom: Place on the level surface. Maintain an adequate air path for ventilation by placing on a stand with a height of 10 cm or more.
English Introduction We would like to thank you for purchasing one of our JVC products. Before operating this unit, read this manual carefully and thoroughly to obtain the best possible performance from your unit, and retain this manual for future reference. About This Manual Power sources This manual is organized as follows: • When unplugging the unit from the wall outlet, always pull on the plug, not the AC power cord. • This manual mainly explains operations using the buttons on the remote control.
English Contents Location of the Buttons and Controls ....................... 3 Remote Control ............................................................................. 3 Front Panel .................................................................................... 4 Getting Started ............................................................ 6 Unpacking ..................................................................................... Putting the Batteries into the Remote Control ...............
English Location of the Buttons and Controls Become familiar with the buttons and controls on your unit. Remote Control Remote Control i 1 o 2 3 ; a 4 See pages in parentheses for details. 1 2 3 4 5 5 s 6 d 6 7 7 f 8 g h 9 j p k q w l e r t / 8 9 p q w e r t z y y x c u u i o ; To open the cover of the remote control, push here, then slide downward.
English f MENU button (20) g Multi control buttons • Cursor (2/3/5/∞) (10, 22, 26 – 33, 36) • ENTER button h ON SCREEN button (24 – 28, 30) j DIMMER button (12) k BASS/TREBLE button (12) l Number buttons • 1 – 10, 0 and +10 buttons • 100+ button (83) • MARK button (42, 69) • Character entry buttons (A – Z, 0 – 9) (42, 69) • TV RETURN button (83) / REV.
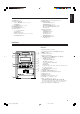
English Location of the Buttons and Controls (Continued) Display window on the front panel 1 2 3 VCDVD 1 2 3 4 5 PROGRESSIVE MD REC 5 4 7 8 9 REC DAILY TAPE 1 DISC PRGM SURROUND PBC AHBPRO SLEEP STEREO REC ALL A - B RANDOM SP LP 2 4 GROUP x 1 6 GROUP 5 0 TITLE SEARCH AUTO STANDBY MONO - = ~ Display window See pages in parentheses for details.
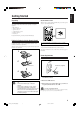
Unpacking About the AUDIO-TV switch After unpacking, be sure that you have all the following items. The number in parentheses indicates the quantity of each piece supplied. • • • • • • English Getting Started With the remote control supplied with this unit, you can also operate a JVC or other manufacturer’s TV. FM antenna (1) AM loop antenna (1) Speaker cords (2) Composite video cord (1) Remote control (1) Batteries (2) If any item is missing, consult your dealer immediately.
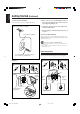
English Getting Started (Continued) To connect an outdoor FM antenna Before connecting it, disconnect the supplied FM antenna. 1 If the cords are covered with insulation, remove a short section of insulation at the end of each cord by twisting and pulling it off. 2 Connect the AM loop antenna to the AM LOOP terminals as illustrated. Outdoor FM antenna (not supplied) 3 Turn the AM loop antenna until you have the best reception.
English 1 If the cords are covered with insulation, remove a short section of insulation at the end of each cord by twisting and pulling it off. 2 Hold the clamp of the speaker terminal. Connecting a TV Connect your TV and this unit using the composite video cord (supplied), an S-video cord (not supplied) or component video cord (not supplied). • You can also connect a JVC’s TV through the AV COMPU LINK control system. (See page 84.) 3 Insert the end of the speaker cord into the terminal.
English Getting Started (Continued) To select the color system AUDIO You need to select the color system setting of this unit to match to your TV. Set the NTSC/PAL switch on the rear correctly while in standby mode by referring to the table below. COMPONENT AUDIO OPTICAL DIGITAL IN PCM PCM/ DVD STREAM OPTICAL DIGITAL OUT PR PB PCM PCM/ DVD STREAM RIGHT NTSC PAL AV COMPU LINK VIDEO OUT SELECT NTSC PAL RIGHT LEFT LEFT Before connecting an optical digital cord, unplug the protective plug.
Setting the Clock English Basic and Common Operations To turn off the clock indication (Power Save) Before operating the unit any further, first set the built-in clock. When you plug in the power cord, “0:00” starts flashing on the display. You can set the clock when the unit is either turned on or on standby (off). You cannot set the clock if the unit is on Power Save mode (see the right column). On the remote control ONLY: 1 Press CLOCK/TIMER.
English Basic and Common Operations (Continued) To turn off the unit automatically (Auto Standby) Using Auto Standby, the unit automatically turns itself off (on standby) if no operation is done for about 3 minutes except when playing back and when FM or AM is selected as the source. If an operation is done within this 3-minute period, Auto Standby is canceled temporarily even though no sound comes in. • You can also turn off the unit automatically by using the Sleep Timer. (See page 75.
English Adjusting the Tone When you turn off (on standby) the unit You can adjust the bass level (low frequency range) and the treble level (high frequency range) within a range of “–5” to “+5” only while the unit is turned on. • This function only affects the playback sound, and does not affect your recording. • This function also affects the sound from headphones. • There is a time limit in doing the following steps. If the setting is canceled before you finish, start from step 1 again.
English Listening to FM and AM Broadcasts Setting the AM Tuner Interval Spacing Some countries AM channel intervals are set to 9 kHz apart, and some countries use 10 kHz apart. When shipped, the built-in AM tuner is set to 9 kHz spacing. You can change the channel interval to 9 kHz or 10 kHz spacing. • The last selected source must be “AM” in order to perform the following operation. Be sure that the unit is turned off (on standby), but is plugged into a wall outlet.
English Presetting Stations Tuning in to a Preset Station You can preset 30 FM and 15 AM stations manually. On the remote control ONLY: In some cases, test frequencies have been already stored for the tuner since the factory examined the tuner preset function before shipment. This is not a malfunction. You can preset the stations you want into memory by following the presetting method. • There is a time limit in doing the following steps.
English Playing Back Discs on the 5-DVD Changer indicates types of disc available for the operation. (Unavailable disc types are shown in halftone color.) • For MP3 and JPEG disc playback, see pages 35 and 36. (For how to make a program using MP3 discs is explained in this section.) Disc Information On CD-R and CD-RW Playable disc types This unit has been designed to play back the following discs: DVD VIDEO*, DVD AUDIO*, Video CD (VCD)*, Super Video CD (SVCD)*, Audio CD*, CD-R, and CD-RW.
English Disc structure DVD VIDEO consists of “titles,” and each title may be divided into some “chapters.” For example, if a DVD VIDEO contains some movies, each movie may have its own title number and it may be further divided into some chapters. In a DVD VIDEO Karaoke, each song may have its own title number, but it may not be further divided into chapters. On a JPEG disc, each still picture is recorded as a file. Files are usually grouped into a folder.
English Playing Back Discs on the 5-DVD Changer (Continued) 2 Press DISC UP or DISC DOWN (or DISC Loading Discs On the unit ONLY: 1 Press one of the disc eject buttons (DISC10 – SELECT on the unit) repeatedly to select the disc you want. DISC SELECT DISC50) for the disc tray you want to load a disc onto. The unit automatically turns on and the selected disc tray comes out if it is unlocked. For details, see “Prohibiting Disc Ejection—Disc Lock” on page 23.
English To resume play, press DVD 3 ( or #¥8 DVD on the unit) again. Basic Disc Operations To stop during play, press 7. To change a disc during playback of another disc To remove discs, press the corresponding disc eject buttons (DISC10 – DISC50) on the unit. • Disc playback sequence in the 5-DVD changer When 5 discs are loaded on the disc trays*, they are played in the following sequence (when Repeat Play is not activated): Ex.
English Playing Back Discs on the 5-DVD Changer (Continued) To go to a particular title, group, chapter or track directly using the number buttons To change the information shown on the display On the remote control ONLY: Press DISP/CHARA. On the remote control ONLY: For DVD VIDEO • Pressing the number buttons before playback allows you to start playing with the title number you want.
English Playing Back by Using the Disc Menu Some DVDs are recorded with their own menus which show their contents. SVCDs or VCDs with the Playback Control (PBC) function also have their own menus, such as lists of songs. You can play back the discs by using these menus. 7 When playing a DVD DVD discs generally have their own menus which show the disc contents. These menus contain various items such as titles of movies, names of songs, or artist information, and display them on the TV.
English Playing Back Discs on the 5-DVD Changer (Continued) Programing the Track Playing Order —Program Play You can arrange the order in which the chapters or tracks play before you start playing. You can program up to 99 steps. • Program Play may not be able to use with JPEG discs and some DVDs. • To use Repeat Play (see page 23) with Program Play, press REPEAT after starting Program Play. • There is a time limit in doing the following steps.
English To check the programed contents To exit from Program Play On the TV screen: & Before or after playback Before or after play, press PLAY/FM MODE once or twice so that the unit enters another play mode (Random Play or Continuous Play). The PRGM indicator goes off. • Turning off the unit also cancels Program Play and changes play mode to Continuous Play. The program you have made will be erased (see the left column). Press PLAY/FM MODE. & During playback Press 7.
English Playing Back Discs on the 5-DVD Changer (Continued) To exit from Random Play CHAP (chapter) Repeats the current chapter (the 1 indicator lights up on the display). GROUP Repeats the current group (the GROUP indicator lights up on the display). TRACK (STEP*) Repeats the current track (the 1 indicator lights up on the display). * “STEP” appears on the TV screen during Program Play or Random Play. TITLE Repeats the current title (the TITLE indicator lights up on the display).
English Advanced Disc Operations 1 Disc type This section explains advanced disc operations by using the remote control. 2 Playback information For MP3 and JPEG playback, see pages 35 and 36. • See also “Basic Disc Operations” on pages 18 and 19. indicates types of disc available for the • operation. • Turn on your TV and select the correct input mode on the TV. Indication Meanings Mbps shows the current transfer rate (Megabits per second). DISC 3 shows the the current disc number.
English Advanced Disc Operations (Continued) On-screen guide icons • During disc playback, the following guide icons may appear for a while on the TV: appears at the beginning of a scene containing multiangle views. appears at the beginning of a scene containing multiaudio languages. appears at the beginning of a scene containing multisubtitle languages.
English 7 Repeating Playback You can repeat playback of the current title or chapter (for DVD VIDEO), group or track (for DVD AUDIO) or track (for SVCD/ VCD/CD). • You can also repeat playback of a desired portion (A-B Repeat). To repeat a current title, group, chapter, or all tracks & For DVD VIDEO: For SVCD/VCD: During playback While stopped or during playback without PBC For DVD AUDIO/CD: While stopped or during playback 1 Press ON SCREEN twice.
English Advanced Disc Operations (Continued) To repeat a desired portion—A-B Repeat You can repeat playback of a desired portion by specifying the beginning (point A) and the ending (point B). • A-B Repeat cannot be used on some DVDs. • You cannot use A-B Repeat during Program and Random Play or while a disc is not playing. 6 Press ENTER at the end of the portion you want to repeat (point B). A-B repeat playback starts. The selected part (between point A and B) is played repeatedly.
English 4 Use the number buttons (0 – 9) to enter the time. You can specify the time in hours/ minutes/seconds for DVD VIDEO/DVD AUDIO, and in minutes/seconds for SVCD/VCD/CD. Ex.: To play back from a point of 1 (hours): 02 (minutes): 49 (seconds) from the beginning for DVD VIDEO/DVD AUDIO. 7 Locating a desired chapter/track When playing back a disc, you can search for the chapter (DVD VIDEO)/track (DVD AUDIO) number to play. & During playback 1 Press ON SCREEN twice.
English Advanced Disc Operations (Continued) Selecting the Audio Language Selecting the Subtitle Language When a DVD contains audio languages (sound track), you can select the language (sound track) to listen to. icon appears at the beginning of playback when the current The scene has plural audio languages. • You can also select the audio language using the on-screen bar. See page 24 for details.
English Selecting a View Angle While playing back a DVD containing multi-view angles, you can view the same scene from different angles. icon appears at the beginning of playback when the current The scene has multi-view angles. • You can also select the angle using the on-screen bar. See page 24 for details.
English Advanced Disc Operations (Continued) Creating a Realistic Sound Field Selecting the Audio Channel With supplied two speakers, you can enjoy multi-channel surround sound. • This function only works for software containing more than 3-channel surround. When playing back some Karaoke SVCDs or VCDs, you can enjoy Karaoke by selecting the audio channel to play. • You can also select the audio channel using the on-screen bar. See page 24 for details.
English 7 To replay the previous scenes (One touch replay function) Special Picture Playback This unit provides special picture playback functions including still picture, frame-by-frame, slow-motion, and zoom. 7 Still picture and frame-by-frame playback & During playback Press . The playback position moves back 10 seconds before the current position. & During playback NOTES 1 Press 8 once. Still picture appears—Still picture playback. 2 Press 8 repeatedly.
English Advanced Disc Operations (Continued) Changing the VFP Setting 2 Press cursor ∞/5 repeatedly to The VFP (Video Fine Processor) function enables you to adjust the picture based on the picture tone, or personal preference. • There is a time limit in doing the following steps. If the setting is canceled before you finish, start from step 1 again. & During playback select a parameter you want to adjust. Adjust the parameters so that the picture you are viewing appears as you prefer.
English Playing Back a Bonus Group Some DVD AUDIOs have a special group called “bonus group” whose contents are not open to the public. The bonus group is always assigned to the last group of a disc (for example, if a disc contains 4 groups including a bonus group, “group 4” is the bonus group). To play back a bonus group, you have to enter the specific “key number” (a kind of password) for the bonus group. The way of getting the key number depends on the disc.
English Advanced Disc Operations (Continued) MP3/JPEG Disc Playback This unit can play back MP3/JPEG files on a CD-R or CD-RW. We call a disc containing MP3 files “MP3 disc” and a disc containing JPEG files “JPEG disc” in this instruction. • For details about other discs (DVD, SVCD, VCD, CD) playback, see pages 17 to 34. • In this instruction, “file” is also referred to as “track.” • Turn on your TV and select the correct input mode on the TV.
English Operations through the MP3/JPEG CONTROL Screens 5 For MP3: Press DVD 3 (or ENTER). Playback starts from the selected file. You can search for and play the desired files in a group through the MP3/JPEG CONTROL screens shown on TV. MP3/JPEG CONTROL screen Ex.: When the current disc is an MP3 disc.
English Playing Back an MD To stop during play, press 7. Playing Back the Entire MD —Normal Play To remove the disc, press 0 (MD eject) on the unit. 1 Insert an MD into the MD loading slot. The MD is pulled in automatically. • If the current playing source is not “MD,” press MD 7 before going to the next step. • Pressing 0 (MD eject) button also turns on the unit if the MD is unlocked. , then Insert an MD in the same way as indicated on the MD.
English To go to another track Before playback: Press ¢ or 4 repeatedly. Total track number 4 DOWN (On the remote control) ¢ UP Total group number* MD (On the unit) • ¢: Skips to the beginning of the next or succeeding tracks. • 4: Goes back to the beginning of the current or previous tracks. Total playing time To go to another track directly using the number buttons MD On the remote control ONLY: Pressing the number button(s) allows you to start playing the track number you want. Ex.
English Playing Back an MD (Continued) Programing the Track Playing Order —Program Play 5 Press MD You can arrange the order in which the tracks play before you start playing. You can program up to 32 tracks. • There is a time limit in doing the following steps. If the setting is canceled before you finish, start from step 3 again. 1 Load an MD. • If the current playing source is not “MD,” press MD 7 before going to the next step.
English Playing at Random—Random Play Playing Tracks in a Group—Group Play The tracks of the loaded MD will be played at random. • Random Play ends when all the tracks are played once (when Repeat Play is not activated). • To use Repeat Play (see page 41) with Random Play, press REPEAT during or before Random Play. You can play back tracks in a group. • To make or edit groups, see pages 54 to 62. • To use Repeat Play (see page 41) with Group Play, press REPEAT after starting Group Play. 1 Load an MD.
English Playing Back an MD (Continued) To go to another track in the same group, press ¢ or 4 repeatedly. • ¢: Skips to the beginning of the next or succeeding tracks in the same group. • 4: Goes back to the beginning of the current or previous tracks in the same group. Searching for Tracks to Play —MD Title Search To go to another group, press GROUP/TITLE >>I or GROUP/ TITLE I<< during Group Play. 1 Load an MD. • GROUP/TITLE >>I: Skips to the first track in the next or succeeding groups.
English (2)Press the character entry button for a character you want to enter. Ex.: • To enter an “A” or “a,” press ABC once. To enter a “B” or “b,” press ABC twice. To enter a “C” or “c,” press ABC three times. • To enter a symbol, press MARK repeatedly until the mark you want appears. For available symbols, see the right column. • To enter a numeral, press 0 – 9. • To enter a space while entering a title, press ¢ twice. • To move the character entry position while entering a title, press ¢ or 4.
English Playing Back a Tape To remove the cassette, press 0 (TAPE eject) on the unit. Tape operation indicators go off. Playing Back a Tape You can play back type I tapes. 1 Insert a cassette into the cassette loading slot with the exposed part of the tape facing left. Pressing 0 (TAPE eject) button also turns on the unit if the cassette is unlocked. DO NOT press 0 (TAPE eject) during tape play.
English Listening to External Equipment 4 Adjust the volume level to your desired listening Listening to External Equipment You can listen to external equipment connected to the AUX jacks and OPTICAL DIGITAL IN terminal on the rear of the unit. • First make sure that the external equipment is properly connected as follows (see also “Connecting Other Equipment” on page 9): DO NOT connect other equipment while the power is on. level. 5 Apply sound effects, if you wish.
English Recording on an MD Before You Start Recording on an MD • It may be unlawful to record or play back copyrighted material without the consent of the copyright owner. • When you record onto partially recorded MD, its contents are not erased or overwritten. The recording starts from the point following the last recorded track of the MD. If you want to record on such an MD from the beginning, you have to erase its contents first (see “Erasing All Tracks —ALL ERASE” on page 67).
English Setting MD Recording Modes Stereo Long-Hour Recording (MDLP) This unit allows for 2 times or 4 times long-hour recording without losing stereo sound. With this feature, songs (tracks) can be recorded on a single MD using different recording length modes—SP: Standard Play, LP2: 2 Times Long Play, LP4: 4 Times Long Play. SP: Signifies standard-hour stereo recording. The amount of time usable for recording is the same as shown on the package of the MD.
English Recording on an MD (Continued) Recording discs onto an MD —Disc-MD Synchronized Recording Using the disc synchronized recording method, you can start and stop disc play and MD recording at the same time. 1 Load discs into the 5-DVD changer. • If the current playing source is not “DISC,” press DVD 3 (or #¥8 DVD on the unit), then 7 before going to the next step. • You can make a program (see page 21) or select Random Play (see page 22) if you want. = Go to step 3.
English To record a single track during play or pause While playing back or pausing a track you want to record, press MD REC. Recording Other Sources onto an MD 1 Prepare the source to record from. To record from FM/AM broadcasts: (On the remote control) (On the unit) The playback of the track is stopped, and the same track starts playing from the beginning again. This time, the MD recorder starts recording the track. The REC (MD recording) indicator flashes on the display.
English Recording on an MD (Continued) On the remote control ONLY: 3 Press TR. MARK SELECT to select track mark entry mode. • Each time you press the button, entry mode changes as follows: MANUAL MARK TIME AUTO MARK AUTO MARK MANUAL MARK* Separates tracks manually by adding track marks at the places where you want. • Press SET to add a track mark while recording. TIME AUTO MARK* The unit automatically separates and put a track mark every 5 minutes.
English Recording on a Tape Before You Start Recording on a Tape • It may be unlawful to record or play back copyrighted material without the consent of the copyright owner. • The recording level is automatically set correctly, so it is not affected by the volume level. Thus, during recording you can adjust the sound you are actually listening to without affecting the recording level.
English Recording on a Tape (Continued) Recording onto a Tape On the remote control ONLY: You can use only type I tapes for recording. 3 Press REV.MODE to select Reverse Mode. 1 Prepare the source to record from. • Each time you press the button, Reverse Mode changes as follows: To record from a disc: Records on one side (1) Load discs into the 5-DVD changer. • If the current playing source is not “DISC,” press DVD 3 (or #¥8 DVD on the unit), then 7 before going to the next step.
English To record a single track of a disc (DVD AUDIO/SVCD/VCD/ MP3/CD)/MD during play On the remote control ONLY: While playing back a track of a disc or MD you want to record, press TAPE REC. The playback of the track is stopped, and the same track starts playing from the beginning again. This time, the cassette deck starts recording the track. • After the track is recorded, both playback and recording stop automatically. 4 Press REV.MODE to select a reverse mode.
English Recording on a Tape (Continued) Recording Discs onto an MD and a Tape —Disc Synchronized Recording With this recording method, you can start and stop disc play, MD and tape recordings at the same time. 1 Load discs into the 5-DVD changer. • If the current playing source is not “DVD,” press DVD 3 (or #¥8 DVD on the unit), then 7 before going to the next step. • You can make a program (see page 21) or select Random Play (see page 22) if you want. = Go to step 3.
English Editing an MD Guidance—MD Group Functions To add to the conventional MD Editing functions (called the track editing functions in this manual), MD Group functions help you to classify the tracks by making groups on your MD. Classifying the tracks on an MD MDLP enables you to record more tracks on a single MD than usual. So, there are many tracks which have been recorded from the various sources—discs, FM, and so on—on your MD.
English Editing an MD (Continued) Introducing Group Editing Functions The groups and tracks can be edited in many ways (Group editing functions and Track editing functions). From this page to page 62, the group editing functions are explained. For details on the track editing functions, see pages 63 to 67. Forming a group (FORM GR): Page 56 This function forms a series of tracks or a single track into a new group. Ungrouping tracks (UNGROUP): Page 61 This function dissolves a group.
English In the following examples of group editing, the process is explained from the very first—that is, inserting a disc. You can also edit an MD during playback (in Normal Play). Forming a Group—FORM GR This function allows you to form a group from a series of tracks which do not belong to the other groups. You can form a group from a single track. Once a new group is formed, the other groups are renumbered. • You can form up to 99 groups on a single MD.
English Editing an MD (Continued) Adding a Track to a Group—ENTRY GR This function allows you to enter a track into a group. The track will be added as the last track in the selected group. The track numbers will be renumbered. • To stop any time during the editing process below before step 8, press GROUP TITLE EDIT. 1 Insert an MD you want to edit into the MD loading slot. On the remote control ONLY: 2 Press GROUP TITLE EDIT repeatedly 5 Press SET.
English Dividing a Group—DIVIDE GR This function allows you to divide one group into two separate groups. You cannot divide the group containing only a single track. When the original group has a title, two separate groups are reassigned the same title as the original group. Once a new group is divided, the other groups are renumbered. • To stop any time during the editing process below before step 7, press GROUP TITLE EDIT. 1 Insert an MD you want to edit into the MD loading slot.
English Editing an MD (Continued) Joining Two Groups—JOIN GR This function allows you to join two adjacent groups into a single group. When the groups have their own titles, the title of the preceding group is reassigned to the newly joined group. Once two groups are joined, the other groups are renumbered. • To stop any time during the editing process below before step 6, press GROUP TITLE EDIT. 1 Insert an MD you want to edit into the MD loading slot.
English Moving a Group—MOVE GR This function allows you to move a group. Once a group is moved, the tracks and the other groups are renumbered. • To stop any time during the editing process below before step 8, press GROUP TITLE EDIT. 1 Insert an MD you want to edit into the MD loading slot. On the remote control ONLY: 5 Press SET. • To cancel the setting, press CANCEL, then repeat from step 4. 6 Press GROUP/TITLE >>I or GROUP/TITLE I<< to select the position where you want to move the group to.
English Editing an MD (Continued) Ungrouping Tracks—UNGROUP This function allows you to dissolve a group. You cannot erase the tracks using this function. Once tracks are ungrouped, the other groups are renumbered. • To stop any time during the editing process below before step 6, press GROUP TITLE EDIT. 1 Insert an MD you want to edit into the MD loading slot. 5 Press SET. • To cancel the setting, press CANCEL, then repeat from step 4. 6 Press ENTER.
English Erasing Tracks in a Group—ERASE GR This function allows you to erase a group together with tracks in the group. You cannot resume the tracks in the erased group. Once a group is erased, the other tracks and groups are renumbered. • To stop any time during the editing process below before step 6, press GROUP TITLE EDIT. 1 Insert an MD you want to edit into the MD loading slot. 4 Press GROUP/TITLE >>I or GROUP/TITLE I<< to select the group you want to erase. Ex.: When group 6 is selected.
English Editing an MD (Continued) Introducing Track Editing Functions The groups and tracks can be edited in many ways (Group editing functions and Track editing functions). From this page to page 67, the track editing functions are explained. For details on the group editing functions, see pages 55 to 62. Dividing a track (DIVIDE): Page 64 This function divides a track by adding a track mark(s) in the desired point(s) in the middle or where you want to search for later.
English In the following examples of track editing, the process is explained from the very first—that is, inserting a disc. You can also edit an MD during playback (in Normal Play). Dividing a Track—DIVIDE This function allows you to divide one track into two separate tracks. It is useful, for example, when you want to add track marks at a certain point within a track or if you want to separate a recording.
English Editing an MD (Continued) Joining Two Tracks—JOIN This function allows you to join two adjacent tracks into one track. When the tracks have their own titles, the title of the preceding track is reassigned to the newly joined track. Once two tracks are joined, the other tracks and/or the groups are renumbered. • To stop any time during the editing process below before step 6, press TITLE EDIT. 1 Insert an MD you want to edit into the MD loading slot.
English Moving a Track—MOVE This function allows you to move a track to the position you prefer. It is useful to change the order of the tracks as you like. Once a track is moved, the tracks and/or the groups are renumbered. • To stop any time during the editing process below before step 8, press TITLE EDIT. 1 Insert an MD you want to edit into the MD loading slot. On the remote control ONLY: 2 Press TITLE EDIT repeatedly until 5 Press SET.
English Editing an MD (Continued) Erasing Tracks—ERASE This function allows you to erase unwanted tracks. You cannot resume the erased tracks. Once tracks are erased, the other tracks and/or groups are renumbered. You can erase up to 15 tracks at a time. • To stop any time during the editing process below before step 8, press TITLE EDIT. 1 Insert an MD you want to edit into the MD loading slot.
English Assigning Titles to an MD You can assign a name to each MD, to each group and to each track using alphabetic characters (uppercase and lowercase), symbols and numerals. Once a title is assigned, it is displayed for your confirmation. • You cannot edit titles composed of more than 61 characters. To make the editing possible, slide to close the erasure prevention tab on the cartridge side surface. (See page 45 for details.) 1 Insert an MD you want to edit into the MD loading slot.
English Editing an MD (Continued) 6 Press ENTER to finish the current title 5 Enter characters. (1) Press DISP/CHARA to select the character set you want. • Each time you press the button, the character set changes as follows: Capital letters & Symbols Small letters & Symbols Numerals (2) Press the character entry button for a character you want to enter. Ex.: • To enter an “A” or “a,” press ABC once. To enter a “B” or “b,” press ABC twice. To enter a “C” or “c,” press ABC three times.
English To Change the Title You can assign titles during play or recording • During play: Entering a track title The MD recorder repeats playback of the current track until you press ENTER in step 6. When you press ENTER, the next track will be played. Entering a disc title The MD recorder repeats playback of all tracks of the MD until you press ENTER in step 6. When you press ENTER, the MD recorder enters the track title entry mode.
English Using the Timers There are three timers available—Recording Timer, Daily Timer and Sleep Timer. • Before using these timers, make sure the built-in clock is set correctly (see page 10). • When using the tuner as the source, preset stations in advance (see page 14). Using Recording Timer (3) Press cursor 3/2 repeatedly to adjust the minute. REC Ex.: When you set start time to 11:30. With Recording Timer, you can make an unattended recording.
English 5 Select the device to record onto. To turn off the Recording Timer after its setting is done 1 Press CLOCK/TIMER repeatedly until “REC TIMER” appears on the display. 2 Press CANCEL. The (timer) and REC (recording timer) indicators go off from the display. (1) Press cursor 3/2 repeatedly to select the device. MD REC TAPE REC (2) Press SET. (3) When you select “MD REC,” select the recording length mode (see page 46) by pressing cursor 3/2, then press SET again.
English Using the Timers (continued) Using Daily Timer 3 Set the shut-off time. With Daily Timer, you can wake up to your favorite music or radio program. • You can set Daily Timer whether the unit is turned on or off (on standby). • To correct a mis-entry any time during the setting process, press CANCEL. • To exit from the timer setting during the process, press CLOCK/ TIMER repeatedly until the source indication appears. (1) Press cursor 3/2 repeatedly to adjust the hour. (2) Press SET.
English 5 Adjust the volume level. (1) Press cursor 3/2 repeatedly to adjust the volume level. • You can adjust the volume level to “– –” or within the range of 0 (silent) to 40 (maximum). • When you select “VOLUME – –,” the volume is set to the volume level when you turn off the unit. DAILY Before the start time, the DAILY indicator and “DAILY TIMER STANDBY!” start flashing on the display. DAILY Before the shut-off time, the DAILY indicator and “DAILY TIMER OFF!” start flashing on the display.
English Using the Timers (continued) Using Sleep Timer To sleep with the Sleep Timer and wake up with the Daily Timer With Sleep Timer, you can fall asleep to your favorite music. • You can set Sleep Timer only when the unit is turned on. How Sleep Timer actually works The unit automatically turns off after the specified time length passes. 1 Set the Daily Timer as explained on pages 73 and 74. 2 Start playing back any source you want to listen to before sleep. 3 Set the Sleep Timer.
You can adjust the initial settings through the choice menu on the TV. You can use the choice menu only when the selected source is disc player and its playback is not started. Before operating... • Turn on your TV and select the correct input mode on the TV. • You can use only the remote control for the choice menu operations. • You can change the language used in the choice menu. See page 78.
English Initial Setting Using Choice Menu (continued) Operating Procedure 5 Press cursor ∞/5 repeatedly to Make sure that the disc player is selected for the source. Ex.: When setting MP3/JPEG. select (highlight) the desired option. On the remote control ONLY: 1 Press CHOICE. PICTURE The LANGUAGE menu appears on the TV.
English : shows the initial setting in the following tables. 7 Language selection menu—LANGUAGE LANGUAGE MENU LANGUAGE ENGLISH AUDIO LANGUAGE ENGLISH SUBTITLE ENGLISH ON SCREEN LANGUAGE ENGLISH Ex.: 16:9 • MENU LANGUAGE Some discs have multiple menu languages. Select one of the languages or language codes from AA to ZU (see “Language Code List” on page 88). • AUDIO LANGUAGE Some discs have multiple audio languages.
English Initial Setting Using Choice Menu (continued) 7 Audio selection menu—AUDIO AUDIO 7 Other setting menu—OTHERS OTHERS DIGITAL AUDIO OUTPUT STREAM/PCM RESUME ON DOWN MIX DOLBY SURROUND ON SCREEN GUIDE ON D. RANGE COMPRESSION AUTO AV COMPU LINK MODE DVD1 PARENTAL LOCK • DIGITAL AUDIO OUTPUT To connect the unit’s digital output to an external device equipped with a digital input, this item must be set correctly.
English Restricting the Access Level—Parental Lock You can restrict playback of DVD VIDEO containing violent scenes and those unsuitable for your family members. Nobody can play such a disc unless this function is canceled. • You can set the Parental Lock only while a disc is not playing. • This setting takes effect only for a DVD VIDEO containing Parental Lock level information—Level 1 (most restrictive) to Level 8 (least restrictive).
English Initial Setting Using Choice Menu (continued) 7 Changing the Parental Lock setting 1 Press CHOICE, then press cursor 3/2 to display the OTHERS menu. 7 Press ENTER. The new setting is stored. To return to OTHERS menu Press ENTER again. To return to the normal screen Press CHOICE. 2 Press cursor ∞/5 repeatedly to select (highlight) “PARENTAL LOCK,” then press ENTER. The PARENTAL LOCK submenu appears on the TV. • You can only select “PASSWORD” or to “EXIT” before you enter your password.
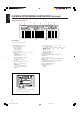
English Country/Area codes list for Parental Lock AD AE AF AG AI AL AM AN AO AQ AR AS AT AU AW AZ BA BB BD BE BF BG BH BI BJ BM BN BO BR BS BT BV BW BY BZ CA CC CF CG CH CI CK CL CM CN CO CR CU CV CX CY CZ DE DJ DK DM DO DZ EC EE EG EH Andorra United Arab Emirates Afghanistan Antigua and Barbuda Anguilla Albania Armenia Netherlands Antilles Angola Antarctica Argentina American Samoa Austria Australia Aruba Azerbaijan Bosnia and Herzegovina Barbados Bangladesh Belgium Burkina Faso Bulgaria Bahrain Burundi B
English Operating Other Manufacturers’ TV Changing the Preset Signal Codes To operate JVC or other manufacturers’ TV using this remote control: • Aim the remote control directly at the remote sensor on each equipment. • Refer also to the manuals supplied with your equipment. If there is more than one code listed for your brand of TV Try each one of the manufacturer’s code until the correct one is entered.
The AV COMPU LINK control system allows you to use JVC’s TV with simple operations. To use AV COMPU LINK control system, you need to connect this unit and a TV through the AV COMPU LINK terminals. • You can connect to a TV that has AV COMPU LINK II, AV COMPU LINK III or AV COMPU LINK EX terminals. AV COMPU LINK connection Connect a TV by using a video cord (see page 8) then also connect it by using a cord with monaural mini-plugs (not supplied).
English Glossary Aspect ratio The ratio of horizontal and vertical sizes of a displayed image. The horizontal vs. vertical ratio of conventional TVs is 4:3 and that of wide-screen TVs is 16:9. Multi-angle By recording multiple scenes progressing at the same time in a single title, the user can select view angles. This feature is called the multi-angle function.
English Maintenance To get the best performance of the unit, keep your discs, tapes and mechanism clean. General Notes Handling MDs In general, you will have the best performance by keeping your discs, tapes and the mechanism clean. • Store discs and tapes in their cases, and keep them in cabinets or on shelves. • Keep the unit’s disc trays closed when not in use. • Do not open the shutter. – The shutter is locked so that it will not open. Trying to force it open will break the MD.
English Additional Information MD Disc Types There are two types of MDs: Premastered (prerecorded) and Recordable (blank). Premastered MDs Premastered MDs, which have been recorded at music studio, can be played back like regular CDs. On an MD of this type, data is recorded as the presence or absence of tiny pits. A laser beam focuses on the pits on the surface of the MD and reflects the detection back to the lens in the MD recorder. The MD recorder then decodes the signals and plays them back as music.
English SCMS (Serial Copy Management System) The MD recorder integrated to this unit uses the Serial Copy Management System which allows only first-generation digital copies to be made of premastered software (like CDs or prerecorded MDs). 1st Generation ABCDEFG 2nd Generation ABCDEFG CD CD-R/RW MD limitations The MD records data in an original format that differs from that of conventional cassette tapes or DATs.
English Additional Information (Continued) Output Signals through the DVD OPTICAL DIGITAL OUT Terminal Output signals differ according to the “DIGITAL AUDIO OUTPUT” setting. (See page 79.
English For MD: Message Signification Solution The disc is blank. Change the MD if you want to enjoy playback. CANNOT ENTRY! The track has already been in the selected group. This is not a malfunction. (See “Adding a Track to a Group—ENTRY GR” on page 57.) CANNOT FORM! You are trying to form a new group including other groups. This is not a malfunction. (See “Forming a Group—FORM GR” on page 56.) CANNOT GROUP! There is no more space for storing information concerning MD group.
English Troubleshooting If you are having a problem with your unit, check this list for a possible solution before calling for service. If you cannot solve the problem from the hints given here, or the unit has been physically damaged, call a qualified person, such as your dealer, for service. Symptom Power does not come on. Possible Cause Action The power cord is not connected to an AC outlet. The built-in microprocessor has malfunctioned due to external electrical interference.
Design and specifications are subject to change without notice. Amplifier Section—CA-UXJ99DVD MD recorder Section Output Power (IEC 268-3): 30 W (15 W + 15 W) at 4 Ω (10% THD) 40 W (20 W + 20 W) at 4 Ω (MAX) Analog input: AUX: Sensitivity/Impedance (at 1 kHz) 400 mV/47 kΩ (at “Input LEVEL 1”) 200 mV/47 kΩ (at “Input LEVEL 2”) Digital input:* OPTICAL DIGITAL IN: –24 dBm to –15 dBm (660 nm ±30 nm) * Corresponding to Linear PCM (with 32 kHz/44.
VICTOR COMPANY OF JAPAN, LIMITED EN, CS © 2003 VICTOR COMPANY OF JAPAN, LIMITED Cover_UX-J99DVD[UB].p65 2 1203AIMMDWJEM 03.11.