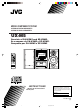
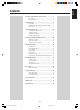
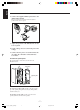
MICRO COMPONENT SYSTEM SISTEMAS DE MICROCOMPONENTES SISTEMA DE MICRO COMPONENTES UX-M5 Consists of CA-UXM5 and SP-UXM5. Se compone de CA-UXM5 y SP-UXM5. Composto por CA-UXM5 e SP-UXM5 CD-R/RW PLAYBACK MICRO REC SYSTEM UX-M5 STANDBY /ON OPEN/ CLOSE DISPLAY MODE REMAIN TIMER ON/OFF STANDBY/ON CD/RANDOM COMPONENT TUNER INTRO SET TAPE /BAND /REV.MODE RANDOM BAND REV.
Warnings, Cautions and Others Avisos, precauciones y otras notas Advertências, precauções e outras notas Caution –– STANDBY/ON button! Disconnect the mains plug to shut the power off completely. The STANDBY/ON button in any position does not disconnect the mains line. The power can be remote controlled. STANDBY/ON! Precaución –– Interruptor Desconectar el cable de alimentación para desactivar la alimentación totalmente.
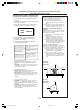
IMPORTANT FOR LASER PRODUCTS / IMPORTANTE PARA PRODUCTOS LÁSER / IMPOTANTE PARA PRODUTOS LASER REPRODUCTION OF LABELS / REPRODUCCIÓN DE ETIQUETAS / REPRODUÇÃO DE ETIQUETAS 1 CLASSIFICATION LABEL, PLACED ON EXTERIOR SURFACE 1 ETIQUETA DE CLASIFICACIÓN, PROVISTA SOBRE LA SUPERFICIE EXTERIOR 1 ETIQUETA DE CLASSIFICAÇÃO LOCALIZADA NA PARTE POSTERIOR DA CAIXA DO APARELHO CLASS LASER 1 PRODUCT Para evitar posibles riesgos de descargas eléctricas e incendios y prevenir cualquier posible daño, coloque el aparato
English Introduction We would like to thank you for purchasing one of our JVC products. Before operating this unit, read this manual carefully and thoroughly to obtain the best possible performance from your unit, and retain this manual for future reference. About This Manual Power sources This manual is organized as follows: • When unplugging from the wall outlet, always pull the plug, not the AC power cord. • The manual mainly explains operations using the buttons and controls on the unit.
English Contents Location of the Buttons and Controls ..................... 3 Front Panel ................................................................ 4 Remote Control ......................................................... 5 Getting Started .......................................................... 6 Unpacking ................................................................. 6 Putting the Batteries into the Remote Control .......... 6 Connections ....................................................
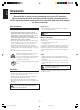
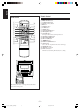
English Location of the Buttons and Controls Become familiar with the buttons and controls on your unit. Front Panel Display Window 8 9 p 1 2 3 4 PROGRAM SLEEP HBS TOTAL REMAIN INTRO STEREO RANDOM ONE REPEAT ALL ON OFF CD SYNC 5 6 POP CLASSIC ROCK TAPE JAZZ w e MHz kHz r REC t 7 y u 1 w CD-R/RW PLAYBACK 2 3 4 5 6 7 e MICRO COMPONENT SYSTEM UX-M5 STANDBY /ON OPEN/ CLOSE r DISPLAY MODE REMAIN t TIMER ON/OFF INTRO SET PROGRAM RANDOM BAND REV.
Front Panel See pages in the parentheses for details. 1 Disc compartment (11) 2 STANDBY/ON button (8) Turns the unit on or off (standby mode). 3 CD/RANDOM button (11, 12) Selects CD mode. Starts or stops random play in CD mode. 4 DISPLAY MODE button (8, 15) Displays the clock time or sets the timer. 5 TIMER ON/OFF SET button (15) Activates/deactivates the timer. 6 Remote sensor (5) Infrared sensor for remote control 7 PROGRAM button (8, 10, 11, 15) CD: programs the track playback order.
English Remote Control Remote Control 1 2 w STANDBY/ON CD/RANDOM 3 REC 4 5 6 7 TUNER TAPE /BAND /REV.
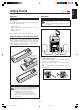
Continued Unpacking Connections After unpacking, check to be sure that you have all the following items. The number in the parentheses following each item name indicates the supplied quantity. • • • • • DO NOT connect any equipment to the unit while the unit is powered. • DO NOT plug in any equipment until all connections are completed. Remote control (1) Batteries R03 (UM-4)/AAA (24F) for remote control (2) AM loop antenna (1) AC plug adapter (1) If any is missing, consult your dealer immediately.
English 2 Connect the supplied AM loop antenna to the AM LOOP terminal. Place the antenna away from the unit and adjust its position for the best reception. 1 2 3 3 Adjust the position of the FM antenna for the best reception. 4 Set the voltage selector to the local power line voltage. 5 Connect the AC power cord of the unit to the AC outlet after all other connections have been made. To remove the speaker grilles The speaker grilles can be removed as shown in the illustration below.
Continued Turning On or Off the Unit notes On clock resetting If a power failure occurs or the AC power cord is disconnected, the clock is reset to “00:00” (flashing). In such a case you need to set the clock again. To turn on the unit Press STANDBY/ON on the unit or remote control. The unit turns on with the last source selection remaining valid. STANDBY/ON STANDBY /ON or Adjusting the Volume To turn off the unit (on standby) • You can adjust the volume only while the unit is turned on.
English Digital Sound Control The unit’s digital sound control feature enables you to select desired preset equalizer settings (selectable as sound modes) to enjoy special sound effects matching the music type. You can also use the HBS (Hyper Bass Sound) system to enjoy powerful bass sound created by emphasizing low frequencies. To select the desired sound mode PRE EQ /HBS Press PRE EQ/HBS repeatedly.
Tuning In a Station Presetting Stations 1 When the unit is turned on, press TUNER/BAND to select tuner mode. You can preset 20 FM and 20 AM stations. BAND TUNER • There is a time limit in doing the following steps. If the setting is canceled before you finish, start from step 1 again. The unit tunes in the last station tuned in (either FM or AM). 2 Press TUNER/BAND to select the band, FM or AM. 1 Tune in the station you want to preset. BAND TUNER • See “Tuning In a Station” on the left.
English Playing Back CDs This unit can play back audio CDs and CD-R/RW discs. Program Play You can arrange the order in which the tracks are played before you start playing. You can program up to 60 tracks. 1 In stop mode, press PROGRAM. Loading a Disc 1 Press CD/RANDOM to select CD mode. RANDOM The PROGRAM indicator starts blinking. CD 2 Press 0 OPEN/CLOSE. OPEN/ CLOSE The disc tray slides out. PROGRAM 2 Press 4 or ¢ repeatedly to select the desired track.
English Random Play Introductory Play You can play all the tracks in random order. The introductory portions of tracks can be played back automatically. Press CD/RANDOM before or during playing. RANDOM Press INTRO. CD To exit random play mode, press CD/RANDOM again. The RANDOM indicator goes off. To exit introductory play mode, press INTRO again. • Activating the REPEAT ONE function during random play mode disables the random play mode.
English Playing Back Tapes Auto Reverse • Use only type I normal tapes. The use of tapes longer than 120 minutes is not recommended, since characteristic deterioration may occur and these tapes easily jam in the pinch roller and the capstan. Loading a Tape 1 Press 0 EJECT to open the tape deck door. Press TAPE/REV.MODE repeatedly to select the desired playback mode. REV. MODE TAPE : playback on one side of the tape only. : both sides are played once.
English Recording Recording Tapes IMPORTANT: • It may be unlawful to record or playback copyrighted material without the consent of the copyright owner. • The recording level is automatically set correctly, so it is not affected by the volume control. Thus, during recording you can adjust the sound you are actually listening to without affecting the recording level. • While recording, you can hear sound modes and/or the HBS sound effect through the speakers.
English Using the Timers There are three timers available – daily timer, recording timer and sleep timer. Before using the timers, you need to set the built-in clock (see page 8). Using Daily Timer With the daily timer, you can wake to your favourite music or radio program. At the timer-on time, the unit automatically turns on, sets the volume to the preset level, and starts playing the specified source (radio or CD). Then, at the timer-off time, the unit automatically turns off (on standby).
English Using Sleep Timer With the sleep timer, you can fall asleep to music. You can set the sleep timer using the remote control when the unit is turned on. How the sleep timer actually works The unit automatically turns off after the specified time length passes. 1 Press and hold SLEEP on the remote control until the desired time length appears on the display. SLEEP The time length changes from 90 to 10 minutes in 10-minute steps. 2 Wait for a moment after specifying the time length.
English Troubleshooting If you are having a problem with your unit, check this list for a possible solution before calling for service. If you cannot solve the problem from the hints given here, or the unit has been physically damaged, call a qualified person, such as your dealer, for service. Symptom No sound is heard. Cause Action • Connections are incorrect or loose. • Check all connections and make corrections. (See pages 6 and 7.) • Headphones are connected. • Disconnect the headphones.
English Maintenance To get the best performance of the unit, keep your discs, tapes, and mechanism clean. Handling discs Cassette decks • Remove the disc from its case by holding it at the edge while pressing the center hole lightly. • Do not touch the shiny surface of the disc, or bend the disc. • Put the disc back in its case after use to prevent warping.
English Specifications Amplifier section General Output power 60 W (30 W + 30 W) at 8 Ω (MAX.) 22 W per channel, min. RMS, driven into 8 Ω at 1 kHz, with no more than 10% total harmonic distortion (IEC 268-3) Audio output level PHONES: 800 mV/32 Ω Speakers/Impedance 8 Ω - 16 Ω Power requirement Mass Tuner Speaker FM tuning range At 100 kHz intervals: 87.50 MHz - 108.00 MHz At 50 kHz intervals: 87.50 MHz - 108.
MEMO 03_MEMO_A4_UXM5_UW_En.
Mains (AC) Line Instruction (not applicable for Europe, U.S.A., Canada, Australia, and U.K.) Instrucción sobre la línea de la red (CA) (no aplicable para Europa, EE.UU., Canadá, Australia, ni el Grã-Bretanha) Instrução sobre a tensão da rede eléctrica (CA) (não aplicável para a Europa, os E.U.A.